Upgrade to Pro
— share decks privately, control downloads, hide ads and more …
Speaker Deck
Features
Speaker Deck
PRO
Sign in
Sign up for free
Search
Search
OWASP ZAP-API #OWASP Night 21th
Search
Sponsored
·
Your Podcast. Everywhere. Effortlessly.
Share. Educate. Inspire. Entertain. You do you. We'll handle the rest.
→
OWASP Japan
June 13, 2016
1.8k
1
Share
Embed
Copy iframe code
Copy JS code
Copy link
Start on current slide
OWASP ZAP-API #OWASP Night 21th
OWASP Japan
June 13, 2016
More Decks by OWASP Japan
See All by OWASP Japan
OWASP Night 2019.03 Tokyo
owaspjapan
0
400
OWASP SAMMを活用したセキュア開発の推進
owaspjapan
0
1.1k
20190107_AbuseCaseCheatSheet
owaspjapan
0
220
セキュリティ要求定義で使える非機能要求グレードとASVS
owaspjapan
5
1.2k
AWSクラスタに捧ぐウェブを衛っていく方法論と死なない程度の修羅場の価値
owaspjapan
9
3.5k
Shifting Left Like a Boss
owaspjapan
2
340
OWASP Top 10 and Your Web Apps
owaspjapan
2
430
OWASP Japan Proposal: Encouraging Japanese Translation
owaspjapan
1
300
elegance_of_OWASP_Top10_2017
owaspjapan
2
580
Featured
See All Featured
エンジニアに許された特別な時間の終わり
watany
107
250k
Between Models and Reality
mayunak
4
370
WCS-LA-2024
lcolladotor
0
680
GraphQLの誤解/rethinking-graphql
sonatard
75
12k
<Decoding/> the Language of Devs - We Love SEO 2024
nikkihalliwell
1
270
Building Flexible Design Systems
yeseniaperezcruz
330
40k
AI: The stuff that nobody shows you
jnunemaker
PRO
8
790
Designing for humans not robots
tammielis
254
26k
A Guide to Academic Writing Using Generative AI - A Workshop
ks91
PRO
1
350
The State of eCommerce SEO: How to Win in Today's Products SERPs - #SEOweek
aleyda
2
11k
YesSQL, Process and Tooling at Scale
rocio
174
15k
The Illustrated Children's Guide to Kubernetes
chrisshort
51
52k
Transcript
OWASP ZAP API + hubot/slack で作る脆弱性スキャンボット OWASP Night 21th
目次 1.自己紹介 2.OWASP ZAP APIとは 3.APIを利用したスキャンの流れ 4.hubotを利用したslack経由での実行
自己紹介
名前 野渡 志浩 / のわたり ゆきひろ 所属 株式会社サイバーエージェント システムセキュリティ推進グループ 経歴
• セキュリティベンダーやSIerで各種セキュリティ 製品や脆弱性診断サービスを担当 • サービス事業者側の職に就いて約8年 業務 • CyberAgent CSIRT • セキュリティグループの取りまとめ
OWASP ZAP APIとは
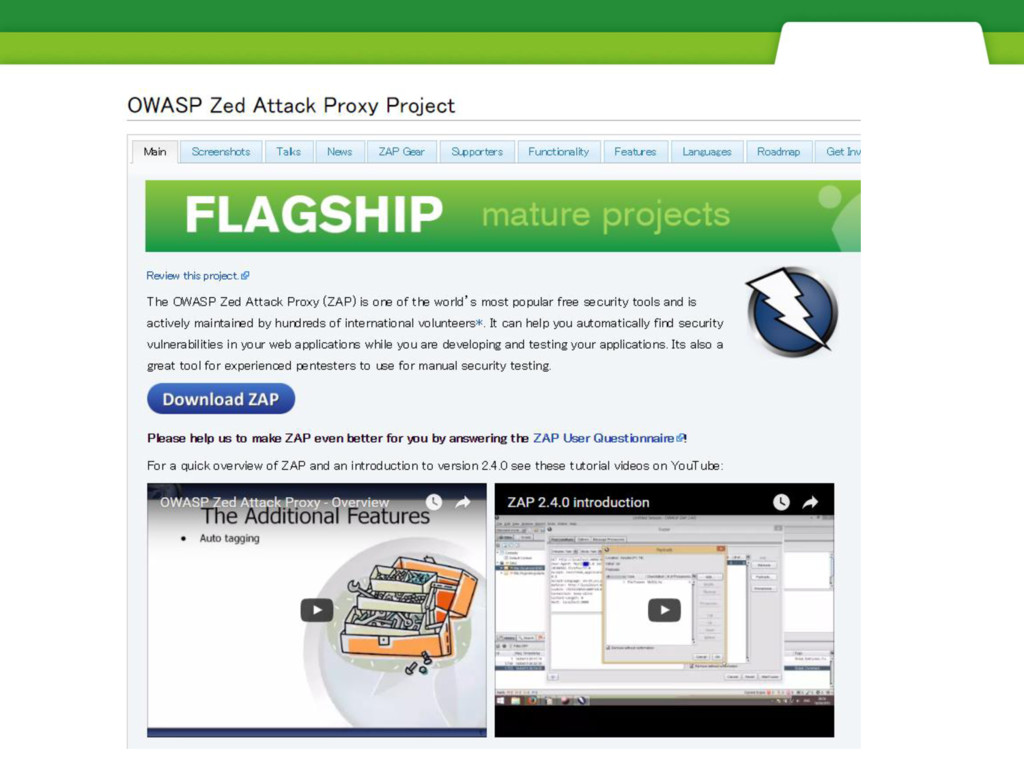
None
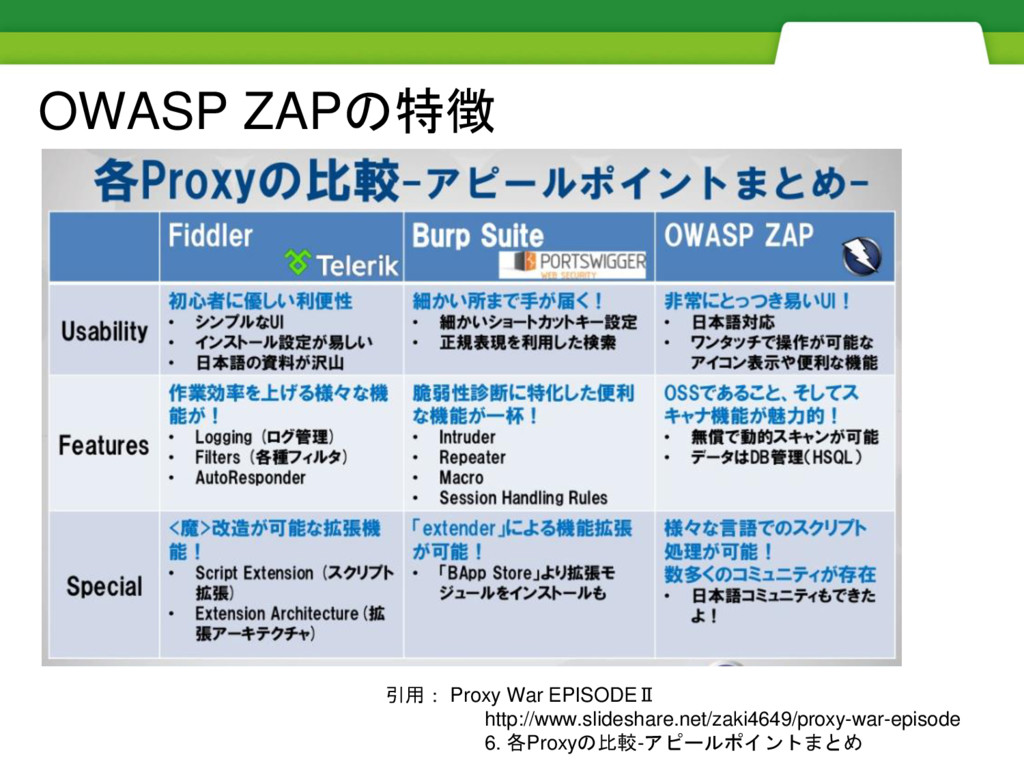
引用: Proxy War EPISODEⅡ http://www.slideshare.net/zaki4649/proxy-war-episode 6. 各Proxyの比較-アピールポイントまとめ OWASP ZAPの特徴
引用: Proxy War EPISODEⅡ http://www.slideshare.net/zaki4649/proxy-war-episode 6. 各Proxyの比較-アピールポイントまとめ OWASP ZAPの特徴
None
None
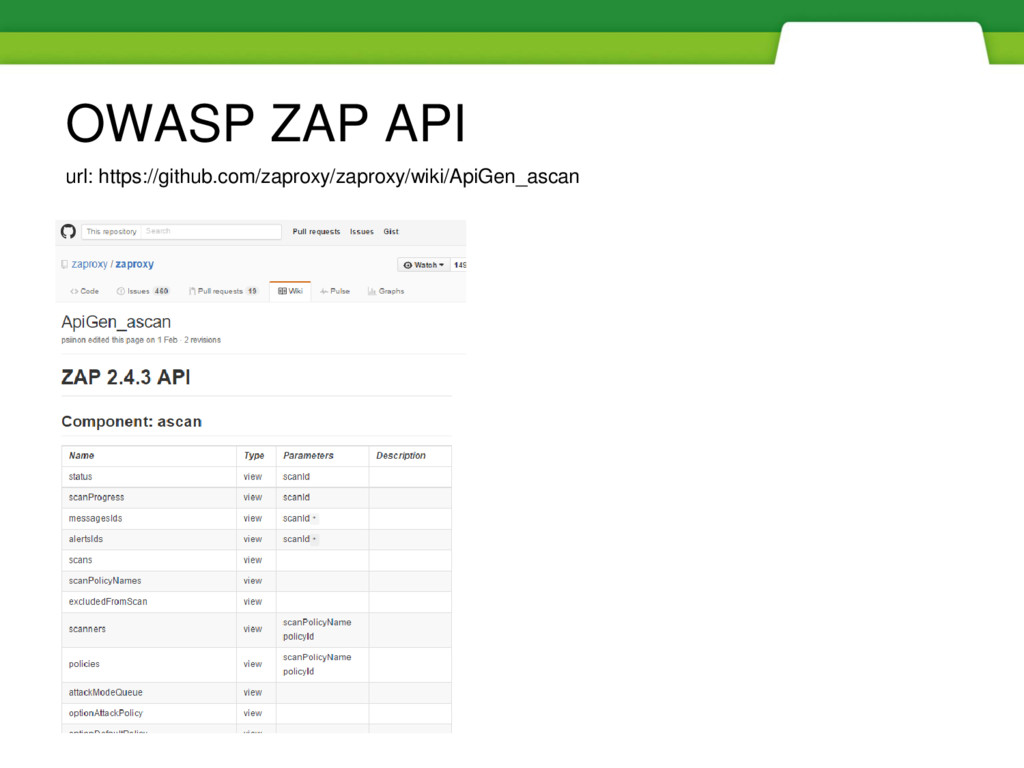
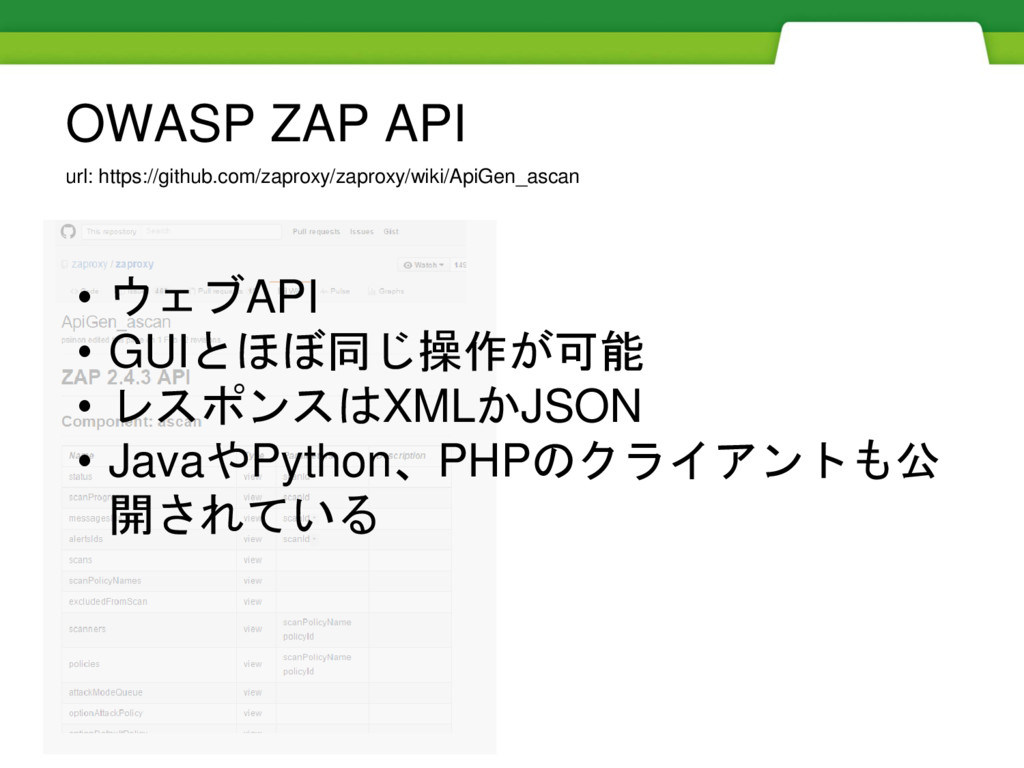
url: https://github.com/zaproxy/zaproxy/wiki/ApiGen_ascan OWASP ZAP API
url: https://github.com/zaproxy/zaproxy/wiki/ApiGen_ascan OWASP ZAP API • ウェブAPI • GUIとほぼ同じ操作が可能 •
レスポンスはXMLかJSON • JavaやPython、PHPのクライアントも公 開されている
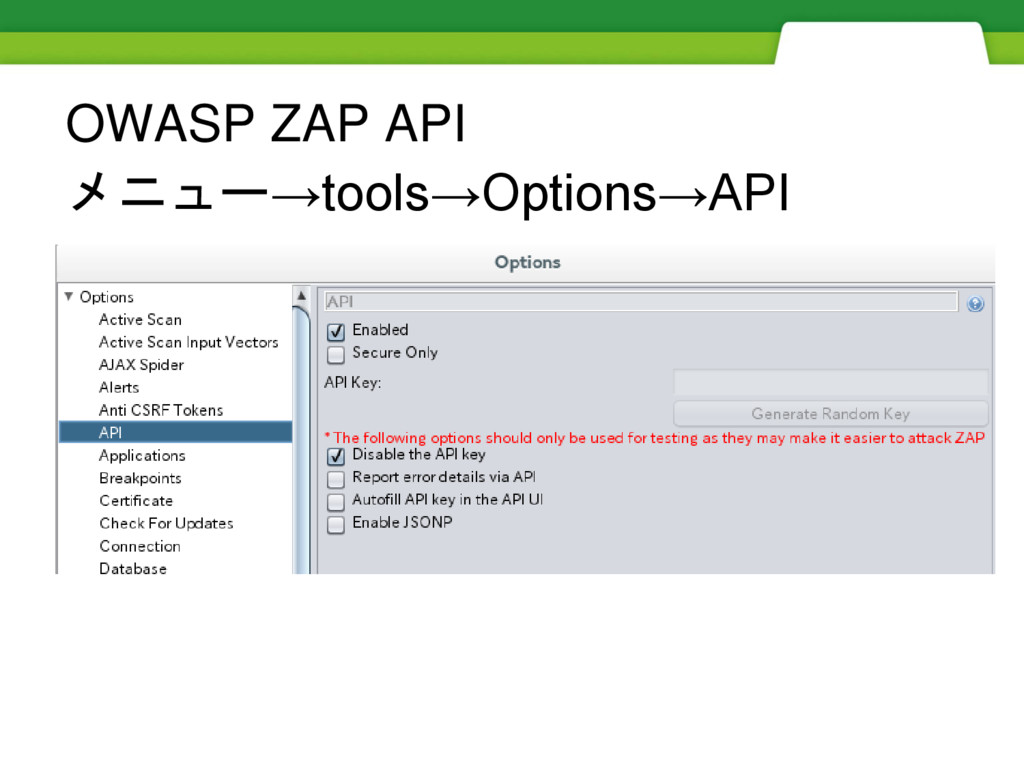
OWASP ZAP API メニュー→tools→Options→API
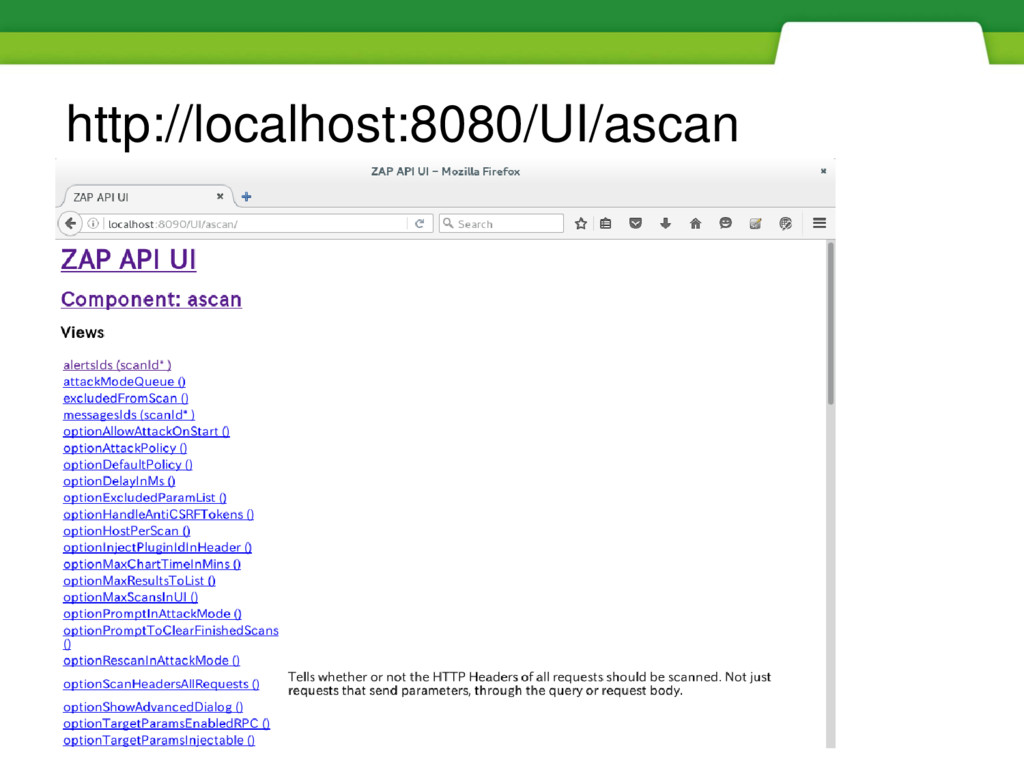
http://localhost:8080/UI/ascan
url: https://github.com/zaproxy/zaproxy/wiki/ApiDetailsUrlFormat リクエストフォーマット http://zap/<format>/<component>/<operation>/<operation name>[/?<parameters>] 例:http://192.168.1.20にスパイダーを実行する場合 http://localhost:8090/JSON/spider/action/scan/?url=https://192.168.1.20/ API keyを有効にしている場合 http://localhost:8090/JSON/spider/action/scan/?url=https://192.168.1.20/&apikey={key}
format JSONやXML、コンポーネントによってはHTMLを指定 component spiderやascanなどzapの機能を指定 参照:Components operation view、action、otherなど動作を指定 operation name scan、pause、stopなどコンポーネントに定義された 操作を指定
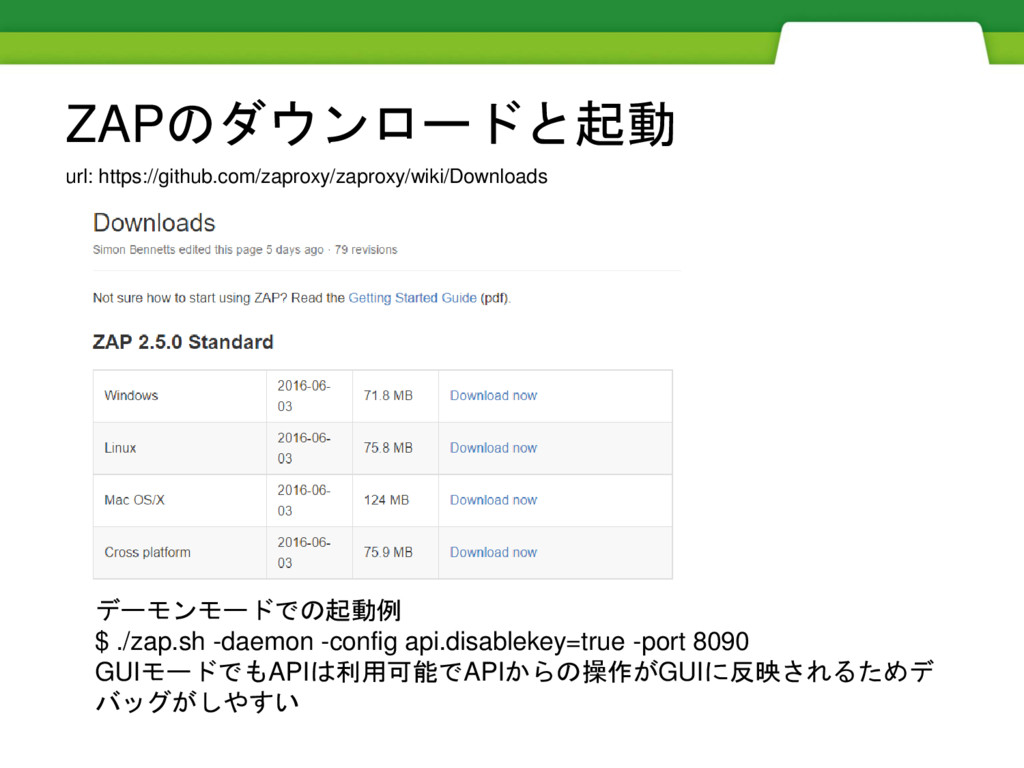
デーモンモードでの起動例 $ ./zap.sh -daemon -config api.disablekey=true -port 8090 GUIモードでもAPIは利用可能でAPIからの操作がGUIに反映されるためデ バッグがしやすい
url: https://github.com/zaproxy/zaproxy/wiki/Downloads ZAPのダウンロードと起動
APIを利用したスキャンの流れ
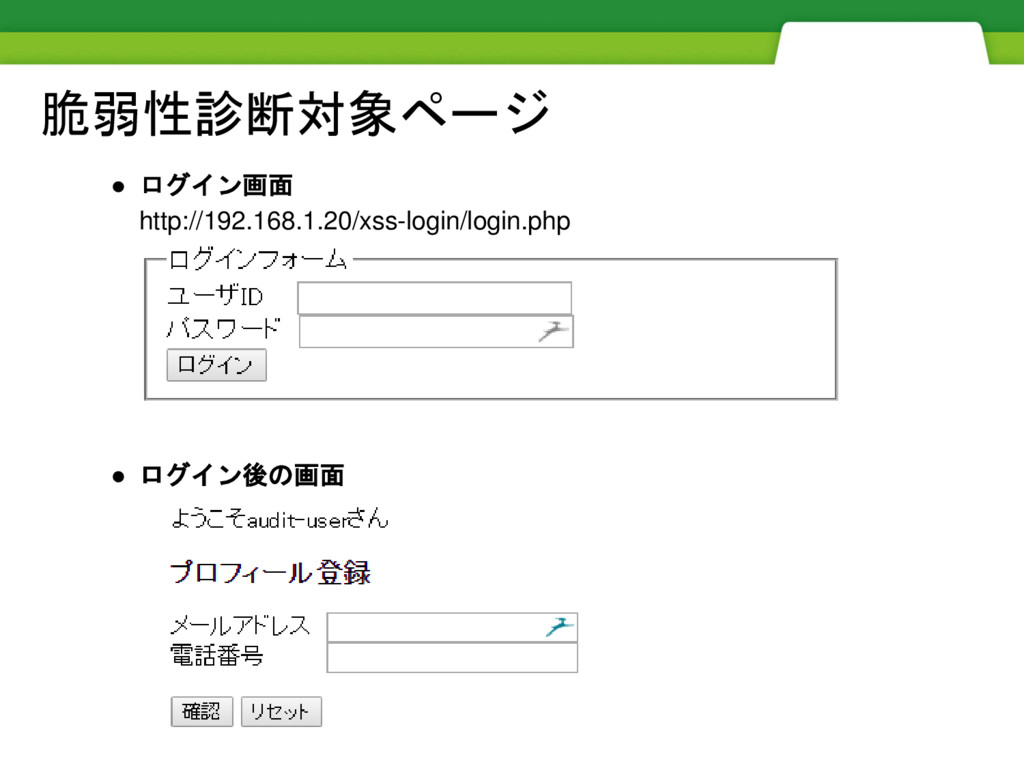
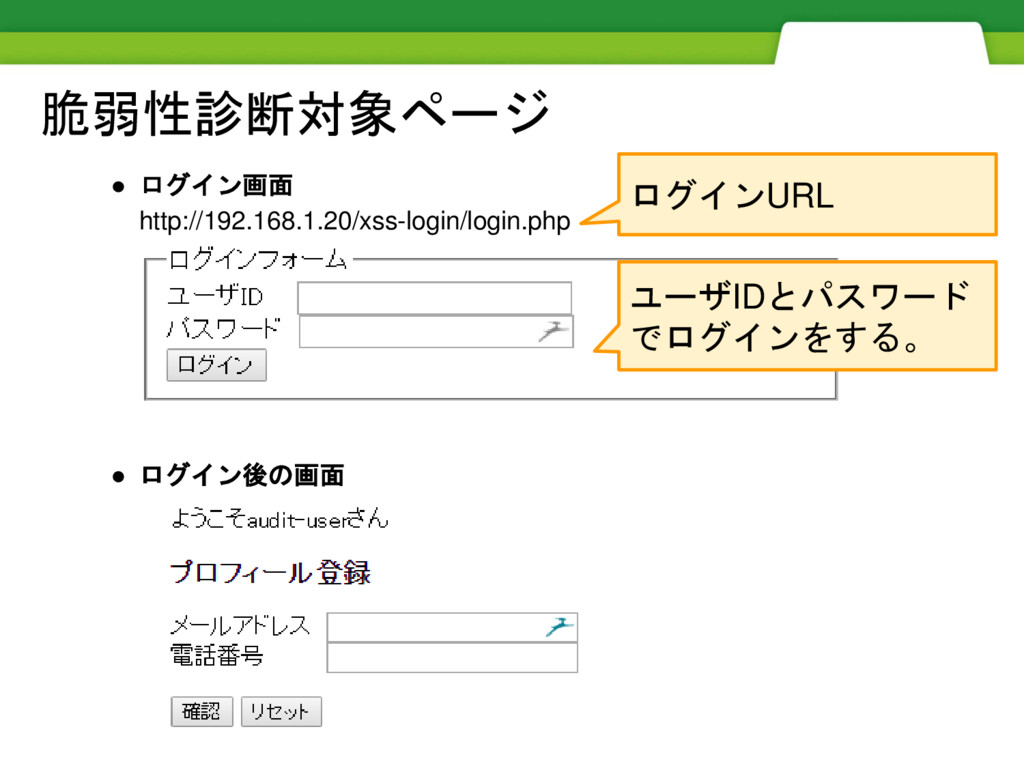
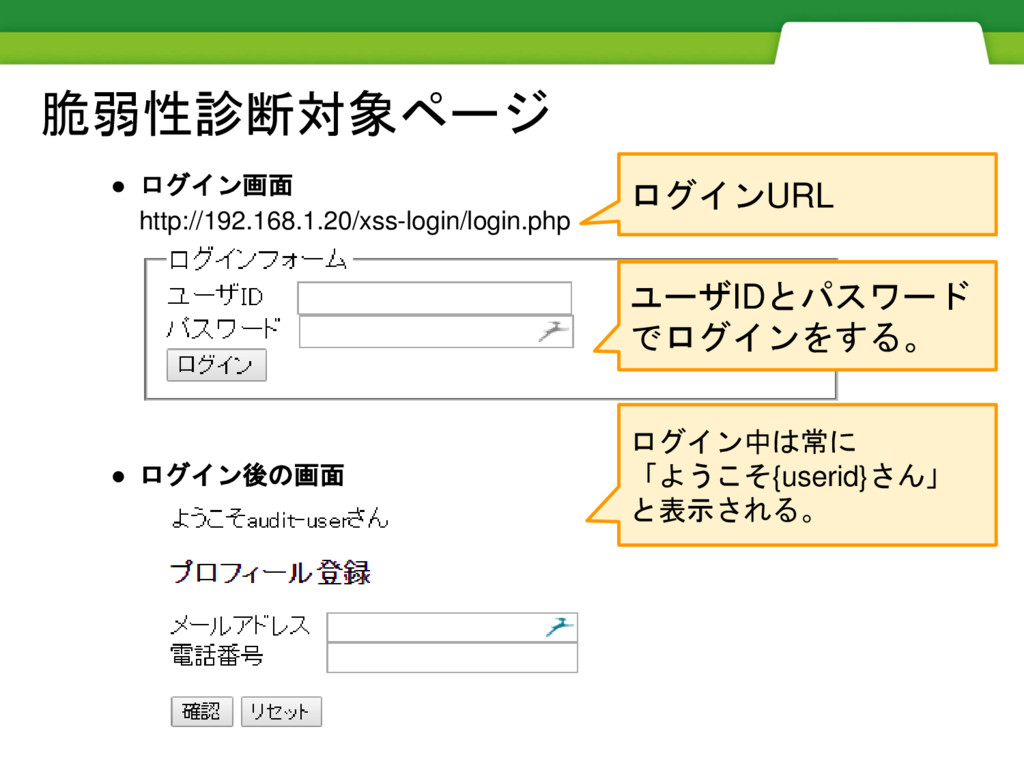
脆弱性診断対象ページ • ログイン画面 http://192.168.1.20/xss-login/login.php • ログイン後の画面
脆弱性診断対象ページ • ログイン画面 http://192.168.1.20/xss-login/login.php • ログイン後の画面 ログインURL
脆弱性診断対象ページ • ログイン画面 http://192.168.1.20/xss-login/login.php • ログイン後の画面 ユーザIDとパスワード でログインをする。 ログインURL
脆弱性診断対象ページ • ログイン画面 http://192.168.1.20/xss-login/login.php • ログイン後の画面 ユーザIDとパスワード でログインをする。 ログイン中は常に 「ようこそ{userid}さん」
と表示される。 ログインURL
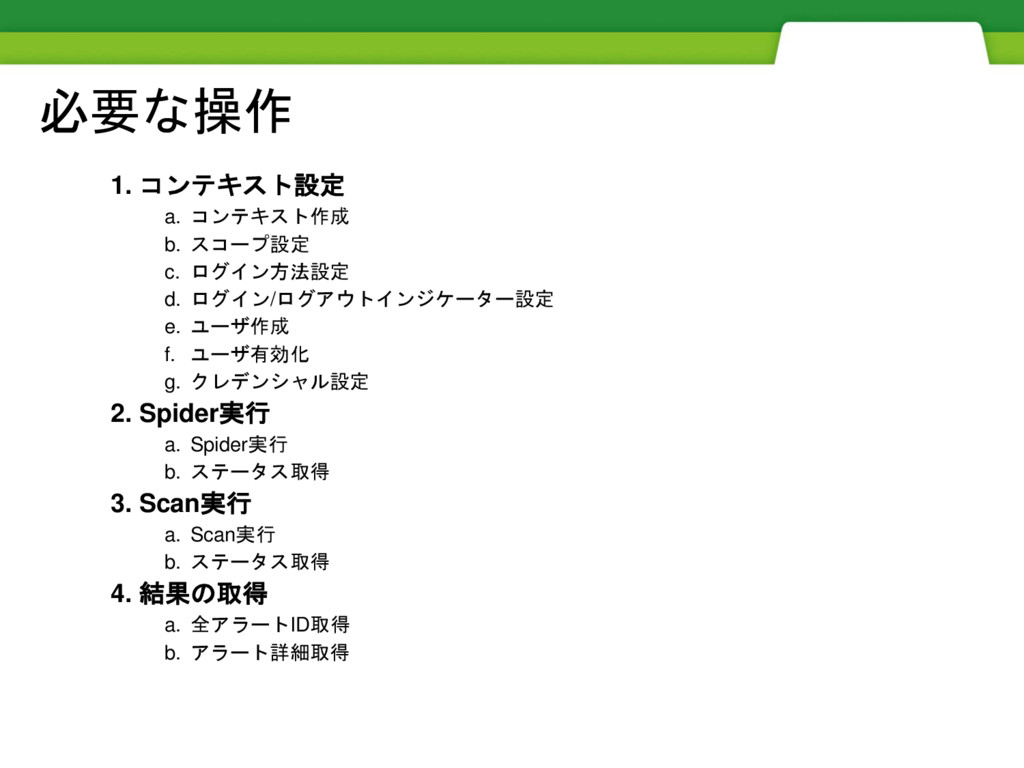
必要な操作 1. コンテキスト設定 a. コンテキスト作成 b. スコープ設定 c. ログイン方法設定 d.
ログイン/ログアウトインジケーター設定 e. ユーザ作成 f. ユーザ有効化 g. クレデンシャル設定 2. Spider実行 a. Spider実行 b. ステータス取得 3. Scan実行 a. Scan実行 b. ステータス取得 4. 結果の取得 a. 全アラートID取得 b. アラート詳細取得
コンテキストの設定
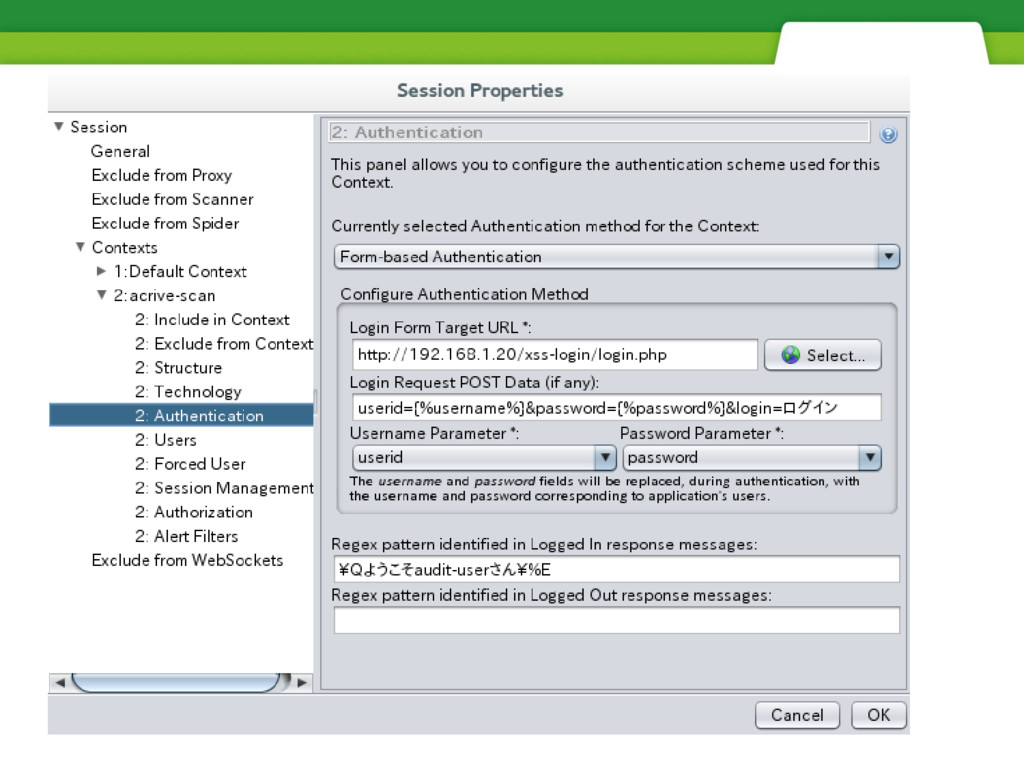
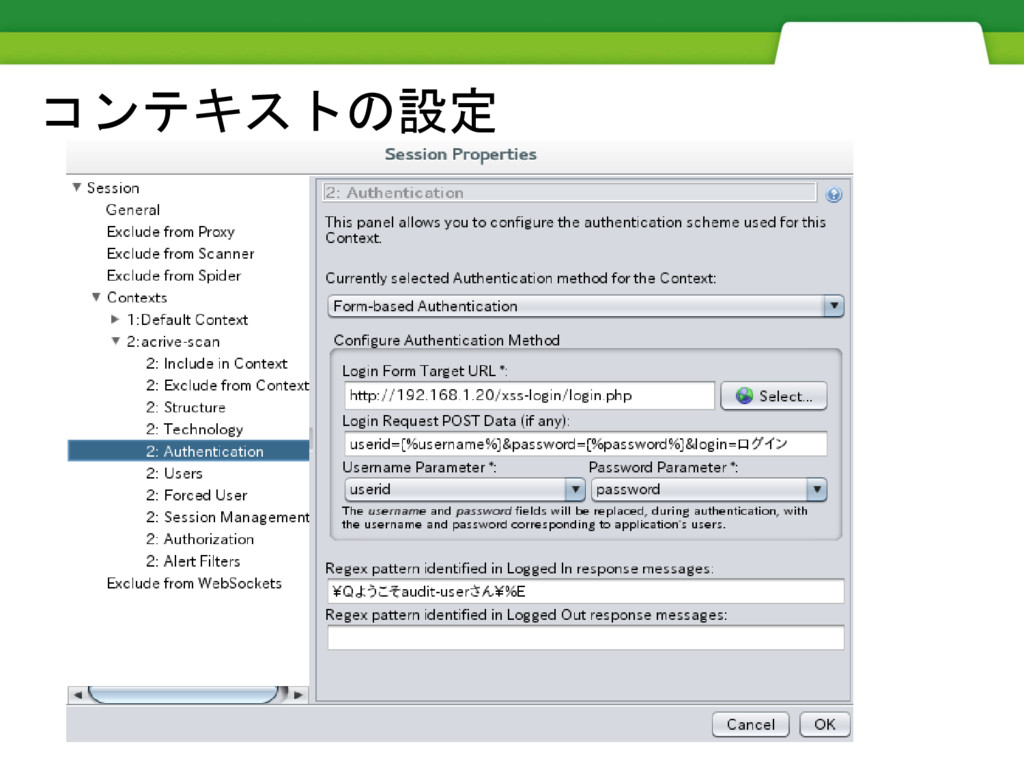
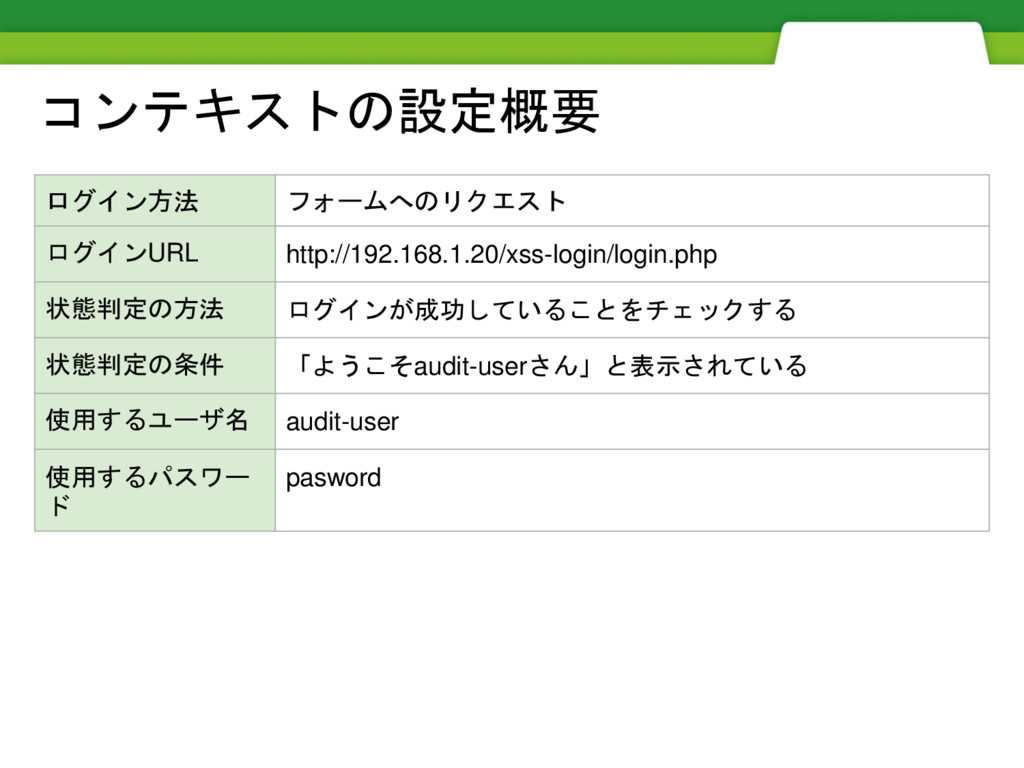
コンテキストの設定概要 ログイン方法 フォームへのリクエスト ログインURL http://192.168.1.20/xss-login/login.php 状態判定の方法 ログインが成功していることをチェックする 状態判定の条件 「ようこそaudit-userさん」と表示されている 使用するユーザ名
audit-user 使用するパスワー ド pasword
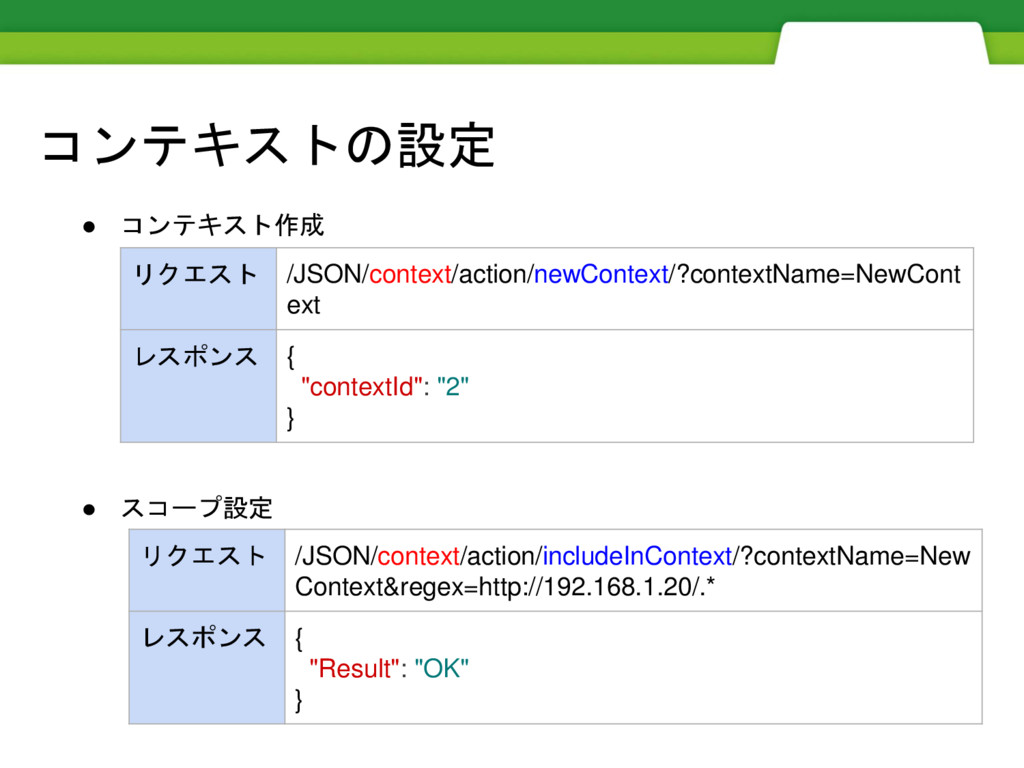
コンテキストの設定
コンテキストの設定 • コンテキスト作成 • スコープ設定 リクエスト /JSON/context/action/newContext/?contextName=NewCont ext レスポンス {
"contextId": "2" } リクエスト /JSON/context/action/includeInContext/?contextName=New Context®ex=http://192.168.1.20/.* レスポンス { "Result": "OK" }
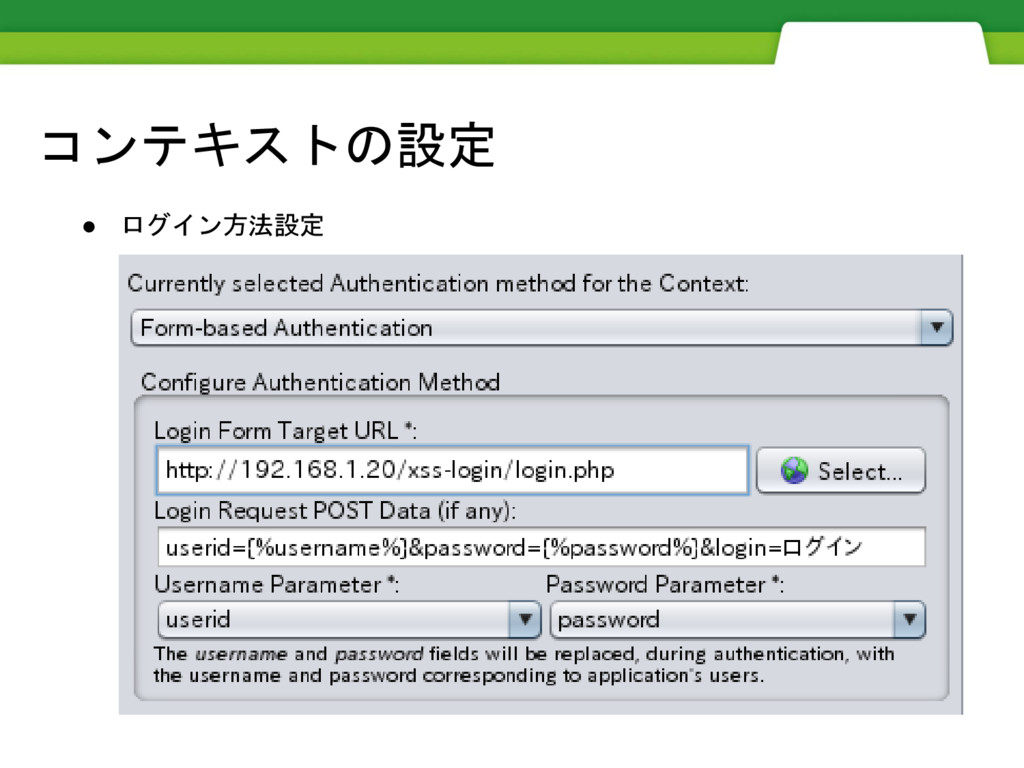
コンテキストの設定 • ログイン方法設定
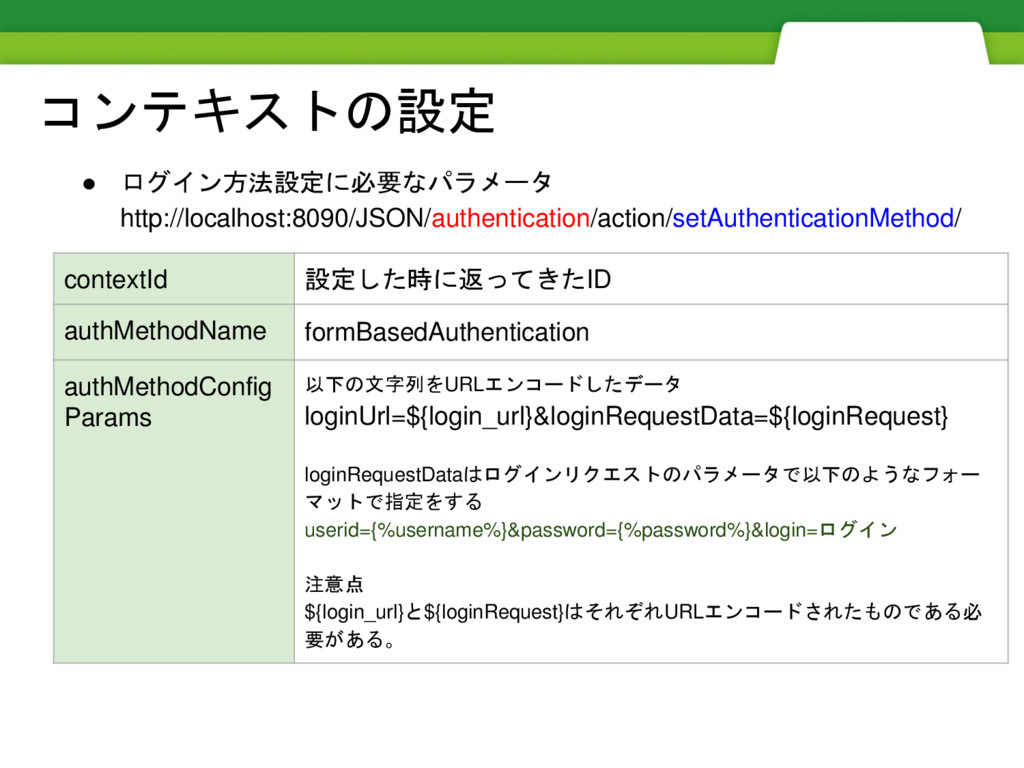
コンテキストの設定 • ログイン方法設定に必要なパラメータ http://localhost:8090/JSON/authentication/action/setAuthenticationMethod/ contextId 設定した時に返ってきたID authMethodName formBasedAuthentication authMethodConfig Params
以下の文字列をURLエンコードしたデータ loginUrl=${login_url}&loginRequestData=${loginRequest} loginRequestDataはログインリクエストのパラメータで以下のようなフォー マットで指定をする userid={%username%}&password={%password%}&login=ログイン 注意点 ${login_url}と${loginRequest}はそれぞれURLエンコードされたものである必 要がある。
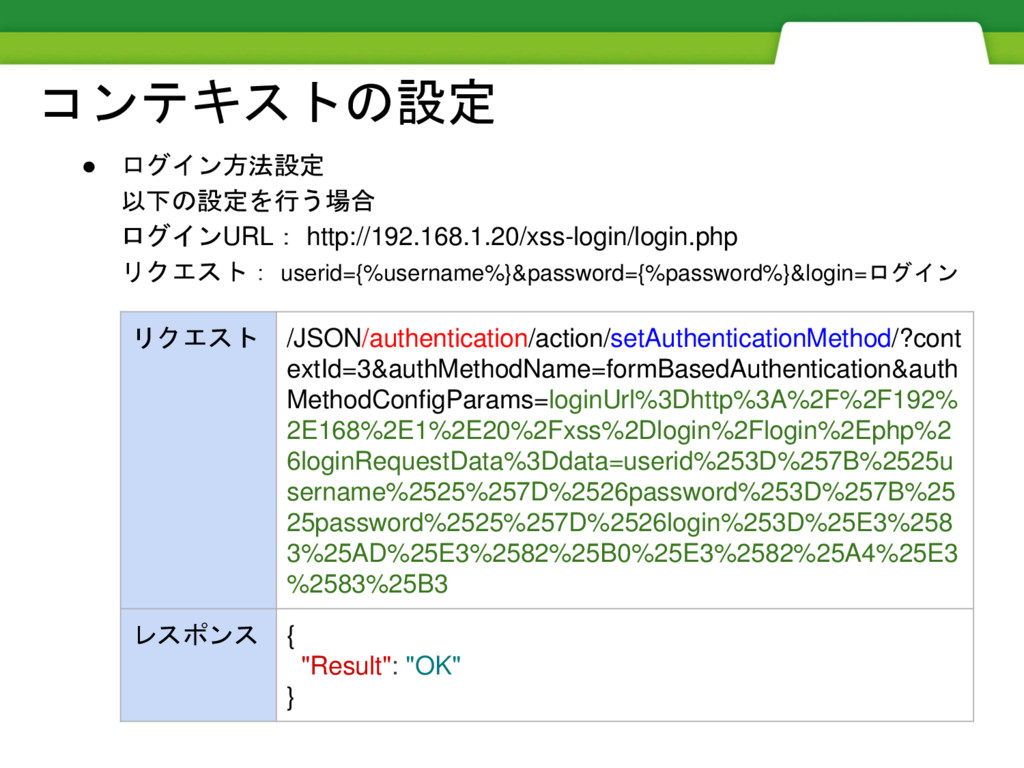
コンテキストの設定 • ログイン方法設定 以下の設定を行う場合 ログインURL: http://192.168.1.20/xss-login/login.php リクエスト: userid={%username%}&password={%password%}&login=ログイン リクエスト /JSON/authentication/action/setAuthenticationMethod/?cont
extId=3&authMethodName=formBasedAuthentication&auth MethodConfigParams=loginUrl%3Dhttp%3A%2F%2F192% 2E168%2E1%2E20%2Fxss%2Dlogin%2Flogin%2Ephp%2 6loginRequestData%3Ddata=userid%253D%257B%2525u sername%2525%257D%2526password%253D%257B%25 25password%2525%257D%2526login%253D%25E3%258 3%25AD%25E3%2582%25B0%25E3%2582%25A4%25E3 %2583%25B3 レスポンス { "Result": "OK" }
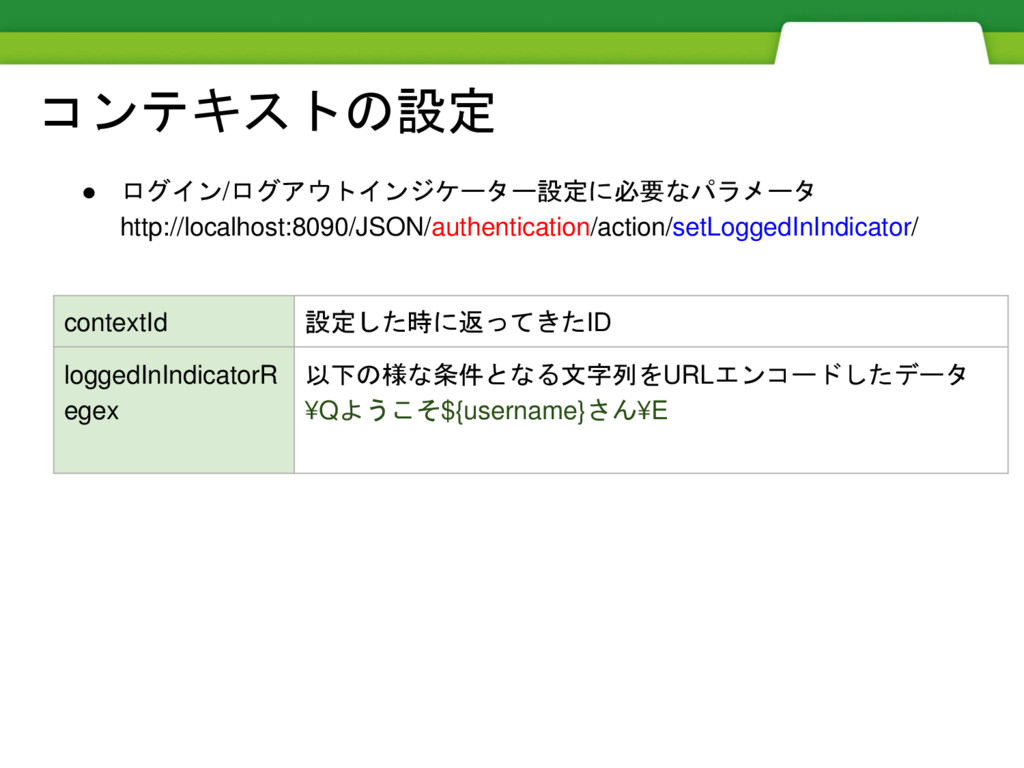
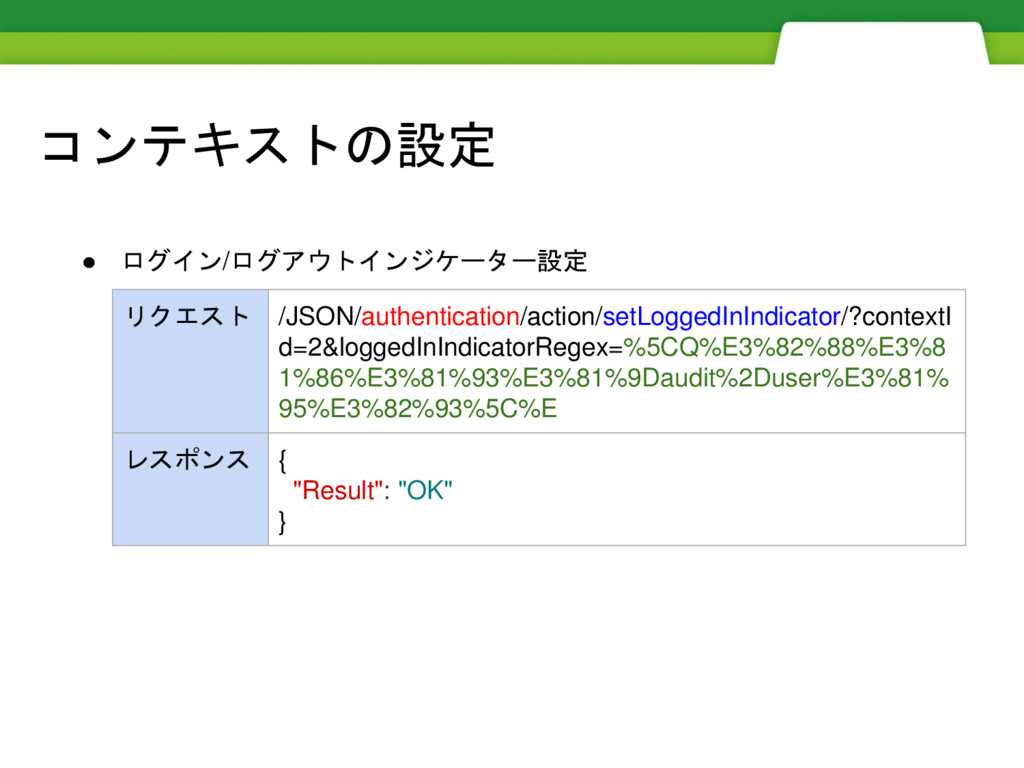
コンテキストの設定 • ログイン/ログアウトインジケーター設定に必要なパラメータ http://localhost:8090/JSON/authentication/action/setLoggedInIndicator/ contextId 設定した時に返ってきたID loggedInIndicatorR egex 以下の様な条件となる文字列をURLエンコードしたデータ ¥Qようこそ${username}さん¥E
コンテキストの設定 • ログイン/ログアウトインジケーター設定 リクエスト /JSON/authentication/action/setLoggedInIndicator/?contextI d=2&loggedInIndicatorRegex=%5CQ%E3%82%88%E3%8 1%86%E3%81%93%E3%81%9Daudit%2Duser%E3%81% 95%E3%82%93%5C%E レスポンス {
"Result": "OK" }
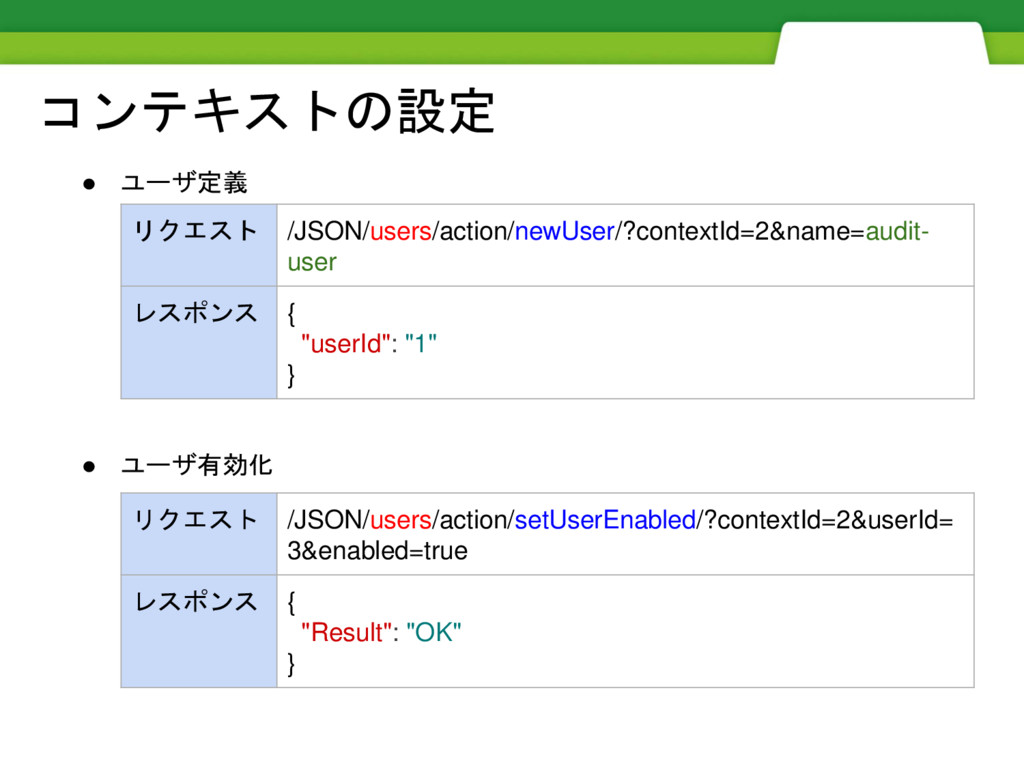
コンテキストの設定 • ユーザ定義 • ユーザ有効化 リクエスト /JSON/users/action/newUser/?contextId=2&name=audit- user レスポンス {
"userId": "1" } リクエスト /JSON/users/action/setUserEnabled/?contextId=2&userId= 3&enabled=true レスポンス { "Result": "OK" }
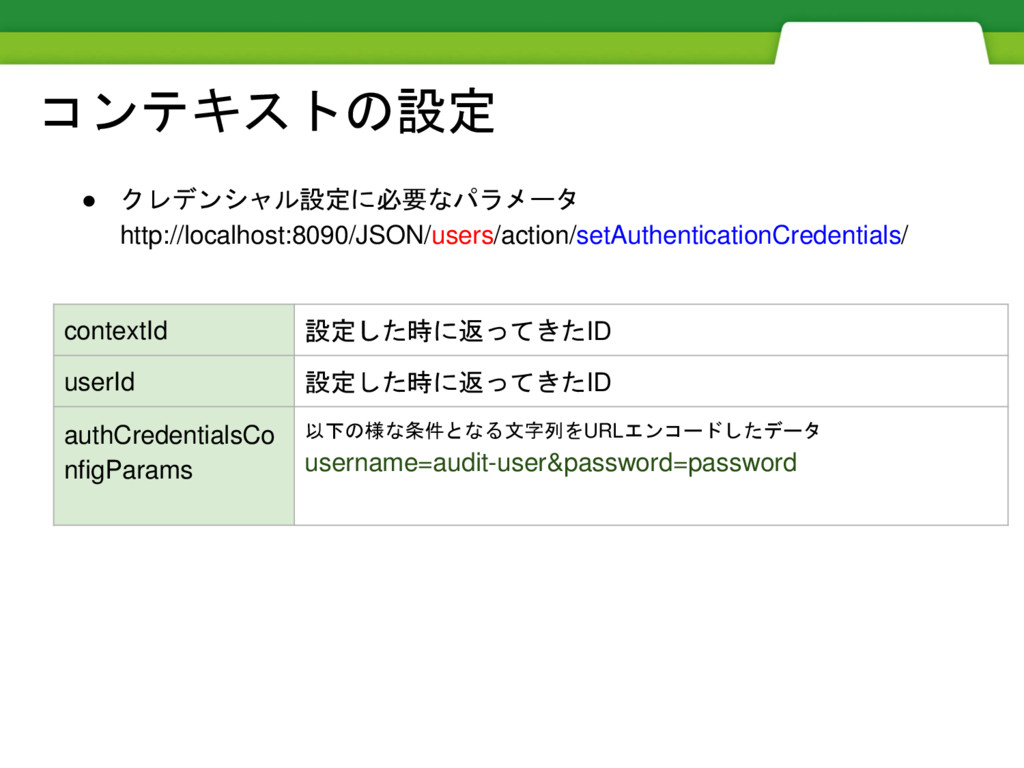
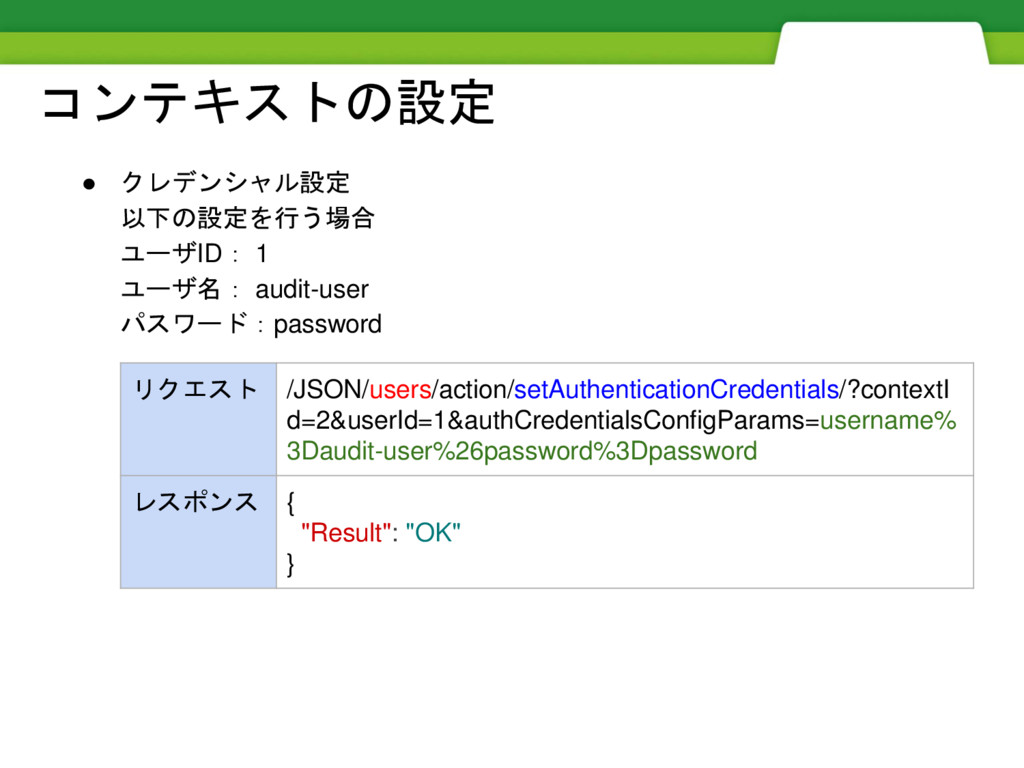
コンテキストの設定 • クレデンシャル設定に必要なパラメータ http://localhost:8090/JSON/users/action/setAuthenticationCredentials/ contextId 設定した時に返ってきたID userId 設定した時に返ってきたID authCredentialsCo nfigParams
以下の様な条件となる文字列をURLエンコードしたデータ username=audit-user&password=password
コンテキストの設定 • クレデンシャル設定 以下の設定を行う場合 ユーザID: 1 ユーザ名: audit-user パスワード:password リクエスト
/JSON/users/action/setAuthenticationCredentials/?contextI d=2&userId=1&authCredentialsConfigParams=username% 3Daudit-user%26password%3Dpassword レスポンス { "Result": "OK" }
Spider(オートクロール)実行
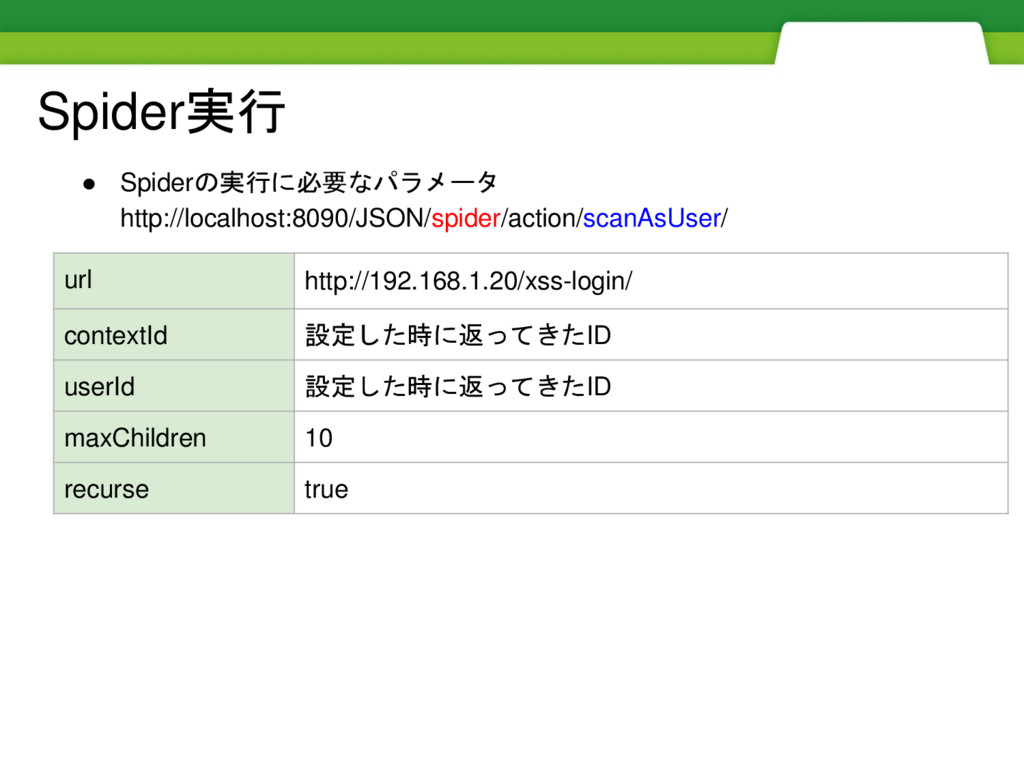
Spider実行 • Spiderの実行に必要なパラメータ http://localhost:8090/JSON/spider/action/scanAsUser/ url http://192.168.1.20/xss-login/ contextId 設定した時に返ってきたID userId 設定した時に返ってきたID
maxChildren 10 recurse true
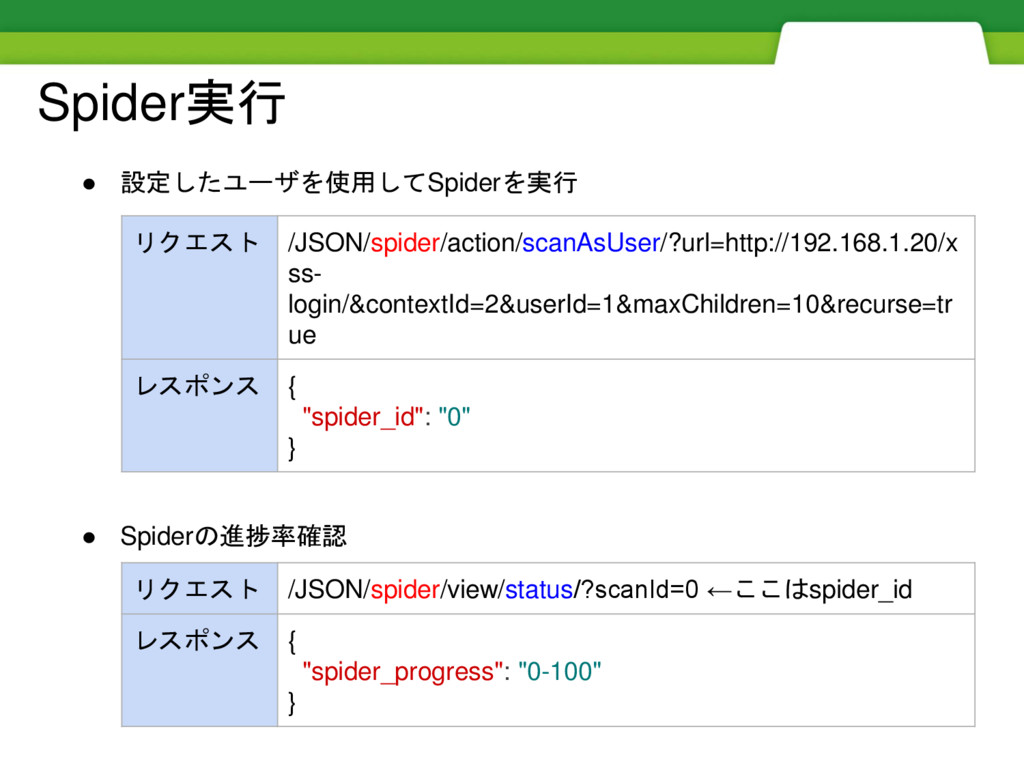
Spider実行 • 設定したユーザを使用してSpiderを実行 • Spiderの進捗率確認 リクエスト /JSON/spider/action/scanAsUser/?url=http://192.168.1.20/x ss- login/&contextId=2&userId=1&maxChildren=10&recurse=tr ue
レスポンス { "spider_id": "0" } リクエスト /JSON/spider/view/status/?scanId=0 ←ここはspider_id レスポンス { "spider_progress": "0-100" }
スキャンの実行
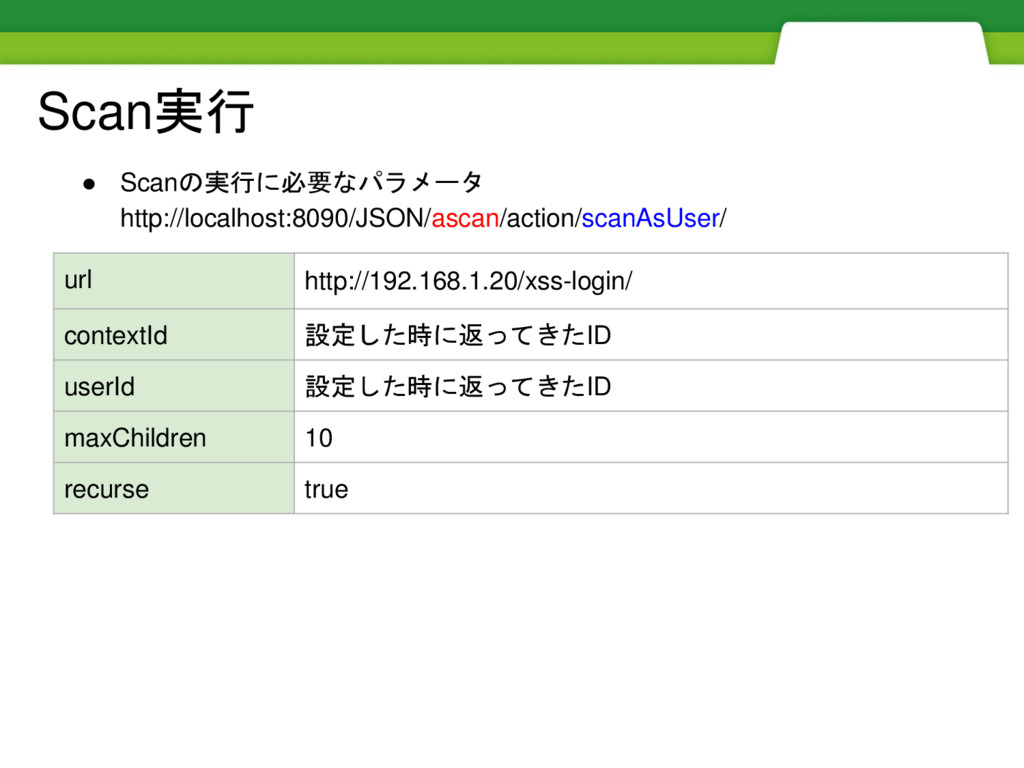
Scan実行 • Scanの実行に必要なパラメータ http://localhost:8090/JSON/ascan/action/scanAsUser/ url http://192.168.1.20/xss-login/ contextId 設定した時に返ってきたID userId 設定した時に返ってきたID
maxChildren 10 recurse true
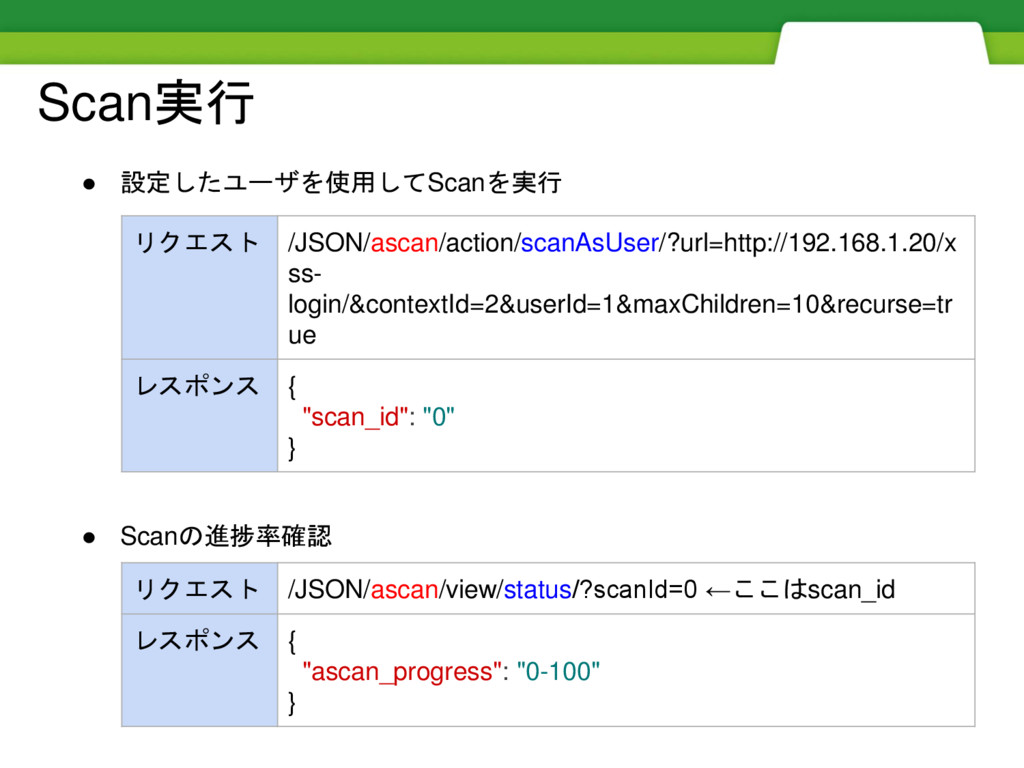
Scan実行 • 設定したユーザを使用してScanを実行 • Scanの進捗率確認 リクエスト /JSON/ascan/action/scanAsUser/?url=http://192.168.1.20/x ss- login/&contextId=2&userId=1&maxChildren=10&recurse=tr ue
レスポンス { "scan_id": "0" } リクエスト /JSON/ascan/view/status/?scanId=0 ←ここはscan_id レスポンス { "ascan_progress": "0-100" }
結果の取得
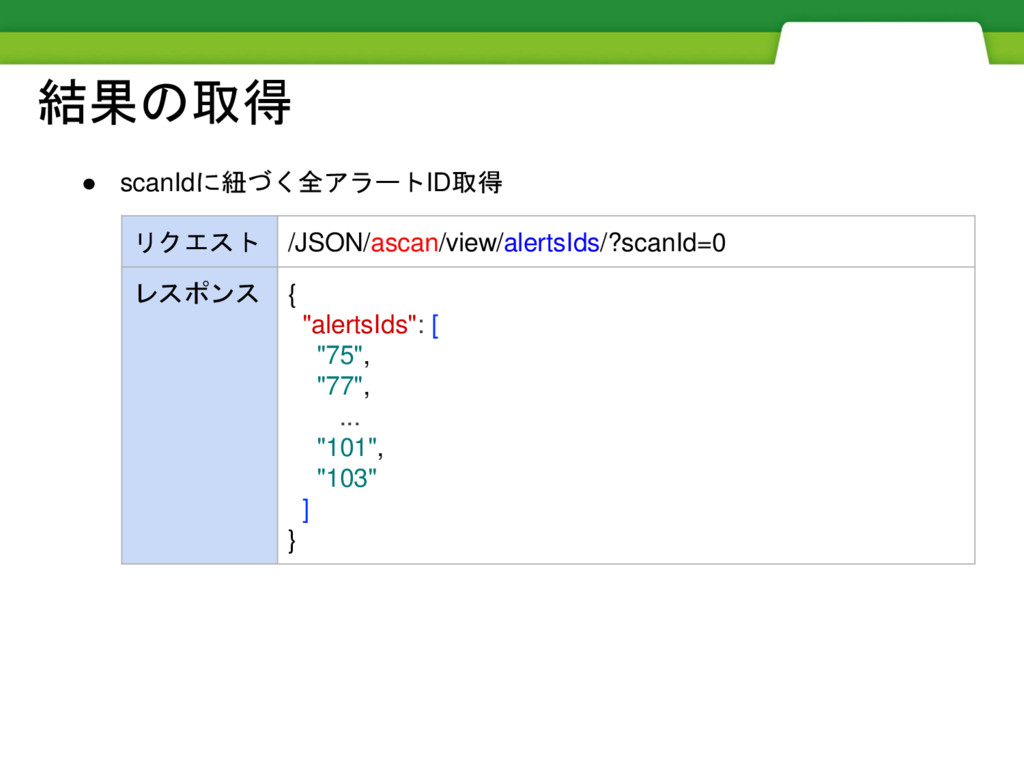
結果の取得 • scanIdに紐づく全アラートID取得 リクエスト /JSON/ascan/view/alertsIds/?scanId=0 レスポンス { "alertsIds": [ "75",
"77", ... "101", "103" ] }
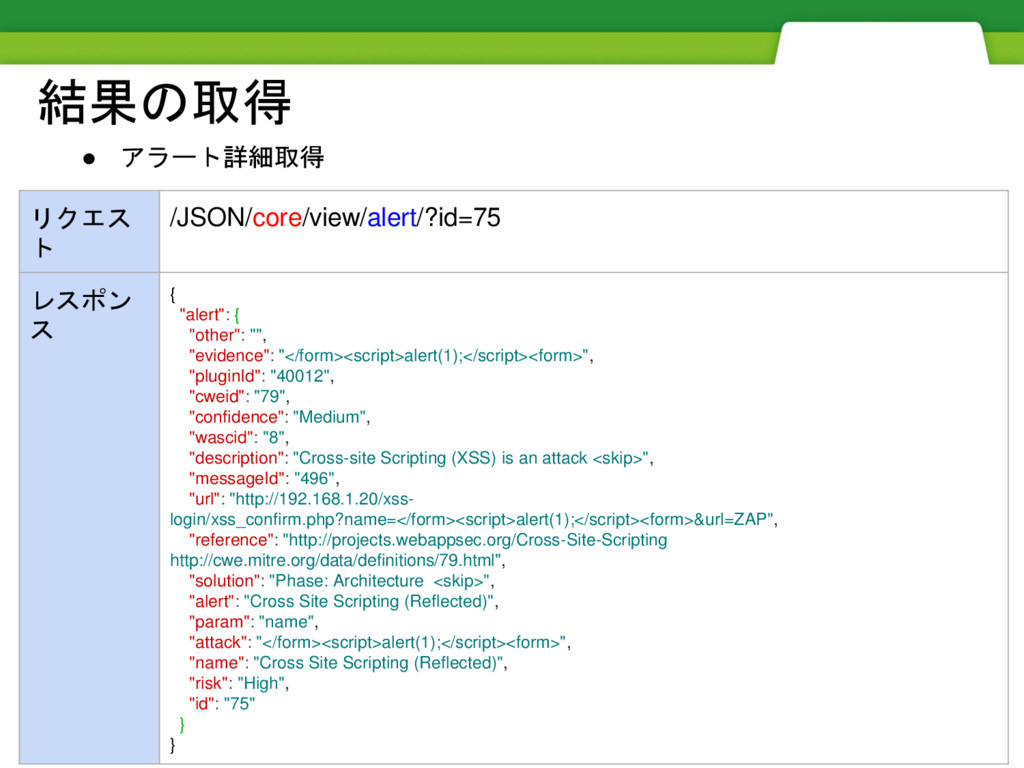
結果の取得 • アラート詳細取得 リクエス ト /JSON/core/view/alert/?id=75 レスポン ス { "alert":
{ "other": "", "evidence": "</form><script>alert(1);</script><form>", "pluginId": "40012", "cweid": "79", "confidence": "Medium", "wascid": "8", "description": "Cross-site Scripting (XSS) is an attack <skip>", "messageId": "496", "url": "http://192.168.1.20/xss- login/xss_confirm.php?name=</form><script>alert(1);</script><form>&url=ZAP", "reference": "http://projects.webappsec.org/Cross-Site-Scripting http://cwe.mitre.org/data/definitions/79.html", "solution": "Phase: Architecture <skip>", "alert": "Cross Site Scripting (Reflected)", "param": "name", "attack": "</form><script>alert(1);</script><form>", "name": "Cross Site Scripting (Reflected)", "risk": "High", "id": "75" } }
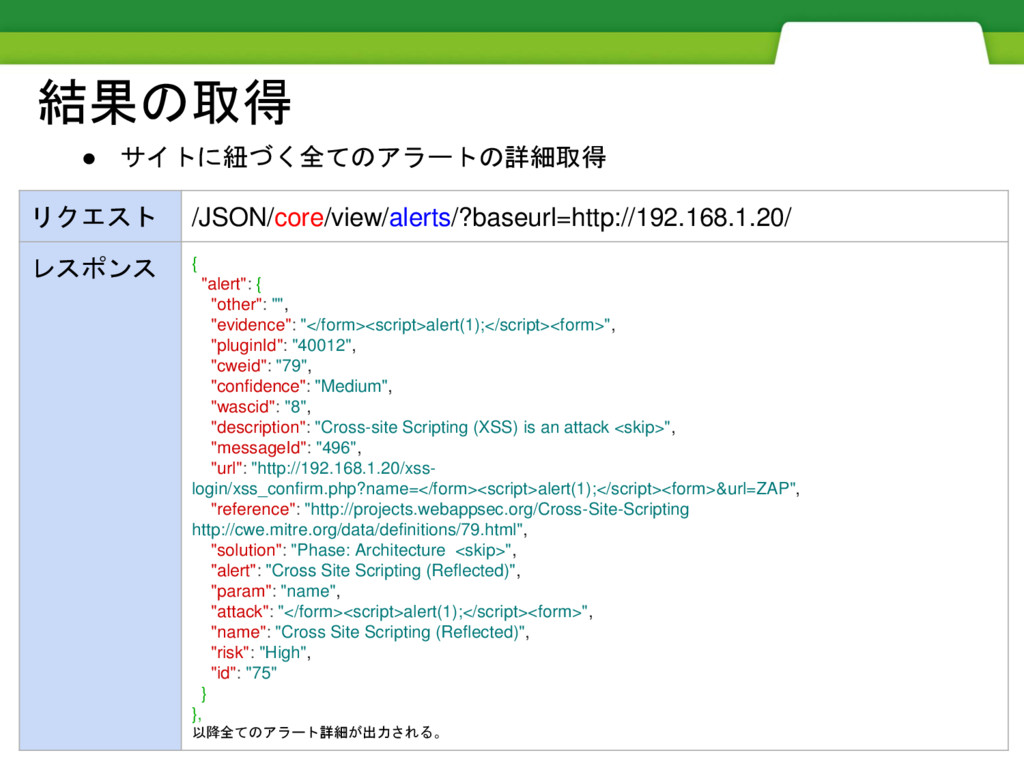
結果の取得 • サイトに紐づく全てのアラートの詳細取得 リクエスト /JSON/core/view/alerts/?baseurl=http://192.168.1.20/ レスポンス { "alert": { "other":
"", "evidence": "</form><script>alert(1);</script><form>", "pluginId": "40012", "cweid": "79", "confidence": "Medium", "wascid": "8", "description": "Cross-site Scripting (XSS) is an attack <skip>", "messageId": "496", "url": "http://192.168.1.20/xss- login/xss_confirm.php?name=</form><script>alert(1);</script><form>&url=ZAP", "reference": "http://projects.webappsec.org/Cross-Site-Scripting http://cwe.mitre.org/data/definitions/79.html", "solution": "Phase: Architecture <skip>", "alert": "Cross Site Scripting (Reflected)", "param": "name", "attack": "</form><script>alert(1);</script><form>", "name": "Cross Site Scripting (Reflected)", "risk": "High", "id": "75" } }, 以降全てのアラート詳細が出力される。
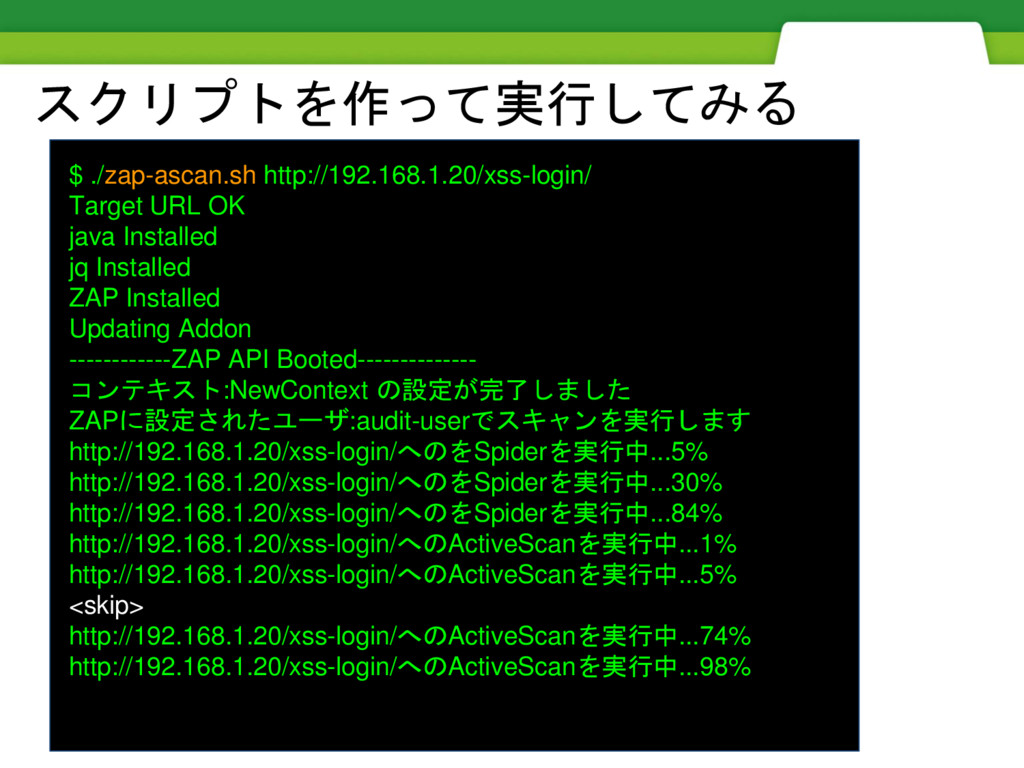
スキャンを実行するスクリプトを用意する
スクリプトを作って実行してみる $ ./zap-ascan.sh http://192.168.1.20/xss-login/ Target URL OK java Installed jq
Installed ZAP Installed Updating Addon ------------ZAP API Booted-------------- コンテキスト:NewContext の設定が完了しました ZAPに設定されたユーザ:audit-userでスキャンを実行します http://192.168.1.20/xss-login/へのをSpiderを実行中...5% http://192.168.1.20/xss-login/へのをSpiderを実行中...30% http://192.168.1.20/xss-login/へのをSpiderを実行中...84% http://192.168.1.20/xss-login/へのActiveScanを実行中...1% http://192.168.1.20/xss-login/へのActiveScanを実行中...5% <skip> http://192.168.1.20/xss-login/へのActiveScanを実行中...74% http://192.168.1.20/xss-login/へのActiveScanを実行中...98%
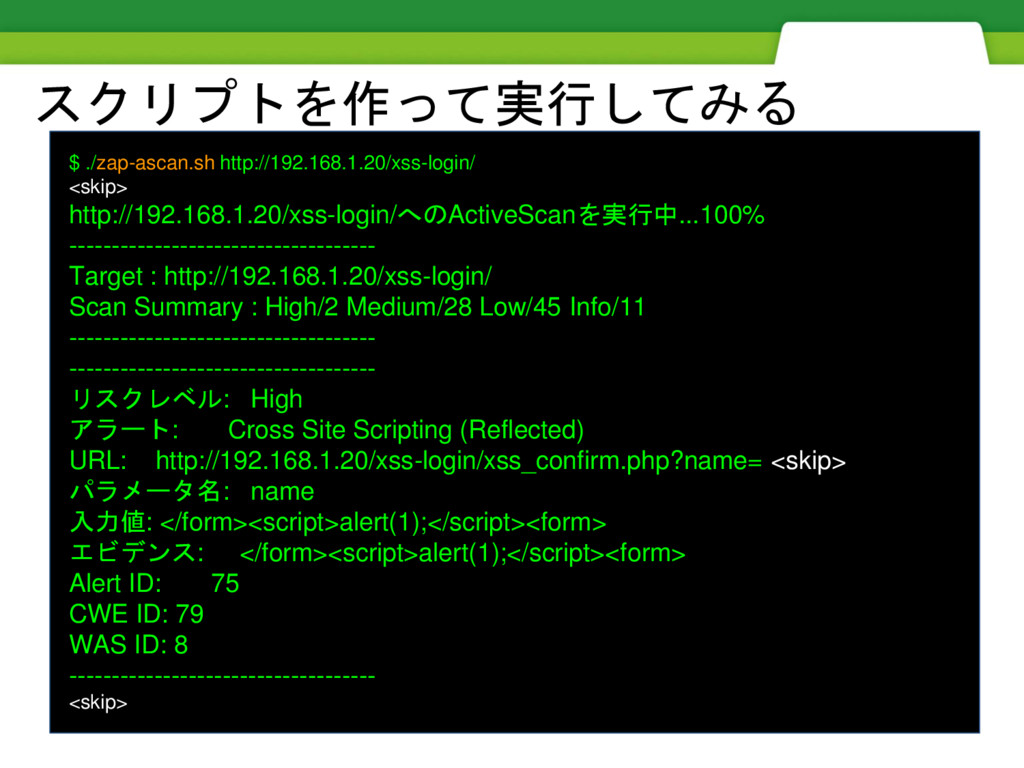
スクリプトを作って実行してみる $ ./zap-ascan.sh http://192.168.1.20/xss-login/ <skip> http://192.168.1.20/xss-login/へのActiveScanを実行中...100% ------------------------------------ Target : http://192.168.1.20/xss-login/
Scan Summary : High/2 Medium/28 Low/45 Info/11 ------------------------------------ ------------------------------------ リスクレベル: High アラート: Cross Site Scripting (Reflected) URL: http://192.168.1.20/xss-login/xss_confirm.php?name= <skip> パラメータ名: name 入力値: </form><script>alert(1);</script><form> エビデンス: </form><script>alert(1);</script><form> Alert ID: 75 CWE ID: 79 WAS ID: 8 ------------------------------------ <skip>
hubotを利用したslack経由での実行
hubotとは https://hubot.github.com/
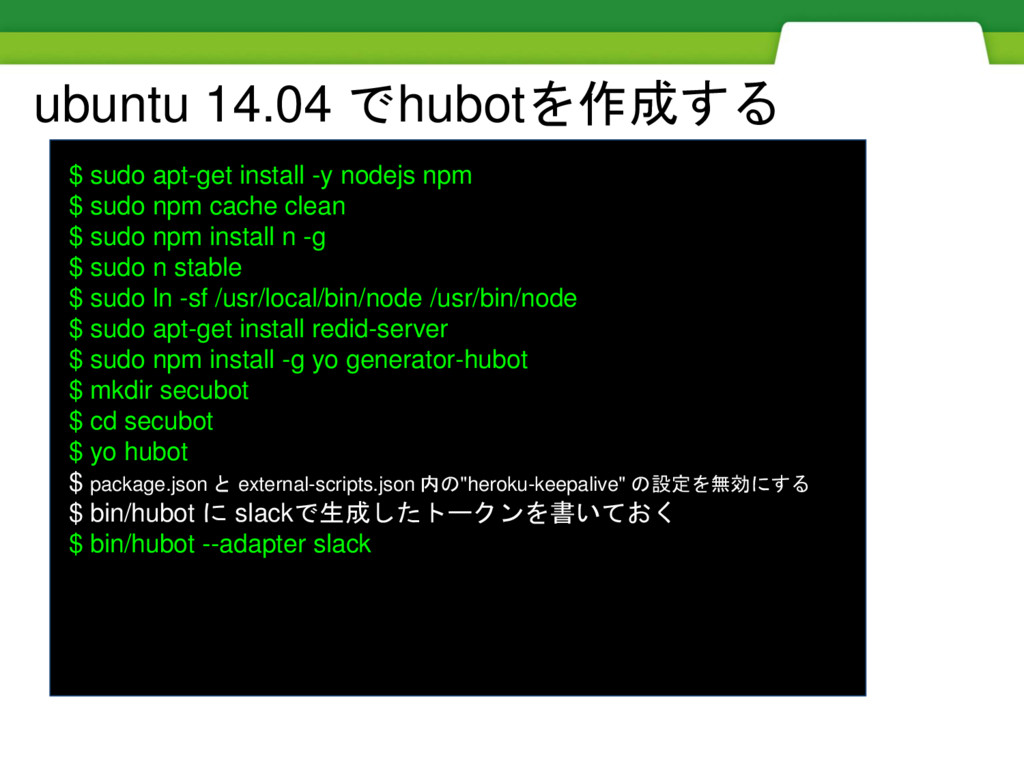
$ sudo apt-get install -y nodejs npm $ sudo npm
cache clean $ sudo npm install n -g $ sudo n stable $ sudo ln -sf /usr/local/bin/node /usr/bin/node $ sudo apt-get install redid-server $ sudo npm install -g yo generator-hubot $ mkdir secubot $ cd secubot $ yo hubot $ package.json と external-scripts.json 内の"heroku-keepalive" の設定を無効にする $ bin/hubot に slackで生成したトークンを書いておく $ bin/hubot --adapter slack ubuntu 14.04 でhubotを作成する
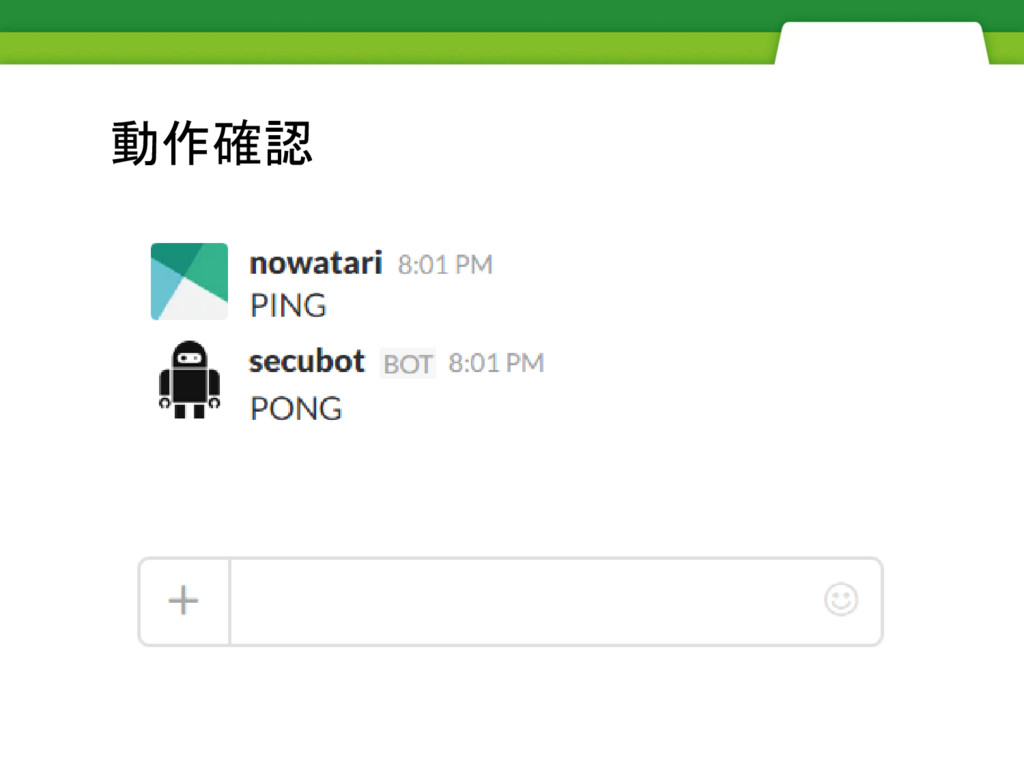
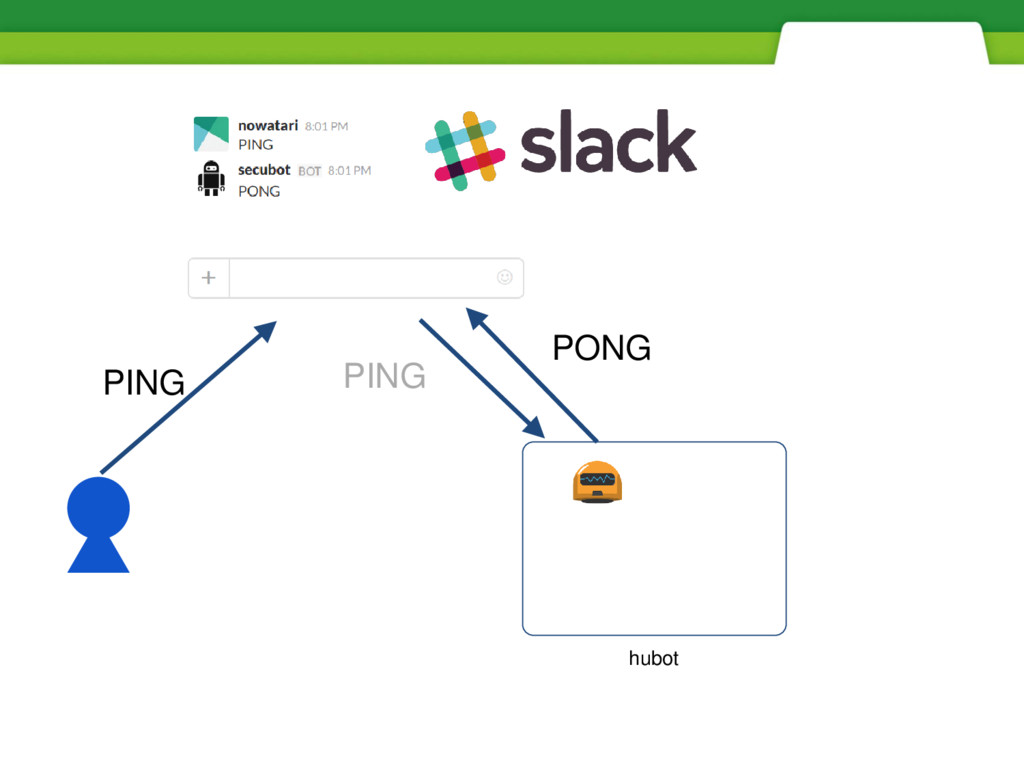
動作確認
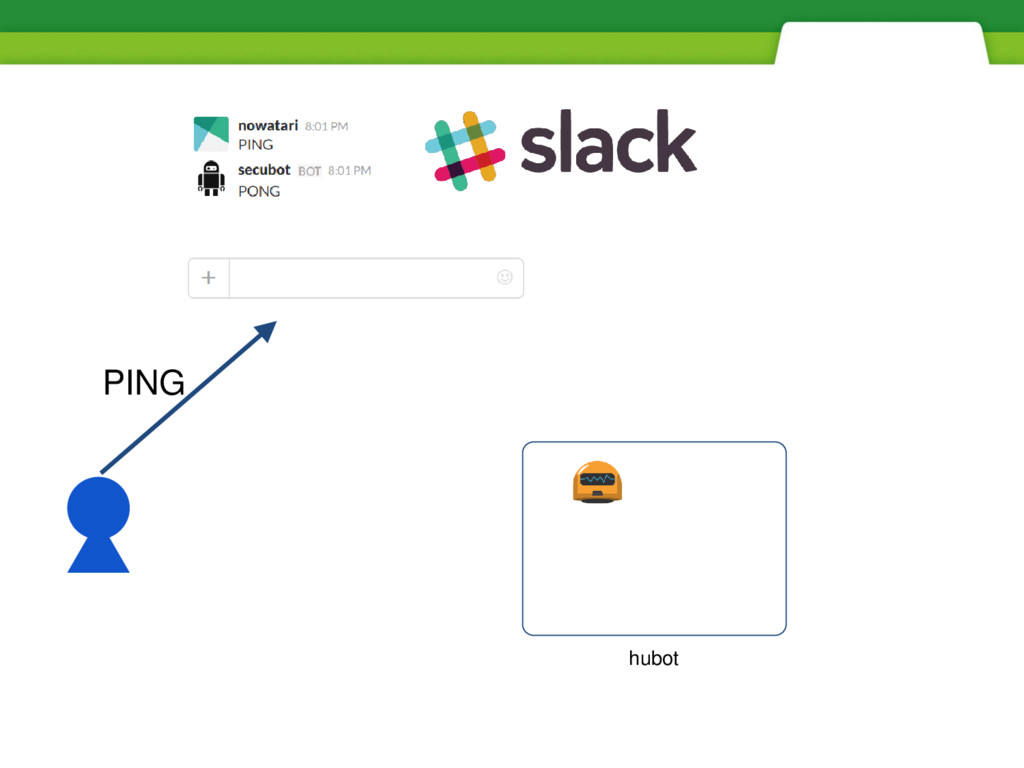
hubot PING
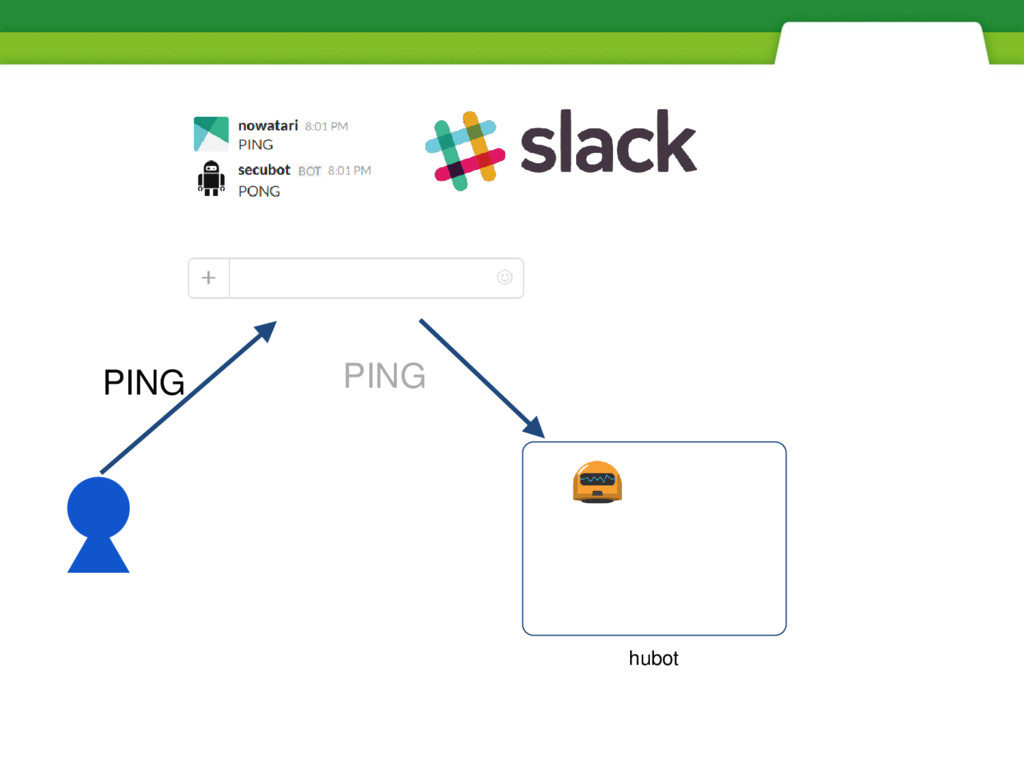
hubot PING PING
hubot PING PONG PING
先ほどのスクリプトを実 行するようにする
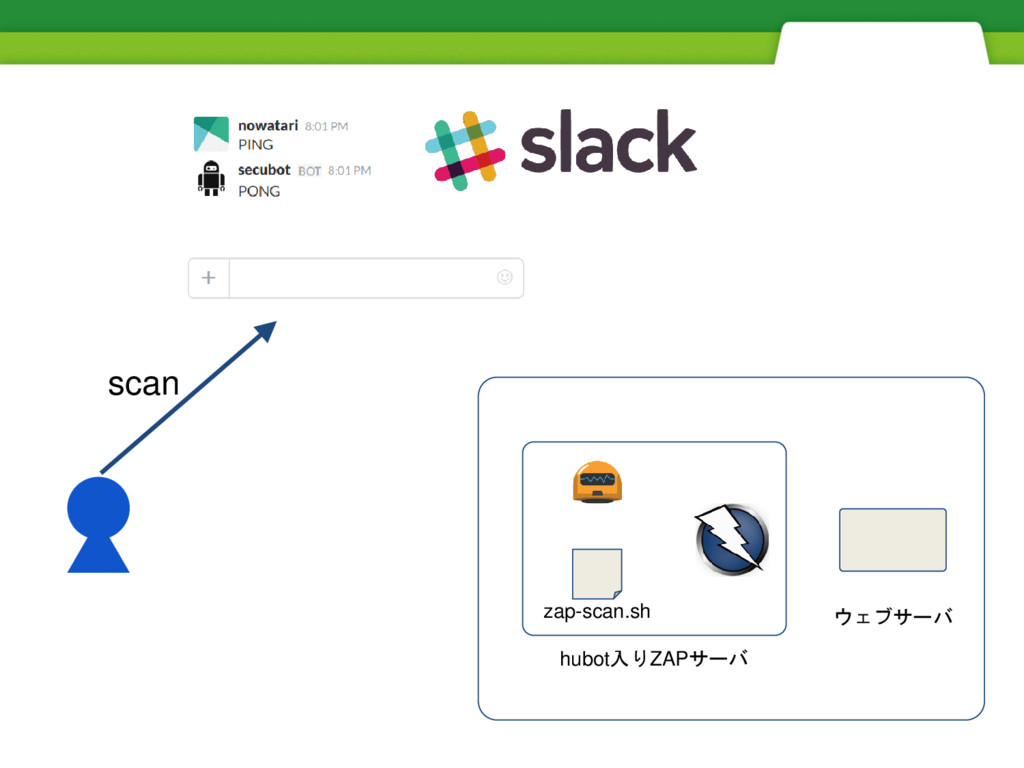
hubot入りZAPサーバ ウェブサーバ scan zap-scan.sh
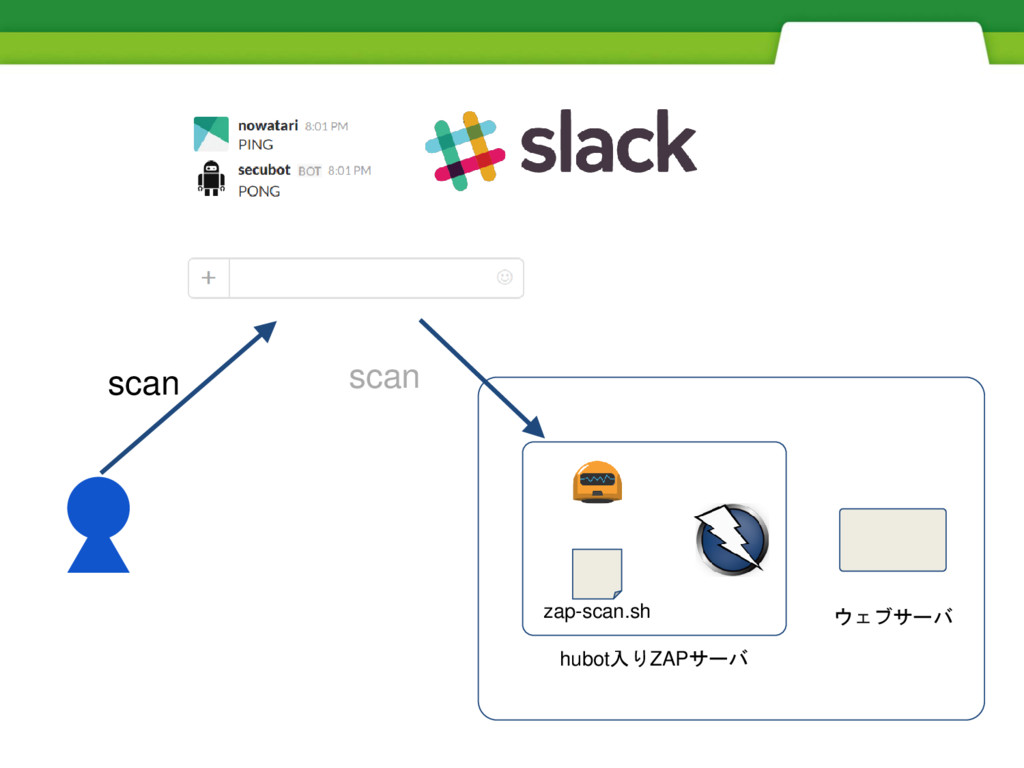
hubot入りZAPサーバ ウェブサーバ scan scan zap-scan.sh
hubot入りZAPサーバ ウェブサーバ scan scan zap-scan.sh
hubot入りZAPサーバ ウェブサーバ scan スキャン結果 scan zap-scan.sh
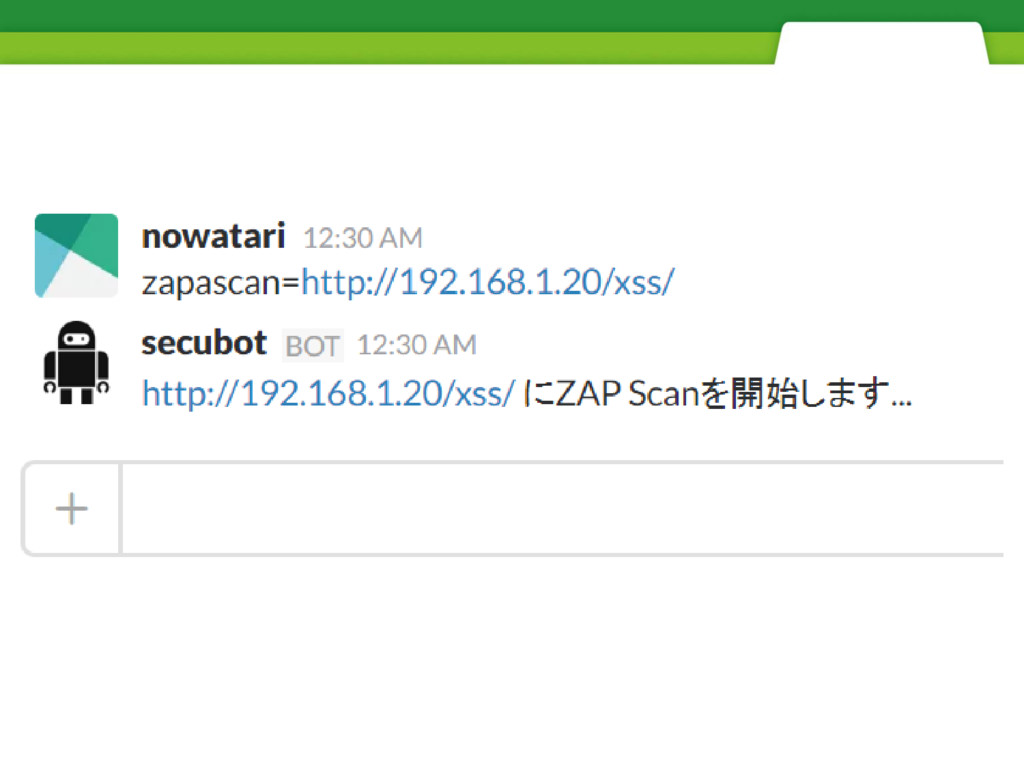
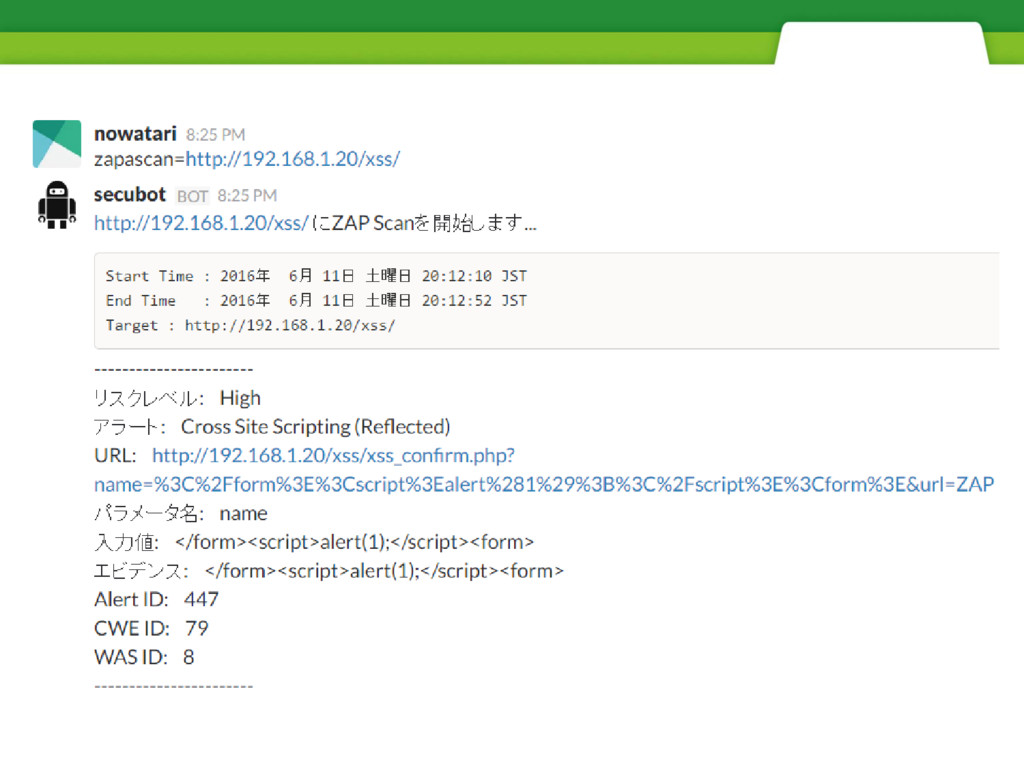
module.exports = (robot) -> robot.respond /zapascan=(.*)/, (msg) -> target =
msg.match[1] @exec = require('child_process').exec command = "hubot/zap-ascan.sh #{target}" msg.send "#{target} にZAP Scanを開始します..." @exec command, (error, stdout, stderr) -> msg.send error if error? msg.send stdout if stdout? msg.send stderr if stderr? slack経由でシェルスクリプトを実行す る
脆弱性スキャンボットを試す
None
None
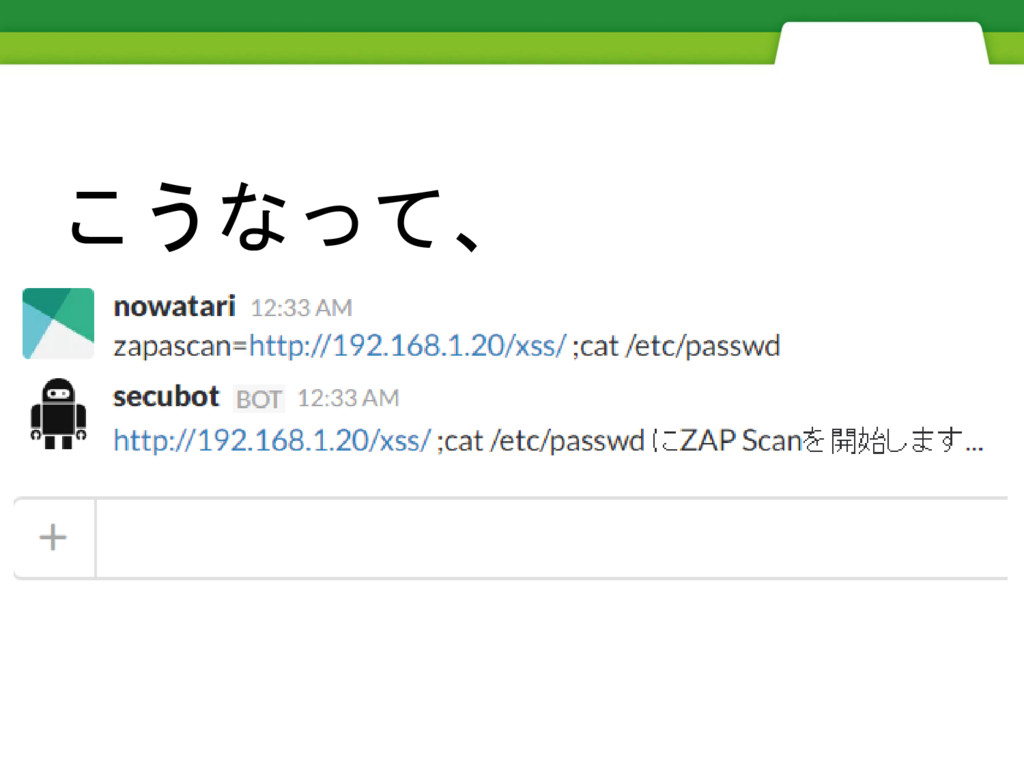
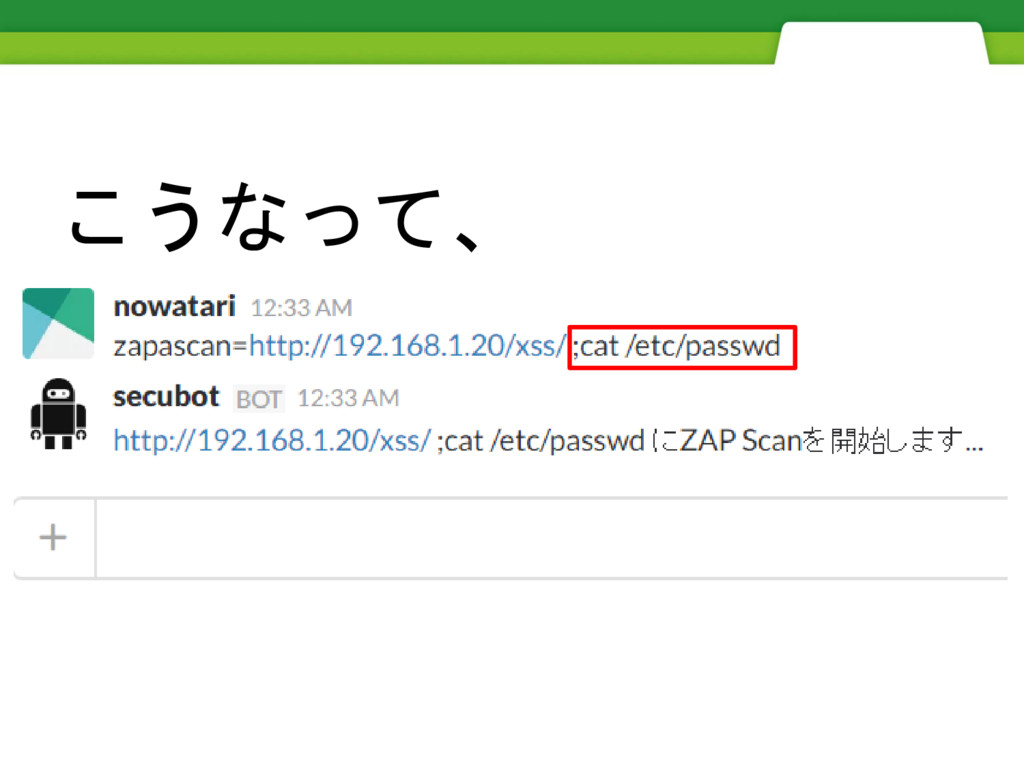
ただ、こういうことをすると
こうなって、
こうなって、
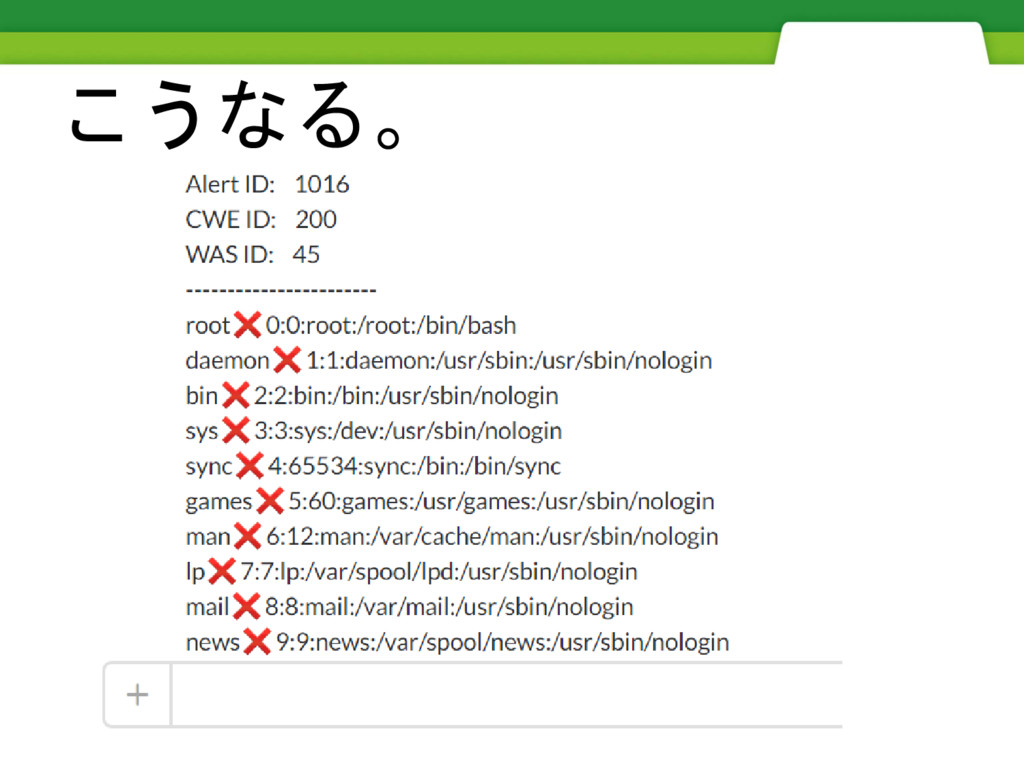
こうなる。
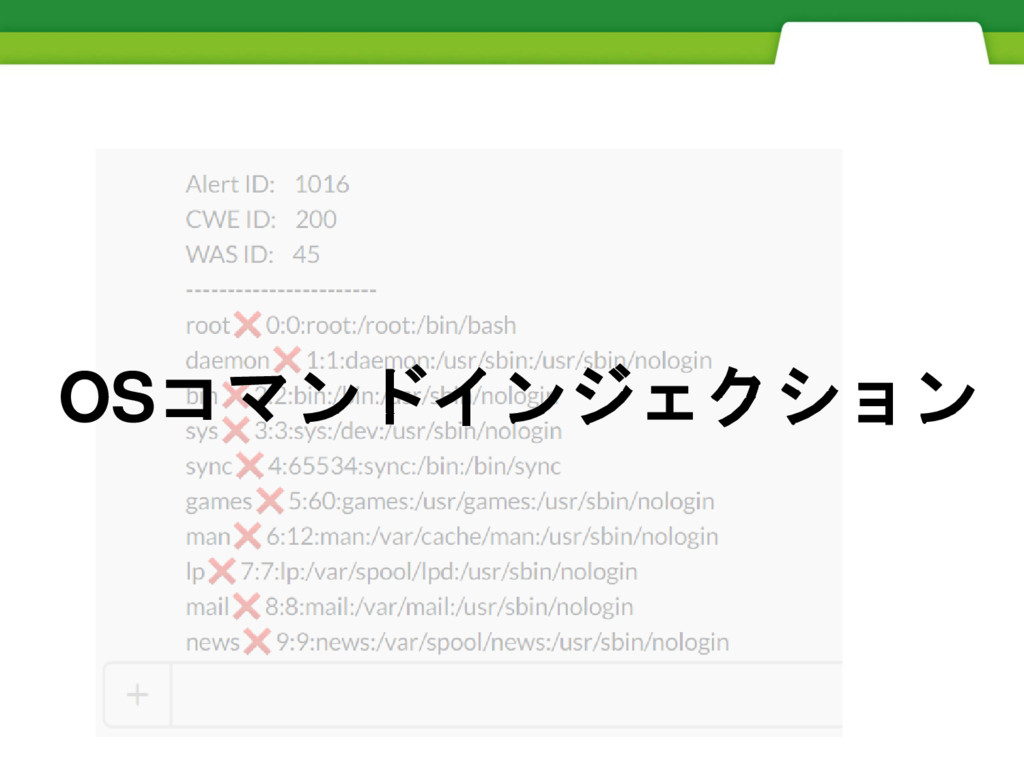
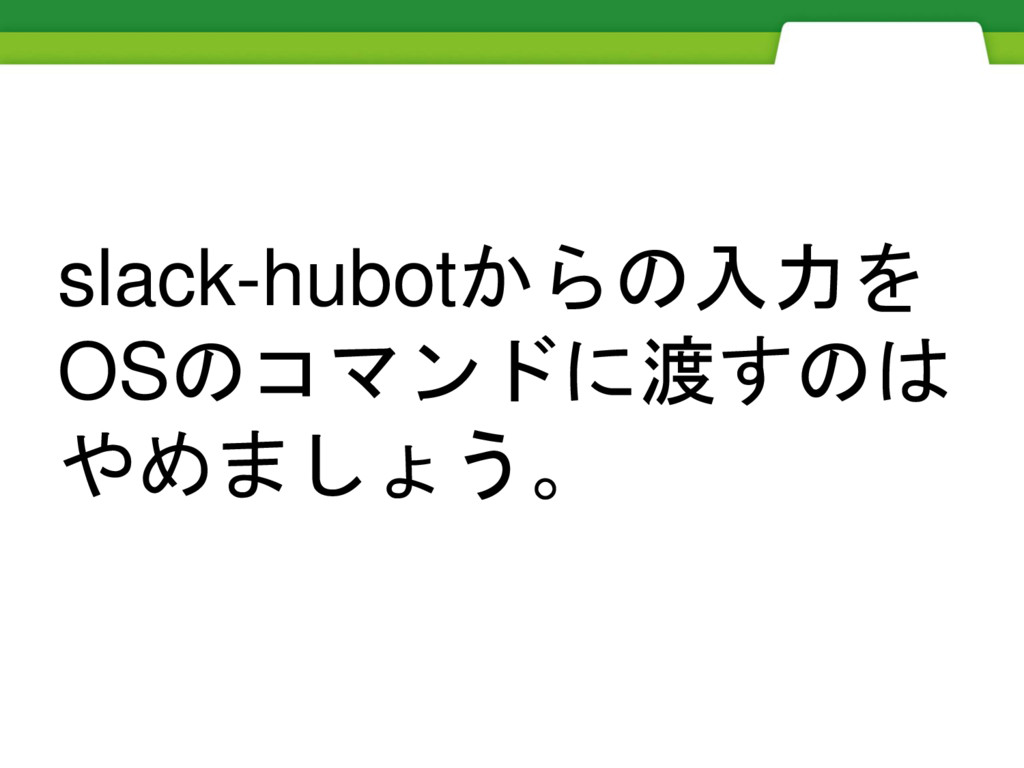
OSコマンドインジェクション
slack-hubotからの入力を OSのコマンドに渡すのは やめましょう。
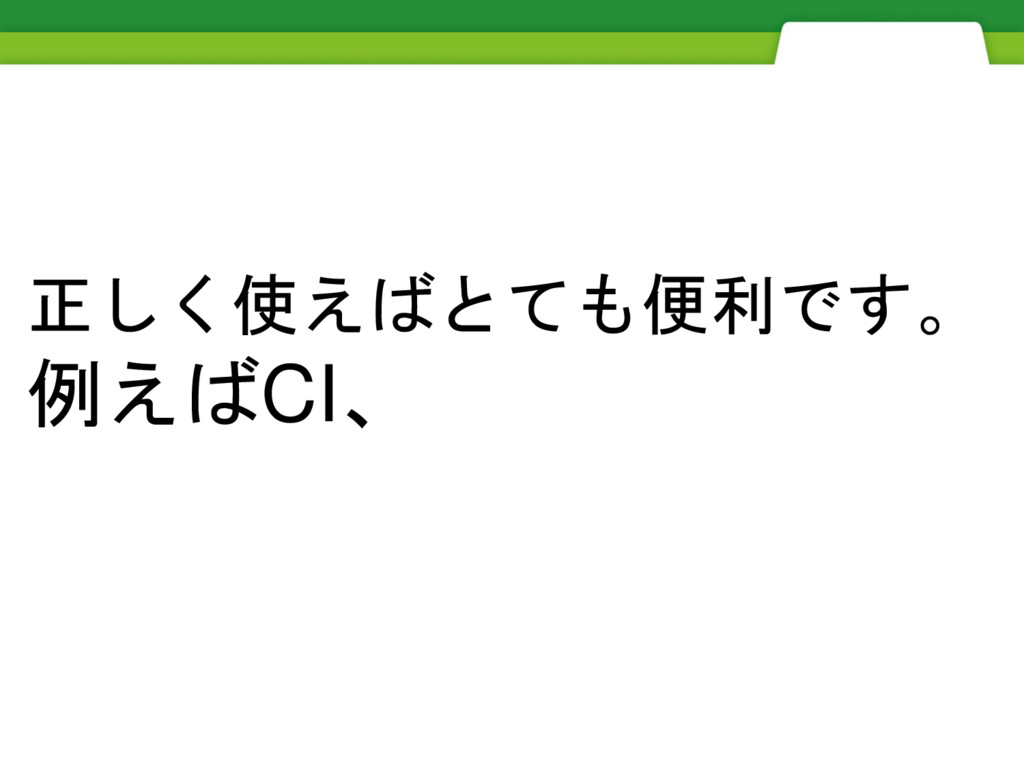
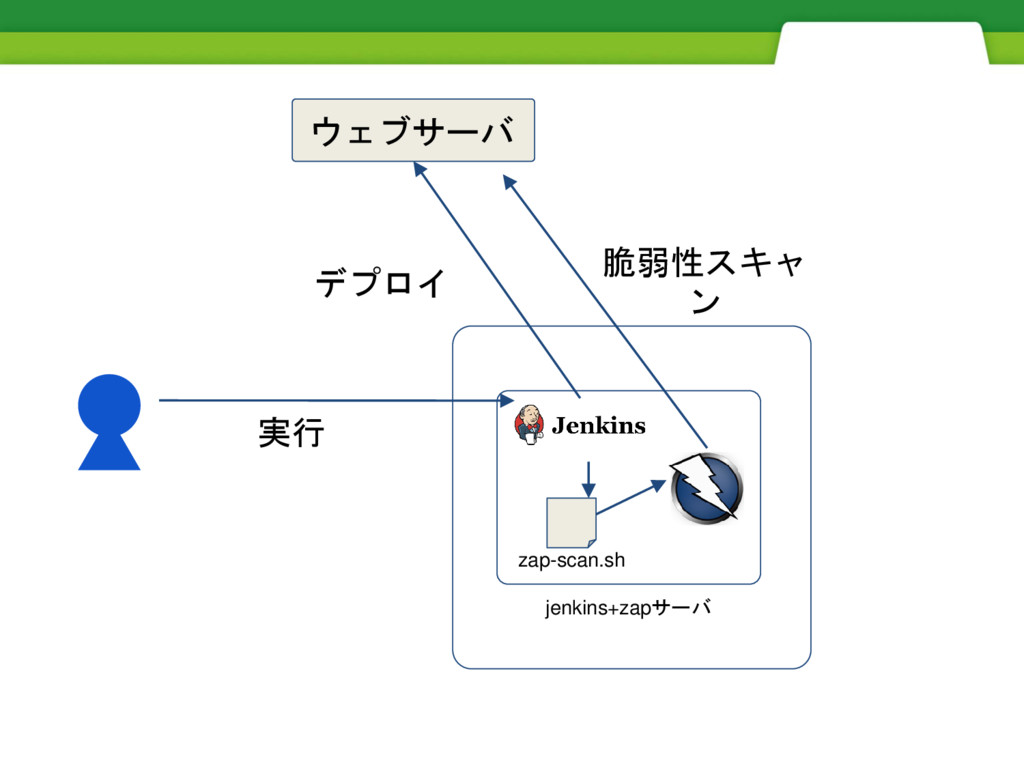
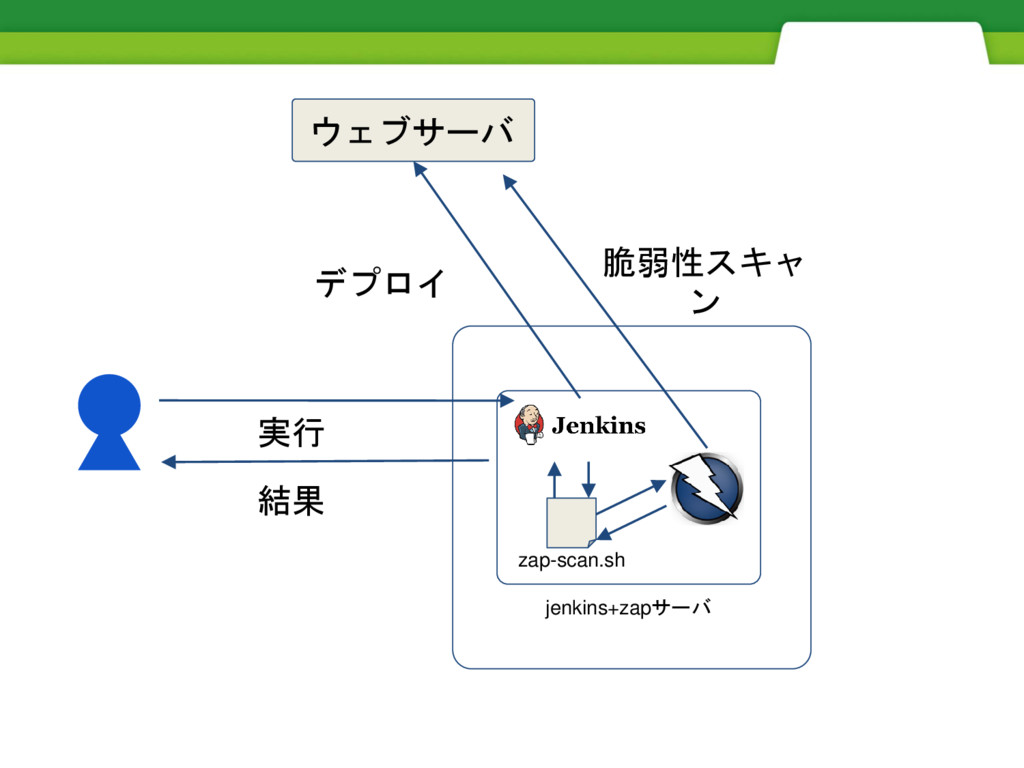
正しく使えばとても便利です。 例えばCI、
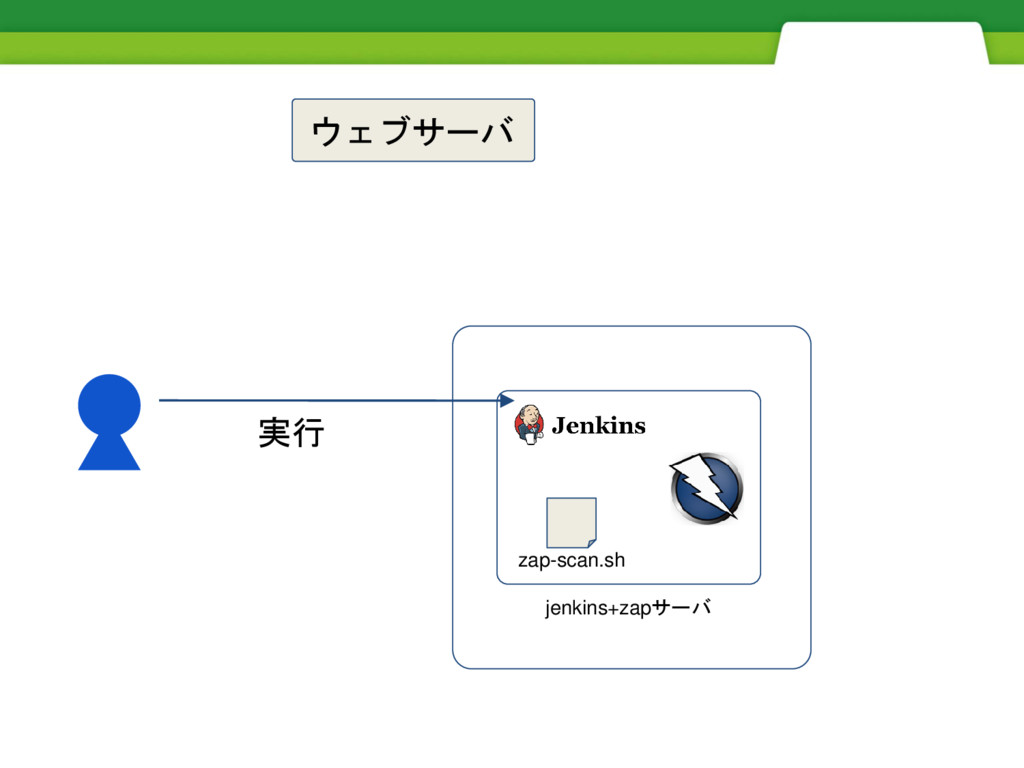
jenkins+zapサーバ zap-scan.sh 実行 ウェブサーバ
jenkins+zapサーバ zap-scan.sh 実行 デプロイ ウェブサーバ
jenkins+zapサーバ zap-scan.sh 実行 デプロイ 脆弱性スキャ ン ウェブサーバ
jenkins+zapサーバ zap-scan.sh 実行 デプロイ 脆弱性スキャ ン ウェブサーバ 結果
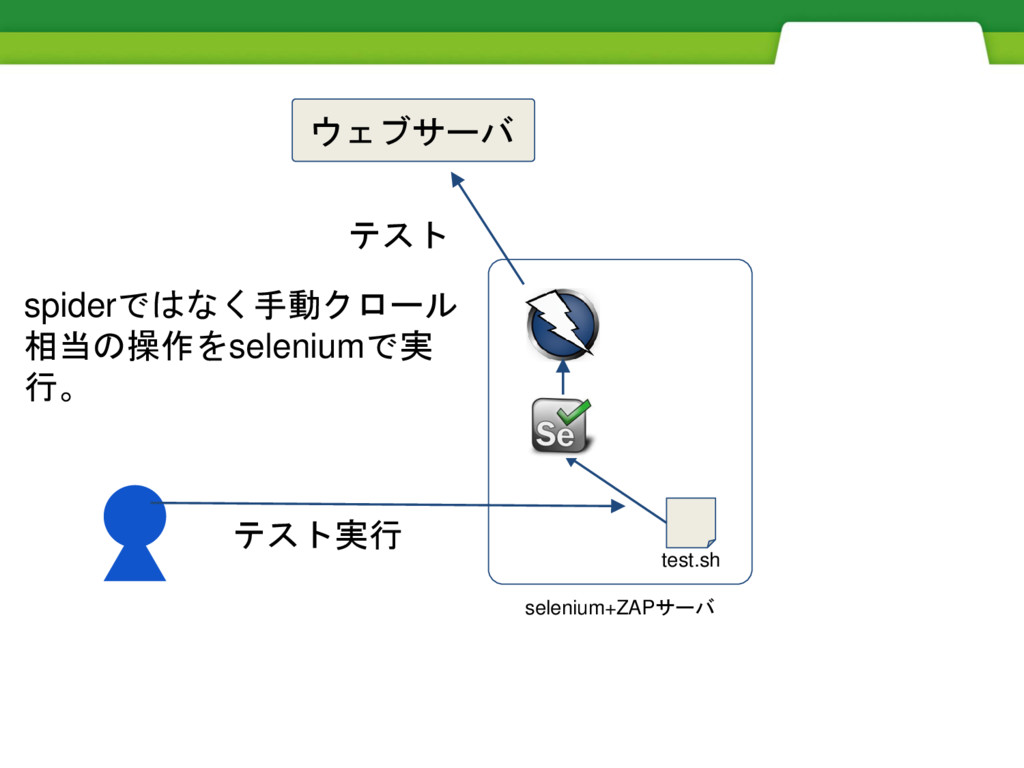
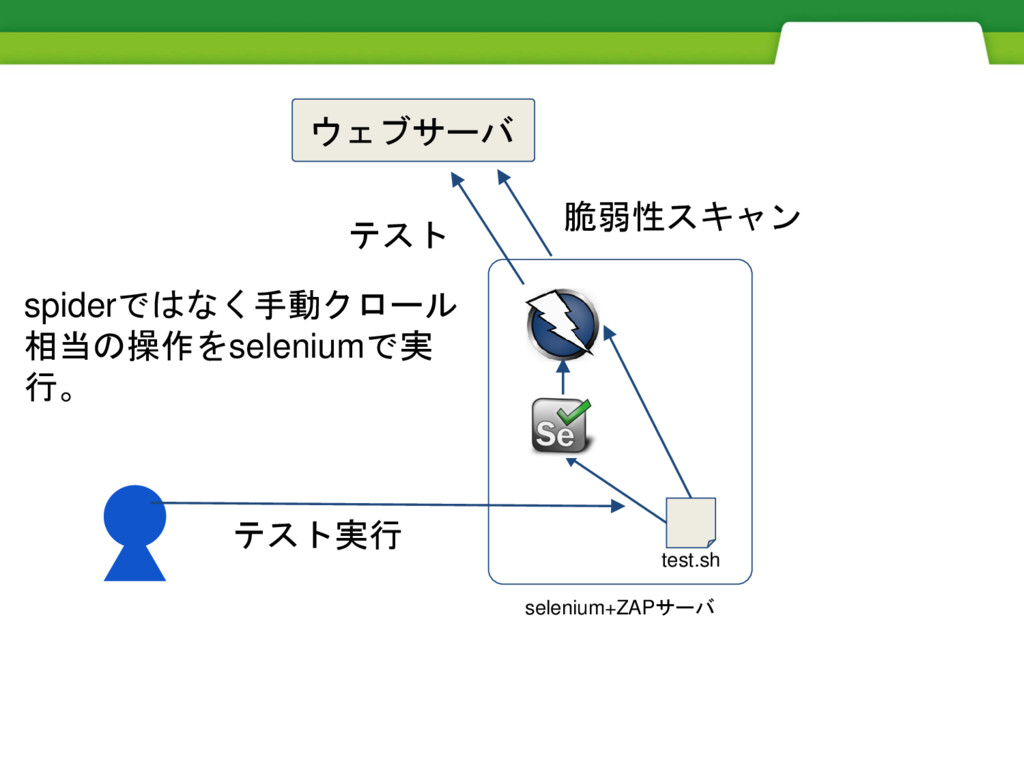
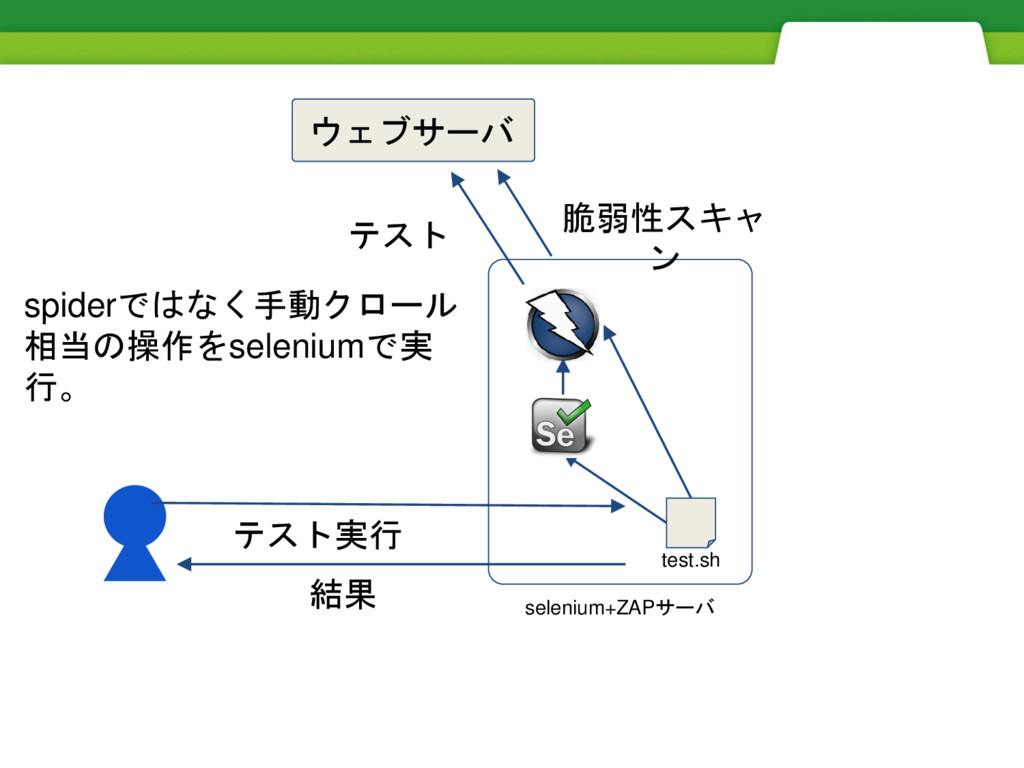
例えばテスト、
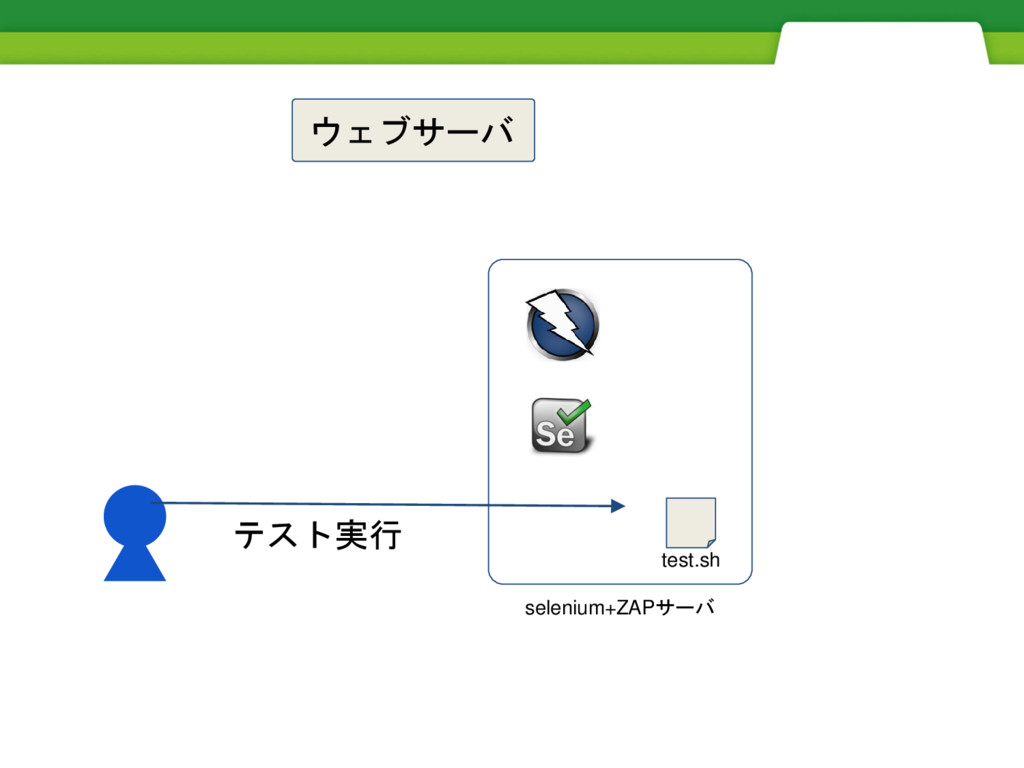
selenium+ZAPサーバ test.sh テスト実行 ウェブサーバ
selenium+ZAPサーバ test.sh テスト実行 テスト ウェブサーバ spiderではなく手動クロール 相当の操作をseleniumで実 行。
selenium+ZAPサーバ test.sh テスト実行 テスト 脆弱性スキャン ウェブサーバ spiderではなく手動クロール 相当の操作をseleniumで実 行。
selenium+ZAPサーバ test.sh テスト実行 テスト 脆弱性スキャ ン ウェブサーバ spiderではなく手動クロール 相当の操作をseleniumで実 行。
結果
まとめ
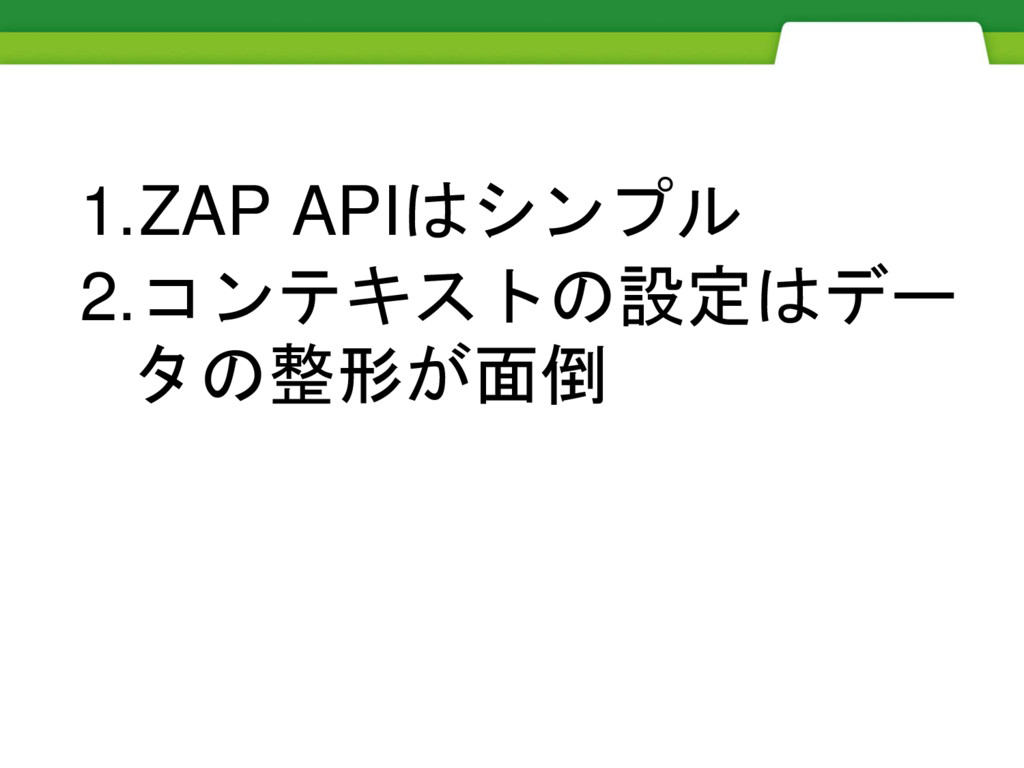
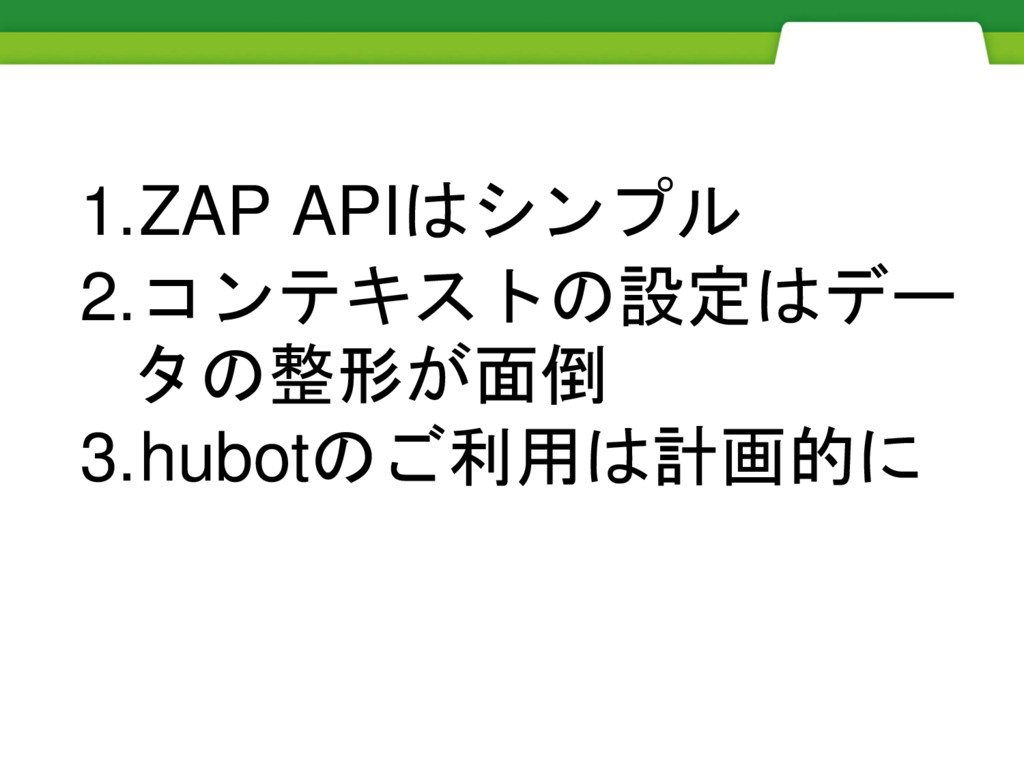
1.ZAP APIはシンプル
1.ZAP APIはシンプル 2.コンテキストの設定はデー タの整形が面倒
1.ZAP APIはシンプル 2.コンテキストの設定はデー タの整形が面倒 3.hubotのご利用は計画的に
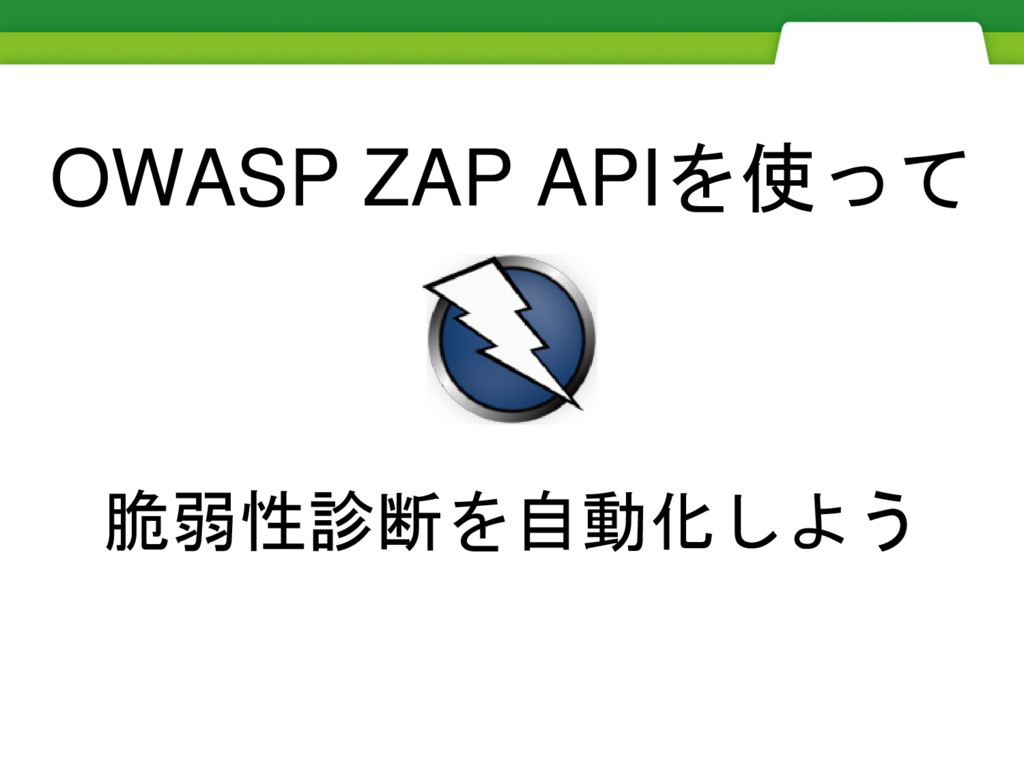
OWASP ZAP APIを使って 脆弱性診断を自動化しよう
![url: https://github.com/zaproxy/zaproxy/wiki/ApiDetailsUrlFormat リクエストフォーマット http://zap/<format>/<component>/<operation>/<operation name>[/?<parameters>] 例:http://192.168.1.20にスパイダーを実行する場合 http://localhost:8090/JSON/spider/action/scan/?url=https://192.168.1.20/ API keyを有効にしている場合 http://localhost:8090/JSON/spider/action/scan/?url=https://192.168.1.20/&apikey={key}](https://files.speakerdeck.com/presentations/834001959d224b6fbf795690a641bb5a/slide_14.jpg)