Lock in $30 Savings on PRO—Offer Ends Soon! ⏳

KMP와 UIKit으로 iOS 네이티브 앱 만들기

KMP와 UIKit으로 iOS 네이티브 앱 만들기

Avatar for Chanjung Kim

Chanjung Kim

December 21, 2025
Tweet

Other Decks in Programming

Transcript

  1. 1. Kotlin/Native의 동작 원리 2. Kotlin/Native 컴파일러 커맨드라인에서 사용하기 3.

    (Gradle 없이) 순수 Kotlin/Native + UIKit으로 iOS 네이티브 앱 만들기 4. Compose Multiplatform에서 UIKit 잘 연동하기 목차
  2. 발표자 소개 피아노키위즈 § CMP 1.4부터 개발 → CMP 1.6

    (베타) 때 출시 § 메인 화면 CMP / 악보 렌더링 Rust § 최다 DAU 6천
  3. CMP 1.5에서 한글이 분리돼서 입력되는 문제 해결 JetBrains/compose-multiplatform-core#718 CMP 1.6

    리소스의 모든 언어 plural strings 지원 추가 JetBrains/compose-multiplatform#4519 Ktor 3.3의 WebRTC를 구현할 때 사용된 KMP + Rust Gradle 플러그인 개발 https://gobley.dev 발표자 소개
  4. 복습: Kotlin/JVM의 동작 원리 Kotlin Source (*.kt) JVM Bytecode (*.class)

    Kotlin Compiler Program Execution Java Virtual Machine
  5. Kotlin 컴파일러의 “프론트엔드”와 “백엔드” Kotlin Source (*.kt) JVM Bytecode (*.class)

    Kotlin Compiler Kotlin Source (*.kt) Kotlin IR The “Frontend” JVM Bytecode (*.class) The Kotlin/JVM “Backend”
  6. Kotlin IR: 컴파일 결과를 AST로 저장 FILE fqName:<root> fileName:<file name

    here> FUN name:add visibility:public modality:FINAL returnType:kotlin.Int VALUE_PARAMETER kind:Regular name:lhs index:0 type:kotlin.Int VALUE_PARAMETER kind:Regular name:rhs index:1 type:kotlin.Int BLOCK_BODY RETURN type=kotlin.Nothing from='public final fun add (lhs: kotlin.Int, rhs: kotlin.Int): kotlin.Int declared in <root>' CALL 'public final fun plus (other: kotlin.Int): kotlin.Int [external,operator] declared in kotlin.Int' type=kotlin.Int origin=PLUS ARG <this>: GET_VAR 'lhs: kotlin.Int declared in <root>.add' type=kotlin.Int origin=null ARG other: GET_VAR 'rhs: kotlin.Int declared in <root>.add' type=kotlin.Int origin=null fun add(lhs: Int, rhs: Int): Int { return lhs + rhs } 실행: konanc -Xprint-ir add.kt
  7. * ChatGPT 5.2를 이용하여 생성함. AST: Abstract Syntax Tree fun

    add(lhs: Int, rhs: Int): Int { return lhs + rhs }
  8. KMP: 백엔드를 교체해 다양한 플랫폼 지원 Kotlin Source (*.kt) Kotlin

    IR The Frontend JVM Bytecode (*.class) LLVM IR (*.ll) JavaScript (*.js) WASM (*.wasm) Kotlin/Native Kotlin/JVM Kotlin/JS Kotlin/WASM
  9. Kotlin/Native: Kotlin IR을 LLVM IR로 바꾸자 Kotlin Source (*.kt) Kotlin

    IR Kotlin Frontend LLVM IR (*.ll) Kotlin/Native Backend LLVM Executables (*.exe, *.kexe, …)
  10. LLVM: 재사용 가능한 컴파일러 인프라스트럭처 Kotlin Source (*.kt) Rust Source

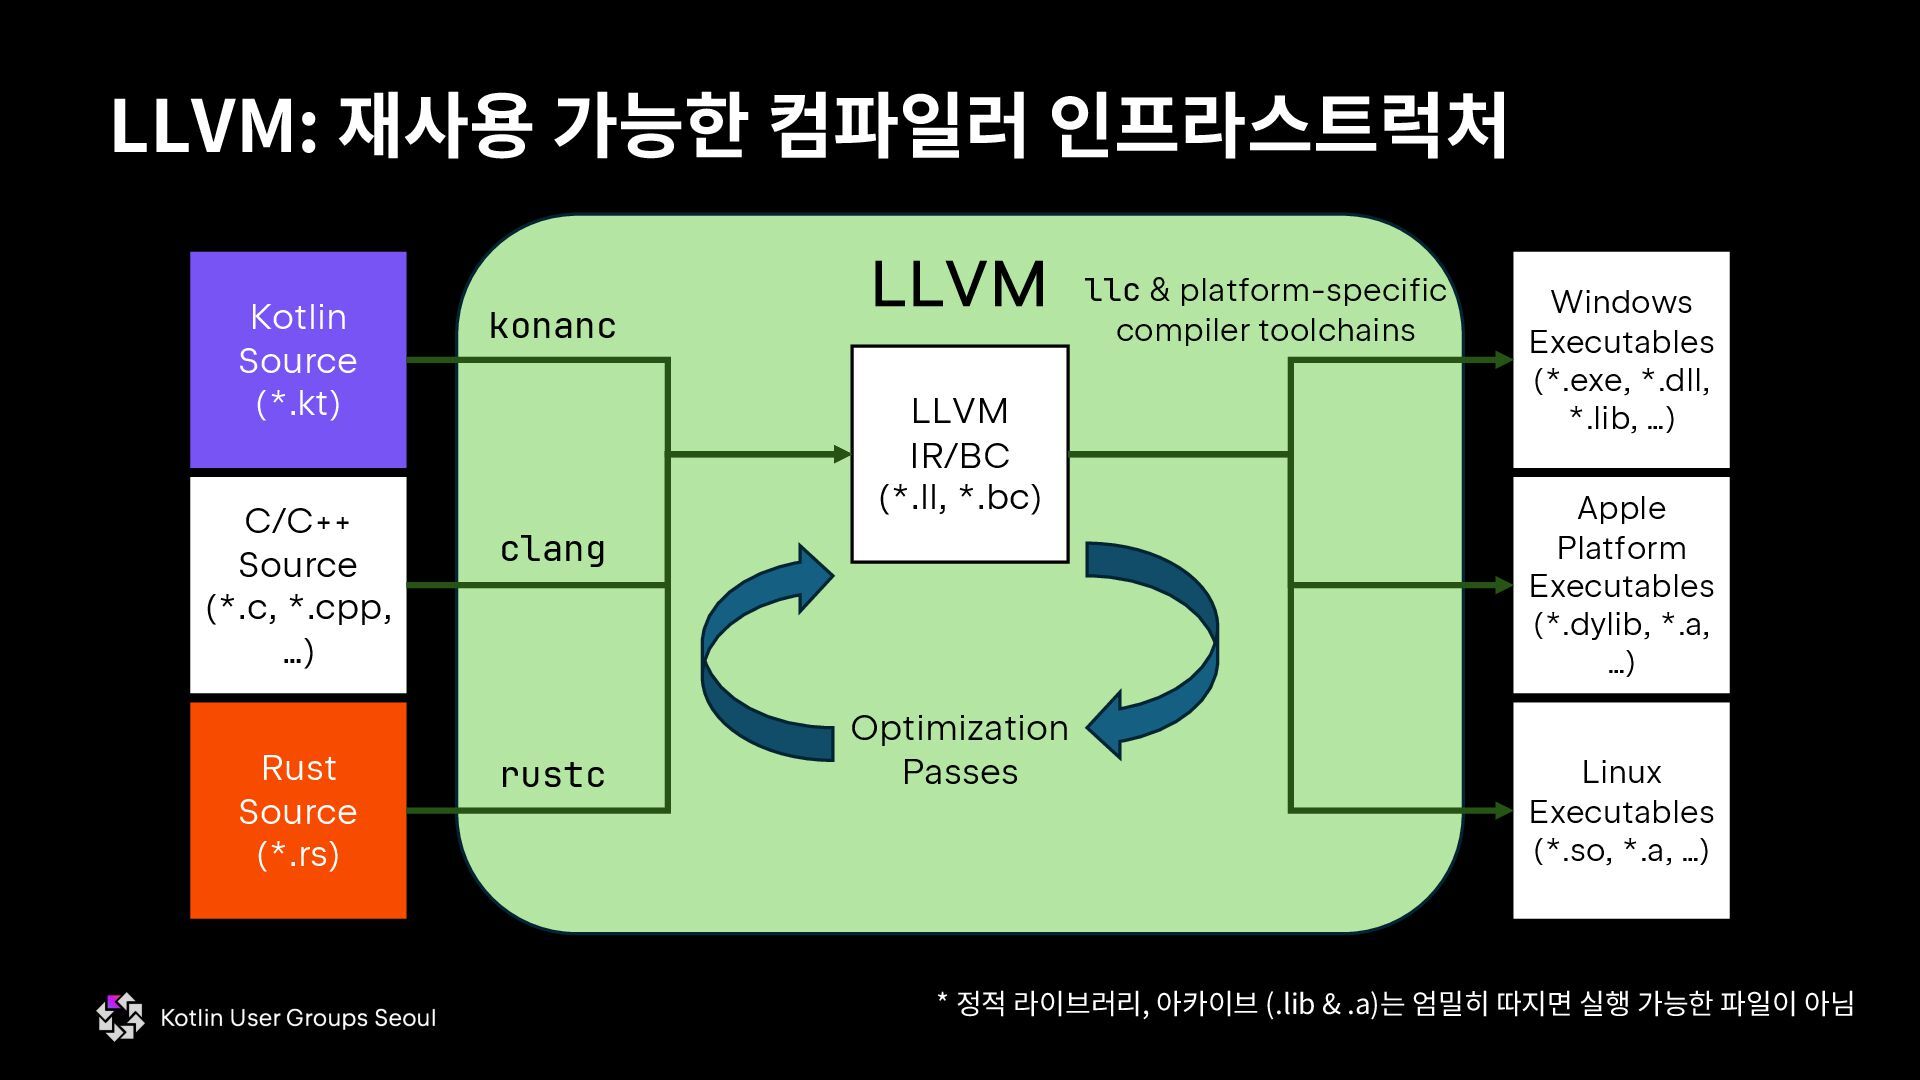
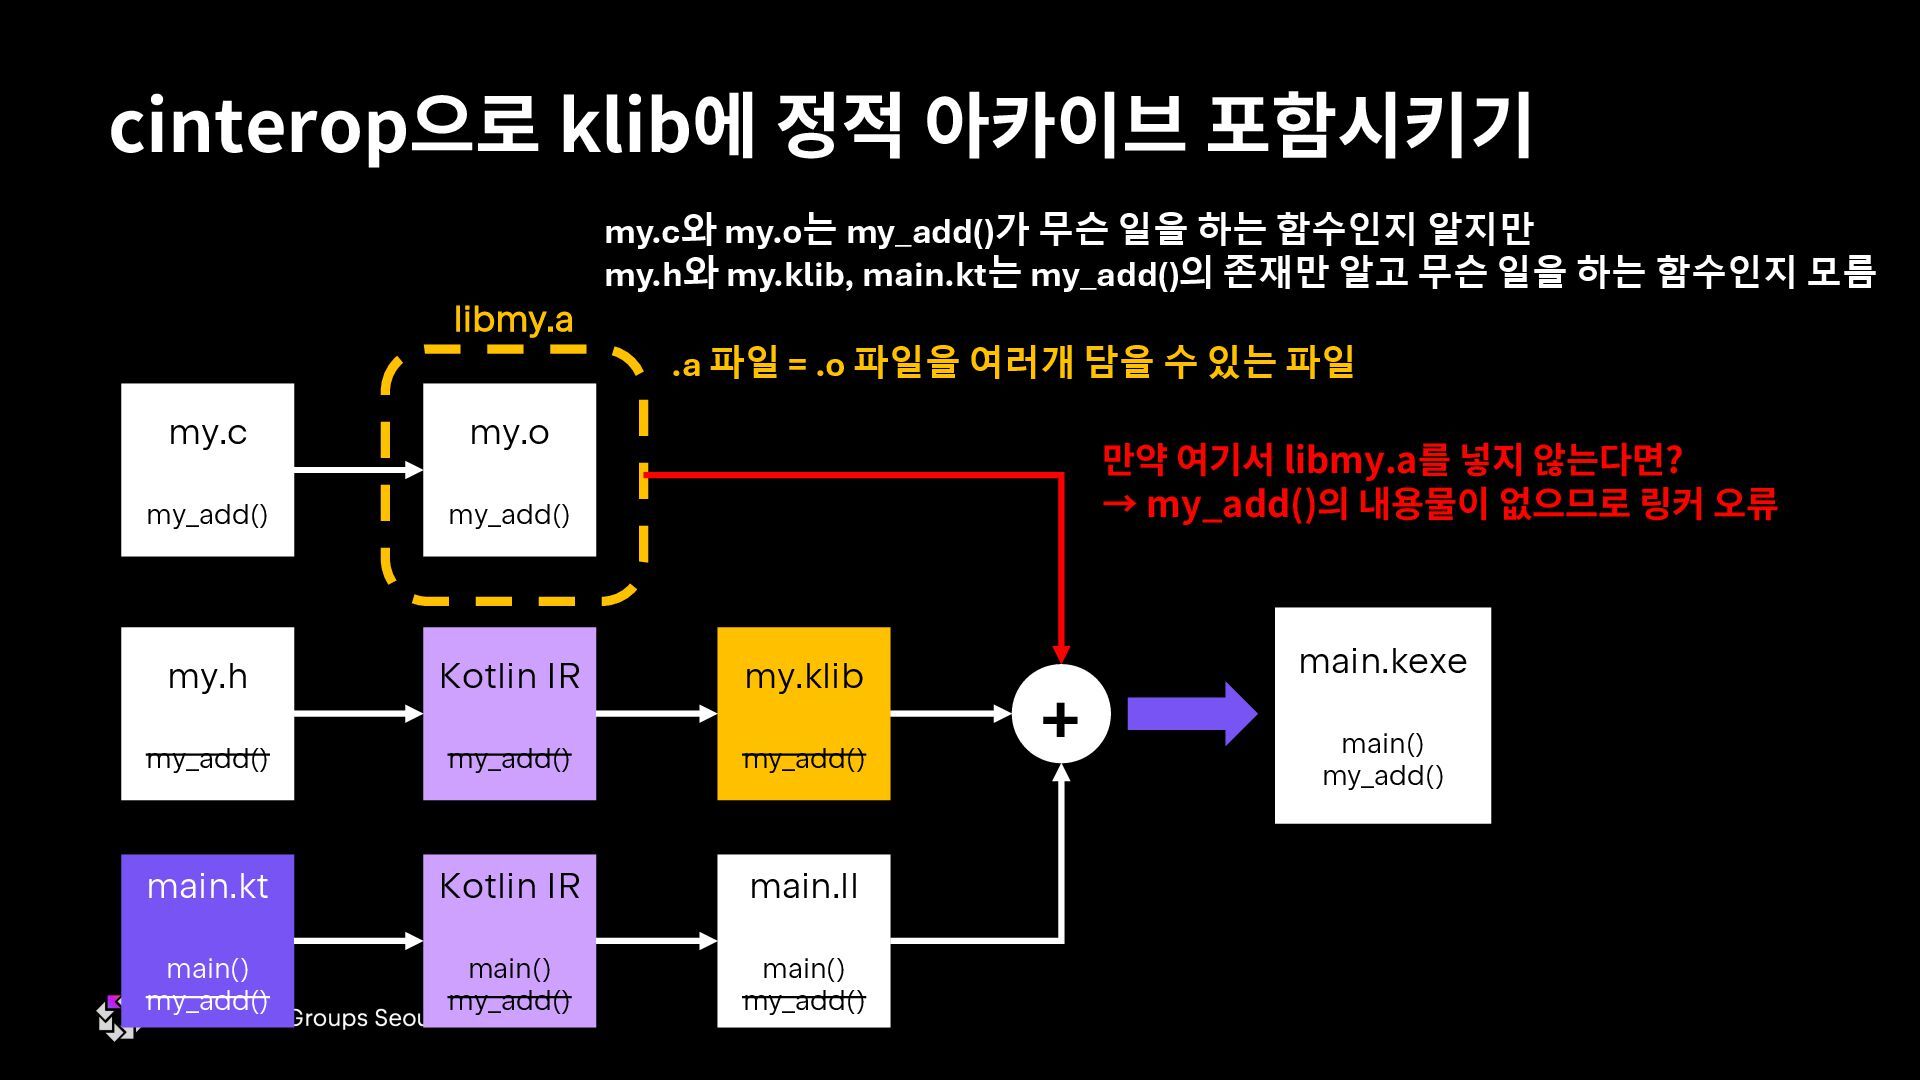
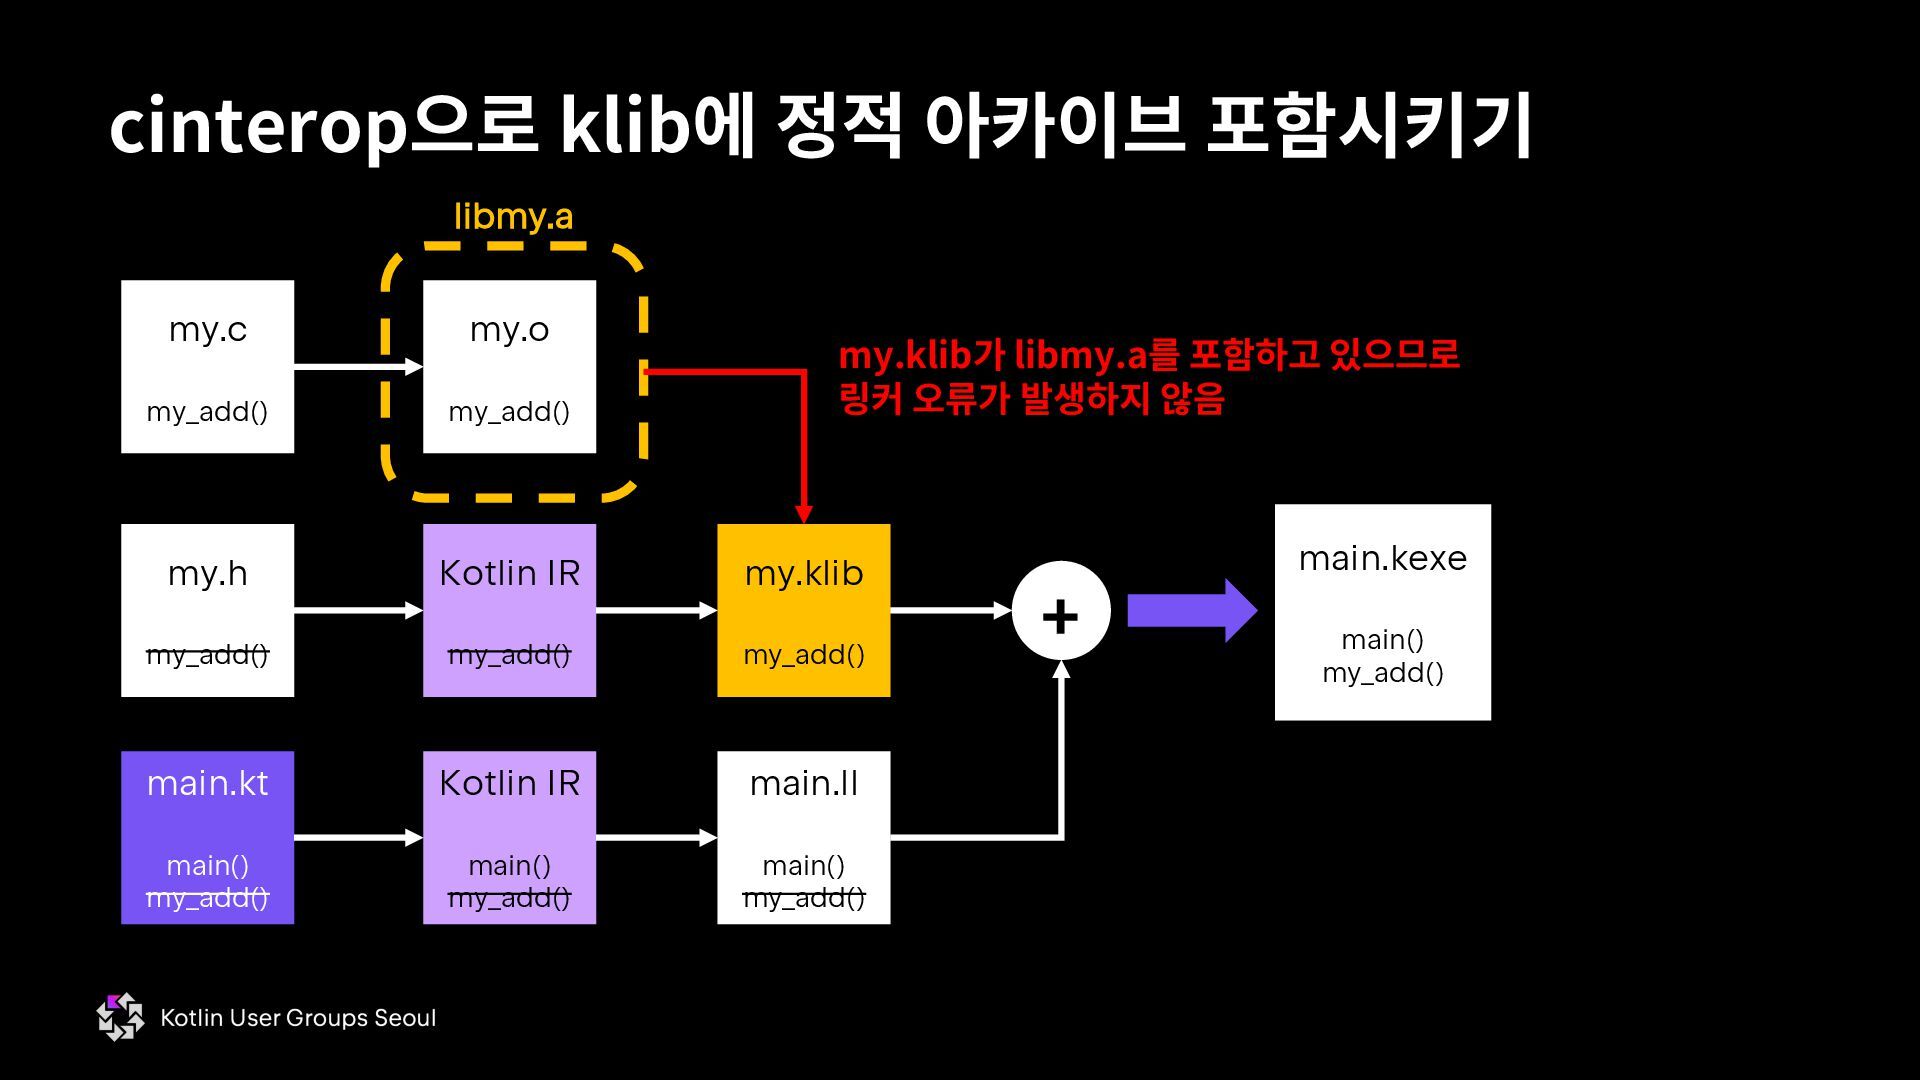
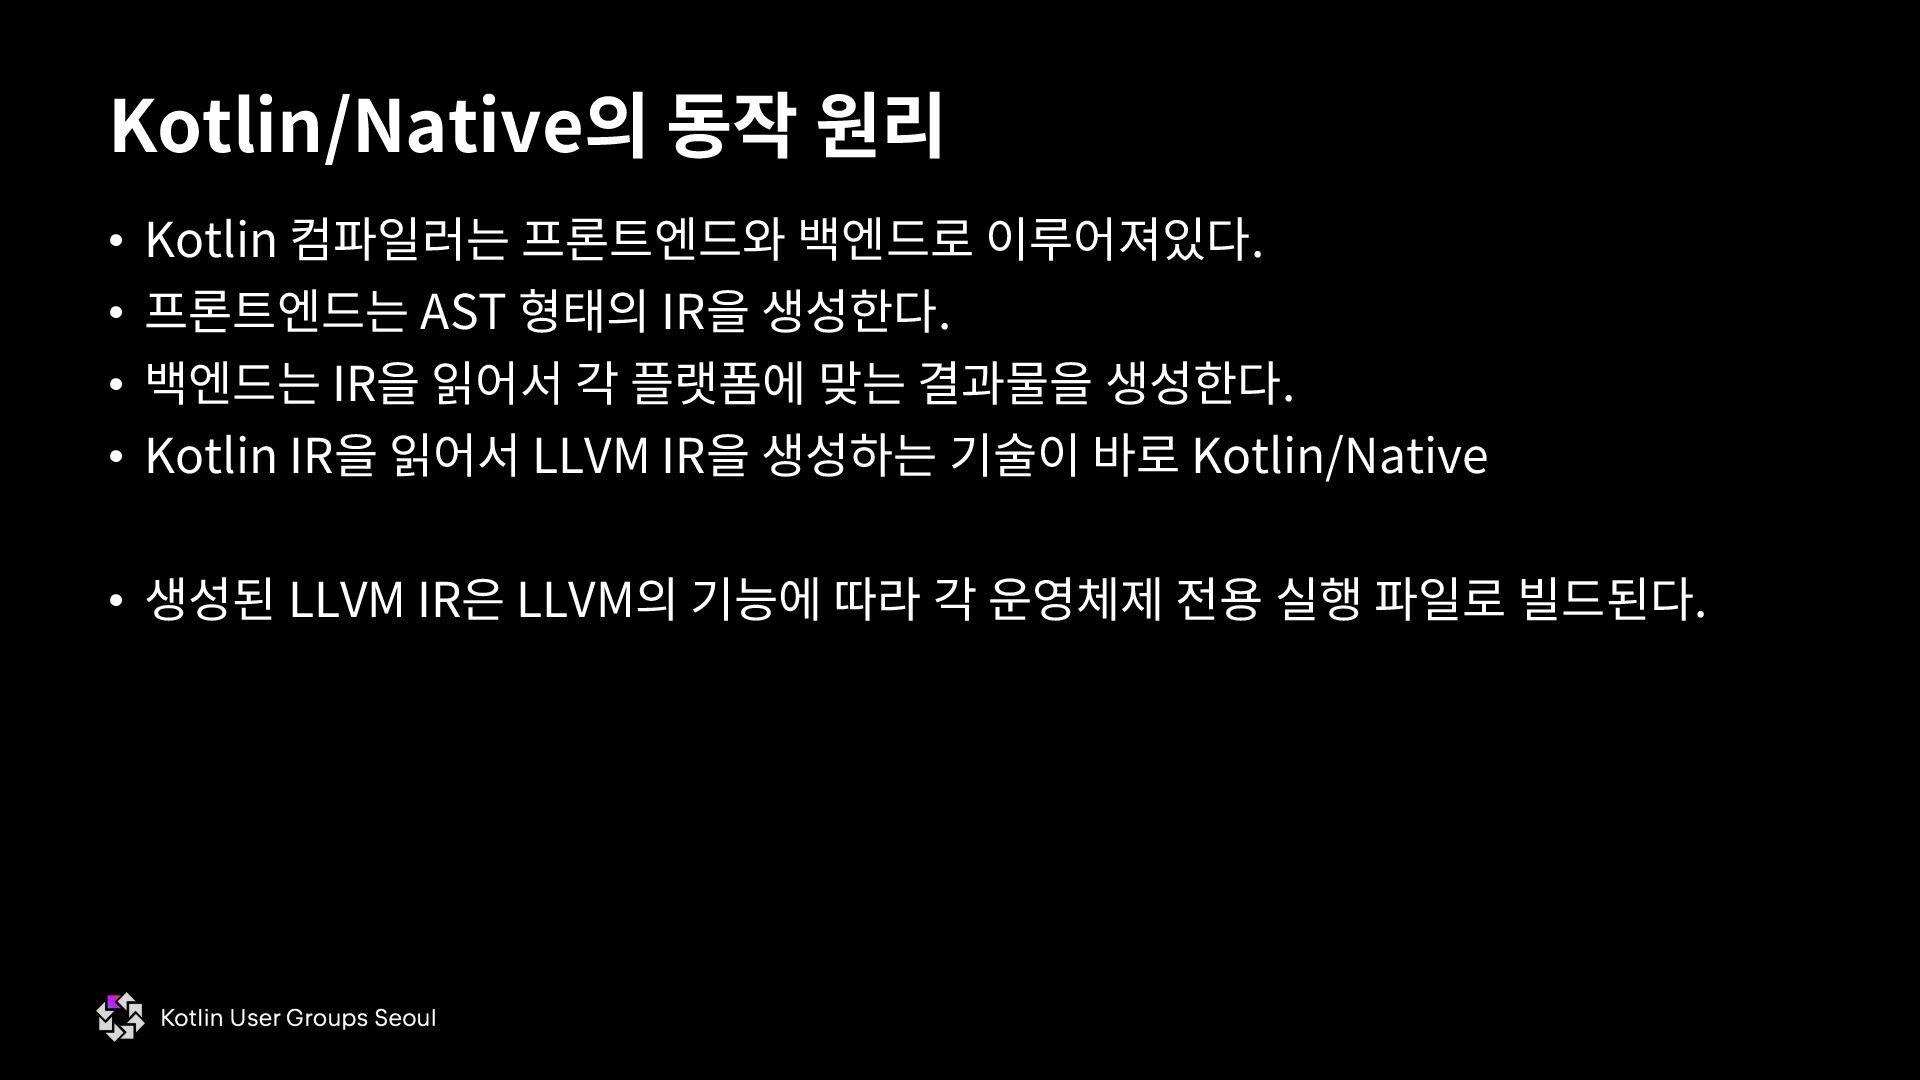
    (*.rs) C/C++ Source (*.c, *.cpp, …) LLVM LLVM IR/BC (*.ll, *.bc) konanc clang rustc Windows Executables (*.exe, *.dll, *.lib, …) Apple Platform Executables (*.dylib, *.a, …) Linux Executables (*.so, *.a, …) Optimization Passes llc & platform-specific compiler toolchains * 정적 라이브러리, 아카이브 (.lib & .a)는 엄밀히 따지면 실행 가능한 파일이 아님
  11. 실제 컴파일러 코드에서 확인해보기 NativeGenerationState.kt 백엔드는 정말 LLVM을 가져다가 사용하고

    있음 runBackend(…) -> createGenerationState(…) -> NativeGenerationState -> LlvmContextRef
  12. 실제 컴파일러 코드에서 확인해보기 IrToBitCode.kt 백엔드는 정말 LLVM IR을 생성하고

    있음 runBackend(…) -> runAfterLowerings(…) -> compileModule(…) -> runBackendCodegen(…) -> runCodegen(…) -> runPhase(CodegenPhase, …) -> CodeGeneratorVisitor
  13. Konan으로 네이티브 프로그램 컴파일하기 // main.kt import platform.posix.printf @kotlinx.cinterop.ExperimentalForeignApi fun

    main() { printf("Hello, %s", "world!") } #include <stdio.h> int main() { printf("Hello, %s\n", "world!") } C 표준 함수의 printf를 그대로 호출 가능 실행: konanc main.kt –o main && ./main.kexe
  14. Konan으로 네이티브 프로그램 컴파일하기 // main.kt import platform.posix.printf @kotlinx.cinterop.ExperimentalForeignApi fun

    main() { printf("Hello, %s", "world!") } #include <stdio.h> int main() { printf("Hello, %s\n", "world!") } C 표준 함수의 printf를 그대로 호출 가능 실행: konanc main.kt –o main && ./main.kexe
  15. Konan으로 네이티브 프로그램 컴파일하기 // main.kt import platform.posix.printf fun main()

    { printf("Hello, %s\n", "world!") } 커맨드라인 옵션으로 opt-in 가능 실행: konanc main.kt \ –opt-in kotlinx.cinterop.ExperimentalForeignApi \ –o main && ./main.kexe Gradle 옵션을 설정하면 커맨드라인으로 전달됨
  16. * LLVM IR이 .klib에 포함되는건 Kotlin/Native 한정으로, Kotlin/JS와 Kotlin/WASM은 Kotlin

    코드를 컴파일해서 나온 JS나 WASM이 .klib에 포함되지 않음. klib: KMP의 라이브러리 형식 Kotlin Source (*.kt) Kotlin IR LLVM IR (*.ll) .klib 실행: konanc <file name>.kt \ –p library Kotlin Source (*.kt) + KMP Library (*.klib) + … LLVM IR (*.ll) LLVM Executables (*.exe, *.kexe, …) 실행: konanc <file name>.kt –l <library name>
  17. Konan으로 네이티브 라이브러리 만들기 // main.kt import platform.posix.printf @kotlinx.cinterop.ExperimentalForeignApi fun

    main() { printf("Hello, %d", my.add(6, 10)) } // add.kt package my fun add(lhs: Int, rhs: Int): Int { return lhs + rhs } 실행: konanc add.kt \ –p library –o my 실행: konanc main.kt –l my.klib \ –o main && main.kexe 1. add.kt로부터 my.klib 파일 생성 2. main.kt와 my.klib로 main.kexe 생성 및 실행
  18. cinterop: C 헤더를 Kotlin 컴파일러가 쓸 수 있게 하자 Kotlin

    IR Other Metadata .klib 실행: cinterop \ –def <file name>.def \ –o <library name> Kotlin Source (*.kt) + KMP Library (*.klib) + … C Header (*.h) LLVM Executables (*.exe, *.kexe, …) 실행: konanc <file name>.kt –l <library name> + LLVM IR (*.ll) 사용법은 거의* 동일 *klib 파일에 헤더 선언만 넣었으므로 정의를 담은 오브젝트 파일을 링크할 필요가 있음
  19. cinterop: C 헤더를 Kotlin 컴파일러가 쓸 수 있게 하자 //

    main.kt import platform.posix.printf @kotlinx.cinterop.ExperimentalForeignApi fun main() { printf("Hello, %d", my.my_add(6, 10)) } // my.h #include <stdint.h> extern int32_t my_add(int32_t lhs, int32_t rhs); // my.c #include <stdint.h> int32_t my_add(int32_t lhs, int32_t rhs) { return lhs + rhs; } # my.def headers = my_add.h package = my 실행: cinterop –def my.def \ –o my –compiler-option –I$(pwd) 실행: clang my.c –c my.o \ && ar rcs libmy.a my.o 1. 헤더로부터 .klib 파일 생성 2. C 정의로부터 오브젝트 파일 및 아카이브 파일 생성 3. my.klib, libmy.a, main.kt를 모두 합쳐 Kotlin과 C를 동시에 쓰는 프로그램 빌드 실행: konanc main.kt \ -l my.klib –o main \ -linker-option –L$(pwd) \ -linker-option –lmy \ && main.kexe
  20. cinterop: C 헤더를 Kotlin 컴파일러가 쓸 수 있게 하자 //

    main.kt import platform.posix.printf @kotlinx.cinterop.ExperimentalForeignApi fun main() { printf("Hello, %d", my.my_add(6, 10)) } // my.h #include <stdint.h> extern int32_t my_add(int32_t lhs, int32_t rhs); // my.c #include <stdint.h> int32_t my_add(int32_t lhs, int32_t rhs) { return lhs + rhs; } # my.def headers = my_add.h package = my 실행: cinterop –def my.def \ –o my –compiler-option –I$(pwd) 실행: clang my.c –c my.o \ && ar rcs libmy.a my.o 1. 헤더로부터 .klib 파일 생성 2. C 정의로부터 오브젝트 파일 및 아카이브 파일 생성 3. my.klib, libmy.a, main.kt를 모두 합쳐 Kotlin과 C를 동시에 쓰는 프로그램 빌드 실행: konanc main.kt \ -l my.klib –o main \ -linker-option –L$(pwd) \ -linker-option –lmy \ && main.kexe
  21. cinterop: C 헤더를 Kotlin 컴파일러가 쓸 수 있게 하자 Kotlin/Native

    프로그램에서 C 함수를 성공적으로 호출한 모습
  22. • C는 함수의 선언과 정의를 분리할 수 있는 언어 •

    함수의 선언: 함수의 시그니처만 포함 • 함수의 정의: 시그니처와 body를 둘 다 포함 • Java에서 .java 파일 하나에 .class 파일 하나가 나오는 것처럼 (nested class가 없는 경우) C에서도 .c 파일 하나에 .o (윈도 VC++는 .obj) 파일 하나가 생성됨 • 함수 호출 → .o 파일에 그 함수를 쓴다는 표시만 하고, 실제 함수 내용물은 포함 x • 컴파일 결과들을 모아 최종적인 실행 파일로 만드는 ʻ링크’ 과정을 거쳐야 함 • .o 파일이 누락되면 undefined symbols error가 발생 • Java에서 .class 파일이 누락되면 NoClassDefFoundError가 발생하는 것과 비슷 cinterop으로 klib에 정적 아카이브 포함시키기
  23. cinterop으로 klib에 정적 아카이브 포함시키기 my.c my_add() my.o my_add() libmy.a

    my.h my_add() Kotlin IR my_add() my.c와 my.o는 my_add()가 무슨 일을 하는 함수인지 알지만 my.h와 my.klib, main.kt는 my_add()의 존재만 알고 무슨 일을 하는 함수인지 모름 my.klib my_add() main.ll main() my_add() + main.kexe main() my_add() Kotlin IR main() my_add() main.kt main() my_add() 만약 여기서 libmy.a를 넣지 않는다면? → my_add()의 내용물이 없으므로 링커 오류 .a 파일 = .o 파일을 여러개 담을 수 있는 파일
  24. • cinterop def 파일에 헤더 파일만 집어넣으면 라이브러리를 쓰는 쪽에서

    별도로 라이 브러리를 추가로 링크해야하는 문제 발생 • def 파일에 헤더 뿐만 아니라 아카이브 파일을 넣을 수 있음 → 라이브러리 사용자가 .klib 파일만 가지고 있어도 C 라이브러리를 사용할 수 있음 cinterop으로 klib에 정적 아카이브 포함시키기
  25. cinterop으로 klib에 정적 아카이브 포함시키기 // main.kt import platform.posix.printf @kotlinx.cinterop.ExperimentalForeignApi

    fun main() { printf("Hello, %d", my.my_add(6, 10)) } // my.h #include <stdint.h> extern int32_t my_add(int32_t lhs, int32_t rhs); // my.c #include <stdint.h> int32_t my_add(int32_t lhs, int32_t rhs) { return lhs + rhs; } # my.def headers = my_add.h package = my staticLibraries = libmy.a # 이 줄이 추가됨 실행: cinterop –def my.def \ –o my –compiler-option –I$(pwd) \ -libraryPath $(pwd) 실행: clang my.c –c my.o \ && ar rcs libmy.a my.o 2. 헤더와 아카이브로부터 .klib 파일 생성 1. C 정의로부터 오브젝트 파일 및 아카이브 파일 생성 3. libmy.a 없이 my.klib, main.kt를 합쳐 Kotlin과 C를 동시에 쓰는 프로그램 빌드 실행: konanc main.kt \ -l my.klib –o main \ && main.kexe
  26. cinterop으로 klib에 정적 아카이브 포함시키기 my.c my_add() my.o my_add() libmy.a

    my.h my_add() Kotlin IR my_add() my.klib my_add() main.ll main() my_add() + main.kexe main() my_add() Kotlin IR main() my_add() main.kt main() my_add() my.klib가 libmy.a를 포함하고 있으므로 링커 오류가 발생하지 않음
  27. Konan properties: 컴파일러 기본 설정 목록 linkerKonanFlags.macos_arm64 → 애플 실리콘

    맥 타겟 빌드 시 링커에 자동으로 넘겨지는 인자 목록 // main.kt import platform.posix.printf @kotlinx.cinterop.ExperimentalForeignApi fun main() { printf("Hello, %s", "world!") } 실행: # -lc++이 빠짐 konanc main.kt \ "-Xoverride-konan-properties=linkerKonanFlags.macos_arm64=\ -lSystem -lobjc -framework Foundation"
  28. • 다른 언어의 class = Objecive-C의 interface • 다른 언어의

    interface = Objective-C의 protocol • C의 수퍼셋 (superset) → 잘 돌아가는 C 코드라면 Objective-C 에서도 작동한다 • C에다가 런타임 타입 정보가 있는 객체지향을 얹은 언어 Objective-C #import <Foundation/Foundation.h> @interface Foo : NSObject @property int value; - (void)func; @end int main() { Foo* foo = [Foo new]; [foo setValue:5]; [foo func]; } @implementation Foo - (void)func { NSLog(@"I have %d", self.value); } @end
  29. Objective-C의 정체 Foo* foo = [Foo new]; [foo setValue:5]; Class

    Foo = objc_getClass("Foo"); SEL new_selector = NSSelectorFromString(@"new"); id foo = objc_msgSend(Foo, new_selector); SEL setValue_selector = NSSelectorFromString(@"setValue"); objc_msgSend(foo, setValue_selector, 5); • Objective-C 전용 문법은 C로 만들어진 Objective-C 런타임 함수 호출로 번역됨 • C 함수 호출이 가능하다면 어떤 언어에서든 Objective-C 클래스 생성/호출 가능 * Selector는 컴파일 시 별도 테이블이 생성되므로, 아래 코드보다 위 코드의 속도가 더 빠름. 아래 코드는 일종의 비유로, 완전히 같은 기계어를 생성하는 코드가 아님.
  30. • 기계어 수준에서 함수 호출이 일어날 때 호출하는 쪽과 호출당하는

    쪽이 서로 호환되 도록 하는 규약 • 호출 규약: 인자와 반환값을 어떤 방식으로 전달하는가 (레지스터 또는 스택) • 메모리 alignment: 각 타입이 램에 저장되어있을 때, 크기와 주솟값은 어떤 값을 가 져야하는가 • 이름 mangling: 코드 상에서의 함수 명이 기계어 상에선 어떻게 변화하는가 • 규약만 맞추면 서로 다른 언어에서 서로를 호출 가능 • C ABI만 맞추면 Kotlin/Native와 Obj-C에서 서로를 호출 가능 ABI: Application Binary Interface * Objective-C의 ABI는 기본적으로 C ABI를 따르고, exception을 처리하기 위한 Itanium C++ ABI를 추가로 사용함.
  31. • cinterop도 Objective-C 코드를 인식한다. • Kotlin에서 Objective-C 인터페이스와 프로토콜을

    상속/구현할 수 있다. • Objective-C에서 Kotlin 클래스와 인터페이스를 상속/구현할 수 있다. Kotlin/Native의 Objective-C 상호운용성
  32. • 객체를 가리키는 참조가 하나 생기면 객체 내부 RC가 1

    증가함 • 객체를 더 이상 참조하지 않게 되면 RC가 1 감소함 • RC가 0인 객체는 자동으로 소멸자(destructor) 호출 • Destructor가 호출되는 시점이 deterministic하다. ARC: Automatic Reference Counting * Destructor와 finalizer (Mark-and-sweep GC가 달린 언어에서 사용되는 그 개념) 모두 소멸자로 번역되니 잘 구분할 필요가 있다.
  33. ARC: Automatic Reference Counting Obj-C Interface Count: 1 Stack Thread

    #1 Obj-C Interface Count: 1 Obj-C Interface Count: 1
  34. ARC: Automatic Reference Counting Obj-C Interface Count: 2 Stack Thread

    #1 Obj-C Interface Count: 1 Obj-C Interface Count: 1 Stack Thread #2
  35. ARC: Automatic Reference Counting Obj-C Interface Count: 1 Stack Thread

    #1 Obj-C Interface Count: 1 Obj-C Interface Count: 1
  36. ARC + GC: Kotlin에서 Obj-C를 사용할 때 Kotlin Object Obj-C

    Interface Count: 1 Obj-C Interface Count: 1 Obj-C Interface Count: 1 Stack Thread #1 GC Root
  37. ARC + GC: Kotlin에서 Obj-C를 사용할 때 Kotlin Object Mark:

    True Obj-C Interface Count: 1 Obj-C Interface Count: 1 Obj-C Interface Count: 1 Stack Thread #1 GC Stop-the-world 발생 GC Root
  38. ARC + GC: Kotlin에서 Obj-C를 사용할 때 Kotlin Object Obj-C

    Interface Count: 1 Obj-C Interface Count: 1 Obj-C Interface Count: 1
  39. ARC + GC: Kotlin에서 Obj-C를 사용할 때 Kotlin Object Mark:

    false Obj-C Interface Count: 1 Obj-C Interface Count: 1 Obj-C Interface Count: 1 GC Stop-the-world 발생
  40. ARC + GC: Kotlin에서 Obj-C를 사용할 때 Obj-C Interface Count:

    0 Obj-C Interface Count: 1 Obj-C Interface Count: 1 Objective-C 인터페이스의 소멸자 호출이 Non-deterministic해진다. Objective-C 객체를 원하는 시점에 파괴하기 위해서 autoreleasepool을 사용해야한다.
  41. ARC + GC: Obj-C에서 Kotlin을 사용할 때 Obj-C Interface Count:

    1 Obj-C Interface Count: 1 Obj-C Interface Count: 1 Stack Thread #1 Kotlin Object GC Root
  42. ARC + GC: Obj-C에서 Kotlin을 사용할 때 Obj-C Interface Count:

    1 Obj-C Interface Count: 1 Obj-C Interface Count: 1 Stack Thread #1 Kotlin Object Mark: True GC Root GC Stop-the-world 발생
  43. ARC + GC: Obj-C에서 Kotlin을 사용할 때 Obj-C Interface Count:

    0 Obj-C Interface Count: 1 Obj-C Interface Count: 1 Kotlin Object GC Root
  44. ARC + GC: Obj-C에서 Kotlin을 사용할 때 Obj-C Interface Count:

    0 Obj-C Interface Count: 0 Obj-C Interface Count: 0 Kotlin Object GC Root
  45. • iOS 앱을 개발할 때 반드시 직간접적으로 쓰는 API §

    안드로이드에 android.view.View가 있다면 iOS에는 UIView와 UIViewController가 있다. • UIView와 UIViewController 모두 Objective-C 인터페이스 § SwiftUI도 iOS에서 내부적으로 UIKit 을 활용 § Flutter도 내부적으로 FlutterViewController라는 인터페이스가 있음 § React Native도 기술 특성 상 iOS에서 여러가지 UIView의 서브클래스를 구현하고 있음 § CMP도 ComposeHostingViewController라는 서브클래스를 구현하고 있음 → 이것이 fun ComposeUIViewController()이 반환하는 클래스 UIKit: iOS의 핵심 UI API
  46. iOS 애플리케이션의 기본 구조 • .app 확장자를 가지는 디렉토리 안에

    여러 파일이 들어있는 구조 • Info.plist: 앱의 여러 메타데이터를 담는 파일 (AndroidManifest.xml과 비슷) • 유닉스 실행 파일: main() 함수를 담고 있는 기계어 파일 • _CodeSignature: 앱 서명 • embedded.mobileprovision: 앱을 정해진 기기에 설치할 수 있게 authorize해주는 파일 • 유닉스 실행 파일을 순수 Kotlin으로 만들 수 있다!
  47. 순수 Kotlin/Native로 iOS 네이티브 앱 만들기 import kotlinx.cinterop.* import platform.Foundation.*

    import platform.UIKit.* @OptIn(ExperimentalForeignApi::class, BetaInteropApi::class) fun main(args: Array<String>) { memScoped { autoreleasepool { UIApplicationMain( argc = args.size, argv = ..., principalClassName = null, delegateClassName = NSStringFromClass(AppDelegate) ) } } } * argc/argv 넘기는 부분은 예시의 간결함을 위해 생략함
  48. 순수 Kotlin/Native로 iOS 네이티브 앱 만들기 import kotlinx.cinterop.* import platform.Foundation.*

    import platform.UIKit.* @OptIn(ExperimentalForeignApi::class, BetaInteropApi::class) fun main(args: Array<String>) { memScoped { autoreleasepool { UIApplicationMain( argc = args.size, argv = null, principalClassName = null, delegateClassName = NSStringFromClass(AppDelegate) ) } } } 직접 구현해야하는 클래스 C의 main함수와 동일 * argc/argv 넘기는 부분은 예시의 간결함을 위해 생략함
  49. 순수 Kotlin/Native로 iOS 네이티브 앱 만들기 @OptIn(ExperimentalForeignApi::class, BetaInteropApi::class) @ExportObjCClass class

    AppDelegate : UIResponder, UIApplicationDelegateProtocol { override fun window(): UIWindow? = _window override fun setWindow(window: UIWindow?) { _window = window } private var _window: UIWindow? = null // 없으면 UIApplicationMain에서 터짐 @ObjCObjectBase.OverrideInit constructor() : super() override fun application( application: UIApplication, didFinishLaunchingWithOptions: Map<Any?, *>?, ): Boolean { val screenBounds = UIScreen.mainScreen.bounds val window = UIWindow(frame = screenBounds) val viewController = UIViewController() window.rootViewController = viewController window.makeKeyAndVisible() _window = window return true } // 없으면 NSStringFromClass에 안 들어감 companion object : UIResponderMeta(), UIApplicationDelegateProtocolMeta } 앱 launch가 완료됐을 때 Android의 onCreate()와 비슷
  50. 순수 Kotlin/Native로 iOS 네이티브 앱 만들기 override fun application( application:

    UIApplication, didFinishLaunchingWithOptions: Map<Any?, *>?, ): Boolean { val screenBounds = UIScreen.mainScreen.bounds val window = UIWindow(frame = screenBounds) val viewController = UIViewController() window.rootViewController = viewController window.makeKeyAndVisible() _window = window return true }
  51. 순수 Kotlin/Native로 iOS 네이티브 앱 만들기 override fun application( application:

    UIApplication, didFinishLaunchingWithOptions: Map<Any?, *>?, ): Boolean { val screenBounds = UIScreen.mainScreen.bounds val window = UIWindow(frame = screenBounds) val viewController = UIViewController() viewController.view.backgroundColor = UIColor.whiteColor val label = UILabel(frame = viewController.view.bounds) label.text = "Hello, world!" label.textAlignment = NSTextAlignmentCenter label.font = UIFont.systemFontOfSize(32.0, weight = UIFontWeightBold) label.autoresizingMask = UIViewAutoresizingFlexibleWidth or UIViewAutoresizingFlexibleHeight window.rootViewController = viewController window.makeKeyAndVisible() _window = window return true } 앱 launch가 완료됐을 때 1. 배경을 흰색으로 변경 2. “Hello, world!” 가 담겨있는 UILabel 추가하기
  52. 순수 Kotlin/Native로 iOS 네이티브 앱 만들기 <?xml version="1.0" encoding="UTF-8"?> <!DOCTYPE

    plist PUBLIC "-//Apple//DTD PLIST 1.0//EN" "http://www.apple.com/DTDs/PropertyList-1.0.dtd"> <plist version="1.0"> <dict> <key>CFBundleExecutable</key><string>MyApp.kexe</string> <key>CFBundleIdentifier</key><string>dev.paxbun.myapp</string> <key>CFBundleName</key><string>MyApp</string> <key>CFBundlePackageType</key><string>APPL</string> <key>CFBundleVersion</key><string>1</string> <key>CFBundleShortVersionString</key><string>1.0</string> <key>UIApplicationSceneManifest</key> <dict> <key>UIApplicationSupportsMultipleScenes</key><false/> </dict> </dict> </plist>
  53. 순수 Kotlin/Native로 iOS 네이티브 앱 만들기 <?xml version="1.0" encoding="UTF-8"?> <!DOCTYPE

    plist PUBLIC "-//Apple//DTD PLIST 1.0//EN" "http://www.apple.com/DTDs/PropertyList-1.0.dtd"> <plist version="1.0"> <dict> <key>CFBundleExecutable</key><string>MyApp.kexe</string> <key>CFBundleIdentifier</key><string>dev.paxbun.myapp</string> <key>CFBundleName</key><string>MyApp</string> <key>CFBundlePackageType</key><string>APPL</string> <key>CFBundleVersion</key><string>1</string> <key>CFBundleShortVersionString</key><string>1.0</string> <key>UIApplicationSceneManifest</key> <dict> <key>UIApplicationSupportsMultipleScenes</key><false/> </dict> </dict> </plist> Kotlin/Native 빌드 결과 파일의 이름 런처에서 사용자에게 표시될 이름 앱 식별자
  54. 순수 Kotlin/Native로 iOS 네이티브 앱 만들기 실행: # MyApp.app 생성

    mkdir –p MyApp.app 실행: # main.kt로부터 유닉스 실행파일 생성 konanc main.kt -target ios_simulator_arm64 -o MyApp -linker-options "- framework UIKit -framework Foundation" 실행: # Info.plist와 유닉스 실행파일을 MyApp.app에 복사 cp Info.plist MyApp.kexe MyApp.app 실행: # MyApp.app 서명 codesign -s - --force --deep MyApp.app * AppStore Connect에서 provisioning profile을 다운받아야 실제 기기에 설치 가능; 이번 발표에선 생략 실행: # 현재 실행 중인 simulator에 MyApp.app 설치 xcrun simctl install booted MyApp.app
  55. • Android, Chromium, CMP가 2D 그래픽스를 위해 사용하는 C++ 라이브러리

    • Flutter도 Impeller라는 자체 그래픽스 엔진을 만들기 전엔 Skia를 사용했었음 • Android가 아닌 플랫폼에서도 Kotlin으로 Skia를 사용하기 위해 JetBrains에서 Skiko라는 라이브러리를 개발 중 • CMP는 Skiko 기반으로 만들어짐 Skia: 2D 그래픽스 라이브러리
  56. • Skiko를 통해 렌더 명령을 기록할 수 있는 PictureRecorder를 생성

    • PictureRecorder를 통해 Canvas 객체 가져오기 • CMP에서 Canvas를 통해 렌더 작업 수행 • ComposeHostingViewController가 가지고 있는 CAMetalLayer로부터 Skia 렌더 타겟을 생성 • Canvas에 기록된 렌더 결과를 렌더 타겟에 표시 CMP가 iOS에서 UI를 그리는 과정
  57. CMP가 iOS에서 UI를 그리는 과정 ComposeHostingViewController : UIViewController ComposeContainer ComposeSceneMediator

    - fun render(Canvas, …) ComposeContainerView : UIView UIKitInteropContainer - overlayView: UIView - backgroundView: UIView MetalView : UIView - layer: CAMetalLayer - fun render(SkCanvas, …) UIKitInteropContainer.overlayView UIKitInteropContainer.backgroundView Subviews * Compose Multiplatform 1.10 기준 ** 일부 생략된 클래스 있음 ComposeScene - fun setContent(@Composable)
  58. CMP가 iOS에서 UI를 그리는 과정 ComposeHostingViewController : UIViewController ComposeContainer ComposeSceneMediator

    - fun render(Canvas, …) ComposeContainerView : UIView UIKitInteropContainer - overlayView: UIView - backgroundView: UIView MetalView : UIView - layer: CAMetalLayer - fun render(SkCanvas, …) UIKitInteropContainer.overlayView UIKitInteropContainer.backgroundView Subviews ComposeScene - fun setContent(@Composable) 실제 렌더링 결과가 그려지는 UIView fun ComposeUIViewController()가 반환하는 것 * Compose Multiplatform 1.10 기준 ** 일부 생략된 클래스 있음
  59. CMP가 iOS에서 UI를 그리는 과정 ComposeHostingViewController : UIViewController ComposeContainer ComposeSceneMediator

    - fun render(Canvas, …) ComposeContainerView : UIView UIKitInteropContainer - overlayView: UIView - backgroundView: UIView MetalView : UIView - layer: CAMetalLayer - fun render(SkCanvas, …) UIKitInteropContainer.overlayView UIKitInteropContainer.backgroundView Subviews ComposeScene - fun setContent(@Composable) ComposeHostingViewController.view 는 ComposeContainerView 반환 * Compose Multiplatform 1.10 기준 ** 일부 생략된 클래스 있음
  60. CMP가 iOS에서 UI를 그리는 과정 ComposeHostingViewController : UIViewController ComposeContainer ComposeSceneMediator

    - fun render(Canvas, …) ComposeContainerView : UIView UIKitInteropContainer - overlayView: UIView - backgroundView: UIView MetalView : UIView - layer: CAMetalLayer - fun render(SkCanvas, …) UIKitInteropContainer.overlayView UIKitInteropContainer.backgroundView Subviews ComposeScene - fun setContent(@Composable) ComposeContainer에서 Canvas.asComposeCanvas() 로 Skia Canvas를 Compose Canvas로 변환 Canvas는 @Composable를 가지는 ComposeScene에 전달됨 * Compose Multiplatform 1.10 기준 ** 일부 생략된 클래스 있음
  61. • UIView 또는 UIViewController를 CMP 뷰 밑에 삽입해주는 @Composable 함수들을

    포함하고 있음 • fun <T : UIView> UIKitView(…) • fun <T : UIViewController> UIKitViewController(…) • 삽입된 UIView는 해당 위치에서의 LayoutNode와 항상 같은 크기와 위치를 가지게 됨 • CMP 1.9 이하 기준, 넘겨진 UIView와 UIViewController는 MetalView 아래에 삽입됨 androidx.compose.ui.viewinterop * LayoutNode: Box, Column, Row 같은 친구들
  62. androidx.compose.ui.viewinterop 악보: 별도의 CAMetalLayer를 가지는 UIView 커서: Compose로 그린 요소

    영상: AVPlayerView 영상 위 누른 키 표시: Compose로 그린 요소
  63. androidx.compose.ui.viewinterop ComposeHostingViewController : UIViewController ComposeContainer ComposeSceneMediator - fun render(Canvas, …)

    ComposeContainerView : UIView UIKitInteropContainer - overlayView: UIView - backgroundView: UIView MetalView : UIView - layer: CAMetalLayer - fun render(SkCanvas, …) UIKitInteropContainer.overlayView UIKitInteropContainer.backgroundView Subviews ComposeScene - fun setContent(@Composable) ComposeSceneMediator는 UIKitInteropContainer를 CompositionLocal로 삽입 전달된 UIView는 backgroundView의 subview로 삽입됨 * Compose Multiplatform 1.10 기준 ** 일부 생략된 클래스 있음 UIKitView 와 UIKitViewController 안에서 CompositionLocal로 컨테이너를 가져와 UIView 또는 UIViewController삽입
  64. • CMP 1.10부터, 삽입된 UIView를 MetalView보다 위에 삽입할 수 있게

    됨 • class UIKitInteropProperties(…, val placedAsOverlay: Boolean) • fun <T> UIKitView(…, UIKitInteropProperties) • fun <T> UIKitViewController(…, UIKitInteropProperties) • placedAsOverlay의 기본값은 false → 기존처럼 아래에 삽입 • true면 기존과 달리 Compose에서 렌더된 결과를 가리게 됨 androidx.compose.ui.viewinterop
  65. androidx.compose.ui.viewinterop ComposeHostingViewController : UIViewController ComposeContainer ComposeSceneMediator - fun render(Canvas, …)

    ComposeContainerView : UIView UIKitInteropContainer - overlayView: UIView - backgroundView: UIView MetalView : UIView - layer: CAMetalLayer - fun render(SkCanvas, …) UIKitInteropContainer.overlayView UIKitInteropContainer.backgroundView Subviews ComposeScene - fun setContent(@Composable) ComposeSceneMediator는 UIKitInteropContainer를 CompositionLocal로 삽입 placedAsOverlay = false * Compose Multiplatform 1.10 기준 ** 일부 생략된 클래스 있음 placedAsOverlay = true UIKitView 와 UIKitViewController 안에서 CompositionLocal로 컨테이너를 가져와 UIView 또는 UIViewController삽입
  66. 예시: WKWebView 연동 @Composable fun WebView(url: String, modifier: Modifier) {

    UIKitView( factory = { WKWebView().apply { backgroundColor = UIColor.clearColor loadRequest(NSURLRequest(NSURL(string = url))) } }, modifier = modifier, update = { webView -> webView.loadRequest(NSURLRequest(NSURL(string = url))) }, ) } 사용법 자체는 AndroidView와 유사
  67. • viewinterop API들은 UIView를 LayoutNode와 섞기 위한 도구들 • 화면을

    아예 가리는 Bottom Sheet, Alert 등을 표시할 때는 다른 방법을 사용해야 함 viewinterop 없이 UIKit 연동이 필요한 시나리오 * LayoutNode: Box, Column, Row 같은 친구들
  68. @Composable fun AlertDialog(title: String, message: String, confirmTitle: String, onConfirm: ()

    -> Unit) { val uiViewController = LocalUIViewController.current DisposableEffect(Unit) { val alertController = UIAlertController.alertControllerWithTitle( title, message, UIAlertControllerStyleAlert ) alertController.addAction( UIAlertAction.actionWithTitle( title = confirmTitle, style = UIAlertActionStyleDefault, handler = { onConfirm() }, ) ) uiViewController.presentViewController( alertController, animated = true, completion = null, ) onDispose { alertController.dismissModalViewControllerAnimated(animated = true) } } } 예시: UIAlertController 연동
  69. @Composable fun AlertDialog(title: String, message: String, confirmTitle: String, onConfirm: ()

    -> Unit) { val uiViewController = LocalUIViewController.current DisposableEffect(Unit) { val alertController = UIAlertController.alertControllerWithTitle( title, message, UIAlertControllerStyleAlert ) alertController.addAction( UIAlertAction.actionWithTitle( title = confirmTitle, style = UIAlertActionStyleDefault, handler = { onConfirm() }, ) ) uiViewController.presentViewController( alertController, animated = true, completion = null, ) onDispose { alertController.dismissModalViewControllerAnimated(animated = true) } } } 예시: UIAlertController 연동
  70. 예시: UIAlertController 연동 ComposeHostingViewController : UIViewController ComposeContainer ComposeSceneMediator - fun

    render(Canvas, …) ComposeContainerView : UIView UIKitInteropContainer - overlayView: UIView - backgroundView: UIView MetalView : UIView - layer: CAMetalLayer - fun render(SkCanvas, …) UIKitInteropContainer.overlayView UIKitInteropContainer.backgroundView Subviews ComposeScene - fun setContent(@Composable) fun ComposeUIViewController()가 반환하는 것 = LocalUIViewController.current가 반환하는 것 * Compose Multiplatform 1.10 기준 ** 일부 생략된 클래스 있음
  71. @Composable fun AlertDialog(title: String, message: String, confirmTitle: String, onConfirm: ()

    -> Unit) { val uiViewController = LocalUIViewController.current DisposableEffect(Unit) { val alertController = UIAlertController.alertControllerWithTitle( title, message, UIAlertControllerStyleAlert ) alertController.addAction( UIAlertAction.actionWithTitle( title = confirmTitle, style = UIAlertActionStyleDefault, handler = { onConfirm() }, ) ) uiViewController.presentViewController( alertController, animated = true, completion = null, ) onDispose { alertController.dismissModalViewControllerAnimated(animated = true) } } } 예시: UIAlertController 연동 ComposeHostingViewController에 UIAlertController 표시
  72. @Composable fun AlertDialog(title: String, message: String, confirmTitle: String, onConfirm: ()

    -> Unit) { val uiViewController = LocalUIViewController.current DisposableEffect(Unit) { val alertController = UIAlertController.alertControllerWithTitle( title, message, UIAlertControllerStyleAlert ) alertController.addAction( UIAlertAction.actionWithTitle( title = confirmTitle, style = UIAlertActionStyleDefault, handler = { onConfirm() }, ) ) uiViewController.presentViewController( alertController, animated = true, completion = null, ) onDispose { alertController.dismissModalViewControllerAnimated(animated = true) } } } 예시: UIAlertController 연동 AlertDialog가 dispose 되면 자동으로 UIAlertController가 닫히도록 설정
  73. @Composable fun AlertDialog(title: String, message: String, confirmTitle: String, onConfirm: ()

    -> Unit) { val uiViewController = LocalUIViewController.current DisposableEffect(Unit) { val alertController = UIAlertController.alertControllerWithTitle( title, message, UIAlertControllerStyleAlert ) alertController.addAction( UIAlertAction.actionWithTitle( title = confirmTitle, style = UIAlertActionStyleDefault, handler = { onConfirm() }, ) ) uiViewController.presentViewController( alertController, animated = true, completion = null, ) onDispose { alertController.dismissModalViewControllerAnimated(animated = true) } } } 예시: UIAlertController 연동 onConfirm이 변하면? 변해도 이미 이전에 캡처된 변하기 전의 onConfirm이 호출
  74. @Composable fun AlertDialog(title: String, message: String, confirmTitle: String, onConfirm: ()

    -> Unit) { val rememberedOnConfirm by rememberUpdatedState(onConfirm) val uiViewController = LocalUIViewController.current DisposableEffect(Unit) { val alertController = UIAlertController.alertControllerWithTitle( title, message, UIAlertControllerStyleAlert ) alertController.addAction( UIAlertAction.actionWithTitle( title = confirmTitle, style = UIAlertActionStyleDefault, handler = { rememberedOnConfirm() }, ) ) uiViewController.presentViewController( alertController, animated = true, completion = null, ) onDispose { alertController.dismissModalViewControllerAnimated(animated = true) } } } 예시: UIAlertController 연동 onConfirm이 변해도 변한 후의 람다 호출
  75. 예시: UIImagePickerViewController 연동 @Composable fun ImagePicker(onDismiss: () -> Unit, onImage:

    (ByteArray?) -> Unit) { val uiViewController = LocalUIViewController.current DisposableEffect(Unit) { val imagePickerController = UIImagePickerController().apply { sourceType = UIImagePickerControllerSourceTypePhotoLibrary allowsEditing = true delegate = TODO() } uiViewController.presentViewController( imagePickerController, animated = true, completion = null, ) onDispose { imagePickerController.dismissViewControllerAnimated(flag = true) {} } } }
  76. 예시: UIImagePickerViewController 연동 @Composable fun ImagePicker(onDismiss: () -> Unit, onImage:

    (ByteArray?) -> Unit) { val uiViewController = LocalUIViewController.current DisposableEffect(Unit) { val imagePickerController = UIImagePickerController().apply { sourceType = UIImagePickerControllerSourceTypePhotoLibrary allowsEditing = true delegate = TODO() } uiViewController.presentViewController( imagePickerController, animated = true, completion = null, ) onDispose { imagePickerController.dismissViewControllerAnimated(flag = true) {} } } } 이미지 선택 시 또는 취소 시를 핸들링할 delegate를 구현해야 한다
  77. 예시: UIImagePickerViewController 연동 private class ImagePickerDelegate( private val onDismiss: ()

    -> Unit, private val onImage: (ByteArray?) -> Unit, ) : NSObject(), UINavigationControllerDelegateProtocol, UIImagePickerControllerDelegateProtocol { override fun imagePickerControllerDidCancel(picker: UIImagePickerController) { picker.dismissViewControllerAnimated(flag = true) {} onDismiss() } override fun imagePickerController( picker: UIImagePickerController, didFinishPickingMediaWithInfo: Map<Any?, Any?>, ) { picker.dismissViewControllerAnimated(flag = true) {} val uiImage = didFinishPickingMediaWithInfo[UIImagePickerControllerEditedImage] as? UIImage onImage(uiImage?.toByteArray()) } private fun UIImage.toByteArray(): ByteArray? = ... } 취소 시 onDismiss() 호출 성공 시 이미지를 onImage() 에 전달
  78. 예시: UIImagePickerViewController 연동 @Composable fun ImagePicker(onDismiss: () -> Unit, onImage:

    (ByteArray?) -> Unit) { val rememberedOnDismiss by rememberUpdatedState(onDismiss) val rememberedOnImage by rememberUpdatedState(onImage) val uiViewController = LocalUIViewController.current DisposableEffect(Unit) { val imagePickerController = UIImagePickerController().apply { sourceType = UIImagePickerControllerSourceTypePhotoLibrary allowsEditing = true delegate = ImagePickerDelegate( { rememberedOnDismiss() }, { rememberedOnImage(it) }, ) } ... } } 구현 완료?
  79. • 강한 참조 (일반적) → 참조를 들고 있는 곳이 있으면

    객체가 정리되지 않음이 보장 • 약한 참조 → 참조를 들고 있어도 객체가 정리될 수 있다 • 약한 참조는 객체가 살아있는 동안 강한 참조로 변환할 수 있다 • 객체가 이미 정리된 상태에서 강한 참조로 변환을 시도하면 null이 반환됨 • 강한 참조로만 이루어진 사이클이 생기는 경우 ARC에선 메모리 누수 발생 • 메모리 누수를 막기 위해 사이클이 생길만한 곳에서 약한 참조를 사용한다 약한 참조: 참조를 들고 있어도 객체가 정리될 수 있다
  80. 예시: UIImagePickerViewController 연동 @Composable fun ImagePicker(onDismiss: () -> Unit, onImage:

    (ByteArray?) -> Unit) { val rememberedOnDismiss by rememberUpdatedState(onDismiss) val rememberedOnImage by rememberUpdatedState(onImage) val uiViewController = LocalUIViewController.current DisposableEffect(Unit) { val imagePickerController = UIImagePickerController().apply { sourceType = UIImagePickerControllerSourceTypePhotoLibrary allowsEditing = true delegate = ImagePickerDelegate( { rememberedOnDismiss() }, { rememberedOnImage(it) }, ) } ... } } 이 시점에서 ImagePickerDelegate를 들고 있는 곳 - 약한 참조: UIImagePickerController - 강한 참조: 없음 강한 참조를 들고 있는 곳이 없으므로 delegate = … 가 끝나자마자 ImagePickerDelegate는 정리됨
  81. 방법 1: remember 쓰기 @Composable fun ImagePicker(onDismiss: () -> Unit,

    onImage: (ByteArray?) -> Unit) { val rememberedOnDismiss by rememberUpdatedState(onDismiss) val rememberedOnImage by rememberUpdatedState(onImage) val pickerDelegate = remember { ImagePickerDelegate( { rememberedOnDismiss() }, { rememberedOnImage(it) }, ) } val uiViewController = LocalUIViewController.current DisposableEffect(Unit) { val imagePickerController = UIImagePickerController().apply { sourceType = UIImagePickerControllerSourceTypePhotoLibrary allowsEditing = true delegate = pickerDelegate } ... } } Compose가 참조를 들고 있으므로 정리되지 않음이 보장
  82. 방법 2: objc_retain 쓰기 (위험) private class ImagePickerDelegate( private val

    onDismiss: () -> Unit, private val onImage: (ByteArray?) -> Unit, ) : NSObject(), UINavigationControllerDelegateProtocol, UIImagePickerControllerDelegateProtocol { init { objc_retain(objcPtr()) } override fun imagePickerControllerDidCancel(picker: UIImagePickerController) { picker.dismissViewControllerAnimated(flag = true) {} onDismiss() objc_release(objcPtr()) } override fun imagePickerController( picker: UIImagePickerController, didFinishPickingMediaWithInfo: Map<Any?, Any?>, ) { picker.dismissViewControllerAnimated(flag = true) {} val uiImage = didFinishPickingMediaWithInfo[UIImagePickerControllerEditedImage] as? UIImage onImage(uiImage?.toByteArray()) objc_release(objcPtr()) } Delegate의 참조 카운트를 강제로 1 증가 Objective-C 런타임이 강한 참조가 하나 있다고 착각하게 함 다 쓴 후 참조 카운트를 강제로 1 감소 호출하지 않으면 메모리 누수 발생 다 쓴 후 참조 카운트를 강제로 1 감소 호출하지 않으면 메모리 누수 발생
  83. 예시: UIImagePickerViewController 연동 @Composable fun ImagePicker(onDismiss: () -> Unit, onImage:

    (ByteArray?) -> Unit) { val rememberedOnDismiss by rememberUpdatedState(onDismiss) val rememberedOnImage by rememberUpdatedState(onImage) val uiViewController = LocalUIViewController.current DisposableEffect(Unit) { val imagePickerController = UIImagePickerController().apply { sourceType = UIImagePickerControllerSourceTypePhotoLibrary allowsEditing = true delegate = ImagePickerDelegate( { rememberedOnDismiss() }, { rememberedOnImage(it) }, ) } ... } } ImagePickerDelegate의 생성자에서 참조 카운트가 1 증가했으므로 delegate = … 가 지난 후에도 delegate 객체가 살아있음이 보장됨
  84. • Kotlin 컴파일러는 프론트엔드와 백엔드로 이루어져있다. • 프론트엔드는 AST 형태의

    IR을 생성한다. • 백엔드는 IR을 읽어서 각 플랫폼에 맞는 결과물을 생성한다. • Kotlin IR을 읽어서 LLVM IR을 생성하는 기술이 바로 Kotlin/Native • 생성된 LLVM IR은 LLVM의 기능에 따라 각 운영체제 전용 실행 파일로 빌드된다. Kotlin/Native의 동작 원리
  85. • Kotlin/Native 컴파일러를 통해 각 운영체제에 맞는 실행파일을 생성할 수

    있다. • .klib는 KMP 전용 라이브러리 형식이다. • Kotlin/Native 컴파일러로 .klib 파일을 생성할 수 있다. • cinterop을 통해 C 헤더로부터 .klib 파일을 생성할 수 있다. • cinterop을 통해 정적 아카이브를 .klib 파일 안에 넣을 수 있다. • Kotlin/Native 컴파일러에 .klib 파일을 집어넣으면 다른 .kt 파일에서 라이브러리를 사용할 수 있다. • Kotlin/Native도 기계어를 생성하는 기술이기 때문에, 다른 기술과 마찬가지로 링커 오류가 날 수 있다. Kotlin/Native 컴파일러 커맨드라인에서 사용하기
  86. • Objective-C는 C의 수퍼셋 언어이다. • Objective-C의 클래스를 Objective-C 없이

    C 코드만으로 호출할 수 있다. • C ABI만 맞추면 어떤 언어에서든 Objective-C를 사용할 수 있다. • UIKit은 iOS의 핵심 UI API이다. • Kotlin/Native와 UIKit을 사용하면 Swift나 Objective-C 없이 iOS 네이티브 앱을 만들 수 있다. Kotlin/Native + UIKit으로 iOS 앱 만들기
  87. • CMP는 2D 그래픽스를 위해 Skia를 사용한다. • CMP는 iOS에선

    Metal 레이어를 가지는 UIView에 UI를 렌더한다. • CMP는 Metal 레이어 위 아래로 UIView를 추가로 삽입할 수 있는 API를 제공한다. • LocalUIViewController를 통해 화면 전체를 가리는 UIKit API도 사용할 수 있다. • CMP와 UIKit을 연동하면 UI 로직 대부분을 공유하면서도 필요한 곳에선 네이티브 뷰를 사용하는 앱을 쉽게 만들 수 있다. CMP에서 UIKit 잘 연동하기