Upgrade to Pro — share decks privately, control downloads, hide ads and more …

Who And Why Need Photo Retouching

Shelley Morris
September 19, 2019
110

Who And Why Need Photo Retouching

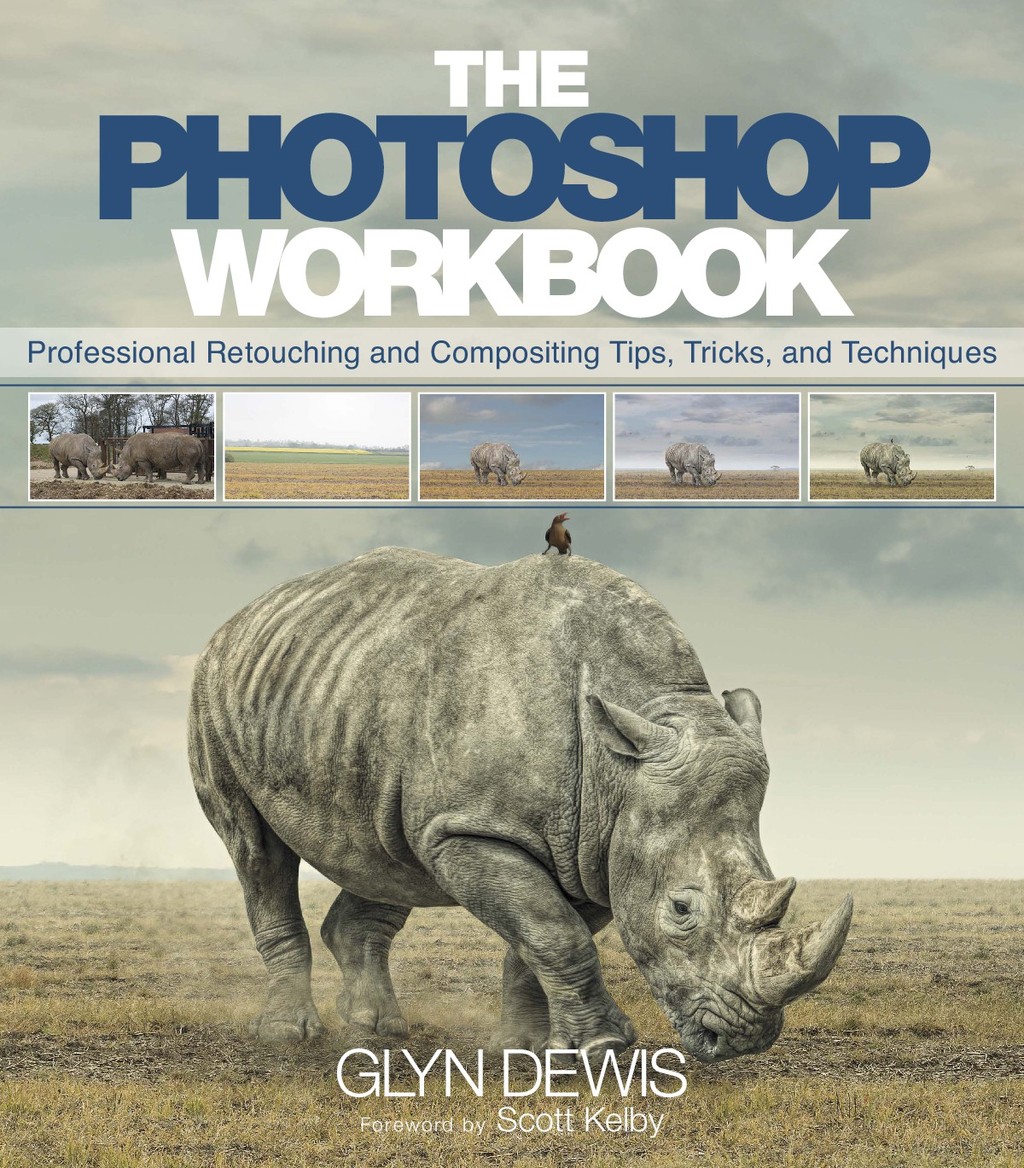
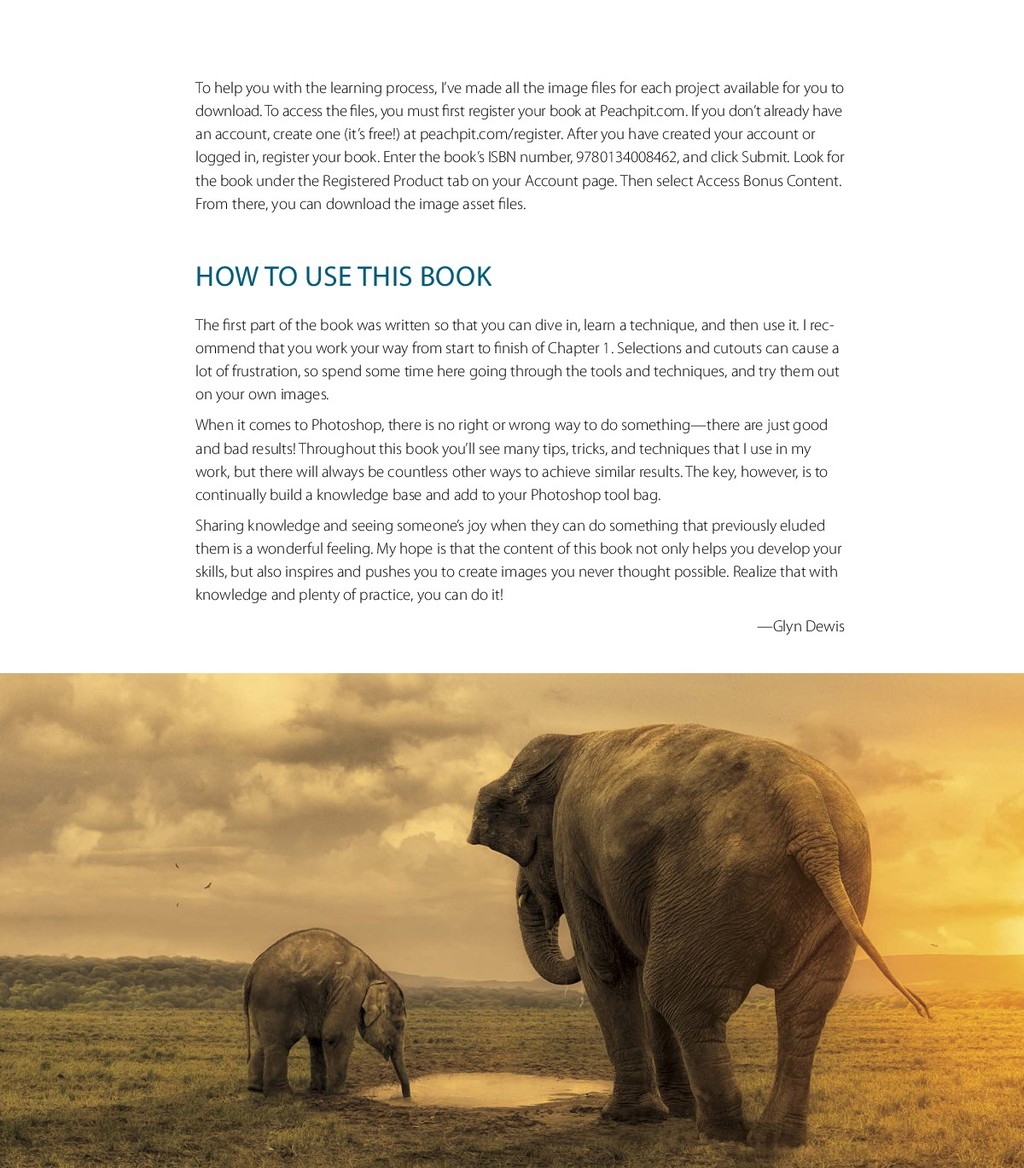
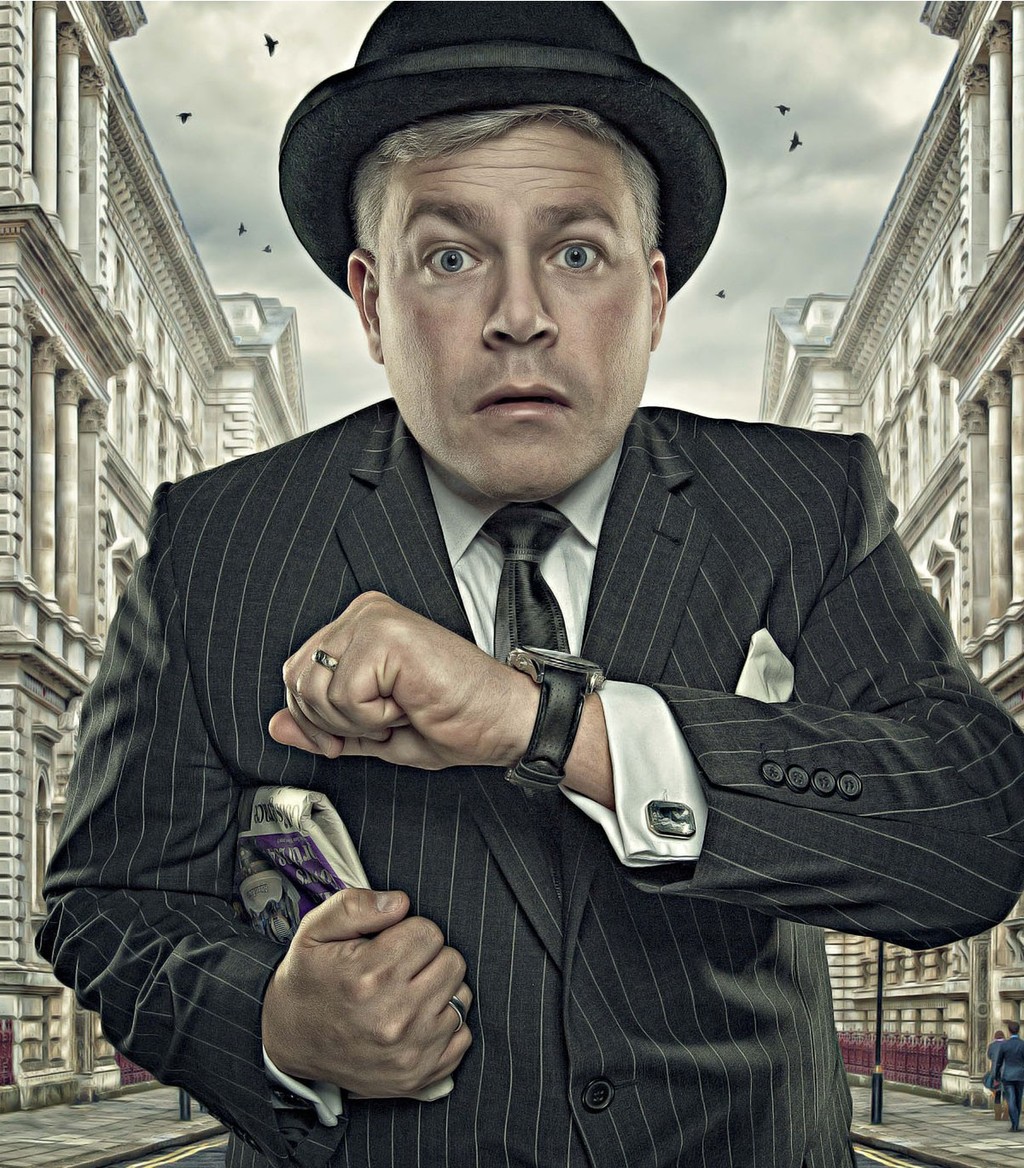
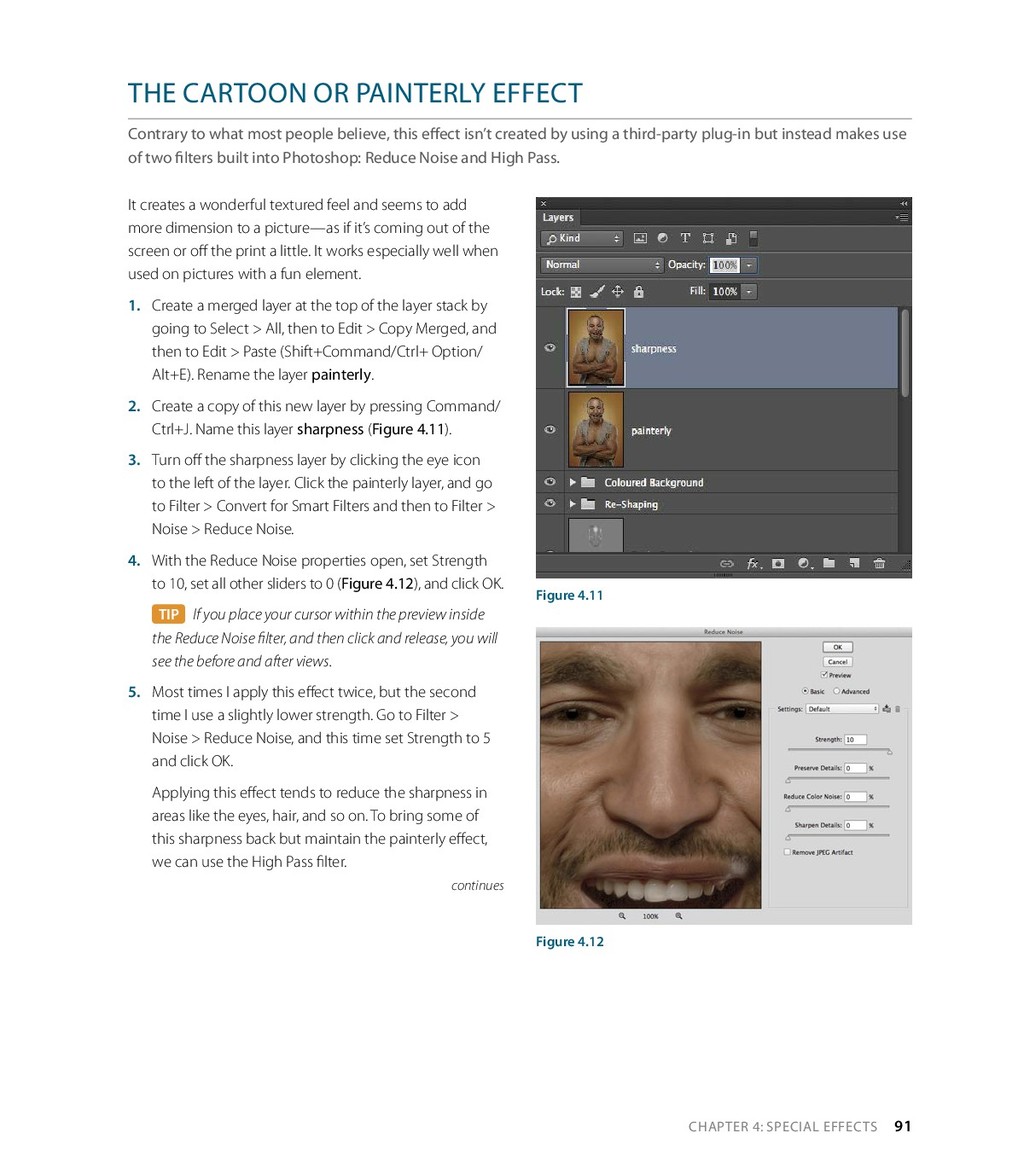
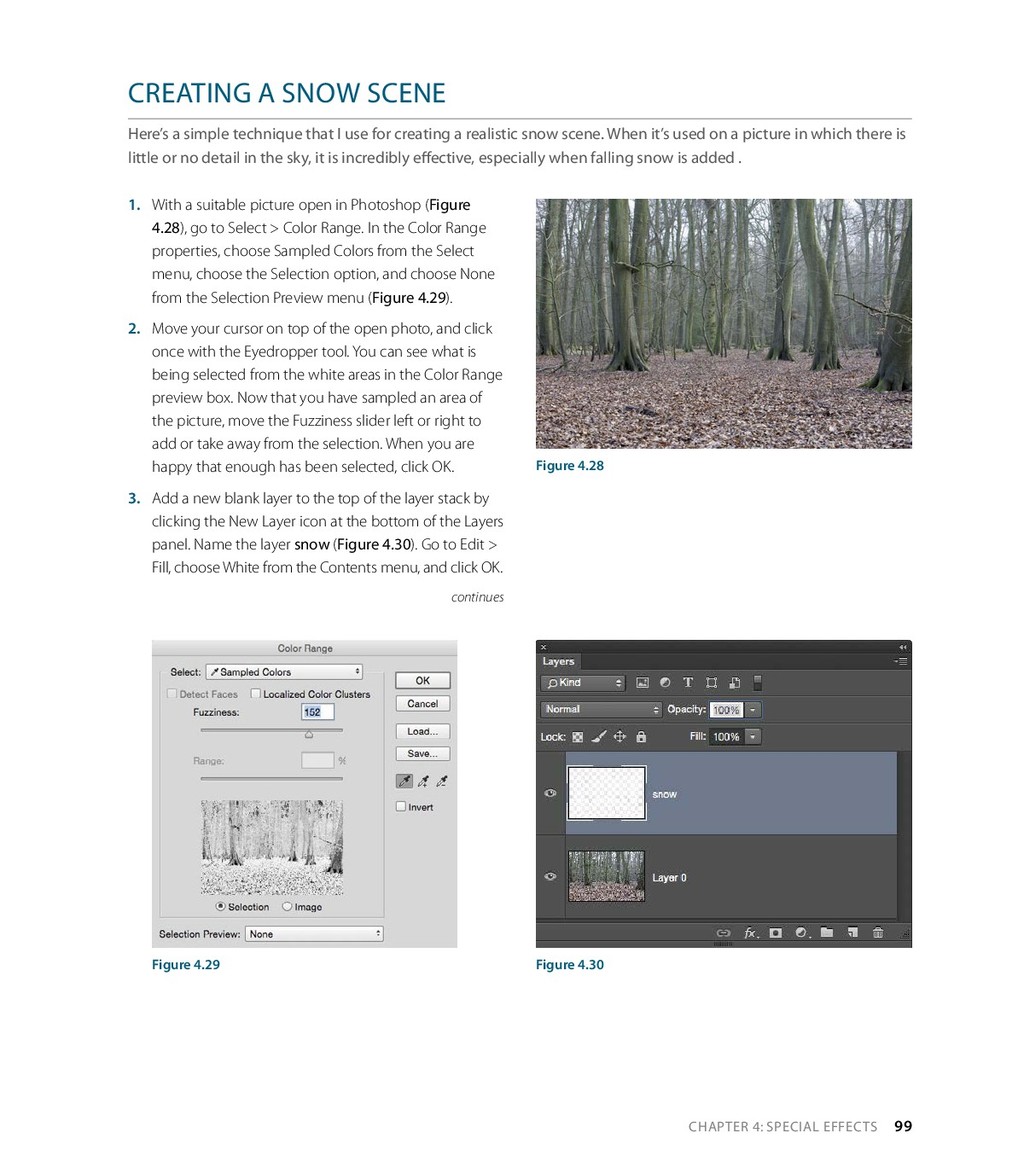
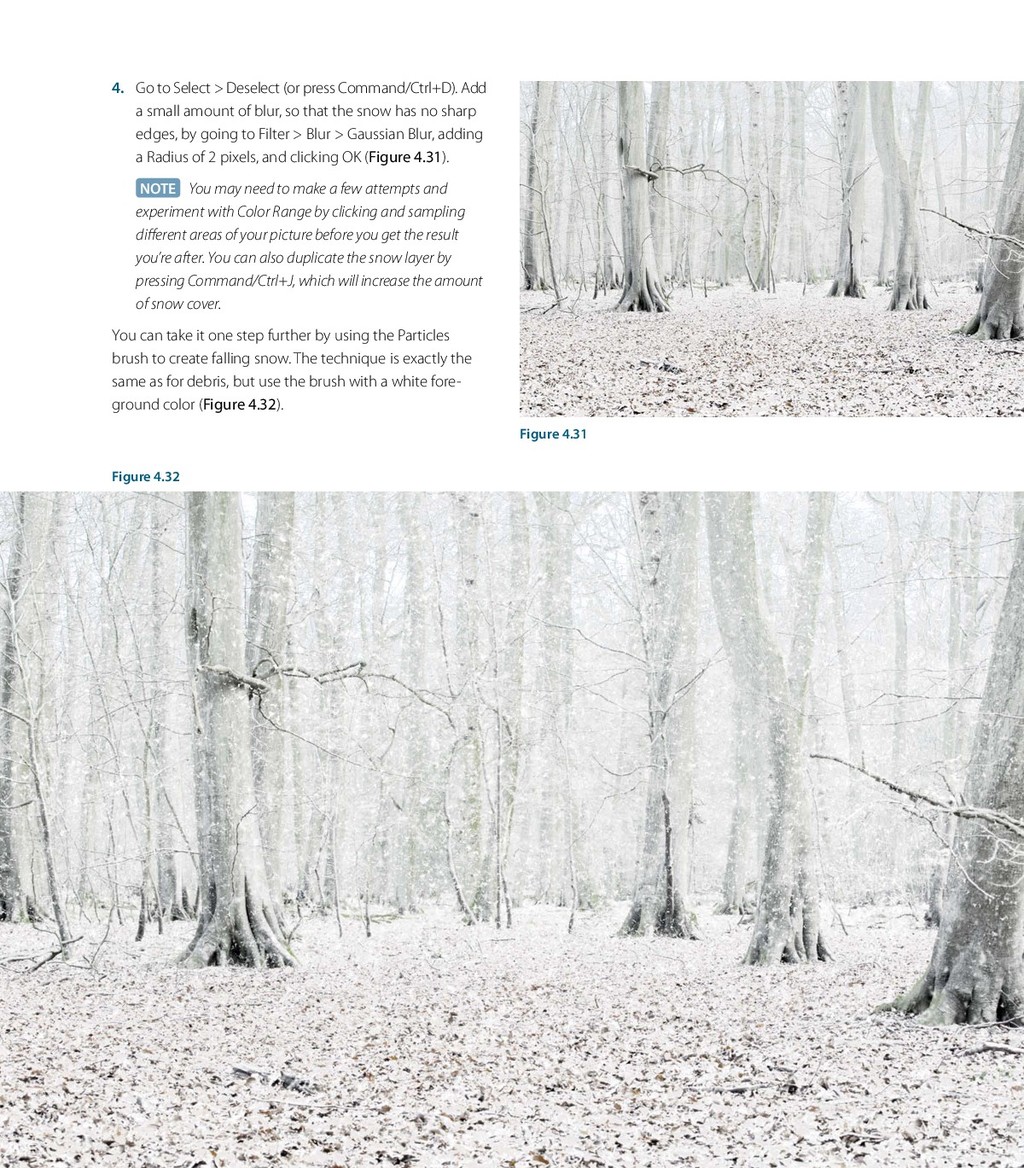
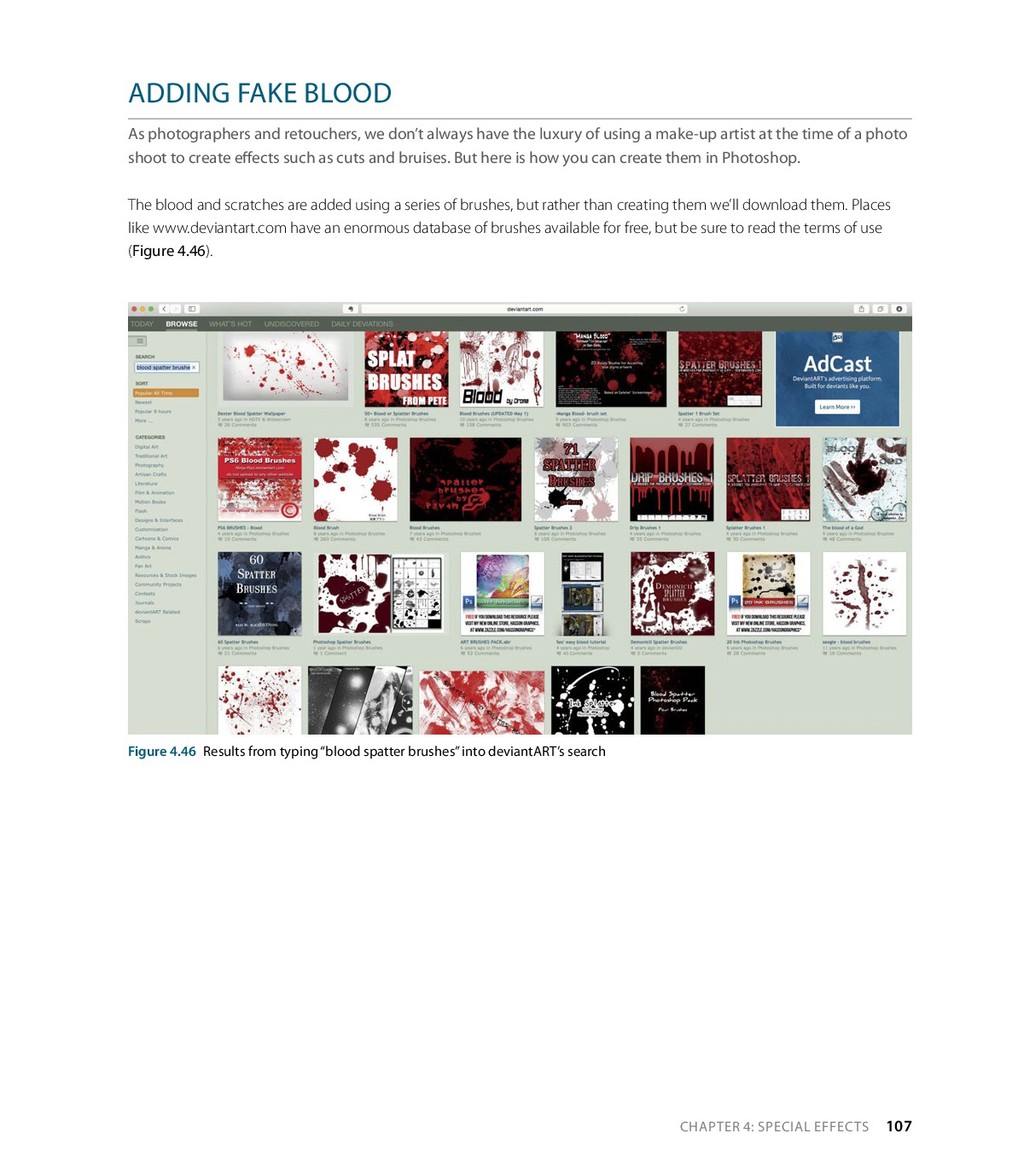
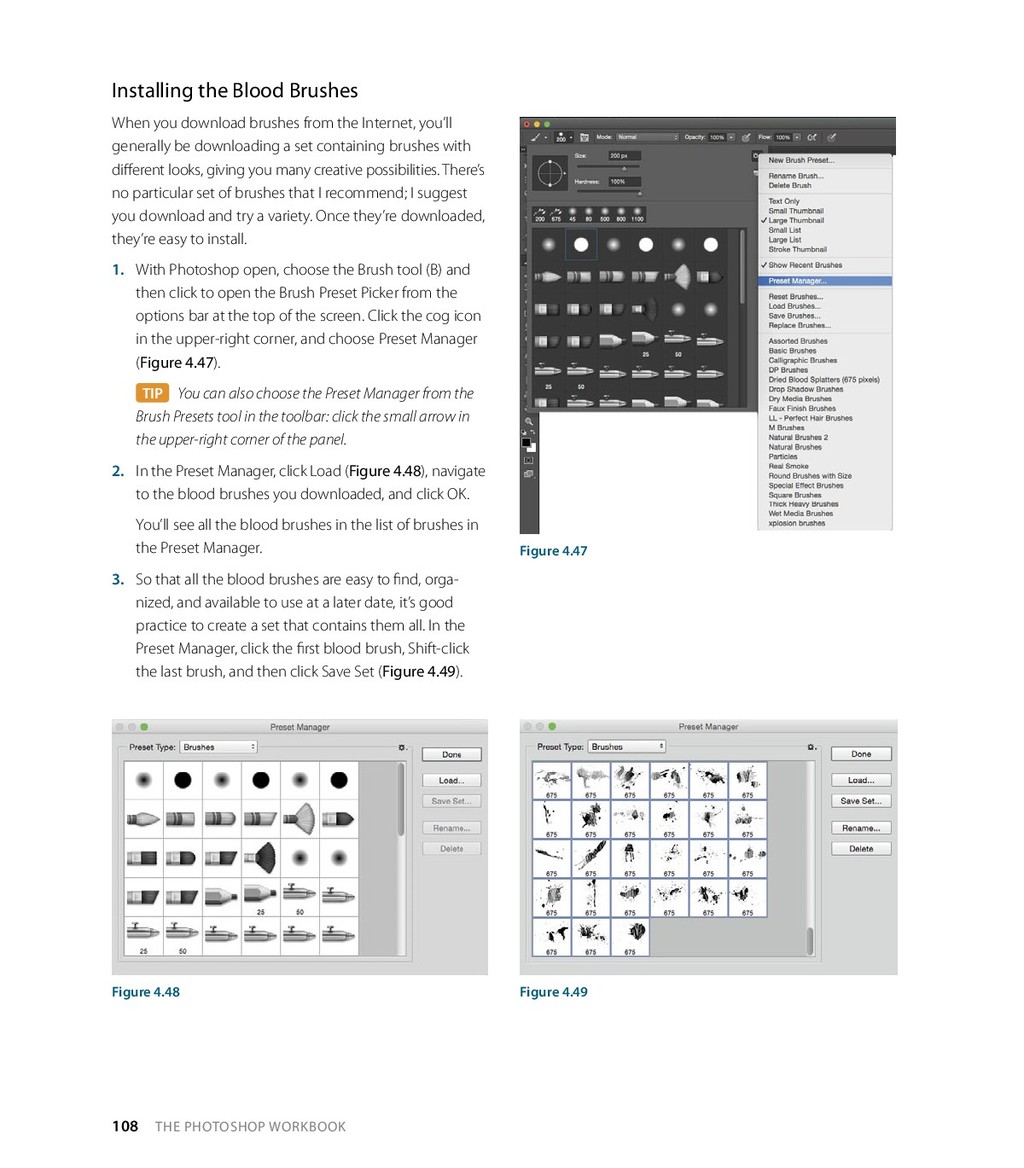
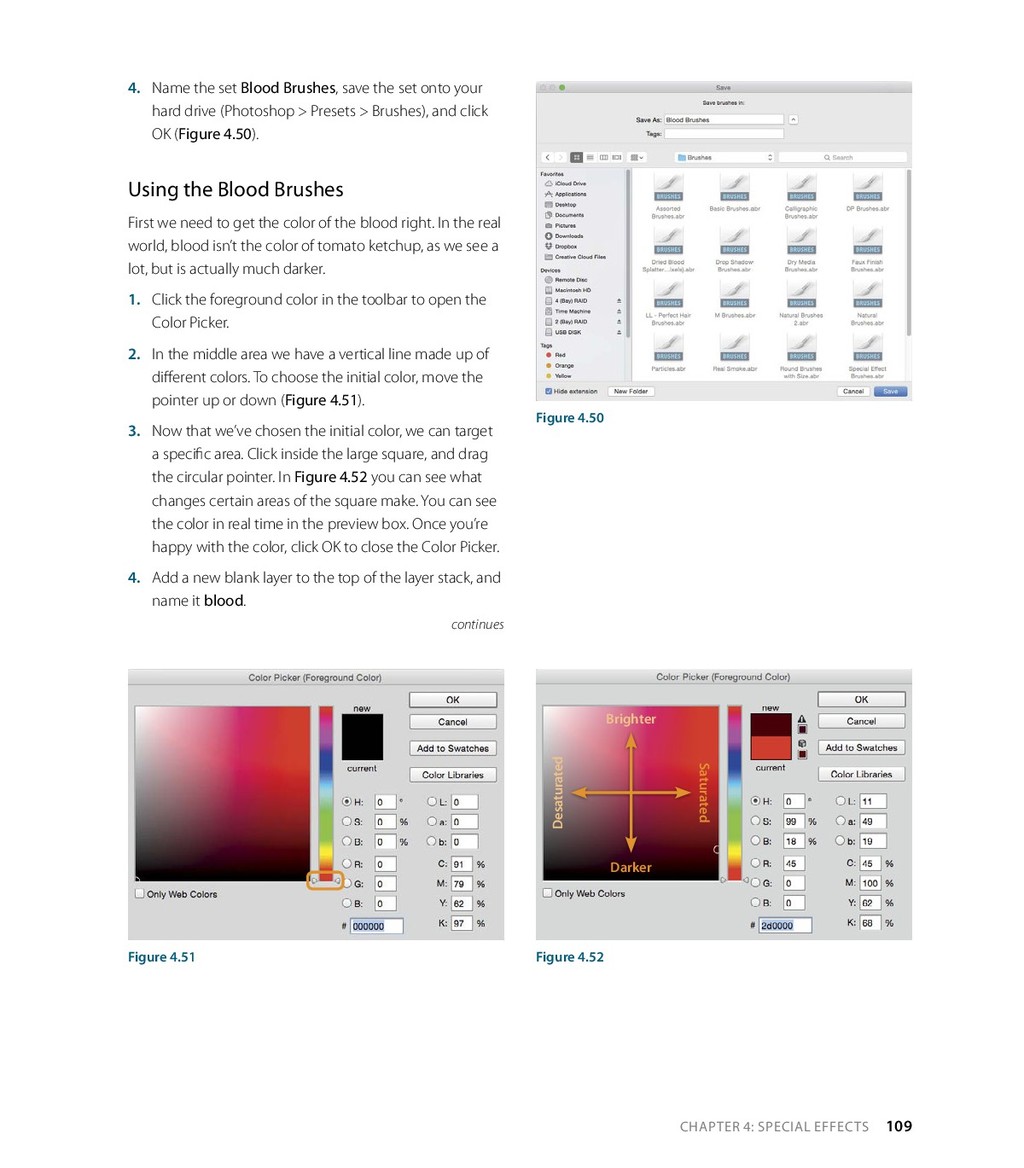
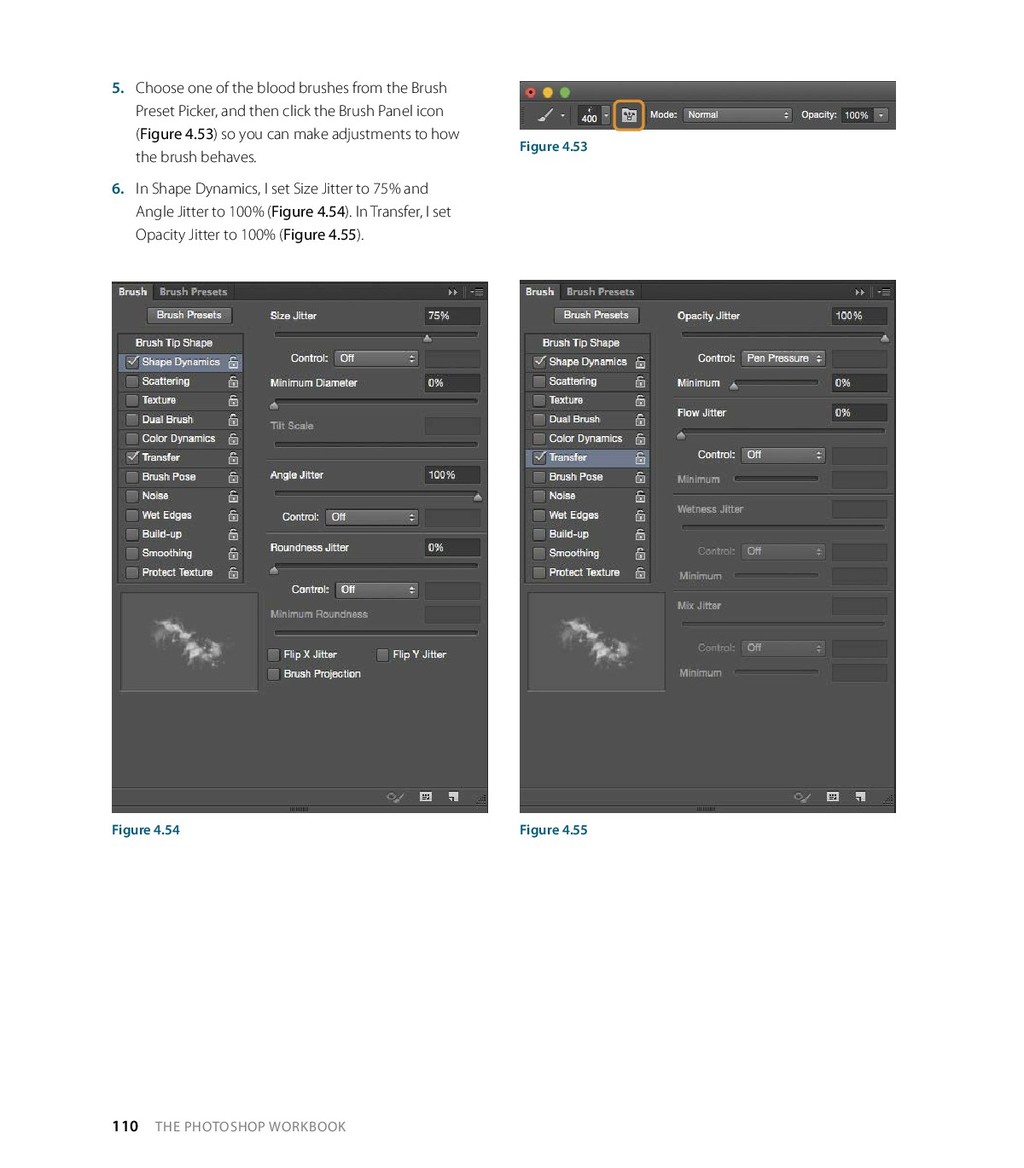
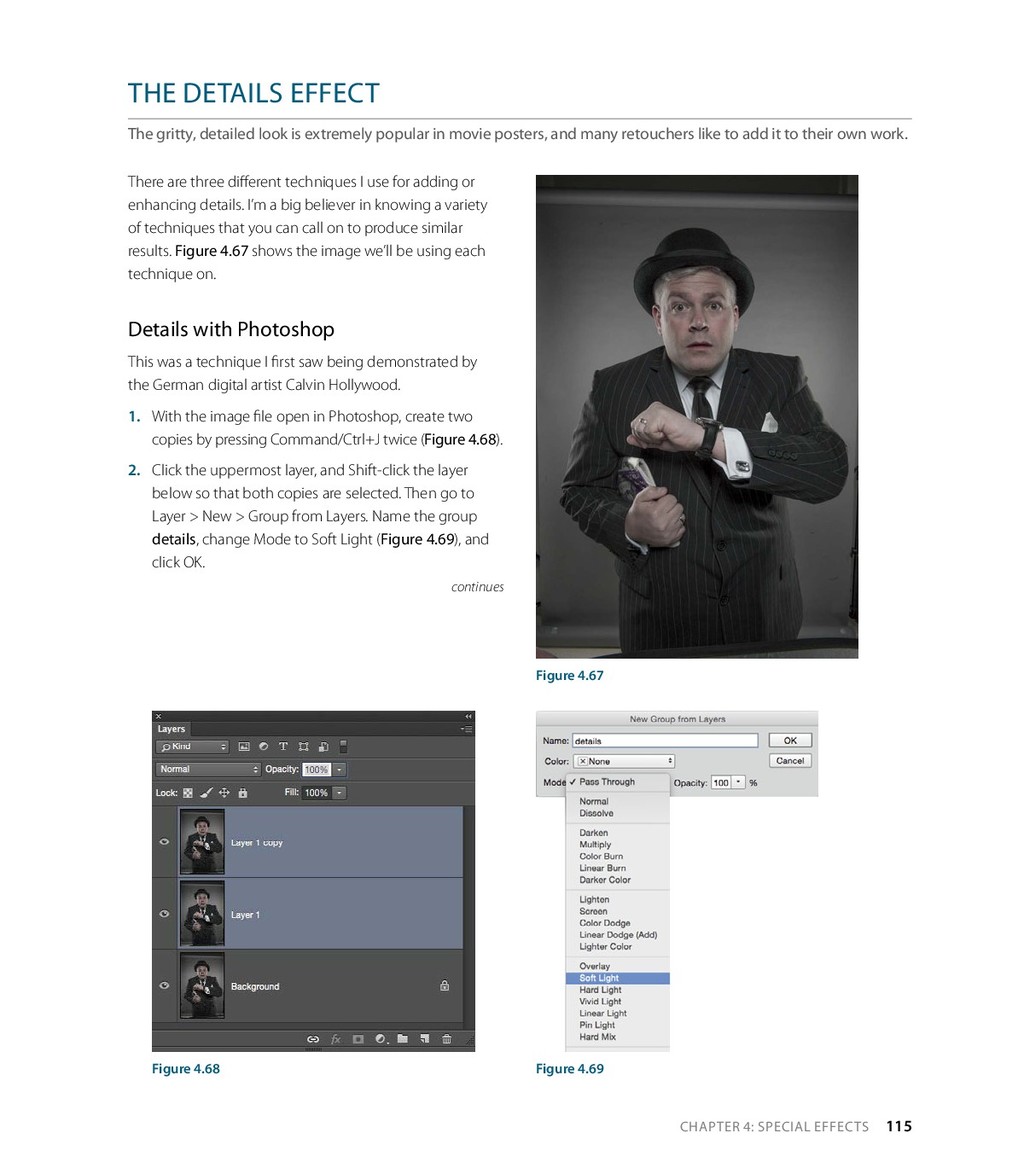
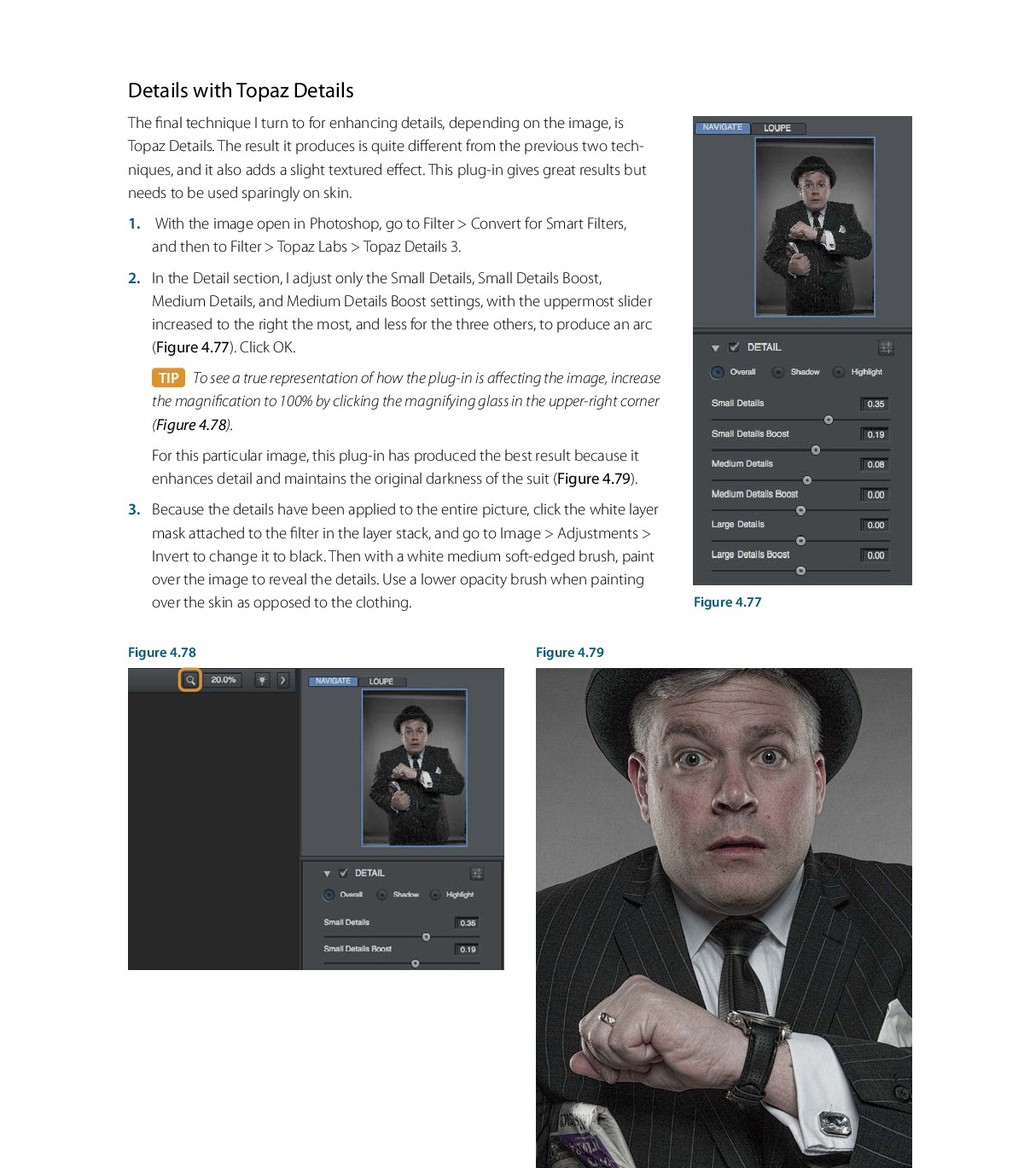
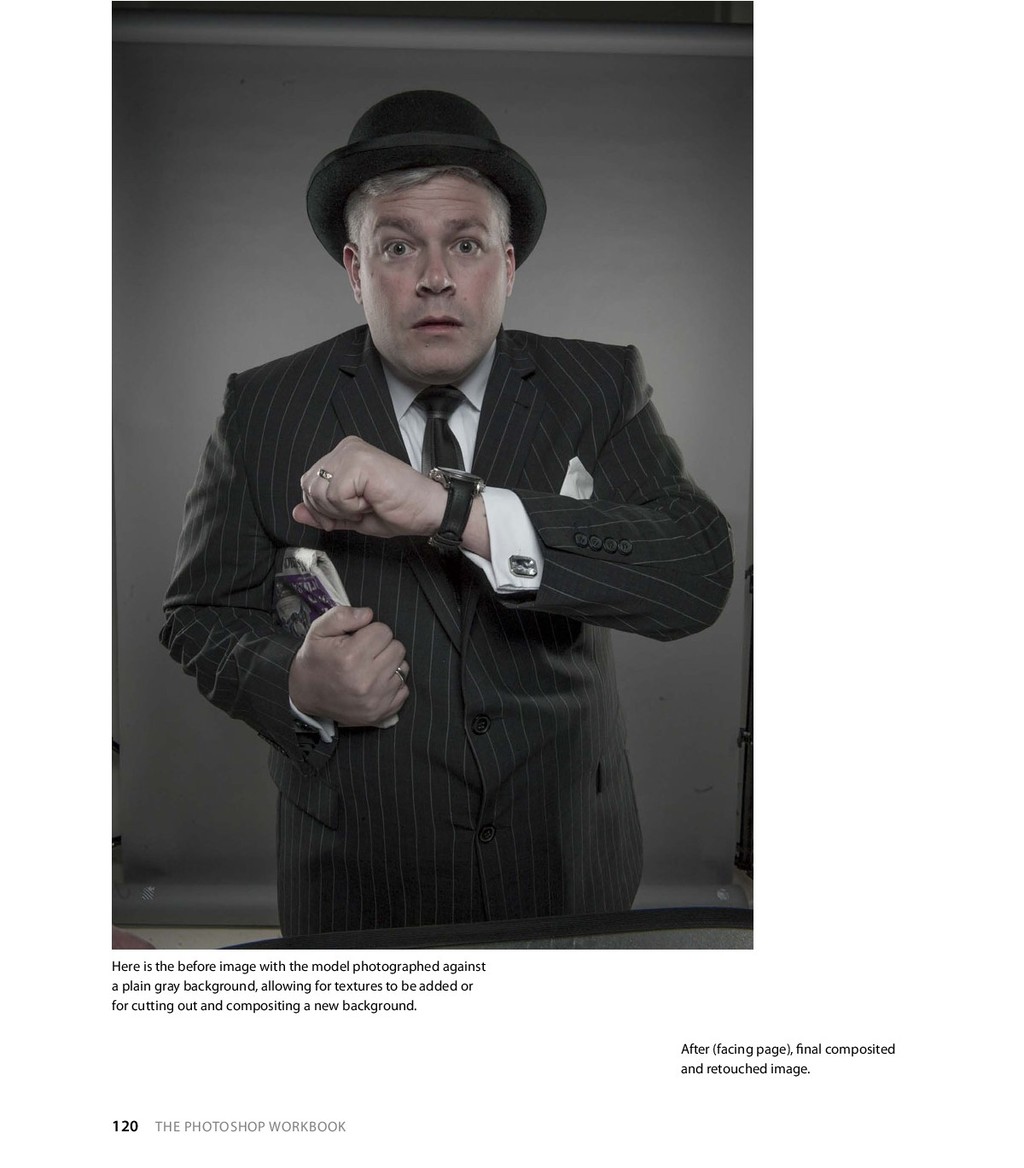
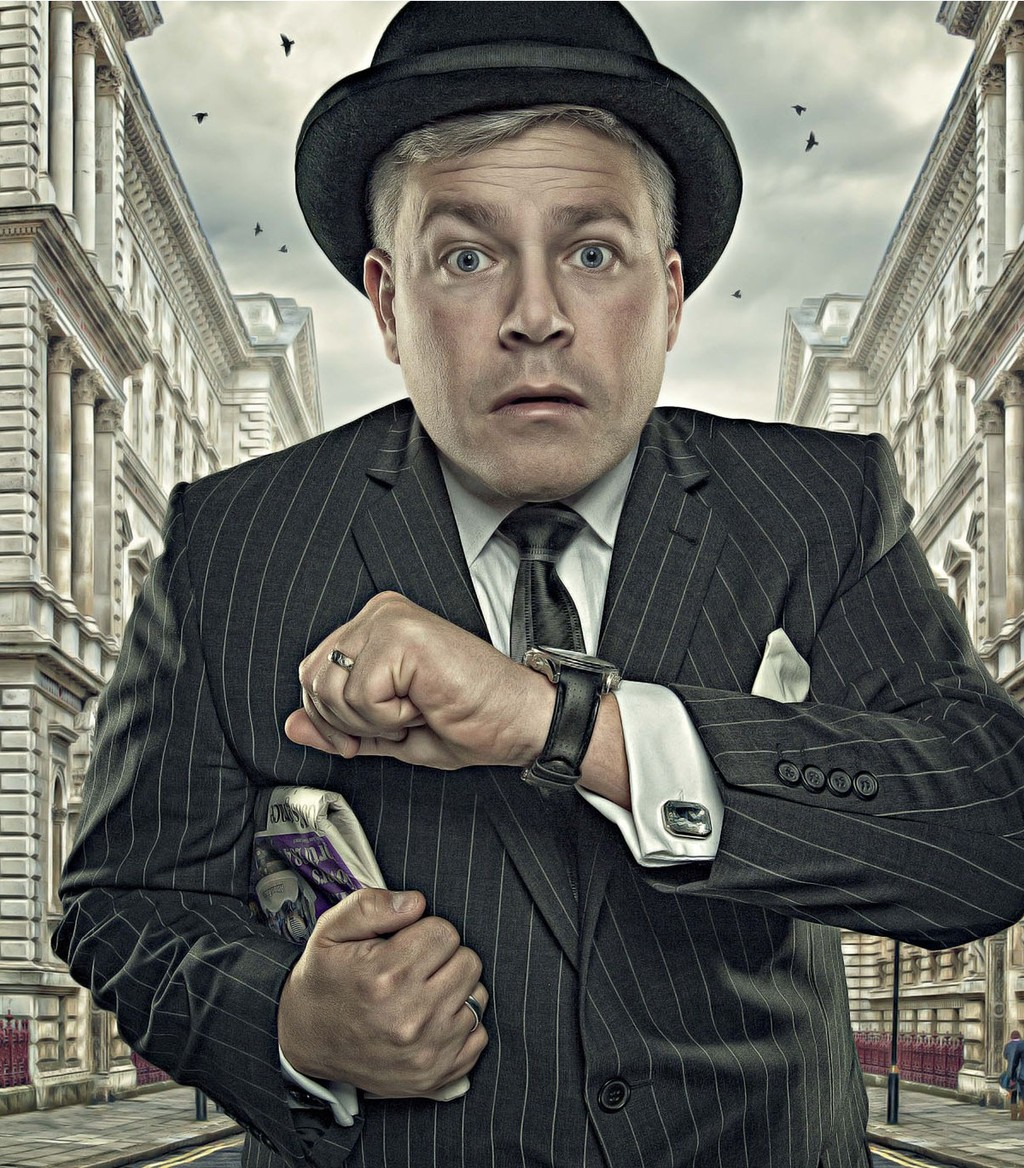
Today mobile phones are widely used to take photos at every occasion as they also allow you to edit your photos before sharing them online. But no editing software can allow your mobile phone to edit your photo better than a professional photo retouching companyas they can improve your image by using their photo retouching skills. In this write-up, you will know who need to retouch his photos and why.

What is photo retouching?

When you are going to get your photos retouched by a professional retouching expert then you must know what photo retouching is. You may come across a number of terms while retouching your photos like photo editing, photo retouching, airbrushing photo, and postproduction work on the photo, etc. normally thee terms are used as a synonym but they are all quite different from each other. In this write-up, we are discussing only the retouching of photos.

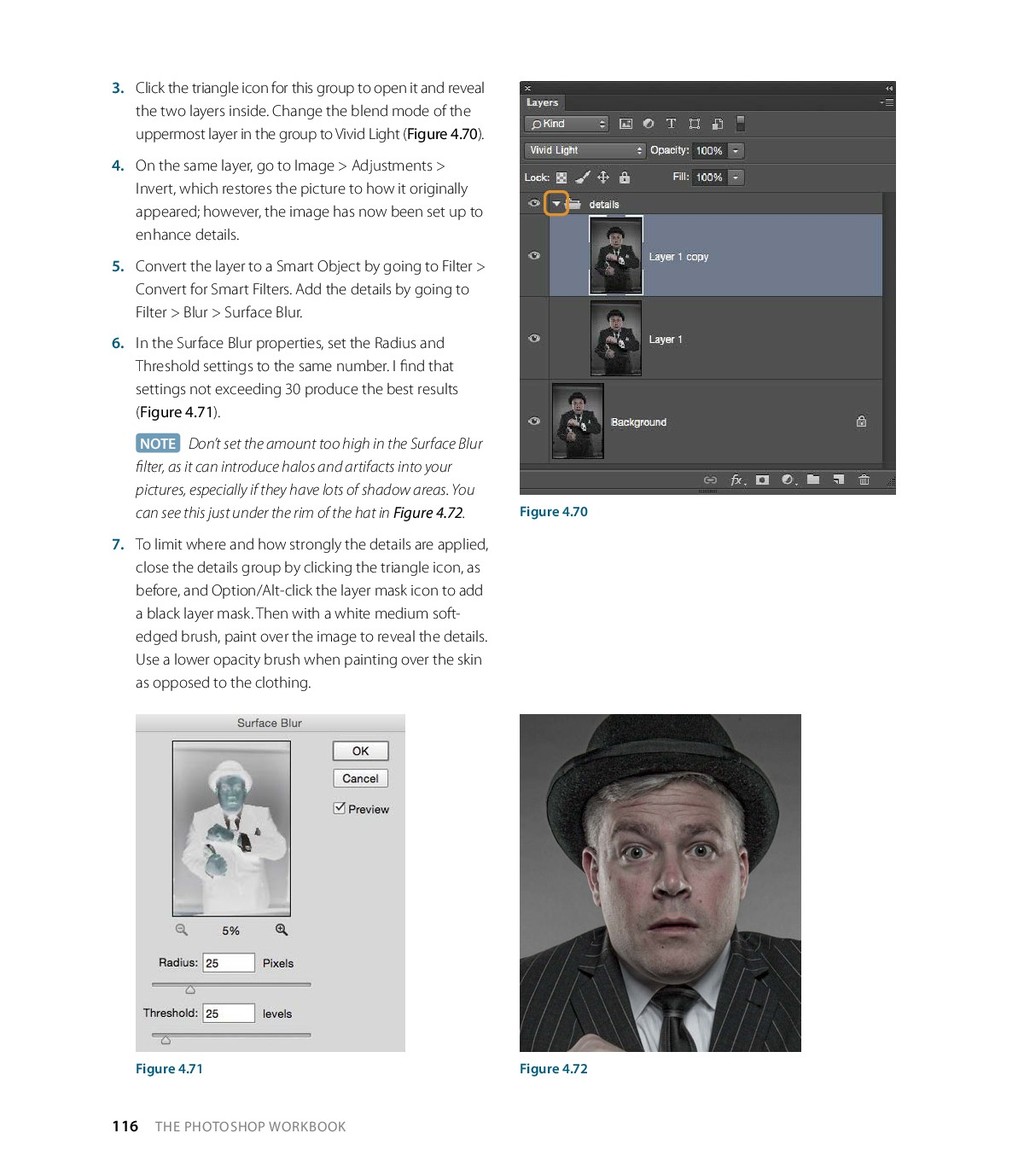
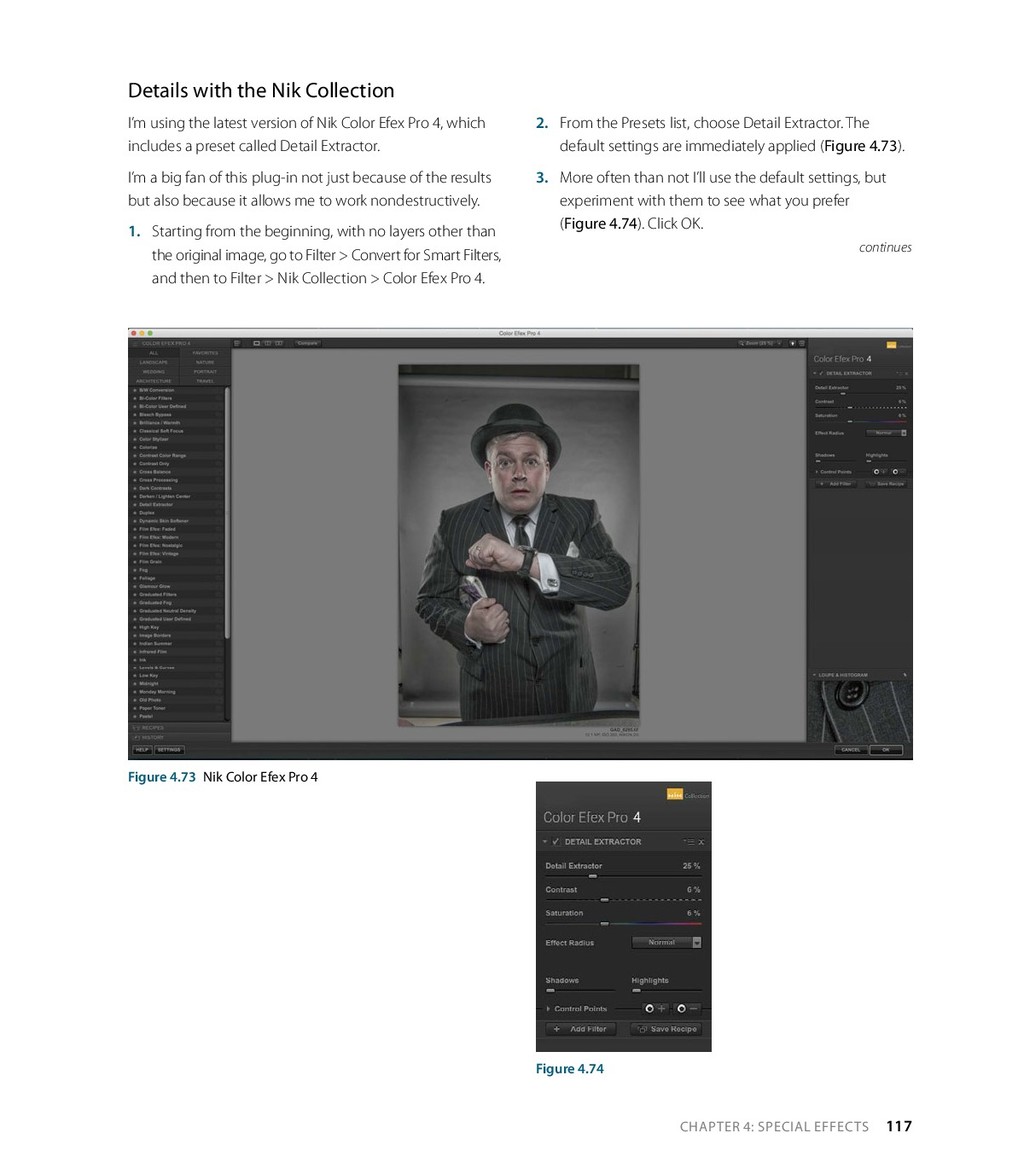
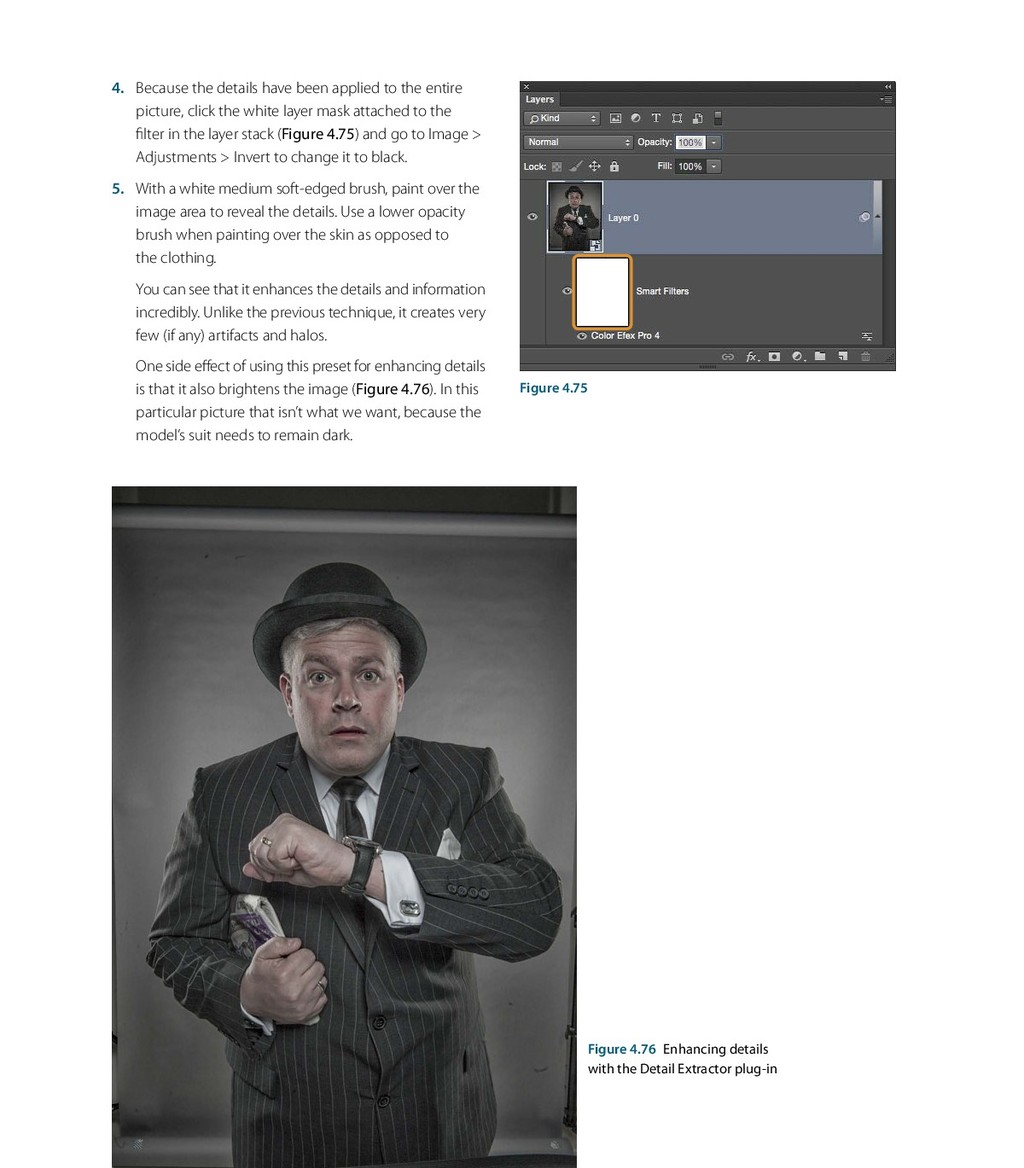
So, the actual meaning of photo retouching is to eliminate all the imperfections in the tone and colors of a photo. The retouching expert takes care of the under-eye circles, blemishes, saturation, contrast, and brightness of the images in a photo while retouching it. In order to remove or add certain elements the professionals at photo retouching company sometimes also use the airbrushing technique during the photo retouching process.

Who needs Photo Retouching?

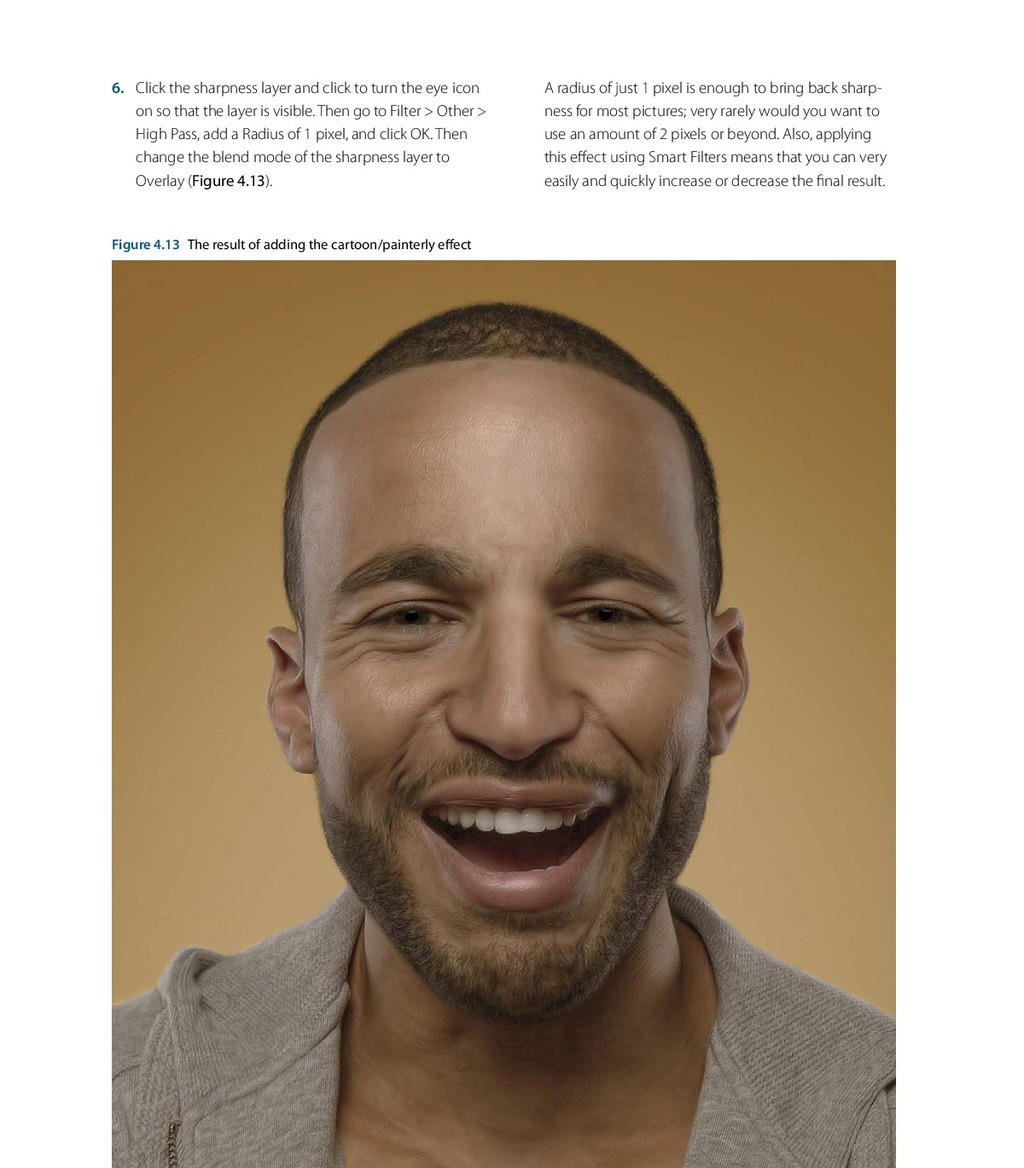
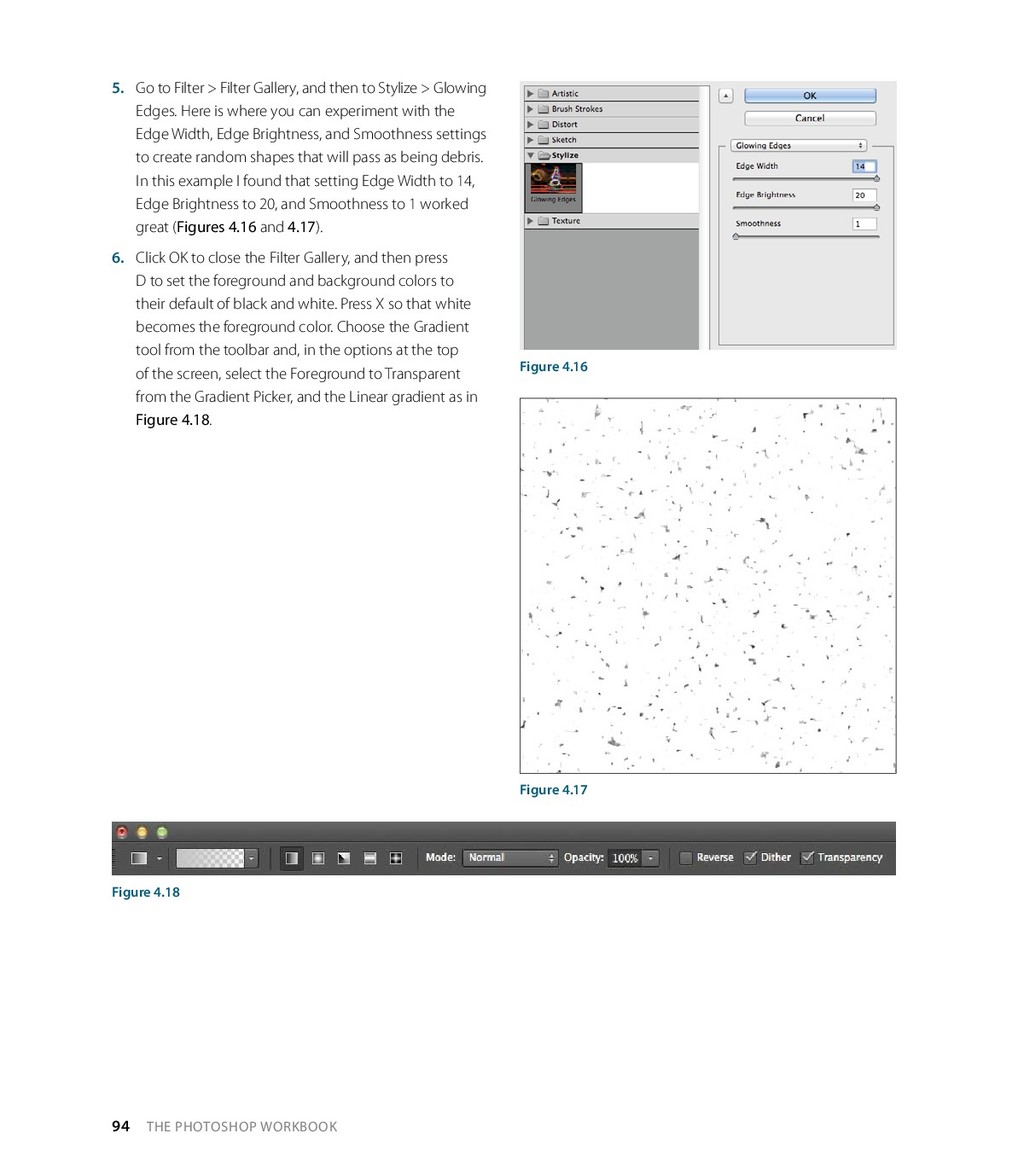
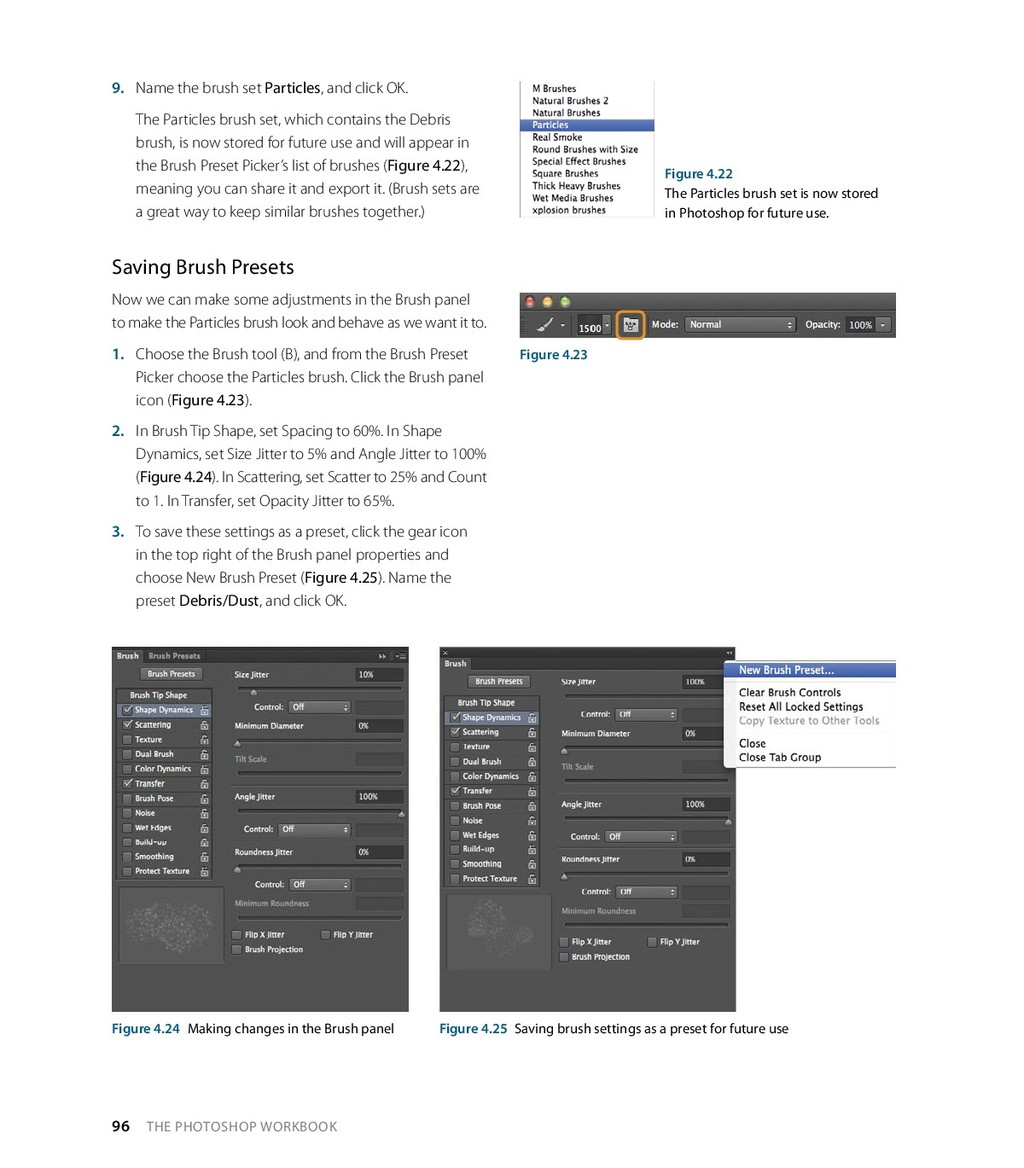
Almost everyone who wants to improve his image in the photo needs retouching of their photos. Professional photo retouching services can also be beneficial for certain businesses, SMBs, brands, influencers, bloggers, marketing agencies and PR agencies. Conference managers, event managers, aspirants and graduates searching for new jobs, parents, would-be parents, and photographers are some of the other people and businesses who may need to retouch their photos. Photographers usually search for photo retouching company to outsource the services of retouching their photos.

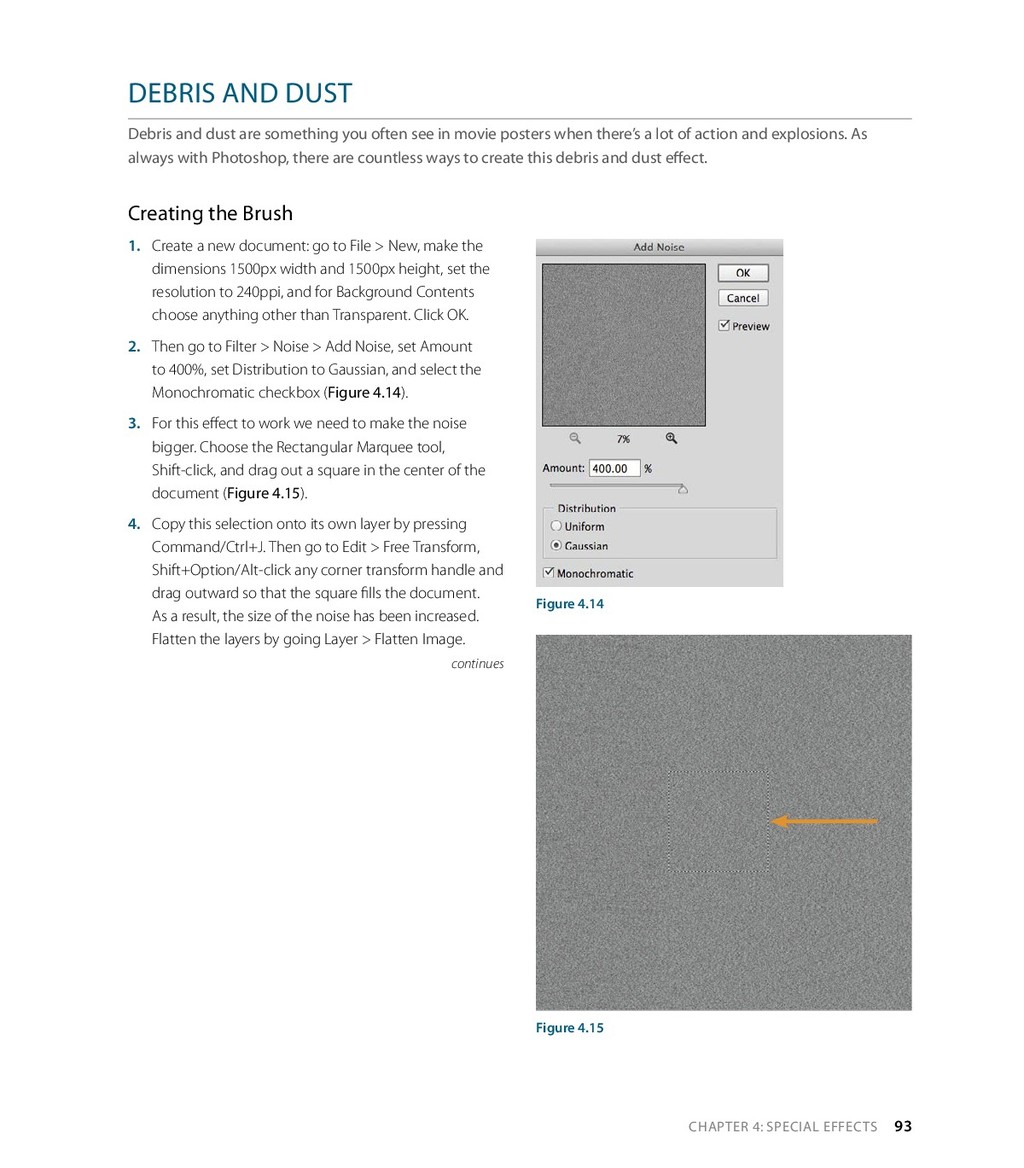
Why photo retouching is needed?

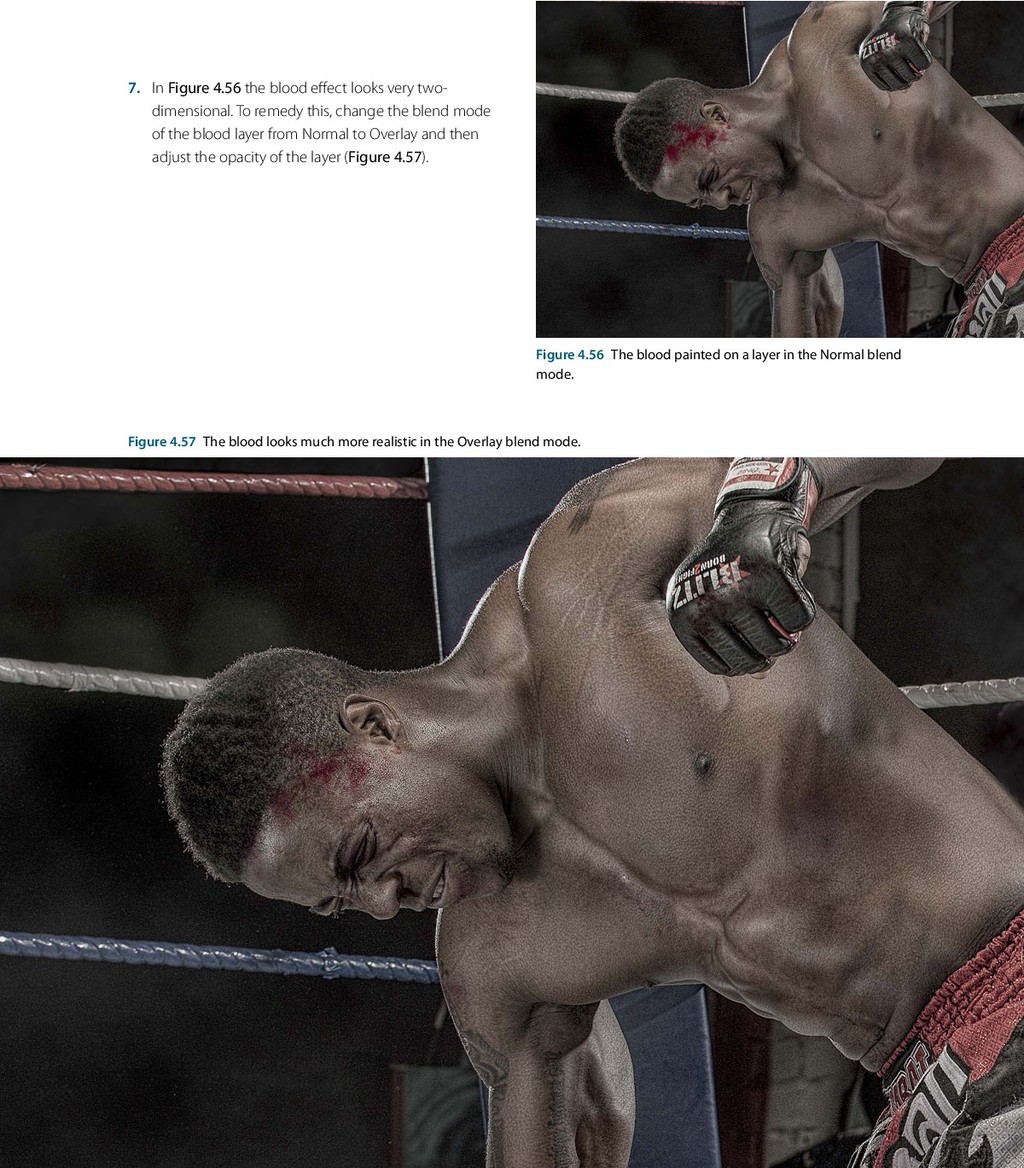
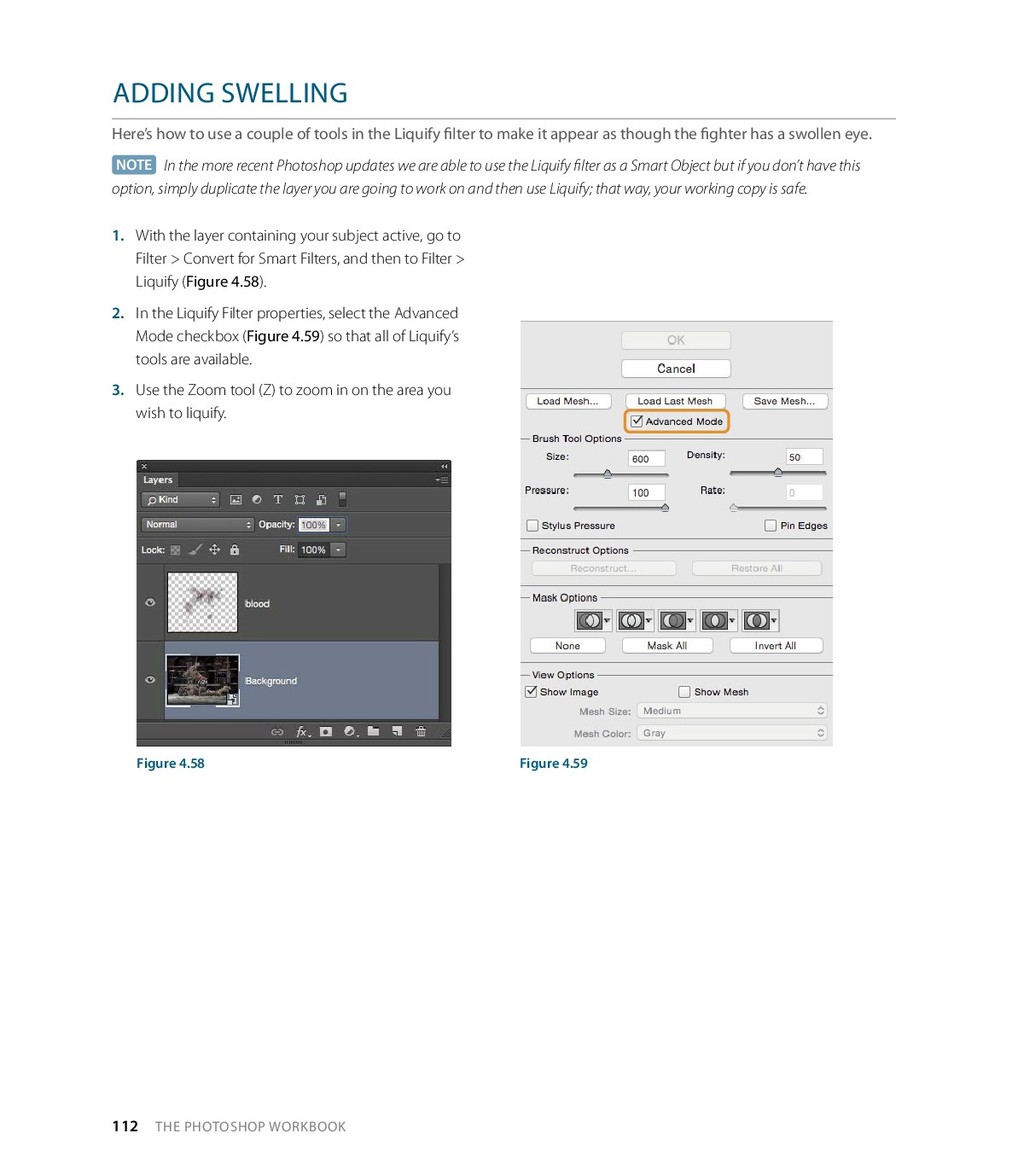
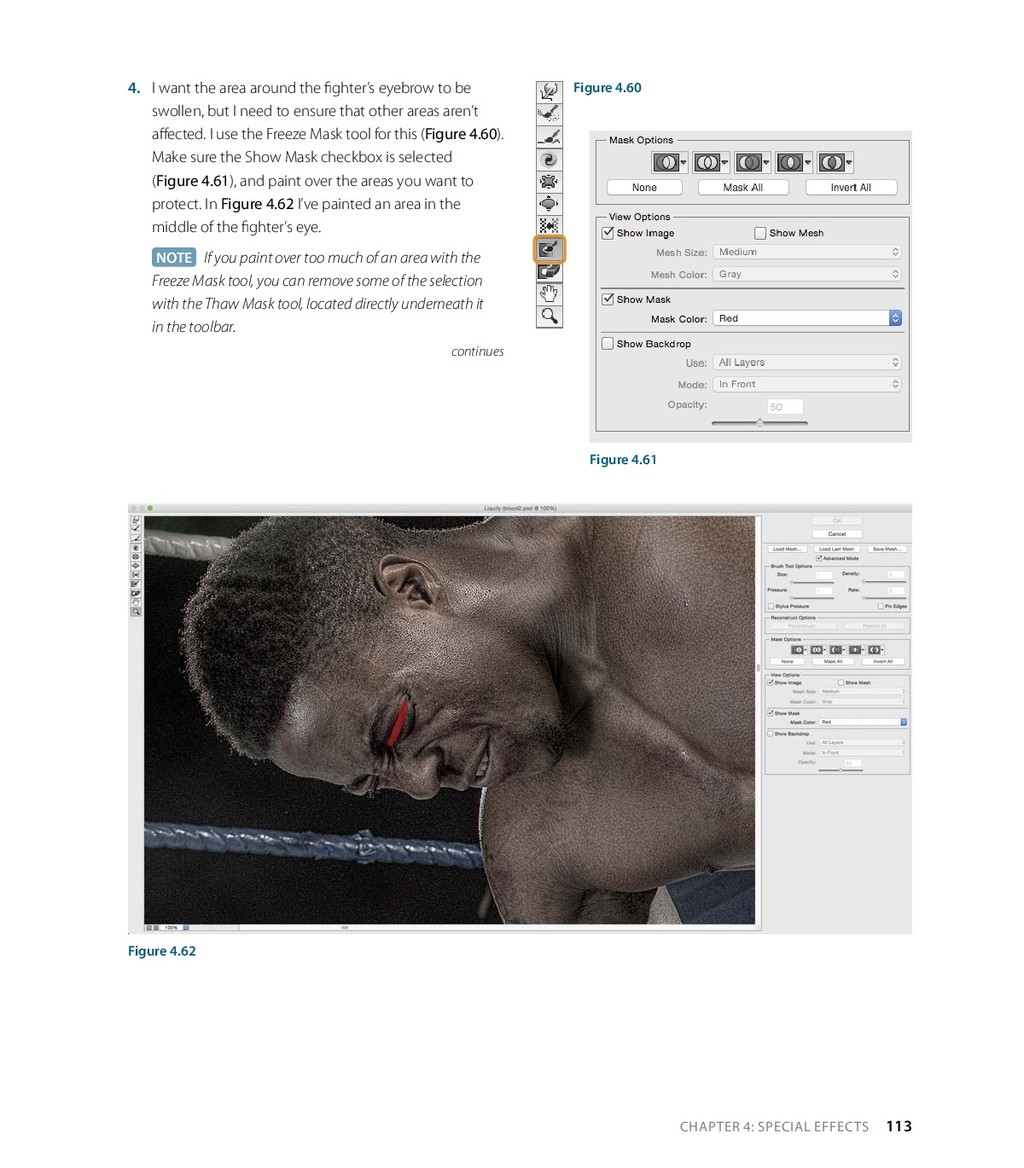
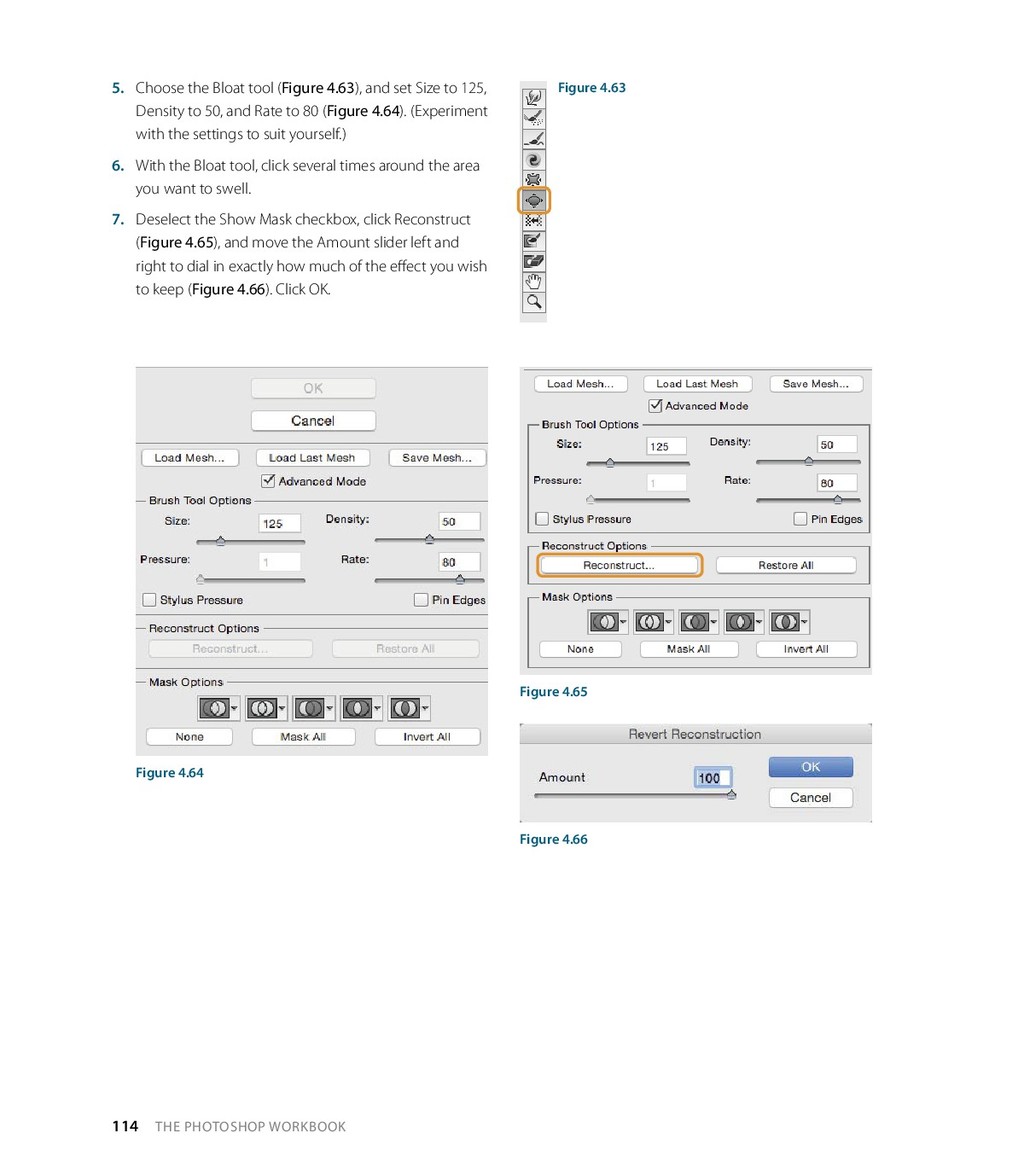
Photo retouching has become essential these days because it offers a number of benefits along with beautifying your photos. These benefits include:

Improve sales: Most of the people emphasize on the importance of quality of photo as good quality photos can be sold at a good price easily. It is similar to the sale of good looking dishes at the restaurants. The sale of real estate can be ensured with its high-quality photos.

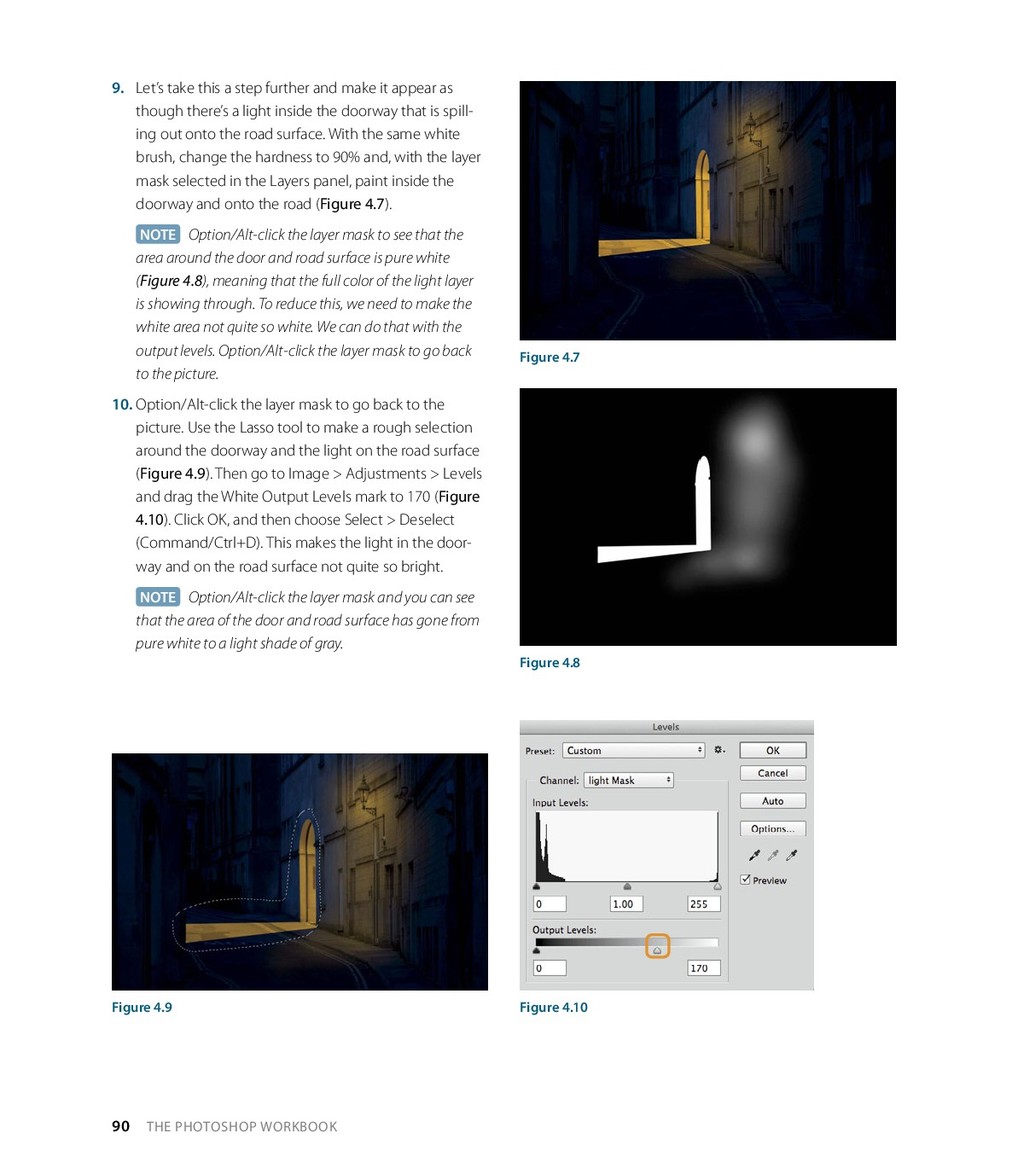
Build reputation: The customers, as well as the partners of your online business, will assess its social media presence and website to know about its probabilities. In this situation, you can build a good reputation for your business and brand by using recently retouched photos than using the images stocked for long.

Look outstanding than your competition: You can establish the authentic style of the visual content of your business and differentiate your brand from your competition by using retouched photos on your website and social media accounts.

Improve online and offline marketing: Your entire marketing campaign can be influenced by using photo retouching techniques to improve the images used for this purpose. The high-quality images of your products and services will greatly influence the onlookers whether you are sharing them online or printing them for an offline marketing campaign.

Final Verdict:

If really you are a photographer or eCommerce business owner then I will suggest you improve image quality. And I also recommend you to hire a professional clipping path service company who provide stunning and beautiful image.

Shelley Morris

September 19, 2019
Tweet

Transcript

  1. GL YN DEWIS Foreword by Scott Kelby PHOTOSHOP WORKBOOK THE

    Professional Retouching and Compositing Tips, Tricks, and Techniques
  2. The Photoshop Workbook: Professional Retouching and Compositing Tips, Tricks, and

    Techniques Glyn Dewis Peachpit Press www.peachpit.com To report errors, please send a note to [email protected] Peachpit Press is a division of Pearson Education Copyright © 2015 by Glyn Dewis Photography Ltd. All photographs © by Glyn Dewis except where noted Acquisitions Editor: Ted Waitt Senior Editor: Susan Rimerman Production Editor: David Van Ness Technical Editor: Scott Martin Development/Copyeditor: Scout Festa Proofreader: Heather Howard Indexer: James Minkin Composition: WolfsonDesign Cover Design: Dave Clayton Interior Design: WolfsonDesign Cover Image: Glyn Dewis Notice of Rights All rights reserved. No part of this book may be reproduced or transmitted in any form by any means, electronic, mechanical, photocopying, recording, or otherwise, without the prior written permission of the publisher. For information on getting permission for reprints and excerpts, contact [email protected]. Notice of Liability The information in this book is distributed on an “As Is” basis, without warranty. While every precaution has been taken in the preparation of the book, neither the author nor Peachpit shall have any liability to any person or entity with respect to any loss or damage caused or alleged to be caused directly or indirectly by the instructions contained in this book or by the computer software and hardware products described in it. Trademarks Adobe and Photoshop are registered trademarks of Adobe Systems Incorporated in the United States and/or other countries. All other trademarks are the property of their respective owners. Many of the designations used by manufacturers and sellers to distinguish their products are claimed as trademarks. Where those designations appear in this book, and Peachpit was aware of a trademark claim, the designations appear as requested by the owner of the trademark. All other product names and services identified throughout this book are used in editorial fashion only and for the benefit of such companies with no intention of infringement of the trademark. No such use, or the use of any trade name, is intended to convey endorsement or other affiliation with this book. ISBN 13: 978-0-134-00846-2 ISBN 10: 0-134-00846-4 9 8 7 6 5 4 3 2 1 Printed and bound in the United States of America
  3. This book is dedicated to my dear friend Todd Mills,

    who leaves a huge void in many people’s hearts having been taken from this World and us all far too soon. Without his welcome, friendship, and support, I could easily have been walking along a very different path. Miss you, Brother!
  4. ACKNOWLEDGMENTS A lot has happened since I first started using

    Photoshop: friendships and opportunities I never would have dreamed possible. Anne: This book doesn’t contain enough pages for me to write how I feel about you. Your love, support, trust, under- standing, and encouragement is overwhelming. You give my life purpose. You are the reason I will never live with a “that will do” attitude; you deserve everything good that life has to offer. I’m an incredibly blessed man to have you as my wife; you and Posey are my world. I love you. Morris Cat: My beautiful boy, my number one critic, my buddy—life isn’t and never will be the same without you. Scott Kelby: Blimey, where do I start? I find myself thanking you so often I just wish I knew a word that truly expressed how grateful I am to you for everything. From that first mention on your blog to the never-ending advice, support, and friendship, I owe more to you than I could ever repay. Dave “The Editor” Clayton and Aaron Blaise: We’ve all said it before, but there are people you meet in life that just fit; people you instantly click with and feel you’ve known all your days—and that’s exactly how I feel about you both. You’re my brothers from other mothers, and I have this incredible creative industry to thank for bringing us together. Good times ahead! Alan Hess: If Dave and Aaron are my brothers, then you’re my cousin. Spending time with you is always such a blast. Thanks so much for your friendship. Matt Kloskowski, Corey Barker, Pete Collins, and RC: Having you guys as friends is something I’ll always treasure. Matt, we’ll never forget your kindness for sending over that wonderful lighthouse picture of yours for Anne. Corey, you’re a top fella and I’m convinced you really are a T1000. Pete, you truly are a great guy with a huge heart. And RC, well…everyone needs an RC in their lives! Dave Cross: You’ve influenced what I do more than you’ll ever know. Joe McNally, Joel Grimes, Peter Hurley, Bert Monroy, Moose Peterson, Joe Glyda, Frank Doorhof, and all the other incredible KelbyOne Instructors: Your talent and love of what you do is a constant source of inspiration. I’m truly honored to share the stage and teach amongst you. Barry Payne: Mate, you’ve been there from day one with your boundless enthusiasm and willingness to help. You epitomize true friendship. Scott Cowlin and Ted Waitt: For your encouragement and belief that I should write this book; thank you so much for this opportunity. The book team at Peachpit: Susan Rimerman (Senior Acquisitions Editor), your patience, organization, and team co-ordination skills are quite simply legendary! Ted Waitt (Executive Editor), Scout Festa (Development Editor and Copyeditor), Scott Martin (Technical Editor), Heather Howard (Proofreader), David Van Ness (Production Editor), WolfsonDesign (Interior Design/Composition), and James Minkin (Indexer), your vision, attention to detail, professionalism, and instincts make you an unbeatable team! Richard Curtis at Adobe: Thanks to Adobe for making such fantastic software and for their support, which ulti- mately enables me to do what I love. In particular, Richard Curtis (Adobe UK) for his help, advice, and friendship. Nicole Wolfe Procunier, Brandon Ford, Steve “Get to the Chopper” Nicolai, Mia McCormick, Meredith Pack, Kathy Siler, and Stephen Bell: There’s so much I could say about you all, but to sum it up in one word: Awesome! Zack and Meghan Arias: Thank you for inviting me into your lives; your generosity has been life-changing! Erik Bernskiöld: How one person can hold so much knowledge, ability, and wisdom and still be so young is unbelievable! My only wish is that I’d known you sooner— I may have retained a few more follicles.
  5. Loxley Colour: Ian Loxley, Calum Thomson, Paul McKendrick, and Neil

    Wright: Thanks for such an incredible product and the continued support. You folks and the team around you are world class! Paul Avins: Your ability to see the possibilities and oppor- tunities where others can’t never fails to motivate. Thank you for your constant guidance and vision. Chris Fields (CHNO Technology), Brian Matiash (Google), Ben Brain (Future Publishing), Chris Whittle (Elinchrom and the Flash Centre), Alastair Jolly (Smugmug), Weston “Wes” Maggio (Wacom USA), Torsten Kieslich, Amber McCoy (TetherTools), Eric Yang (Topaz Labs), David MacKay (Headshot Photographer), and Sylights (www.sylights.com): Thank you so much for being there in so many ways. Whether it be your world-class equip- ment and products, your support, your promotion, or your expertise, you guys rock! Gabor Richter, Calvin Hollywood, Uli Staiger, and Olaf Giermann: I thank each and every one of you for your influence and advice, and for the many laughs; I look forward to much more in the future. The Curry Club: Noel Hannan, Brian Worley, David Kelly, Keith Hammond, David Lee, James Hole, Gareth Davies, Dave Clayton, and Chris Fields: Isn’t it about time we arranged another shoot and meal? Always fun, and always gets the creative juices flowing. And finally, a huge thank you to all the models and clients I’ve worked with to date; it’s been a pleasure working with and photographing you. Quite simply, these pages would be blank without you!
  6. ABOUT THE AUTHOR Glyn Dewis Originally from Staffordshire, England, Glyn

    was introduced to Photoshop in 2005, and his life took a completely different path. With a somewhat tenacious personality and a hunger to learn, he attended his first Photoshop World Conference and Expo in Las Vegas in 2006. The trip had a profound effect on Glyn because he was exposed to a completely new world—the world of creativity and expression, where the only limitations are those placed on you by yourself. Fast-forward a few years and Glyn is now an established photographer, retoucher, and trainer, with clients ranging from the BBC, Sky TV, and Air New Zealand to physique athletes and musicians. He attributes it all to a combina- tion of hard work, the guidance of incredibly talented and generous friends, and a mind set of always wanting to improve and learn. Photoshop and photography is very much an equal partnership in Glyn’s work, and in addition to working with clients he now travels internationally, teaching his own series of workshops, as well as coaching, speaking, and instructing at conferences. He writes for several Photoshop magazines across Europe and the USA, including Photoshop User and Practical Photoshop. In 2013, he was featured in the New York Times. One of the highlights of his career was becoming a Member of the Photoshop World Dream Team of Instructors. Teaching and standing in front of large audiences came naturally to Glyn, having attended drama school for a short time as a child. Until 2008, Glyn was also a competitive bodybuilder. He lives just outside Oxford, England, with his wife, Anne, and his cat, Posey. Glyn regularly updates his blog with news, reviews, behind the scenes information, tutorials, and much more. To see more of Glyn’s work, keep up with him on social media, and learn from his tutorial videos, check out these links: Blog: www.glyndewis.com YouTube: www.youtube.com/glyndewis Facebook: www.facebook.com/glyndewis Twitter: www.twitter.com/glyndewis Google+: www.gplusglyn.com
  7. Foreword. . . . . . . . . .

    . . . . . . . . . . . . . . . . . . . . . . . . . . . . . . . . . . . . . xii Introduction . . . . . . . . . . . . . . . . . . . . . . . . . . . . . . . . . . . . . . . . . . . xv PART 1 TECHNIQUES 1 CHAPTER 1 SELECTIONS AND CUTOUTS 3 Quick Selection Tool and Refine Edge . . . . . . . . . . . . . . . . . . . . 4 Improving Cutouts with Layer Styles . . . . . . . . . . . . . . . . . . . . . 9 How to Remove the Annoying Outline . . . . . . . . . . . . . . . . . 11 Quick Mask . . . . . . . . . . . . . . . . . . . . . . . . . . . . . . . . . . . . . . . . . . . . . 12 Faking Cutouts: Part 1 . . . . . . . . . . . . . . . . . . . . . . . . . . . . . . . . . . 13 Faking Cutouts: Part 2 . . . . . . . . . . . . . . . . . . . . . . . . . . . . . . . . . . 16 Advanced Blending . . . . . . . . . . . . . . . . . . . . . . . . . . . . . . . . . . . . 19 Color Range . . . . . . . . . . . . . . . . . . . . . . . . . . . . . . . . . . . . . . . . . . . . 21 The Pen Tool . . . . . . . . . . . . . . . . . . . . . . . . . . . . . . . . . . . . . . . . . . . 23 Channels for Selections . . . . . . . . . . . . . . . . . . . . . . . . . . . . . . . . . 25 CONTENTS
  8. viii THE PHOTOSHOP WORKBOOK CHAPTER 2 THE POWER OF GRAY

    29 Blend Mode Compositing . . . . . . . . . . . . . . . . . . . . . . . . . . . . . . 30 Textures, Textures, Textures . . . . . . . . . . . . . . . . . . . . . . . . . . . . . 36 Smart Dodging and Burning. . . . . . . . . . . . . . . . . . . . . . . . . . . . 40 Transforming a Location . . . . . . . . . . . . . . . . . . . . . . . . . . . . . . . . 43 Adding Dents and Damage . . . . . . . . . . . . . . . . . . . . . . . . . . . . 50 Instant Six-Pack . . . . . . . . . . . . . . . . . . . . . . . . . . . . . . . . . . . . . . . . . 54 Photoshop Lens Flares . . . . . . . . . . . . . . . . . . . . . . . . . . . . . . . . . . 56 Make Eyes Pop . . . . . . . . . . . . . . . . . . . . . . . . . . . . . . . . . . . . . . . . . 58 CHAPTER 3 LIGHTING EFFECTS 63 The World’s Simplest Lighting Effect . . . . . . . . . . . . . . . . . . . . 64 The Never-ending Lighting Rig . . . . . . . . . . . . . . . . . . . . . . . . . 67 Gradient Lighting: Part 1 . . . . . . . . . . . . . . . . . . . . . . . . . . . . . . . . 70 Gradient Lighting: Part 2 . . . . . . . . . . . . . . . . . . . . . . . . . . . . . . . . 73 Light Beams . . . . . . . . . . . . . . . . . . . . . . . . . . . . . . . . . . . . . . . . . . . . 75 Horizon Light . . . . . . . . . . . . . . . . . . . . . . . . . . . . . . . . . . . . . . . . . . 78 Fake Rim Lighting . . . . . . . . . . . . . . . . . . . . . . . . . . . . . . . . . . . . . . 80 Reflected Light . . . . . . . . . . . . . . . . . . . . . . . . . . . . . . . . . . . . . . . . . 81 Shadows . . . . . . . . . . . . . . . . . . . . . . . . . . . . . . . . . . . . . . . . . . . . . . . 83
  9. CONTENTS ix CHAPTER 4 SPECIAL EFFECTS 87 Turning Day into

    Night . . . . . . . . . . . . . . . . . . . . . . . . . . . . . . . . . 88 The Cartoon or Painterly Effect . . . . . . . . . . . . . . . . . . . . . . . . . 91 Debris and Dust . . . . . . . . . . . . . . . . . . . . . . . . . . . . . . . . . . . . . . . . 93 Creating a Snow Scene . . . . . . . . . . . . . . . . . . . . . . . . . . . . . . . . . 99 Rain . . . . . . . . . . . . . . . . . . . . . . . . . . . . . . . . . . . . . . . . . . . . . . . . . . .101 The Wet Look . . . . . . . . . . . . . . . . . . . . . . . . . . . . . . . . . . . . . . . . .104 Black and White Conversion . . . . . . . . . . . . . . . . . . . . . . . . . . .105 Adding Fake Blood . . . . . . . . . . . . . . . . . . . . . . . . . . . . . . . . . . . .107 Adding Swelling . . . . . . . . . . . . . . . . . . . . . . . . . . . . . . . . . . . . . . .112 The Details Effect . . . . . . . . . . . . . . . . . . . . . . . . . . . . . . . . . . . . . .115 CHAPTER 5 COMPOSITING QUICK TIPS 123 Creating a Horizon Line. . . . . . . . . . . . . . . . . . . . . . . . . . . . . . . .124 Compositing into Grass. . . . . . . . . . . . . . . . . . . . . . . . . . . . . . . .129 Shadows . . . . . . . . . . . . . . . . . . . . . . . . . . . . . . . . . . . . . . . . . . . . . .131 Matching Color #1 . . . . . . . . . . . . . . . . . . . . . . . . . . . . . . . . . . . .133 Matching Color #2 . . . . . . . . . . . . . . . . . . . . . . . . . . . . . . . . . . . . .136
  10. x THE PHOTOSHOP WORKBOOK PART 2 PROJECTS 139 CHAPTER 6

    CHARACTER PORTRAIT 141 RAW Conversion and Retouch . . . . . . . . . . . . . . . . . . . . . . . . .142 Nondestructive Retouching in Photoshop . . . . . . . . . . . . .145 Adding Color to the Background . . . . . . . . . . . . . . . . . . . . . .147 Adding a Spotlight . . . . . . . . . . . . . . . . . . . . . . . . . . . . . . . . . . . .149 Matching Background and Foreground Color . . . . . . . . . .150 Lighting the Cigar . . . . . . . . . . . . . . . . . . . . . . . . . . . . . . . . . . . . .151 The Painterly Textured Effect . . . . . . . . . . . . . . . . . . . . . . . . . . .152 CHAPTER 7 TOUGH GUY 155 RAW Conversion and Retouch . . . . . . . . . . . . . . . . . . . . . . . . .156 Nondestructive Retouching in Photoshop . . . . . . . . . . . . .158 Creating a New Background Using Textures . . . . . . . . . . . .159 Adding Shadows . . . . . . . . . . . . . . . . . . . . . . . . . . . . . . . . . . . . . .161 Using the World’s Simplest Lighting Effect . . . . . . . . . . . . .162 CHAPTER 8 RHINO COMPOSITE 167 Creating the Landscape . . . . . . . . . . . . . . . . . . . . . . . . . . . . . . .168 Adding the Rhino . . . . . . . . . . . . . . . . . . . . . . . . . . . . . . . . . . . . .178 Creating the Dust . . . . . . . . . . . . . . . . . . . . . . . . . . . . . . . . . . . . .183 Finishing Touches . . . . . . . . . . . . . . . . . . . . . . . . . . . . . . . . . . . . .185
  11. CONTENTS xi CHAPTER 9 FAIRYTALE SCENE 189 Behind the Scenes

    . . . . . . . . . . . . . . . . . . . . . . . . . . . . . . . . . . . .190 The Miniature Room . . . . . . . . . . . . . . . . . . . . . . . . . . . . . . . . . . .192 Adding the Toys . . . . . . . . . . . . . . . . . . . . . . . . . . . . . . . . . . . . . . .198 Adding the Shadows . . . . . . . . . . . . . . . . . . . . . . . . . . . . . . . . . .200 Adding the Children . . . . . . . . . . . . . . . . . . . . . . . . . . . . . . . . . . .206 Turning Day into Night . . . . . . . . . . . . . . . . . . . . . . . . . . . . . . . .210 The Wardrobe Light . . . . . . . . . . . . . . . . . . . . . . . . . . . . . . . . . . .212 Finishing Touches . . . . . . . . . . . . . . . . . . . . . . . . . . . . . . . . . . . . .217 CHAPTER 10 RETOUCHING A LANDSCAPE 221 Using Camera Raw . . . . . . . . . . . . . . . . . . . . . . . . . . . . . . . . . . . .222 CHAPTER 11 ASSASSIN 235 Lighting Setup . . . . . . . . . . . . . . . . . . . . . . . . . . . . . . . . . . . . . . . .236 Camera Raw . . . . . . . . . . . . . . . . . . . . . . . . . . . . . . . . . . . . . . . . . . .236 Composition . . . . . . . . . . . . . . . . . . . . . . . . . . . . . . . . . . . . . . . . . .239 Selecting the Model . . . . . . . . . . . . . . . . . . . . . . . . . . . . . . . . . . .240 Dodging and Burning . . . . . . . . . . . . . . . . . . . . . . . . . . . . . . . . .243 Retouching the Jacket . . . . . . . . . . . . . . . . . . . . . . . . . . . . . . . . .245 Adding the Background . . . . . . . . . . . . . . . . . . . . . . . . . . . . . . .248 Add a Moveable Vignette . . . . . . . . . . . . . . . . . . . . . . . . . . . . . .252 The Glasses. . . . . . . . . . . . . . . . . . . . . . . . . . . . . . . . . . . . . . . . . . . .253 Finishing Touches . . . . . . . . . . . . . . . . . . . . . . . . . . . . . . . . . . . . .255 INDEX 262
  12. xii THE PHOTOSHOP WORKBOOK FOREWORD I wear a lot of

    hats at my day job, where since 1999 I lead a company dedicated to teaching people Photoshop, Lightroom, and photography. One of my roles there (and one I particularly enjoy) is my role as Conference Technical Chair for the Photoshop World Conference & Expo. That’s a fancy-sounding name for “the guy who gets to choose who speaks at the conference.” It’s a job I take very seriously. People from all over the world come to this three-day conference and we had decided from the very beginning that if this truly was going to be a world-class event, we had to hire nothing but absolutely the very best instructors on earth—the thing that would make our conference so unique. If you come to Photoshop World as an attendee, you know for certain that you’re learning from the very best. Sure, there are some very obvious choices for instructors out there, but I don’t need just 10 or 12 instructors. With well over 100 classes to fill during the conference and I need to put together a team or 35 to 40 flat-out amazing teachers. They can’t be just “fairly good” or “pretty solid.” They have to be literally the world’s best at what they do. That’s quite a small list. Of course, I can’t use the same instructors every single year—you have to keep things fresh for the attendees who come year after year. So an important part of my Technical Chair job is to find the next generation of Photoshop gurus—teachers whose skill and passion have started getting them worldwide acclaim. I was delighted to see that a photographer/Photoshop guru I met a few years ago on a vacation trip to London with my wife turned out to be just that. After spending the day shooting (and laughing) our way around London (with our dear friend, designer Dave Clayton), I started following Glyn’s tutorials online and son of a gun not only did he have some very clever stuff, I was learning new techniques from him on a regular basis. His retouching techniques and special effects were just really clever and he was covering and creating some of the most popular “looks” out there today. So, when two years later I came to London with my “Light it, Shoot it, Retouch it” full-day seminar, I invited Glyn to be my “guest retoucher” to come on stage for 30-minutes and do a start-to-finish retouch of an image I had just lit and photographed of a boxer in a boxing ring. I left the stage, sat in the audience, and took notes along with everyone else. As expected, he absolutely crushed it! I knew from the audience’s reaction that Glyn had been a huge hit, but when I read the hundreds of written evaluation forms completed at the end of the day, I realized that what he did on stage that day wasn’t just a really good session on retouching. What he did was something really special. He connected with the audience in a way that a few people in this entire industry can. Whatever that “thing” is that makes someone go from a really good teacher to a world-class instructor, he had it in spades. I knew right then I had to ask him to join our “Instructor Dream Team” at the Photoshop World Conference & Expo.
  13. CONTENTS xiii From his first time speaking at Photoshop World,

    he was a hit. He captivated rooms full of serious Photoshop users with his knowledge, passion, and gift for communicating with wit and wisdom throughout. But it was his heartfelt presentation at the closing ceremony that year in front of literally thousands of Photoshop users gathered from around the world, where he shared his personal story, his journey, his struggles, and his triumphs, that made him who he is today and that made us fall in love with the man behind the training. He shared some wonderful insights into his life, which brought into perspective his willingness to pass on what he’s learned to others (even if he learned it the hard way). He does it all in a way that really makes it stick. Glyn’s teaching has helped so many people around the world achieve their dreams in Photoshop, and in doing that, they’ve helped him achieve his dreams as well. And you’re holding a culmination of all of that in your hands right now. I’ve learned so much from Glyn over the years, and I’m so excited that you’ll now have the opportunity to learn from him as well as you join him on this journey. I’m so proud of Glyn for what he’s done here in his debut book—the first of many to come—and one that I know will have you creating the type of images you’ve always dreamed of. Glyn has a lot to share, and he doesn’t hold back. He gives you everything he’s got (as he does in everything). I know as you go through this book and start creating these types of images that there will be times where you’ll have that same silly smile on as I did when sitting in that audience in London watching Glyn teach. You’ll have that moment when Glyn teaches one of his amazing techniques and you think to yourself (just like I did), “Ah ah—so that’s how you do it!” You are really in for a treat. All my best, Scott Kelby Publisher, Photoshop User magazine
  14. xv INTRODUCTION Adobe Photoshop is a truly incredible piece of

    software, limited only by the skill and creativity of the person using it. From my perspective, there are no advanced users. There’s no such thing as advanced—there are just those who have put it to use, practiced more, and have a working knowledge of the tools and techniques. Most importantly, though, they understand how and when to use the tools and techniques to get the results they want again and again. So who is this book for? Well, to be perfectly honest, it’s for anyone who already uses Adobe Photoshop, has a basic knowledge of the tools and features, and wants to improve and realize their own creative potential—it’s that simple! In The Photoshop Workbook, I lead you through the compositing and retouching techniques that I use every day to create images for my portfolio and for clients, who range from the BBC and Sky TV to athletes, musicians, and other professionals.
  15. xvi THE PHOTOSHOP WORKBOOK ABOUT THIS BOOK This book is

    split into two distinct sections. In the first section, we start off by going through selections and cutouts. Having taught thousands of Photoshop users around the world, I know that making great selections and cutouts is the area that causes the most frustration. So, I‘ve purposely dedicated Chapter 1 to this and placed it right at the start of the book. I’ll show you how to achieve the very best results using a range of tools and techniques to get the job done, so you can carry on doing what you really want to be doing: being creative. The tools we have available to us are incredible, but despite this there’s no single tool or technique that will work on every image. I’ll show you how to master the tools and the techniques, and even show you some tricks of the trade for making the perfect selections. Your knowledge and confidence will quickly build, so you can then laugh in the face of a tricky cutout—well, you know what I mean. We then move on to look at the many creative uses of gray in Chapter 2. I’ll show you a super-fast way to create composite images, how to creatively use textures, and will explain a nondestructive dodging and burning technique for adding depth and dimension to your images. I’ll also share how to com- pletely transform a location using gray, how to create a lens flare, how to add fake damage and dents, and even how to give anyone a perfect abs six-pack (well, almost anyone!). Adding lighting effects is a great way to change the look and feel of a picture, so Chapter 3 covers some of the most common techniques I use to do exactly that. I show you what I call “the world’s simplest lighting effect” and how to create realistic shadows. These techniques are effective but also simple and quick to apply. Chapter 4 is where we’ll have great fun with special effects, but with the emphasis on realism. We’ll look at how to add realistic rain and how to create the flying debris that we so often see in Hollywood action-movie photos. You’ll also learn how to turn day into night and even how to create a snow scene. In Chapter 5 I’ll show you how to match the color when compositing, and how to add realistic shadows so that the viewer will totally believe that everything was there in the original photograph. In addition, I show you some clever uses of brushes in compositing and how to add a horizon line so that the lighting in a scene is totally believable. In the second section of the book, everything comes together and we put all the learning into practice as I take you step by step through six complete retouching projects. Anyone can learn Photoshop techniques, but the real skill is in knowing how and when to apply them, and that’s exactly what we do here as we work through a character portrait, a themed composite using gray, an animal project composite creating a unique landscape from a number of different pictures, a fairytale-themed composite using miniature and life-size elements, and a landscape retouch. By working through the projects you’ll learn not only how to apply the techniques we covered in part one of the book, but also how to combine them to make your own creative images.
  16. INTRODUCTION xvii To help you with the learning process, I’ve

    made all the image files for each project available for you to download. To access the files, you must first register your book at Peachpit.com. If you don’t already have an account, create one (it’s free!) at peachpit.com/register. After you have created your account or logged in, register your book. Enter the book’s ISBN number, 9780134008462, and click Submit. Look for the book under the Registered Product tab on your Account page. Then select Access Bonus Content. From there, you can download the image asset files. HOW TO USE THIS BOOK The first part of the book was written so that you can dive in, learn a technique, and then use it. I rec- ommend that you work your way from start to finish of Chapter 1. Selections and cutouts can cause a lot of frustration, so spend some time here going through the tools and techniques, and try them out on your own images. When it comes to Photoshop, there is no right or wrong way to do something—there are just good and bad results! Throughout this book you’ll see many tips, tricks, and techniques that I use in my work, but there will always be countless other ways to achieve similar results. The key, however, is to continually build a knowledge base and add to your Photoshop tool bag. Sharing knowledge and seeing someone’s joy when they can do something that previously eluded them is a wonderful feeling. My hope is that the content of this book not only helps you develop your skills, but also inspires and pushes you to create images you never thought possible. Realize that with knowledge and plenty of practice, you can do it! —Glyn Dewis
  17. CHAPTER 4 SPECIAL EFFECTS In this chapter I share some

    special effects that I regularly use in my own pictures. I’m often asked how I create these effects and whether they come from using third-party plug-ins. The great thing is that they’re all created within Photoshop, and each one is quick and easy to produce. Over the next few pages I’ll show you techniques I use for turning day into night, creating a cartoon/painterly effect, and making your own dust, debris, snow, and rain brushes. Plus, I show a quick and easy black and white conversion technique, and how to fake the wet look. 87
  18. 88 THE PHOTOSHOP WORKBOOK TURNING DAY INTO NIGHT Techniques for

    turning a day scene into a night scene open up a whole new world of creative possibilities. Here’s a really simple way to do exactly this, and how to add realistic street lighting by using the Camera Raw filter and a layer mask. 1. With an image file open in Photoshop (Figure 4.1), create a copy by going to Layer > New > Layer via Copy (Command/Ctrl+J). Name this layer night. 2. Because we’re going to make use of a filter for this effect, we want to use it as a Smart Filter, so go to Filter > Convert for Smart Filters, and then to Filter > Camera Raw. 3. To create the nighttime look, move the Temperature slider to –55 so that we introduce much more blue into the picture. Then darken the picture by moving the Exposure slider to –3.00 (Figure 4.2), and click OK. Now that we have the beginnings of our nighttime scene (Figure 4.3), we’ll move on to adding the street lighting. Figure 4.1 Figure 4.3 Figure 4.2
  19. CHAPTER 4: SPECIAL EFFECTS 89 4. Click the original background

    layer at the bottom of the layer stack, and create a copy by pressing Command/Ctrl+J. Rename it light, drag it to the top of the layer stack, and go Filter > Convert for Smart Filters (Figure 4.4). 5. Go to Filter > Camera Raw, increase Temperature to +100 and Vibrance to +100, and click OK. 6. Click the triangular icon to the right of the night and light layers (Figure 4.5) to hide the layer masks that are attached to the Smart Filter, and to prevent the layer stack from becoming too long. 7. Click the uppermost layer (light), and Option/Alt-click the layer mask icon at the bottom of the Layers panel. This adds a black mask and hides the contents of the light layer. 8. Press D to set the foreground and background colors to their default, and then with a white foreground color and a normal soft-edged brush at 25% opacity, paint around the wall light and down to the ground and pavement (Figure 4.6). TIP Releasing and pressing down with the brush increases the opacity of the light layer showing through the black layer mask. continues Figure 4.4 Figure 4.5 Figure 4.6
  20. 90 THE PHOTOSHOP WORKBOOK 9. Let’s take this a step

    further and make it appear as though there’s a light inside the doorway that is spill- ing out onto the road surface. With the same white brush, change the hardness to 90% and, with the layer mask selected in the Layers panel, paint inside the doorway and onto the road (Figure 4.7). NOTE Option/Alt-click the layer mask to see that the area around the door and road surface is pure white (Figure 4.8), meaning that the full color of the light layer is showing through. To reduce this, we need to make the white area not quite so white. We can do that with the output levels. Option/Alt-click the layer mask to go back to the picture. 10. Option/Alt-click the layer mask to go back to the picture. Use the Lasso tool to make a rough selection around the doorway and the light on the road surface (Figure 4.9). Then go to Image > Adjustments > Levels and drag the White Output Levels mark to 170 (Figure 4.10). Click OK, and then choose Select > Deselect (Command/Ctrl+D). This makes the light in the door- way and on the road surface not quite so bright. NOTE Option/Alt-click the layer mask and you can see that the area of the door and road surface has gone from pure white to a light shade of gray. Figure 4.7 Figure 4.8 Figure 4.9 Figure 4.10
  21. CHAPTER 4: SPECIAL EFFECTS 91 THE CARTOON OR PAINTERLY EFFECT

    Contrary to what most people believe, this effect isn’t created by using a third-party plug-in but instead makes use of two filters built into Photoshop: Reduce Noise and High Pass. It creates a wonderful textured feel and seems to add more dimension to a picture—as if it’s coming out of the screen or off the print a little. It works especially well when used on pictures with a fun element. 1. Create a merged layer at the top of the layer stack by going to Select > All, then to Edit > Copy Merged, and then to Edit > Paste (Shift+Command/Ctrl+ Option/ Alt+E). Rename the layer painterly. 2. Create a copy of this new layer by pressing Command/ Ctrl+J. Name this layer sharpness (Figure 4.11). 3. Turn off the sharpness layer by clicking the eye icon to the left of the layer. Click the painterly layer, and go to Filter > Convert for Smart Filters and then to Filter > Noise > Reduce Noise. 4. With the Reduce Noise properties open, set Strength to 10, set all other sliders to 0 (Figure 4.12), and click OK. TIP If you place your cursor within the preview inside the Reduce Noise filter, and then click and release, you will see the before and after views. 5. Most times I apply this effect twice, but the second time I use a slightly lower strength. Go to Filter > Noise > Reduce Noise, and this time set Strength to 5 and click OK. Applying this effect tends to reduce the sharpness in areas like the eyes, hair, and so on. To bring some of this sharpness back but maintain the painterly effect, we can use the High Pass filter. continues Figure 4.11 Figure 4.12
  22. 6. Click the sharpness layer and click to turn the

    eye icon on so that the layer is visible. Then go to Filter > Other > High Pass, add a Radius of 1 pixel, and click OK. Then change the blend mode of the sharpness layer to Overlay (Figure 4.13). A radius of just 1 pixel is enough to bring back sharp- ness for most pictures; very rarely would you want to use an amount of 2 pixels or beyond. Also, applying this effect using Smart Filters means that you can very easily and quickly increase or decrease the final result. Figure 4.13 The result of adding the cartoon/painterly effect
  23. CHAPTER 4: SPECIAL EFFECTS 93 DEBRIS AND DUST Debris and

    dust are something you often see in movie posters when there’s a lot of action and explosions. As always with Photoshop, there are countless ways to create this debris and dust effect. Creating the Brush 1. Create a new document: go to File > New, make the dimensions 1500px width and 1500px height, set the resolution to 240ppi, and for Background Contents choose anything other than Transparent. Click OK. 2. Then go to Filter > Noise > Add Noise, set Amount to 400%, set Distribution to Gaussian, and select the Monochromatic checkbox (Figure 4.14). 3. For this effect to work we need to make the noise bigger. Choose the Rectangular Marquee tool, Shift-click, and drag out a square in the center of the document (Figure 4.15). 4. Copy this selection onto its own layer by pressing Command/Ctrl+J. Then go to Edit > Free Transform, Shift+Option/Alt-click any corner transform handle and drag outward so that the square fills the document. As a result, the size of the noise has been increased. Flatten the layers by going Layer > Flatten Image. continues Figure 4.15 Figure 4.14
  24. 94 THE PHOTOSHOP WORKBOOK 5. Go to Filter > Filter

    Gallery, and then to Stylize > Glowing Edges. Here is where you can experiment with the Edge Width, Edge Brightness, and Smoothness settings to create random shapes that will pass as being debris. In this example I found that setting Edge Width to 14, Edge Brightness to 20, and Smoothness to 1 worked great (Figures 4.16 and 4.17). 6. Click OK to close the Filter Gallery, and then press D to set the foreground and background colors to their default of black and white. Press X so that white becomes the foreground color. Choose the Gradient tool from the toolbar and, in the options at the top of the screen, select the Foreground to Transparent from the Gradient Picker, and the Linear gradient as in Figure 4.18. Figure 4.16 Figure 4.17 Figure 4.18
  25. CHAPTER 4: SPECIAL EFFECTS 95 7. Drag inward from each

    side (left, right, top, and bottom) and from the corner of the document several times. This will cover the debris that is too close to the edge and ensure that there are no straight lines (Figure 4.19). Then go to Image > Adjustments > Levels, click the Black Point sampler icon (Figure 4.20). Zoom in on the document and click any of the debris shapes (this darkens them all so that they stand out more). Click OK to close the Levels Adjustment dialog. NOTE When you’re defining (creating) a brush, Photoshop makes the darkest areas opaque and the gray areas semitransparent. White areas are completely ignored. 8. Choose Edit > Define Brush Preset, name the brush Debris, and click OK. Choose the Brush tool (B), and in the options at the top of the screen click to open the Brush Preset Picker. The brush we just created will appear as the very last in the list. Click this new brush to select it, click the gear icon in the top right of the Brush Preset Picker properties to open a menu (Figure 4.21), and choose Save Brushes. continues Figure 4.20 Figure 4.19 The result of using several gradients to remove the debris from the edges and to remove any straight lines Figure 4.21
  26. 96 THE PHOTOSHOP WORKBOOK 9. Name the brush set Particles,

    and click OK. The Particles brush set, which contains the Debris brush, is now stored for future use and will appear in the Brush Preset Picker’s list of brushes (Figure 4.22), meaning you can share it and export it. (Brush sets are a great way to keep similar brushes together.) Saving Brush Presets Now we can make some adjustments in the Brush panel to make the Particles brush look and behave as we want it to. 1. Choose the Brush tool (B), and from the Brush Preset Picker choose the Particles brush. Click the Brush panel icon (Figure 4.23). 2. In Brush Tip Shape, set Spacing to 60%. In Shape Dynamics, set Size Jitter to 5% and Angle Jitter to 100% (Figure 4.24). In Scattering, set Scatter to 25% and Count to 1. In Transfer, set Opacity Jitter to 65%. 3. To save these settings as a preset, click the gear icon in the top right of the Brush panel properties and choose New Brush Preset (Figure 4.25). Name the preset Debris/Dust, and click OK. Figure 4.22 The Particles brush set is now stored in Photoshop for future use. Figure 4.24 Making changes in the Brush panel Figure 4.25 Saving brush settings as a preset for future use Figure 4.23
  27. CHAPTER 4: SPECIAL EFFECTS 97 Using the Debris Brush We’ll

    now add depth using several layers. 4. With an image open in Photoshop that you want to add debris to, add a new blank layer to the top of the layer stack and name it debris 1. 5. Use the Debris brush with a black foreground color to paint the debris. Debris in the distance would be small because it is farthest from the camera, so to make it appear out of focus go to Filter > Convert for Smart Filters and then to Filter > Blur > Gaussian Blur. I used a blur amount of 20 pixels (Figure 4.26). Then click OK. 6. Add another blank layer and name it debris 2. Increase the size of the brush a little because the debris nearer to the camera would be larger, and then apply a few brush strokes. Go to Filter > Convert for Smart Filters, and then to Filter > Blur > Gaussian Blur and apply less blur than in the previous step. I applied a blur amount of 15 pixels. Click OK. continues Figure 4.26
  28. 98 THE PHOTOSHOP WORKBOOK 7. Add another blank layer and

    name it debris 3. This debris should be slightly larger than the previous layer, so increase the size of the brush. Add a small amount of Gaussian Blur (5 pixels) so that it still has the look of movement. Click OK. 8. Add another blank layer and name it debris 4. This will be the debris nearest the camera. This debris needs to be largest of all, so increase the size of the brush to the maximum and apply a few brush strokes (if you want the debris to be even bigger, use Edit > Free Transform and resize the contents of the layer). Finally, go to Filter > Convert for Smart Filters, and then to Filter > Gaussian Blur and add a blur amount similar (if not slightly more) to the amount you used on the debris 1 layer. NOTE In Figure 4.27, you can see that adding layers of debris at varying sizes and with different amounts of blur creates the feeling of depth. You can add as many layers of debris as you like, but I recommend no less than three: farthest away, in line with the subject, and closest to the camera. Figure 4.27 Adding multiple debris layers to create depth
  29. CHAPTER 4: SPECIAL EFFECTS 99 CREATING A SNOW SCENE Here’s

    a simple technique that I use for creating a realistic snow scene. When it’s used on a picture in which there is little or no detail in the sky, it is incredibly effective, especially when falling snow is added . 1. With a suitable picture open in Photoshop (Figure 4.28), go to Select > Color Range. In the Color Range properties, choose Sampled Colors from the Select menu, choose the Selection option, and choose None from the Selection Preview menu (Figure 4.29). 2. Move your cursor on top of the open photo, and click once with the Eyedropper tool. You can see what is being selected from the white areas in the Color Range preview box. Now that you have sampled an area of the picture, move the Fuzziness slider left or right to add or take away from the selection. When you are happy that enough has been selected, click OK. 3. Add a new blank layer to the top of the layer stack by clicking the New Layer icon at the bottom of the Layers panel. Name the layer snow (Figure 4.30). Go to Edit > Fill, choose White from the Contents menu, and click OK. continues Figure 4.28 Figure 4.29 Figure 4.30
  30. 100 THE PHOTOSHOP WORKBOOK 4. Go to Select > Deselect

    (or press Command/Ctrl+D). Add a small amount of blur, so that the snow has no sharp edges, by going to Filter > Blur > Gaussian Blur, adding a Radius of 2 pixels, and clicking OK (Figure 4.31). NOTE You may need to make a few attempts and experiment with Color Range by clicking and sampling different areas of your picture before you get the result you’re after. You can also duplicate the snow layer by pressing Command/Ctrl+J, which will increase the amount of snow cover. You can take it one step further by using the Particles brush to create falling snow. The technique is exactly the same as for debris, but use the brush with a white fore- ground color (Figure 4.32). Figure 4.31 Figure 4.32
  31. CHAPTER 4: SPECIAL EFFECTS 101 RAIN Here’s how to create

    rain using a few Photoshop filters, as well as how to turn it into a brush that you can keep and use in the future. 1. Press D to set the foreground and background colors to their default of black and white. Create a new document by going File > New. Set Width to 1200px, Height to 800px, and Resolution to 240ppi, and click OK (Figure 4.33). (It doesn’t matter what color you set as Background Contents so long as you don’t use Transparent.) 2. Go to Filter > Noise > Add Noise, set Amount to 400%, and choose Gaussian and Monochromatic (Figure 4.34). Click OK. Go to Filter > Blur > Motion Blur, and set Angle to –52 and Distance to 70 pixels (Figure 4.35). continues Figure 4.33 Figure 4.34 Figure 4.35
  32. 102 THE PHOTOSHOP WORKBOOK 3. You may notice that the

    motion blur around the edges of the file don’t look quite right (Figure 4.36). Go to Edit > Free Transform, Shift+Option/Alt-click a corner transform handle, and drag outward until the edges aren’t visible. Press Return/Enter. NOTE If you can’t use Free Transform, then the layer you’re working on may be locked. Simply click the padlock icon to the left of the layer to unlock it. 4. Go to Image > Adjustments > Levels, choose the Black Point sampler, and then click within the image. This changes the look of the layer entirely, and you’ll see lines appear that we’ll be able to use as rain (Figure 4.37). Try clicking around different areas of the layer, which will create results with more or less rain. Once you have the look you’re after, click OK. 5. To turn this rain effect into a brush, go to Image > Adjustments > Invert so that the rain effect is now black against a white background. Photoshop uses the dark and gray areas to form the brush, ignoring the white areas. Go to Edit > Define Brush preset, name the preset rain, and click OK. TIP When adding rain to your pictures, stick to the principles covered earlier: Create a number of layers with rain of different sizes and blur strengths to add depth (Figure 4.38). Figure 4.36 Figure 4.37
  33. THE WET LOOK Here’s a simple technique you can use

    for making something look wet, which I applied to the model in the previous rain technique. Of course nothing beats the real thing, but this can give a great result. 1. Create a merged layer at the top of the layer stack by going to Select > All, then to Edit > Copy Merged, and then to then Edit > Paste (or press Shift+Command/ Ctrl+Alt/Option+E). Name the merged layer wet look. 2. Go to Filter > Filter Gallery > Artistic > Plastic Wrap and experiment with the settings until you get the look you’re after. I set Highlight Strength to 20, Detail to 5, and Smoothness to 15 (Figures 4.39 and 4.40). 3. Add a black layer mask to the wet look layer by Option/Alt-clicking the layer mask at the bottom of the Layers panel. Then with a normal white soft-edged brush at 20% opacity, paint over areas of the image to reveal the wet look. Apply several brush strokes to build up the opacity in areas where you want the wet look to be more visible. Figure 4.39 Figure 4.40
  34. CHAPTER 4: SPECIAL EFFECTS 105 BLACK AND WHITE CONVERSION I

    often use black and white conversions as a way to reduce the color in my pictures. In this example, I’ll show you how I applied it to a physique photograph that I shot of UK-based natural bodybuilder Nigel St. Lewis. 1. With the image that you want to convert to black and white open in Photoshop, press D to set the fore- ground and background colors to their default of black and white. Then click the Gradient Map adjustment layer icon (Figure 4.41). 2. We can now make adjustments to get exactly the look we’re after. Click the gradient bar in the Gradient Map properties (Figure 4.42). 3. Drag the Gradient Editor to one side so that you can see your picture. Drag the Black Output Levels marker and the White Output Levels marker (Figure 4.43) to make adjustments to the black and white conversion. A new icon appears under the gradient (Figure 4.44). This controls the transition from black to white. 4. Drag the new icon left or right until you get the look that you’re after (Figure 4.45 on the following page). Figure 4.41 Figure 4.43 Figure 4.44 Figure 4.42
  35. CHAPTER 4: SPECIAL EFFECTS 107 ADDING FAKE BLOOD As photographers

    and retouchers, we don’t always have the luxury of using a make-up artist at the time of a photo shoot to create effects such as cuts and bruises. But here is how you can create them in Photoshop. The blood and scratches are added using a series of brushes, but rather than creating them we’ll download them. Places like www.deviantart.com have an enormous database of brushes available for free, but be sure to read the terms of use (Figure 4.46). Figure 4.46 Results from typing “blood spatter brushes” into deviantART’s search
  36. 108 THE PHOTOSHOP WORKBOOK Installing the Blood Brushes When you

    download brushes from the Internet, you’ll generally be downloading a set containing brushes with different looks, giving you many creative possibilities. There’s no particular set of brushes that I recommend; I suggest you download and try a variety. Once they’re downloaded, they’re easy to install. 1. With Photoshop open, choose the Brush tool (B) and then click to open the Brush Preset Picker from the options bar at the top of the screen. Click the cog icon in the upper-right corner, and choose Preset Manager (Figure 4.47). TIP You can also choose the Preset Manager from the Brush Presets tool in the toolbar: click the small arrow in the upper-right corner of the panel. 2. In the Preset Manager, click Load (Figure 4.48), navigate to the blood brushes you downloaded, and click OK. You’ll see all the blood brushes in the list of brushes in the Preset Manager. 3. So that all the blood brushes are easy to find, orga- nized, and available to use at a later date, it’s good practice to create a set that contains them all. In the Preset Manager, click the first blood brush, Shift-click the last brush, and then click Save Set (Figure 4.49). Figure 4.47 Figure 4.48 Figure 4.49
  37. CHAPTER 4: SPECIAL EFFECTS 109 4. Name the set Blood

    Brushes, save the set onto your hard drive (Photoshop > Presets > Brushes), and click OK (Figure 4.50). Using the Blood Brushes First we need to get the color of the blood right. In the real world, blood isn’t the color of tomato ketchup, as we see a lot, but is actually much darker. 1. Click the foreground color in the toolbar to open the Color Picker. 2. In the middle area we have a vertical line made up of different colors. To choose the initial color, move the pointer up or down (Figure 4.51). 3. Now that we’ve chosen the initial color, we can target a specific area. Click inside the large square, and drag the circular pointer. In Figure 4.52 you can see what changes certain areas of the square make. You can see the color in real time in the preview box. Once you’re happy with the color, click OK to close the Color Picker. 4. Add a new blank layer to the top of the layer stack, and name it blood. continues Figure 4.50 Figure 4.51 Figure 4.52 Brighter Darker Desaturated Saturated
  38. 110 THE PHOTOSHOP WORKBOOK 5. Choose one of the blood

    brushes from the Brush Preset Picker, and then click the Brush Panel icon (Figure 4.53) so you can make adjustments to how the brush behaves. 6. In Shape Dynamics, I set Size Jitter to 75% and Angle Jitter to 100% (Figure 4.54). In Transfer, I set Opacity Jitter to 100% (Figure 4.55). Figure 4.53 Figure 4.54 Figure 4.55
  39. CHAPTER 4: SPECIAL EFFECTS 111 7. In Figure 4.56 the

    blood effect looks very two- dimensional. To remedy this, change the blend mode of the blood layer from Normal to Overlay and then adjust the opacity of the layer (Figure 4.57). Figure 4.56 The blood painted on a layer in the Normal blend mode. Figure 4.57 The blood looks much more realistic in the Overlay blend mode.
  40. 112 THE PHOTOSHOP WORKBOOK ADDING SWELLING Here’s how to use

    a couple of tools in the Liquify filter to make it appear as though the fighter has a swollen eye. NOTE In the more recent Photoshop updates we are able to use the Liquify filter as a Smart Object but if you don’t have this option, simply duplicate the layer you are going to work on and then use Liquify; that way, your working copy is safe. 1. With the layer containing your subject active, go to Filter > Convert for Smart Filters, and then to Filter > Liquify (Figure 4.58). 2. In the Liquify Filter properties, select the Advanced Mode checkbox (Figure 4.59) so that all of Liquify’s tools are available. 3. Use the Zoom tool (Z) to zoom in on the area you wish to liquify. Figure 4.58 Figure 4.59
  41. CHAPTER 4: SPECIAL EFFECTS 113 4. I want the area

    around the fighter’s eyebrow to be swollen, but I need to ensure that other areas aren’t affected. I use the Freeze Mask tool for this (Figure 4.60). Make sure the Show Mask checkbox is selected (Figure 4.61), and paint over the areas you want to protect. In Figure 4.62 I’ve painted an area in the middle of the fighter’s eye. NOTE If you paint over too much of an area with the Freeze Mask tool, you can remove some of the selection with the Thaw Mask tool, located directly underneath it in the toolbar. continues Figure 4.60 Figure 4.61 Figure 4.62
  42. 114 THE PHOTOSHOP WORKBOOK 5. Choose the Bloat tool (Figure

    4.63), and set Size to 125, Density to 50, and Rate to 80 (Figure 4.64). (Experiment with the settings to suit yourself.) 6. With the Bloat tool, click several times around the area you want to swell. 7. Deselect the Show Mask checkbox, click Reconstruct (Figure 4.65), and move the Amount slider left and right to dial in exactly how much of the effect you wish to keep (Figure 4.66). Click OK. Figure 4.64 Figure 4.63 Figure 4.65 Figure 4.66
  43. CHAPTER 4: SPECIAL EFFECTS 115 THE DETAILS EFFECT The gritty,

    detailed look is extremely popular in movie posters, and many retouchers like to add it to their own work. There are three different techniques I use for adding or enhancing details. I’m a big believer in knowing a variety of techniques that you can call on to produce similar results. Figure 4.67 shows the image we’ll be using each technique on. Details with Photoshop This was a technique I first saw being demonstrated by the German digital artist Calvin Hollywood. 1. With the image file open in Photoshop, create two copies by pressing Command/Ctrl+J twice (Figure 4.68). 2. Click the uppermost layer, and Shift-click the layer below so that both copies are selected. Then go to Layer > New > Group from Layers. Name the group details, change Mode to Soft Light (Figure 4.69), and click OK. continues Figure 4.68 Figure 4.69 Figure 4.67
  44. 116 THE PHOTOSHOP WORKBOOK 3. Click the triangle icon for

    this group to open it and reveal the two layers inside. Change the blend mode of the uppermost layer in the group to Vivid Light (Figure 4.70). 4. On the same layer, go to Image > Adjustments > Invert, which restores the picture to how it originally appeared; however, the image has now been set up to enhance details. 5. Convert the layer to a Smart Object by going to Filter > Convert for Smart Filters. Add the details by going to Filter > Blur > Surface Blur. 6. In the Surface Blur properties, set the Radius and Threshold settings to the same number. I find that settings not exceeding 30 produce the best results (Figure 4.71). NOTE Don’t set the amount too high in the Surface Blur filter, as it can introduce halos and artifacts into your pictures, especially if they have lots of shadow areas. You can see this just under the rim of the hat in Figure 4.72. 7. To limit where and how strongly the details are applied, close the details group by clicking the triangle icon, as before, and Option/Alt-click the layer mask icon to add a black layer mask. Then with a white medium soft- edged brush, paint over the image to reveal the details. Use a lower opacity brush when painting over the skin as opposed to the clothing. Figure 4.70 Figure 4.71 Figure 4.72
  45. CHAPTER 4: SPECIAL EFFECTS 117 Details with the Nik Collection

    I’m using the latest version of Nik Color Efex Pro 4, which includes a preset called Detail Extractor. I’m a big fan of this plug-in not just because of the results but also because it allows me to work nondestructively. 1. Starting from the beginning, with no layers other than the original image, go to Filter > Convert for Smart Filters, and then to Filter > Nik Collection > Color Efex Pro 4. 2. From the Presets list, choose Detail Extractor. The default settings are immediately applied (Figure 4.73). 3. More often than not I’ll use the default settings, but experiment with them to see what you prefer (Figure 4.74). Click OK. continues Figure 4.74 Figure 4.73 Nik Color Efex Pro 4
  46. 4. Because the details have been applied to the entire

    picture, click the white layer mask attached to the filter in the layer stack (Figure 4.75) and go to Image > Adjustments > Invert to change it to black. 5. With a white medium soft-edged brush, paint over the image area to reveal the details. Use a lower opacity brush when painting over the skin as opposed to the clothing. You can see that it enhances the details and information incredibly. Unlike the previous technique, it creates very few (if any) artifacts and halos. One side effect of using this preset for enhancing details is that it also brightens the image (Figure 4.76). In this particular picture that isn’t what we want, because the model’s suit needs to remain dark. Figure 4.75 Figure 4.76 Enhancing details with the Detail Extractor plug-in
  47. CHAPTER 4: SPECIAL EFFECTS 119 Details with Topaz Details The

    final technique I turn to for enhancing details, depending on the image, is Topaz Details. The result it produces is quite different from the previous two tech- niques, and it also adds a slight textured effect. This plug-in gives great results but needs to be used sparingly on skin. 1. With the image open in Photoshop, go to Filter > Convert for Smart Filters, and then to Filter > Topaz Labs > Topaz Details 3. 2. In the Detail section, I adjust only the Small Details, Small Details Boost, Medium Details, and Medium Details Boost settings, with the uppermost slider increased to the right the most, and less for the three others, to produce an arc (Figure 4.77). Click OK. TIP To see a true representation of how the plug-in is affecting the image, increase the magnification to 100% by clicking the magnifying glass in the upper-right corner (Figure 4.78). For this particular image, this plug-in has produced the best result because it enhances detail and maintains the original darkness of the suit (Figure 4.79). 3. Because the details have been applied to the entire picture, click the white layer mask attached to the filter in the layer stack, and go to Image > Adjustments > Invert to change it to black. Then with a white medium soft-edged brush, paint over the image to reveal the details. Use a lower opacity brush when painting over the skin as opposed to the clothing. Figure 4.77 Figure 4.78 Figure 4.79
  48. 120 THE PHOTOSHOP WORKBOOK Here is the before image with

    the model photographed against a plain gray background, allowing for textures to be added or for cutting out and compositing a new background. After (facing page), final composited and retouched image.
  49. 262 THE PHOTOSHOP WORKBOOK INDEX 50% gray, 29, 40, 42,

    56, 58 A about this book, xvi–xvii Add Noise filter, 58, 93, 101 Add to Selection icon, 4 Adjustment Brush landscape retouching with, 225–226 portrait retouching with, 144, 157, 237–238 adjustment layers Curves, 150 Gradient Map, 105, 163, 185, 245–247 Hue/Saturation, 45, 60–61, 251 Levels, 83–84, 149, 160, 202 Photo Filter, 85 Selective Color, 163, 258 Adobe Exchange, 36 Amount slider, Detail tab, 227, 238 Angle setting Brush panel, 16 Gradient Fill dialog, 70 Anti Alias checkbox, 162 assassin project, 235–261 background added to, 248–251 before/after images for, 260–261 Camera Raw adjustments, 236–239 cartoon/painterly effect for, 259 coloring or toning, 257–258 composition adjustments, 239 detail enhancement, 255 dodging and burning for, 243–244 finishing touches for, 255–260 jacket retouching for, 245–247 lens flare added to, 256 model selection technique, 240–242 moveable vignette for, 252 reflection added to glasses in, 253–254 studio lighting setup, 236 Auto Enhance checkbox, 4 Auto Mask checkbox, 144, 157, 226 Average Blur filter, 134 B backgrounds adding color to, 148 cloning away parts of, 43–44 matching foreground color with, 150 preparing for composites, 248–251 setting default color for, 126, 184 shadows added to, 161–162 shooting for composites, 31 battle damage effects, 50–53 beams of light, 75–77 black and white conversions, 105–106, 185, 245–247 Black Point sampler, 95, 102 Blacks slider, 142, 156, 222, 236 Blaise, Aaron, 16 Blend If sliders, 19–21 blend mode compositing, 30–35 background photos for, 31 steps in process of, 32–34 studio lighting for, 30 textures used in, 36–39, 159–161 tough guy project, 155–165 See also composite images blend modes Color, 135, 148 Color Dodge, 82, 208, 212, 213, 216 Dissolve, 182 Hard Light, 59 Linear Dodge, 162, 256 Normal, 57 Overlay, 7, 26, 32, 34, 37–38, 67, 111 Screen, 65, 257 Soft Light, 22, 34, 76, 145, 158 Vivid Light, 116, 255
  50. INDEX 263 Bloat tool, 114 blood brushes, 107–111 downloading, 107,

    108 installing, 108–109 using, 109–111 blood effect, 107–111 Blur filters Average Blur, 134 Gaussian Blur, 11, 41, 97–98, 100, 132, 180, 198 Motion Blur, 101, 163, 257 Radial Blur, 59 Surface Blur, 116, 255 body selections, 4, 240 brightening lights, 68 Brush panel, 85, 96, 110, 125, 172 Brush Preset Picker, 95, 96, 108, 124, 172 brush sets, 96, 108 Brush Tip Shape options, 15, 85, 96, 172, 183 brushes blood, 107–111 creating new, 16–17 debris and dust, 93–96 downloading, 107, 108 faking cutouts using, 13–16 installing new, 108–109 lighting effects and, 82 saving as presets, 95, 96, 102 setting options for, 15 special effects as, 95–96, 102 tip shape for, 15, 85 Burn tool, 41, 254 burning and dodging. See dodging and burning C Camera Raw composite image preparation in, 168, 179 enhancements and updates to, 221 landscape retouching in, 168, 221–229 portrait retouching in, 142–145, 156–157, 236–239 sharpening images in, 145, 157, 168, 179, 227 vignettes added in, 229 Camera Raw filter, 88, 89, 201, 211 cartoon/painterly effect, 91–92, 259 Channel menu, 8, 22, 27, 46, 47 channels, for selections, 25–27 Channels panel, 25, 26, 242 character portrait project, 141–153 background color addition, 148 before/after images for, 153 Camera Raw adjustments, 142–145 cigar lighting technique, 151 foreground/background color matching, 150 nondestructive retouching, 145–147 painterly textured effect, 152 Smart Object creation, 147 spotlight effect, 149 Clarity slider, 143, 179, 211, 224 Clayton, Dave, 141 Clear Guides option, 202 Clipping Mask icon, 60, 205, 206 Clone mode, Spot Removal tool, 144, 239 Clone Stamp tool adding elements with, 195–196 filling transparent areas with, 158 Hardness setting for, 194 removing elements with, 43–44, 194–195, 231 Clouds filter, 249 Collins, Pete, 136 color adding to backgrounds, 148 adjusting foreground/background, 150 matching in composite images, 133–137 Color blend mode, 135, 148 color cast corrections, 237 Color Dodge blend mode, 82, 208, 212, 213, 216 Color Dynamics option, 183, 184 Color Efex Pro 4 plug-in, 117, 158, 185–186, 217, 260 Color Model setting, 76 Color Picker, 9, 40, 57, 70, 81, 109 Color Range, 21–23, 99–100, 175 coloring images, 257–258 Colorize checkbox, 60 Command/Ctrl key, 24, 68 composite images, 123–137 assassin project, 235–261 blend mode technique for, 30–35, 155 day-into-night effect for, 210–211 dust effects for, 183–184 fairytale scene project, 189–219 grass surface in, 129–130 haze effect in, 137, 174
  51. 264 THE PHOTOSHOP WORKBOOK composite images (continued) horizon line created

    for, 124–128, 173 landscape created for, 168–177 lighting effects in, 162–163, 201–203 matching color in, 133–137 retouching scenery for, 192–197 rhino in landscape project, 167–187 shadows in, 131–132, 161–162, 182, 200–205, 207 shooting backgrounds for, 31 studio lighting for, 30 textures used in, 36–39, 159–161 tough guy project, 155–165 composition adjustments, 239 Constrain Path Dragging checkbox, 24 contact shadows, 131–132, 200, 207 Content Aware option, 230 Contrast slider, 6, 143, 224 Convert for Smart Filters option, 52, 57, 88 Convert to Smart Object option, 147, 201, 211 Create Layer option, 73 Crop tool, 156, 158, 169–170, 192, 231 Cross Processing preset, 185, 260 curves, creating with Pen tool, 24 Curves adjustment layer, 150 Custom Shape tool, 161, 204 cutouts creating from selections, 8 improving with layer styles, 9–10 removing outlines around, 11 techniques for faking, 13–18 See also selections D darkening effect, 83–84, 202, 203, 206 day-into-night effect, 88–90, 210–211 debris and dust effect, 93–98 creating the brush for, 93–96 using the Debris brush for, 97–98 Debris brush, 97–98 Delete Cropped Pixels checkbox, 231 dent/damage effects, 50–53 Desaturate command, 38, 47, 52 Deselect command, 4, 7, 11 Detail Enhancer preset, 185 Detail Extractor preset, 117–118, 158, 217 Detail tab Noise Reduction panel, 227 Sharpening panel, 145, 168, 179, 227, 238 details effect, 115–121 Nik Collection preset for, 117 Photoshop technique for, 115–116, 255 Topaz Details plug-in for, 119 Details plug-in, 119, 146 deviantART brushes, 107 Dissolve blend mode, 182 distortion effect, 254 Dodge tool, 41, 146, 158, 243 dodging and burning portrait retouching and, 145–146, 158, 243–244 steps in process of, 40–42 downloading project files, xiv duplicating layers, 68, 100, 159, 213 dust effects, 183–184 dust/mark removal, 228 E effects. See special effects Elliptical Marquee tool, 58, 149, 160 Erase option, 144, 225 Exposure slider, 88, 211, 226, 236, 238 eye icon, 41, 42, 91, 152, 186 eye retouching, 58–61, 144 Eyedropper tool Color Range, 21, 99 Levels, 26 F fairytale scene project, 189–219 before/after images for, 218–219 children added to, 206–209 day-into-night effect for, 210–211 finishing touches for, 217 miniature room retouches, 192–197 photographs created for, 190–191 shadows added to, 200–205 toys added to, 198–199 wardrobe light in, 212–216 fake blood, 107–111
  52. INDEX 265 fake rim lighting, 80–81 faking cutouts, 13–18 Feather

    adjustments, 195, 202, 228 files accessing for projects, xiv Photoshop and TIFF, 27 raw, 221, 222, 230 Fill with Hard-Light-neutral color checkbox, 57 Fill with Soft-Light-neutral color checkbox, 40 Filter Gallery, 94 filters Add Noise, 58, 93, 101 Average Blur, 134 Camera Raw, 88, 89, 201, 211 Clouds, 249 Gaussian Blur, 11, 41, 97–98, 100, 132, 180, 198 High Pass, 53, 92, 152, 186, 217, 259 Lens Flare, 56–57 Liquify, 112–114 Motion Blur, 101, 163, 257 Pinch, 254 Plastic Wrap, 104 Radial Blur, 59 Reduce Noise, 91, 152, 186, 217, 259 Smart Filters, 52, 88, 92 Surface Blur, 116, 255 Topaz Details, 119 Unsharp Mask, 186, 217 flattening layers, 93 Flip Horizontal command, 159 Foreground to Transparent gradient, 66, 73, 78, 94, 174 foreground/background color matching in portraits, 150 setting defaults for, 126, 184 Free Transform, 20, 46, 47, 52, 64, 67 Freeze Mask tool, 113 Fuzziness slider, 22, 99, 175 G Gaussian Blur filter, 11, 41, 97–98, 100, 132, 180, 198 Giermann, Olaf, 66 glasses, reflections in, 253–254 Glowing Edges option, 94 Gradient Editor, 70, 73, 75, 78, 105, 245–246 Gradient Fill dialog, 70, 75, 77 Gradient Map adjustment layer, 105, 163, 185, 245–247 Gradient Overlay dialog, 73 Gradient Overlay layer style, 151 Gradient Picker, 66, 94 Gradient tool, 78, 174, 250 gradients Foreground to Transparent, 66, 73, 78, 94, 174 haze effect added with, 174 lighting effect using, 70–74 Graduated Filter, 224 gray, power of, 29 groups layer, 61, 68, 115, 159, 197, 209 texture, 38–39 guides, 202 H hair faking cutouts of, 13–18 selections around, 5–7, 241 Hand tool, 145, 192 Hard Light blend mode, 59 haze effect, 137, 174 head/hair selections, 5–7, 241 Heal mode, Spot Removal tool, 143–144, 157, 193, 228 Healing Brush tool, 146 High Pass filter, 53, 92, 152, 186, 217, 259 Highlights slider, 142, 156, 222, 236 Hollywood, Calvin, 115 horizon light, 78–79 horizon line creation, 124–128, 173 HSB color model, 76 HSL/Grayscale panel, 143, 238 Hue slider adjustments, 60 Hue/Saturation adjustment layer, 45, 60–61, 145, 251 I image asset files, xiv Inner Glow layer style, 80–81, 151, 208–209 Inner Shadow layer style, 9–10 Inverse command, 26, 162, 247 Invert command, 26, 84, 102, 116, 147, 255 istockphoto.com website, 51
  53. 266 THE PHOTOSHOP WORKBOOK K keyboard shortcuts for deselecting selections,

    7 for foreground/background color, 126 L landscapes creating composite, 168–177 retouching, 221–233 underexposing, 222 Lasso tool, 11, 20, 26, 41, 90 layer masks compositing with, 32–33, 129–130 viewing, 130, 160 Layer Style dialog, 80 layer styles Gradient Overlay, 151 improving cutouts with, 9–10 Inner Glow, 80–81, 151, 208–209 Inner Shadow, 9–10 Outer Glow, 151 Layer via Copy command, 181 layers creating copies of, 17, 181 duplicating, 68, 100, 159, 213 flattening, 93 groups of, 61, 68, 115, 159, 197, 209 merged, 104, 186, 211, 217 organizing, 209 Smart Object, 22, 116, 147 unlocking, 102 Layers panel, 8, 9, 10, 14, 33, 52, 61 lens flare, 56–57, 256 Lens Flare filter, 56–57 Levels adjustment layer, 83–84, 149, 160, 202 Levels adjustments Black Point sampler for, 95, 102 brightening backgrounds, 149 contrast levels and, 177 darkening effect and, 83–84, 202, 203, 206 Eyedroppers for, 26 Output Levels settings, 83, 84, 90, 105 removing outlines using, 11 vignette creation, 160–161 Lewis, C. S., 189 light beams of, 75–77 horizon, 78–79 reflected, 81–83, 213 spill, 213–215 lighting gradient, 70–74 learning about, 63 rim, 80–81, 207–208, 216 studio, 30, 142, 236 window, 47 lighting effects, 63–85 composite image, 162–163, 201–203 gradient, 70–74 horizon light, 78–79 light beams, 75–77 never-ending lighting rig, 67–69 reflected light, 81–83, 213 rim light, 80–81, 207–208, 216 shadow creation, 83–85 spotlight, 149 world’s simplest, 64–66, 162–163 Lightness slider, 145 Linear Dodge blend mode, 162, 256 The Lion, the Witch, and the Wardrobe (film), 189, 197 Liquify filter, 112–114 Load Path as a Selection icon, 24, 198, 240 loading downloaded brushes, 108 selections, 8, 22, 46, 215 location transformations, 43–49 locked layers, 102 Luminance slider, 227 M Marquee tool, 194, 195 Mask checkbox, 144, 157, 237 Masking slider, 145, 227, 238 Merge Down command, 217 merged layers, 104, 186, 211, 217 Midtones slider, 83, 202 Motion Blur filter, 101, 163, 257
  54. INDEX 267 Move tool composite images and, 126, 132, 248

    lighting effects and, 65, 67, 162 positioning image elements with, 47, 52, 57, 180, 198 repositioning vignettes with, 161, 252 moveable vignettes, 252 N never-ending lighting rig, 67–69 New Channel icon, 26 New Guide option, 202 night-from-day effect, 88–90, 210–211 Nik Collection, 117, 158, 185, 217 Noise filters Add Noise, 58, 93, 101 Reduce Noise, 91, 217, 259 Noise gradients, 75 Noise Reduction panel, 227 nondestructive retouching character portrait project, 145–147 tough guy composite project, 158 Normal blend mode, 57 O opacity composite image, 137, 177, 248 Hard Light blend mode, 59 lighting effects, 68, 70, 82 Overlay blend mode, 7, 26 Quick Mask overlay, 12, 13 shadow effects, 200 Opacity Jitter option, 96, 110, 183 Open command, 65 Open Object command, 230 organizing layers, 209 Outer Glow layer style, 151 outlines removing around selections, 11 tip on painting along, 16 Output Levels setting, 83, 84, 90, 105, 203, 206 Overlay blend mode, 7, 26, 32, 34, 37–38, 67, 111 overlays guide, 202 Quick Mask, 12 P painterly effect, 91–92, 152, 186, 259 panels Brush, 85, 96, 110, 125, 172 Channels, 25 HSL/Grayscale, 143 Layers, 8, 9, 10, 14, 33, 52, 61 Noise Reduction, 227 Paths, 127–128, 173, 198 Radial Filter, 229 Sharpening, 145, 168, 179, 227 Particles brush set, 96, 100 Paste Into option, 46 Path Selection tool, 24 paths drawing with Pen tool, 171, 198 loading as selections, 24 Paths panel, 127–128, 173, 198 Pen tool drawing paths with, 171, 198 making selections with, 23–24, 171, 240 personal projects, 167 Perspective adjustments, 193, 204 Photo Filter adjustment layer, 85 Photoshop (.psd) files, 27 Pinch filter, 254 Pixels option, 204 Place command, 65, 125 Place Embedded option, 22, 32, 37, 65, 125 Plastic Wrap filter, 104 plug-ins Color Efex Pro, 117, 158, 185–186, 217, 260 Topaz Details, 119, 146 portrait retouching Camera Raw adjustments, 142–145, 156–157, 236–239 eye enhancement techniques, 58–61, 144 nondestructive, in Photoshop, 145–147, 158 projects illustrating, 141–153, 155–165, 235–261 six-pack abs technique, 54–55 Preset Manager, 108 presets brush, 17, 95, 96, 102 Cross Processing, 185, 260 Detail Extractor, 117–118, 158, 217
  55. 268 THE PHOTOSHOP WORKBOOK projects accessing files for, xiv assassin,

    235–261 character portrait, 141–153 fairytale scene, 189–219 landscape retouching, 221–233 rhino composite, 167–187 tough guy composite, 155–165 Protect Tones checkbox, 41, 146, 243 Q Quick Mask mode, 12, 241 Quick Selection tool, 4–8, 241 R Radial Blur filter, 59 Radial Filter panel, 229 Radius slider High Pass filter, 53 Refine Edge dialog, 6 rain effect, 101–103 Randomize button, 76 raw image files, 221, 222, 230 See also Camera Raw Reconstruct options, 114 Rectangular Marquee tool, 93, 128, 193, 249 Reduce Noise filter, 91, 152, 186, 217, 259 reference photos, 63, 75, 203 Refine Edge dialog, 5–6, 241 Refine Radius tool, 6 Reflected gradient, 78 reflected light, 81–83, 213 reflections, adding to glasses, 253–254 removing dust/marks from photos, 228 outlines around selections, 11 unwanted elements from photos, 43–44, 194–195, 231 resizing images, 20, 47, 52 lights, 64, 67 textures, 46 retouching Camera Raw, 142–145, 156–157, 221–229 landscapes, 221–233 miniature room photo, 192–197 nondestructive, 145–147, 158 portraits, 54–55, 58–61, 141–153 RGB channel, 8, 27 RGB color model, 76 rhino composite project, 167–187 before/after images for, 187 dust effect for, 183–184 finishing touches for, 185–186 landscape creation for, 168–177 rhino added to, 178–182 rim light, 80–81, 207–208, 216 Roughness slider, 76 Rubber Band option, 24 S Sample All Layers option, 230 Sampled Colors option, 99 Saturation adjustments, 45, 76, 157, 168, 238 saving brush presets, 95, 96, 108–109 selections, 4, 7, 22, 27, 43 Scattering option, 15, 85 Screen blend mode, 65, 257 selections body, 4, 240 channels for, 25–27 cloning within, 195 Color Range, 21–23 combining, 7–8 head/hair, 5–7, 241 inversing, 26 loading, 8, 22, 46, 215 Pen tool for, 23–24, 171, 240 Quick Mask for viewing, 12 removing outlines around, 11 saving, 4, 7, 22, 27, 43 See also cutouts Selective Color adjustment layer, 163, 258 shadows adding to photos, 83–85, 182 brightening areas of, 246 composite image, 131–132, 161–162, 200–205, 207 contact and shape, 131–132, 200, 207
  56. INDEX 269 Shadows slider, 142, 156, 179, 222, 226, 236

    Shape Dynamics option, 15, 85 shape shadows, 131, 132, 200, 207 sharpening images Camera Raw Detail tab for, 145, 157, 168, 179, 227 Unsharp Mask filter for, 186, 217 Sharpening panel, 145, 168, 179, 227, 238 Sharpness slider, 157 Show Mask checkbox, 113, 114 Show Overlay checkbox, 144, 239 simplest lighting effect, 64–66, 162–163 six-pack abs technique, 54–55 Size Jitter option, 15, 85 sizing images, 20, 47, 52 lights, 64, 67 textures, 46 sky adjustments, 224 Smart Filters, 52, 88, 92 Smart Objects, 22, 116, 147, 201, 211, 230, 251 Smart Radius checkbox, 6 smoke effect, 151 Smudge tool, 18 snow scene effect, 99–100 Soft Light blend mode, 22, 34, 76, 145, 158 special effects, 87–121 black and white conversions, 105–106 cartoon/painterly effect, 91–92, 259 debris and dust, 93–98 dents and damage, 50–53 details effect, 115–121 fake blood, 107–111 rain effect, 101–103 snow scene effect, 99–100 swelling effect, 112–114 turning day into night, 88–90 wet look, 104 spill light, 213–215 Spot Healing Brush, 230 Spot Removal tool Clone mode, 144, 239 Heal mode, 143–144, 157, 193, 228 spotlight effect, 149 St. Lewis, Nigel, 105 Staiger, Uli, 189 Step Backwards command, 24, 57 stock photos, 51 Straighten tool, 169, 192, 248 studio lighting, 30, 142, 236 sunglass reflections, 253–254 Surface Blur filter, 116, 255 swelling effect, 112–114 T Temperature slider, 88, 142, 211, 224, 226, 238 textures Adobe Exchange resource for, 36 blend mode compositing with, 36–39, 159–161 creating new backgrounds with, 159–161 photographing and collecting, 36 resizing with Free Transform, 46 transforming locations using, 45–46 Thaw Mask tool, 113 thingys technique, 65, 66, 162 three-light setup, 142, 236 TIFF (.tif) files, 27 Tint slider, 224, 226, 238 toning images, 257–258 tools Bloat, 114 Burn, 41, 254 Clone Stamp, 43–44, 158, 194–196, 231 Crop, 156, 158, 169–170, 192, 231 Custom Shape, 161, 204 Dodge, 41, 146, 158, 243 Elliptical Marquee, 58, 149, 160 Eyedropper, 21, 26, 99 Freeze Mask, 113 Gradient, 78, 174, 250 Hand, 145, 192 Healing Brush, 146 Lasso, 11, 20, 26, 41, 90 Marquee, 194, 195 Move, 47, 52, 57 Path Selection, 24 Pen, 23–24, 171, 198, 240 Quick Selection, 4–8 Rectangular Marquee tool, 93, 128, 193, 249 Refine Radius, 6 Smudge, 18 Spot Removal, 143–144, 157, 193, 228, 239
  57. 270 THE PHOTOSHOP WORKBOOK tools (continued) Straighten, 169, 192 White

    Balance, 142 Zoom, 112, 239 Topaz Details plug-in, 119, 146 tough guy composite project, 155–165 background texture for, 159–161 before/after images for, 164–165 Camera Raw adjustments, 156–157 lighting effect used in, 162–163 nondestructive retouching, 158 shadows added to, 161–162 U underexposing images, 222 unlocking layers, 102 Unsharp Mask filter, 186, 217 V Vibrance slider, 223 viewing layer masks, 130, 160 selections, 12 vignettes adding to images, 160–161, 229, 252 creating moveable, 252 Visualize Spots checkbox, 143 Vivid Light blend mode, 116, 255 W wet look, 104 White Balance tool, 142, 237 window light, 47 windows adding to images, 47–48 placing scenes into, 48 world’s simplest lighting effect, 64–66, 162–163 Z Zoom tool, 112, 239