The design assumes projects detailed as follows Development scale is medium (several tens) to large (several hundreds) • Platform is console, but there is a Windows build for development • A fast and stable internal network infrastructure is available • Designed for specific projects, not for a generic game engine
Combat 6: Fires of Liberation (2007) Ace Combat: Assault Horizon (2011) Tales of Card Evolve (2012) THE IDOLM@STER MILLION LIVE! (2013) Pokkén Tournament (2015) Pokkén Tournament DX (2017) • Past talks: Continuous integration of ACE COMBAT ASSAULT HORIZON: CEDEC2011 In-game camera production example in “ACE COMBAT ASSAULT HORIZON” in-game camera production example”: CEDEC2011 Game editor design and implementation in Pokkén: CEDEC2015 • In the current game team, I’m in charge of programming of graphics, tools, systems and assets
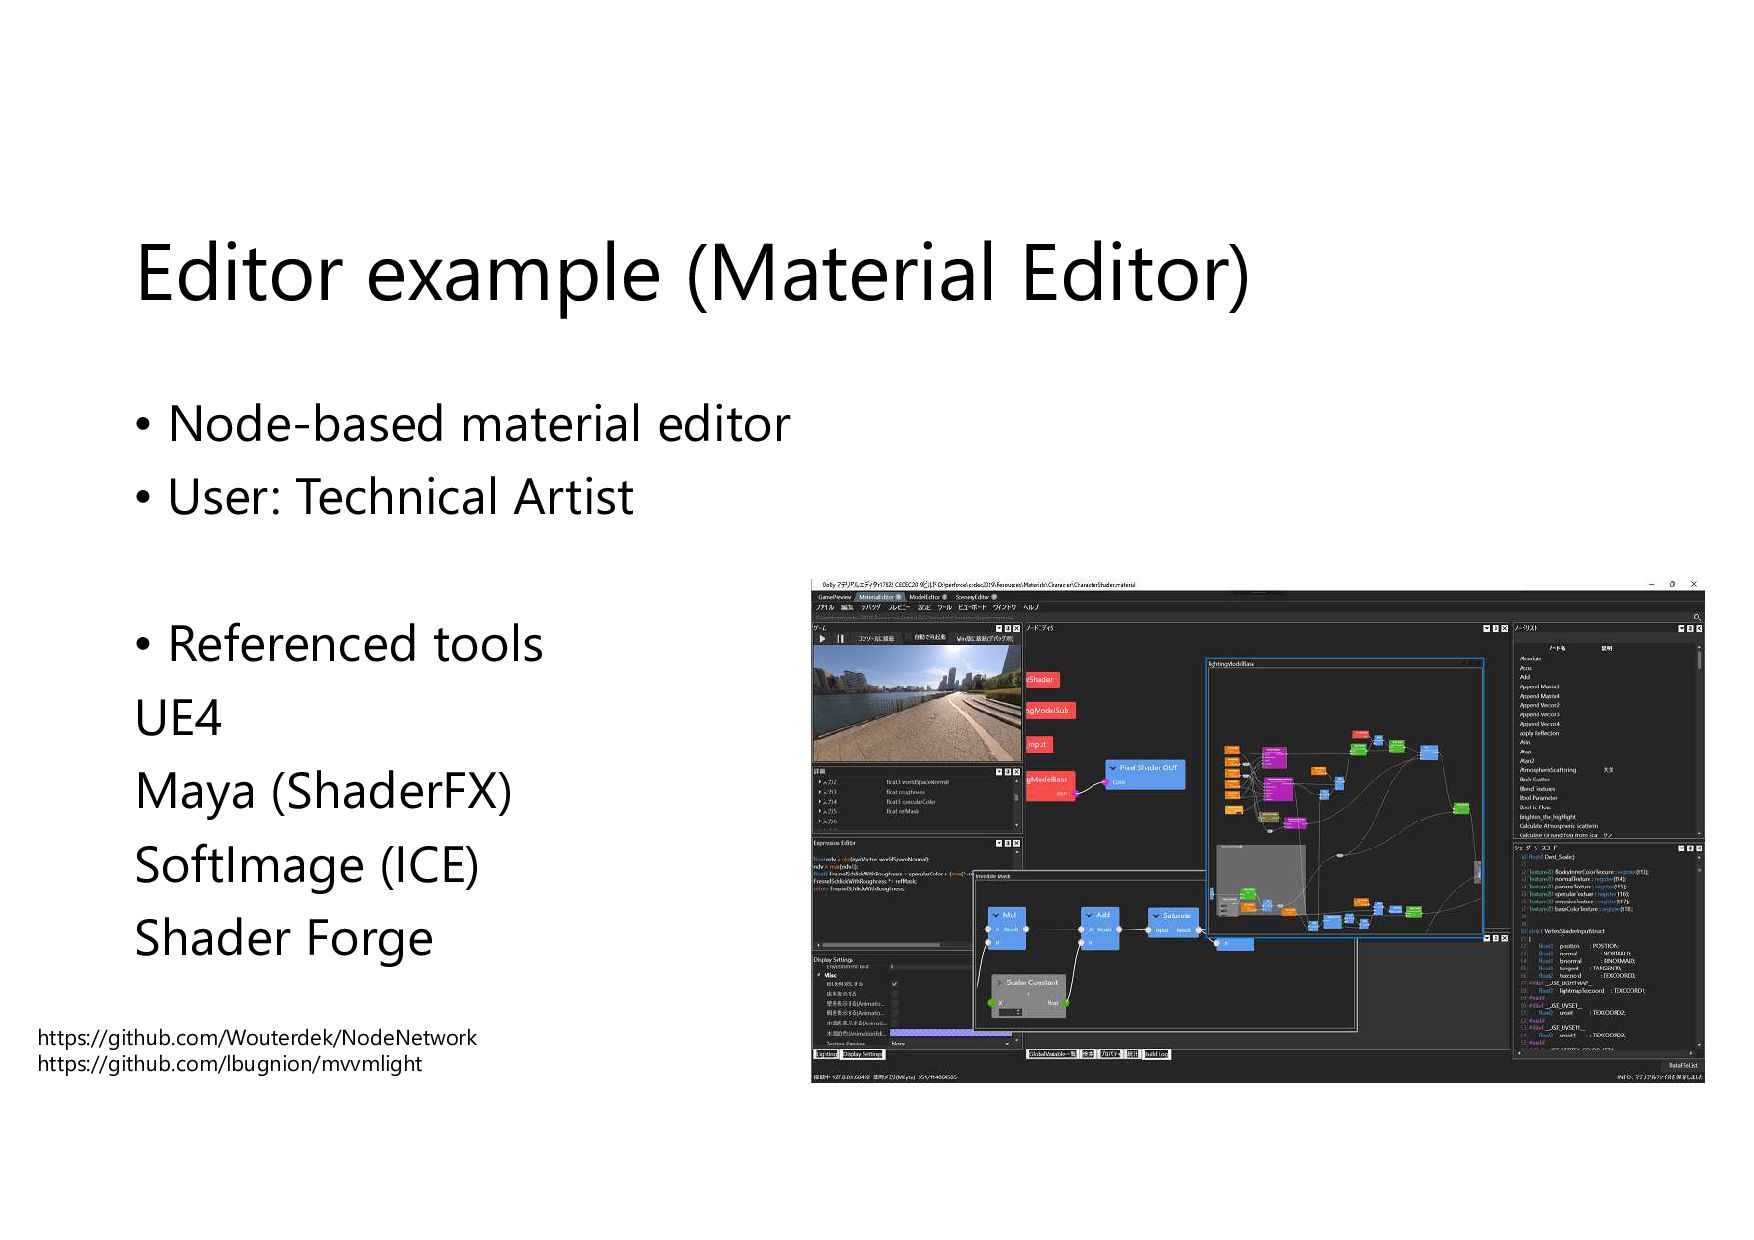
there are many UE4 projects in the company, the game editor is named similar to UE4 and its operation flow as well, to make it easier for artists familiar with UE4 to migrate Materials, Material instances ... • The detailed UI of the tools refers to various DCC tools Asset management Game editor Runtime Make operation flow similar to UE4 → [CEDEC2015] Game editor design and implementation in Pokkén https://docs.unrealengine.com/en-US/index.html https://github.com/lbugnion/mvvmlight https://github.com/mathtone/MIST
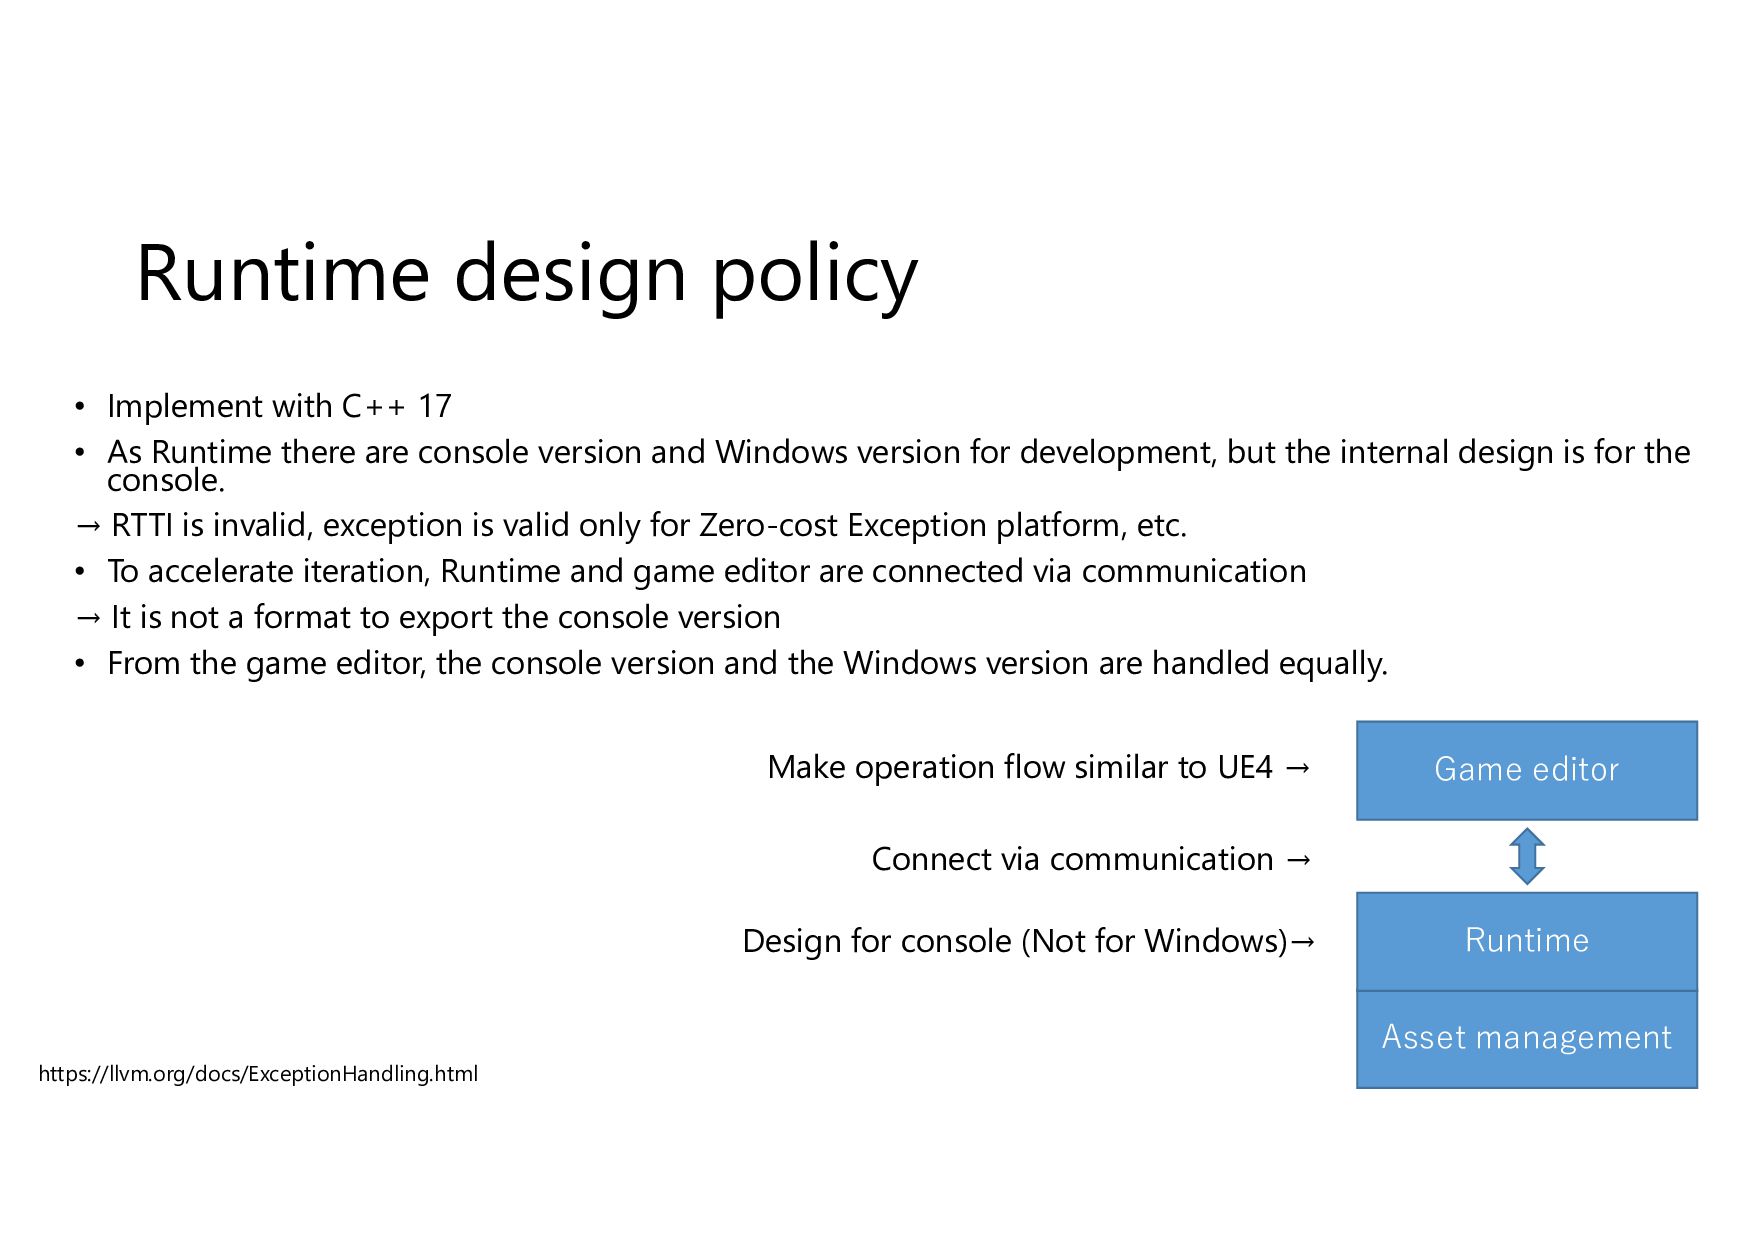
Runtime there are console version and Windows version for development, but the internal design is for the console. → RTTI is invalid, exception is valid only for Zero-cost Exception platform, etc. • To accelerate iteration, Runtime and game editor are connected via communication → It is not a format to export the console version • From the game editor, the console version and the Windows version are handled equally. Asset management Game editor Runtime Design for console (Not for Windows)→ Make operation flow similar to UE4 → Connect via communication → https://llvm.org/docs/ExceptionHandling.html
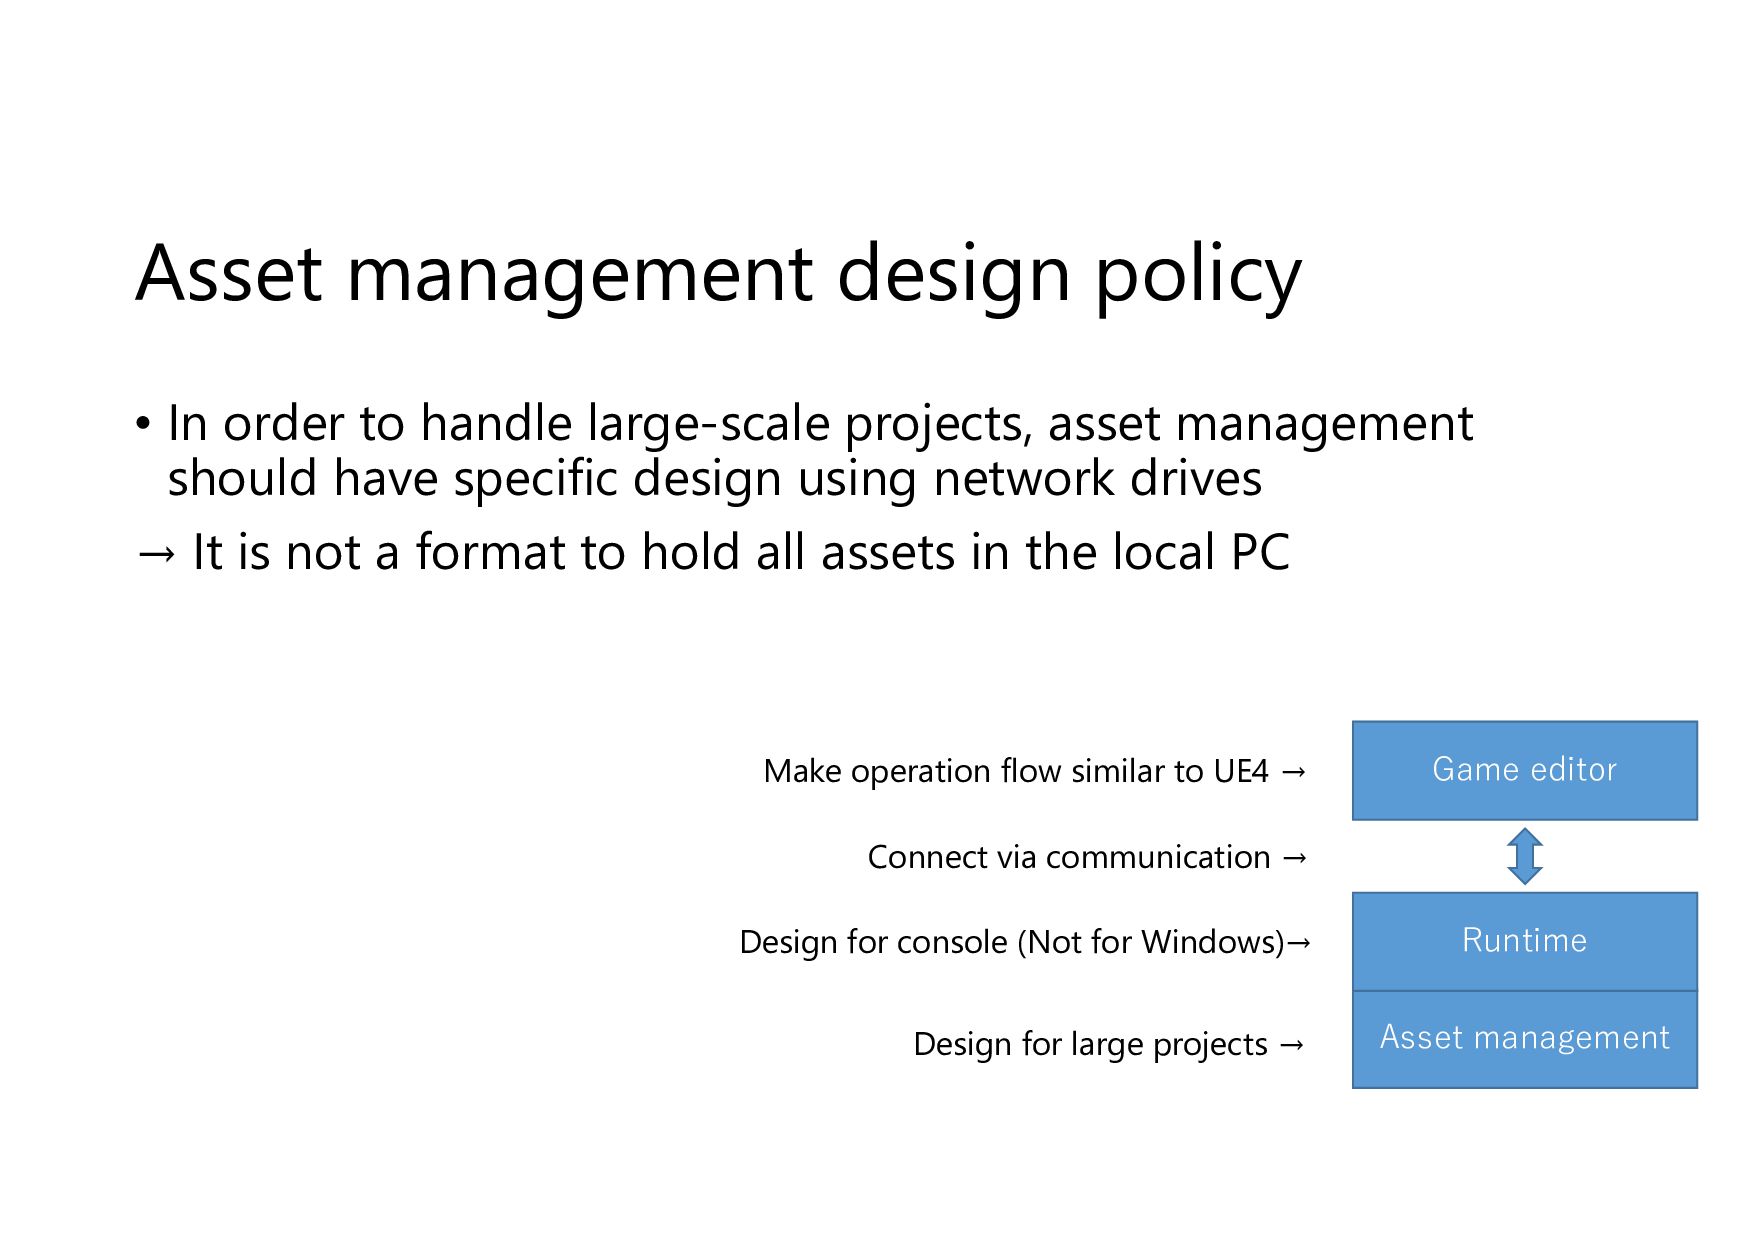
projects, asset management should have specific design using network drives → It is not a format to hold all assets in the local PC Design for large projects → Asset management Game editor Runtime Make operation flow similar to UE4 → Connect via communication → Design for console (Not for Windows)→
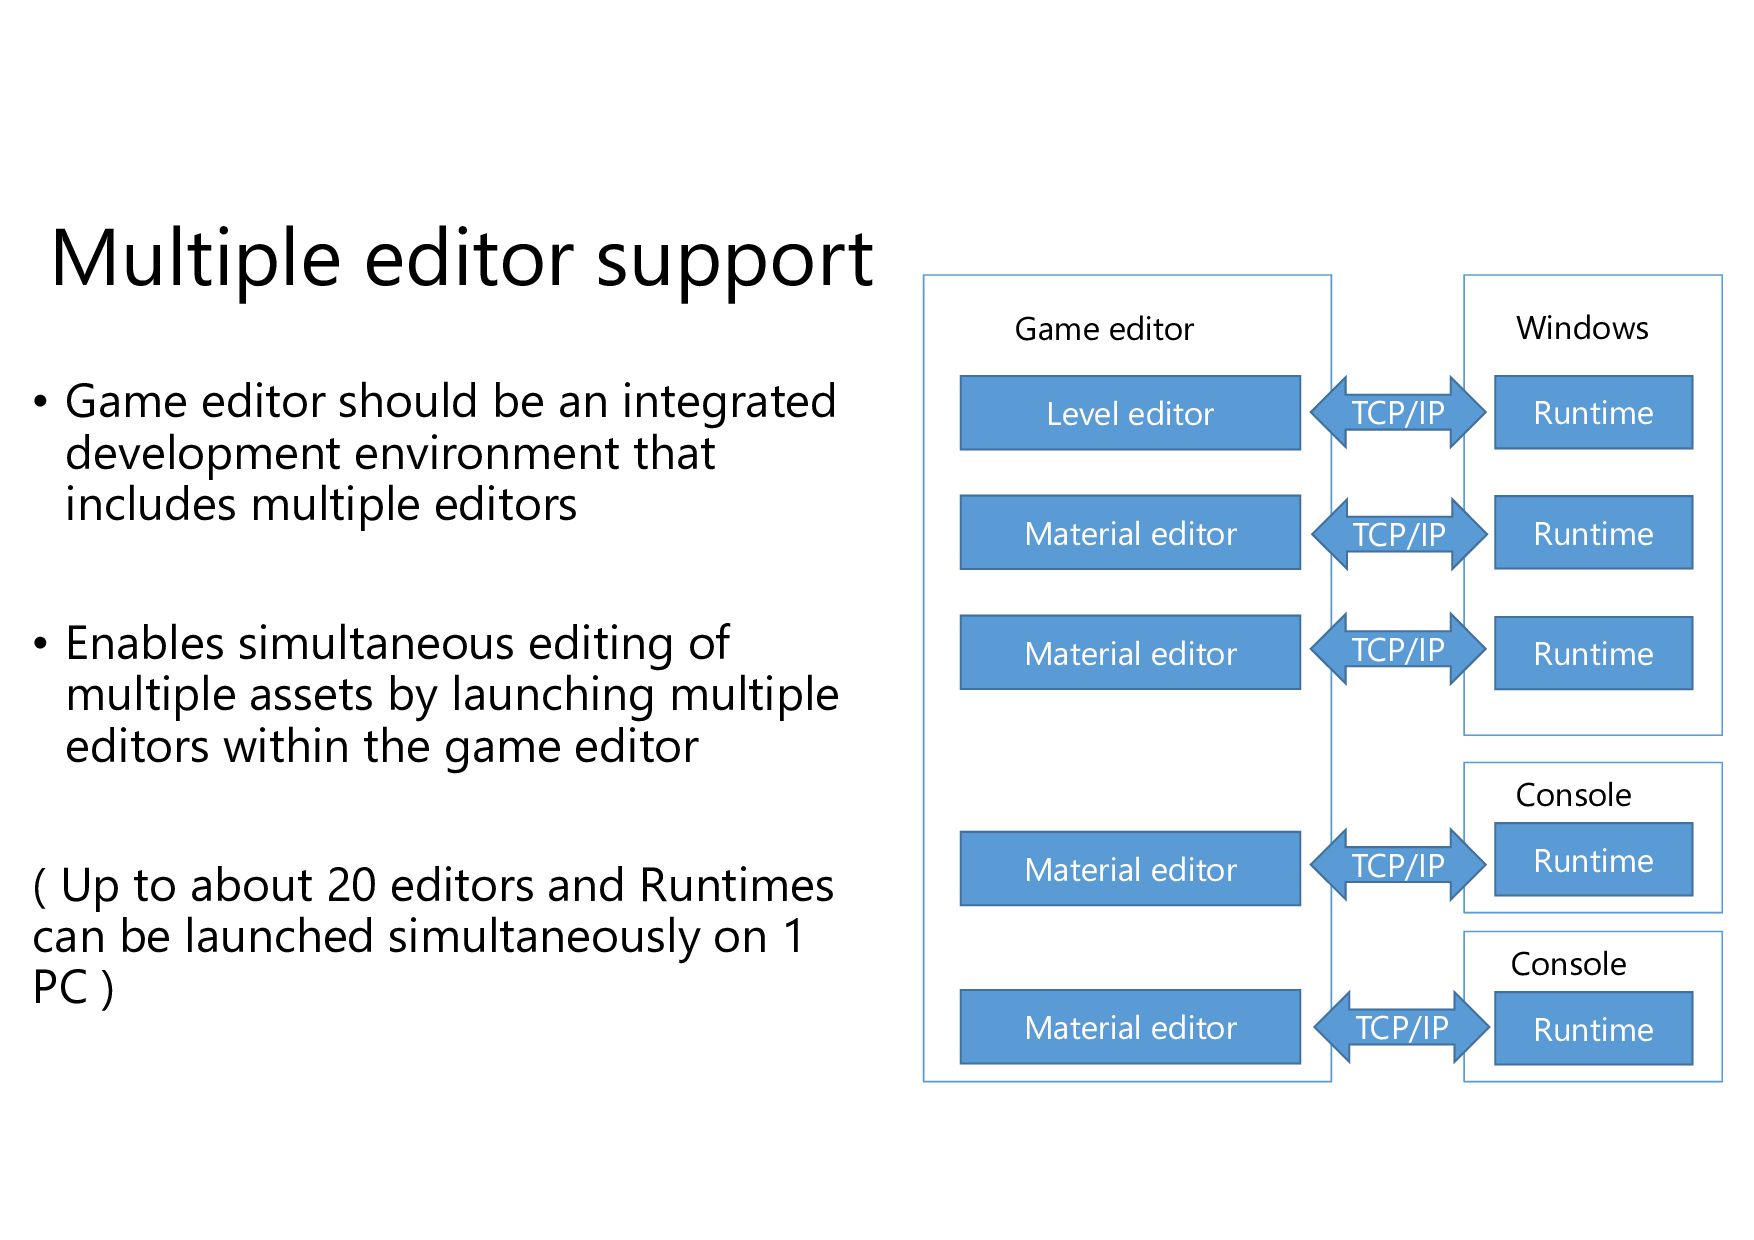
development environment that includes multiple editors • Enables simultaneous editing of multiple assets by launching multiple editors within the game editor ( Up to about 20 editors and Runtimes can be launched simultaneously on 1 PC ) Level editor Material editor Material editor Material editor Material editor Game editor Runtime Runtime Runtime Windows Runtime Console TCP/IP TCP/IP TCP/IP Runtime Console TCP/IP TCP/IP
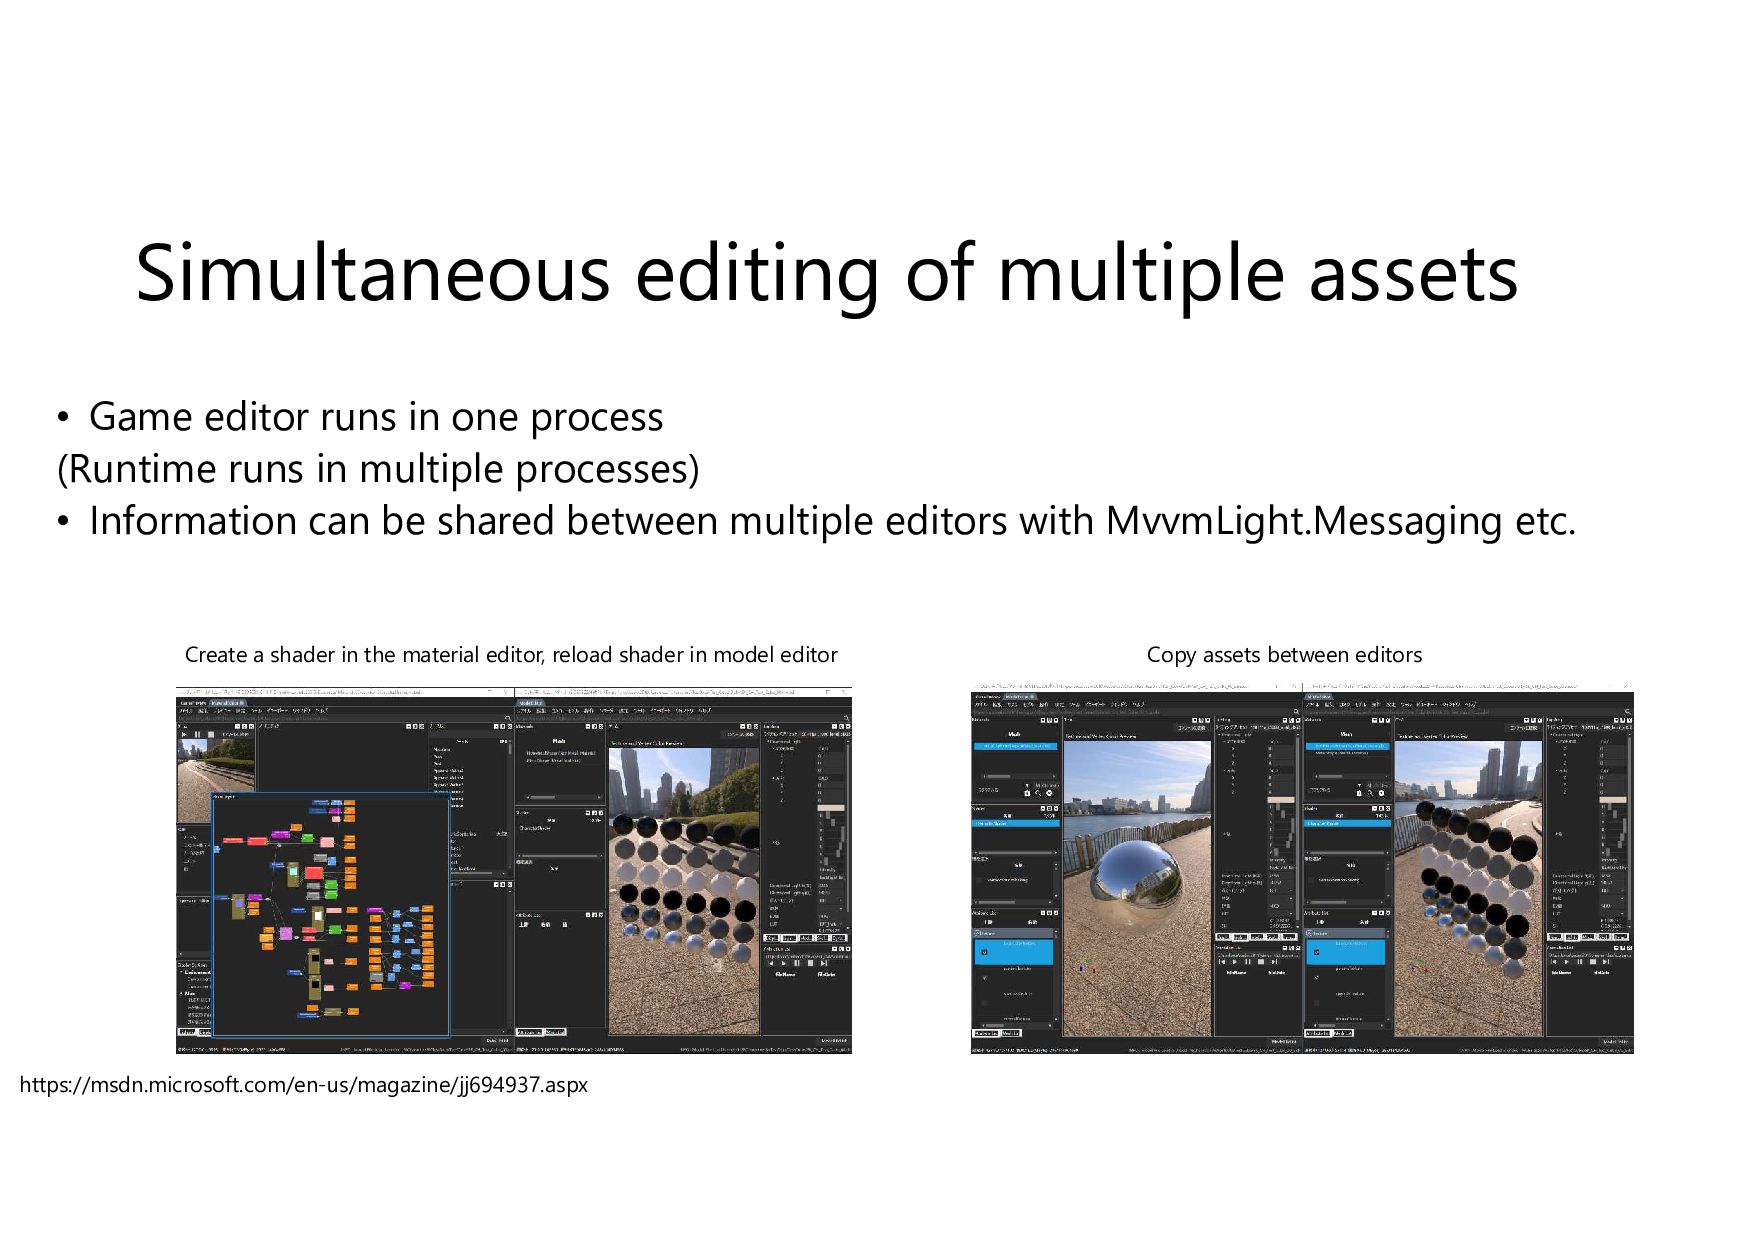
one process (Runtime runs in multiple processes) • Information can be shared between multiple editors with MvvmLight.Messaging etc. https://msdn.microsoft.com/en-us/magazine/jj694937.aspx Copy assets between editors Create a shader in the material editor, reload shader in model editor
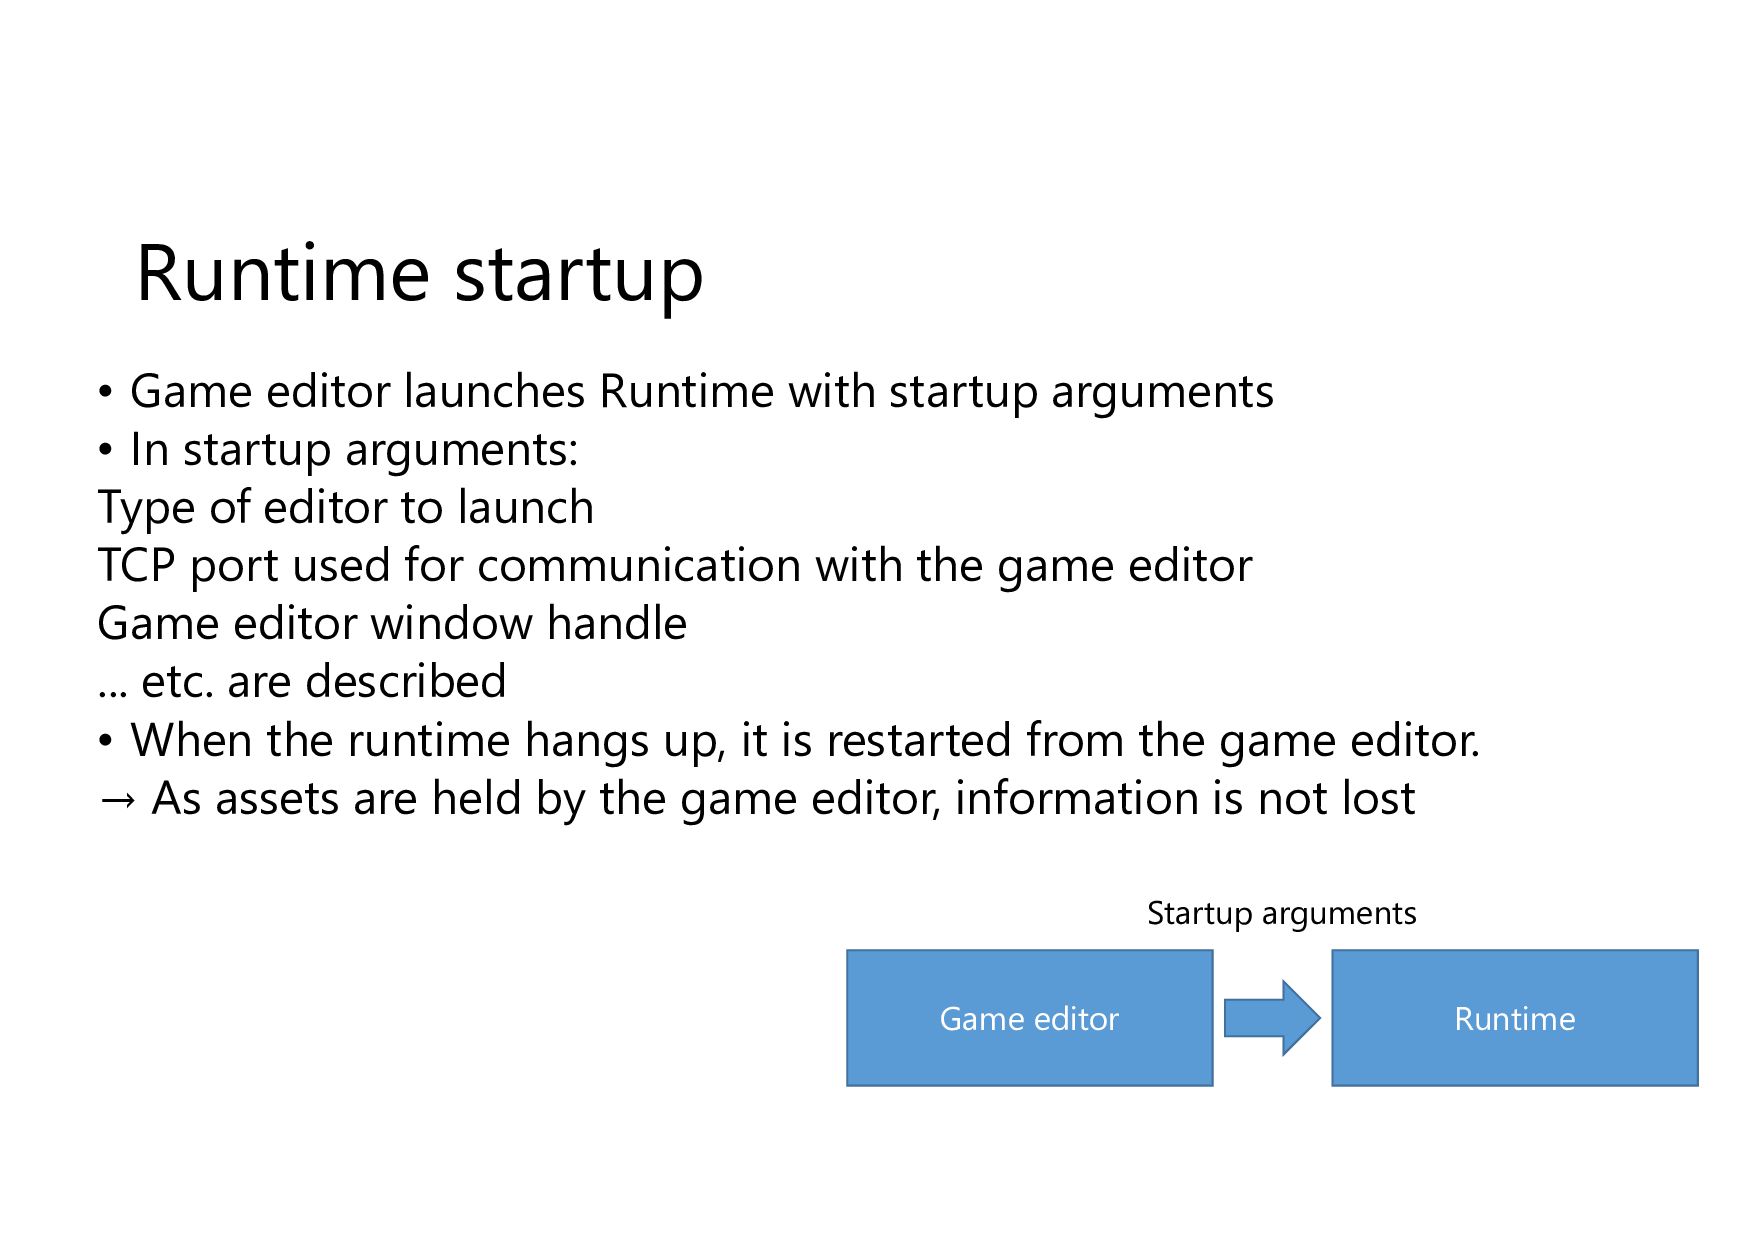
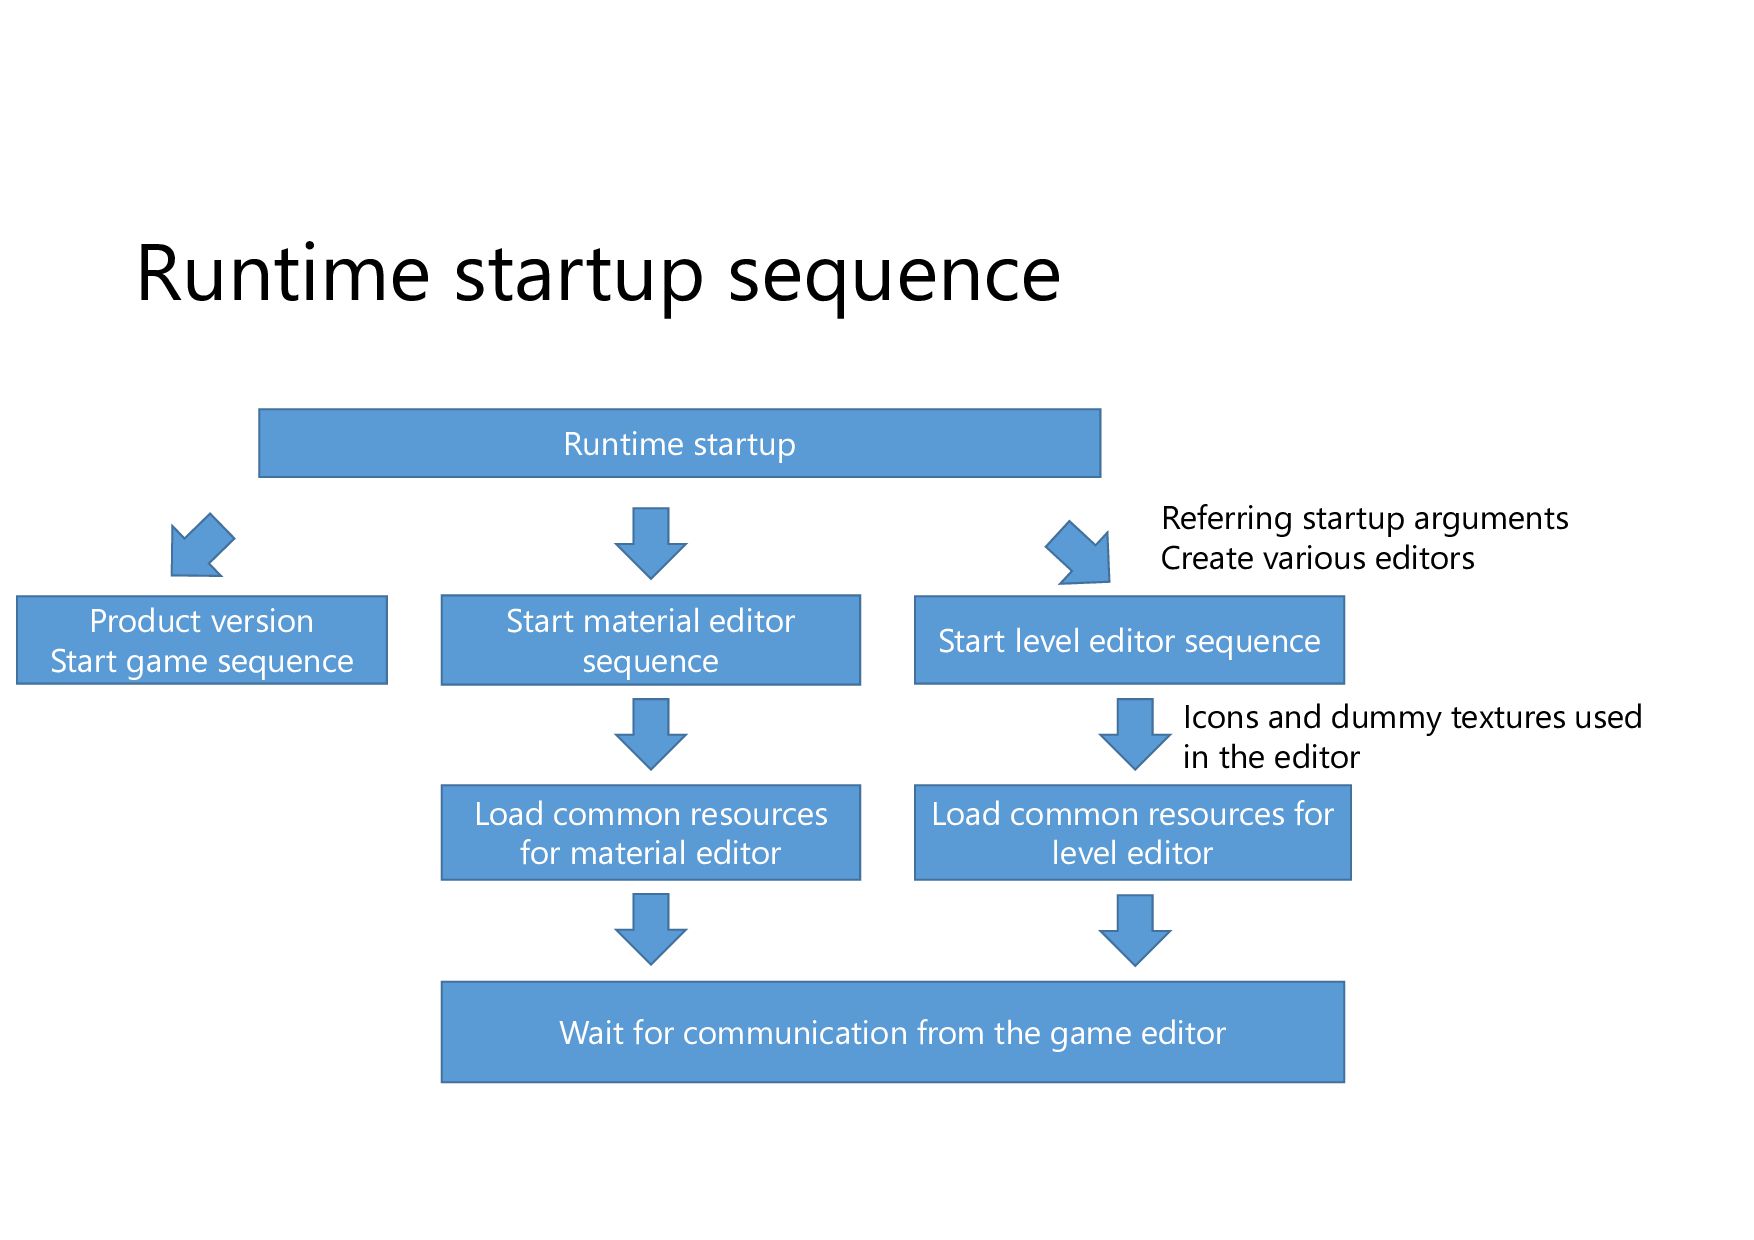
• In startup arguments: Type of editor to launch TCP port used for communication with the game editor Game editor window handle ... etc. are described • When the runtime hangs up, it is restarted from the game editor. → As assets are held by the game editor, information is not lost Game editor Runtime Startup arguments
Start material editor sequence Start level editor sequence Load common resources for material editor Load common resources for level editor Wait for communication from the game editor Referring startup arguments Create various editors Icons and dummy textures used in the editor
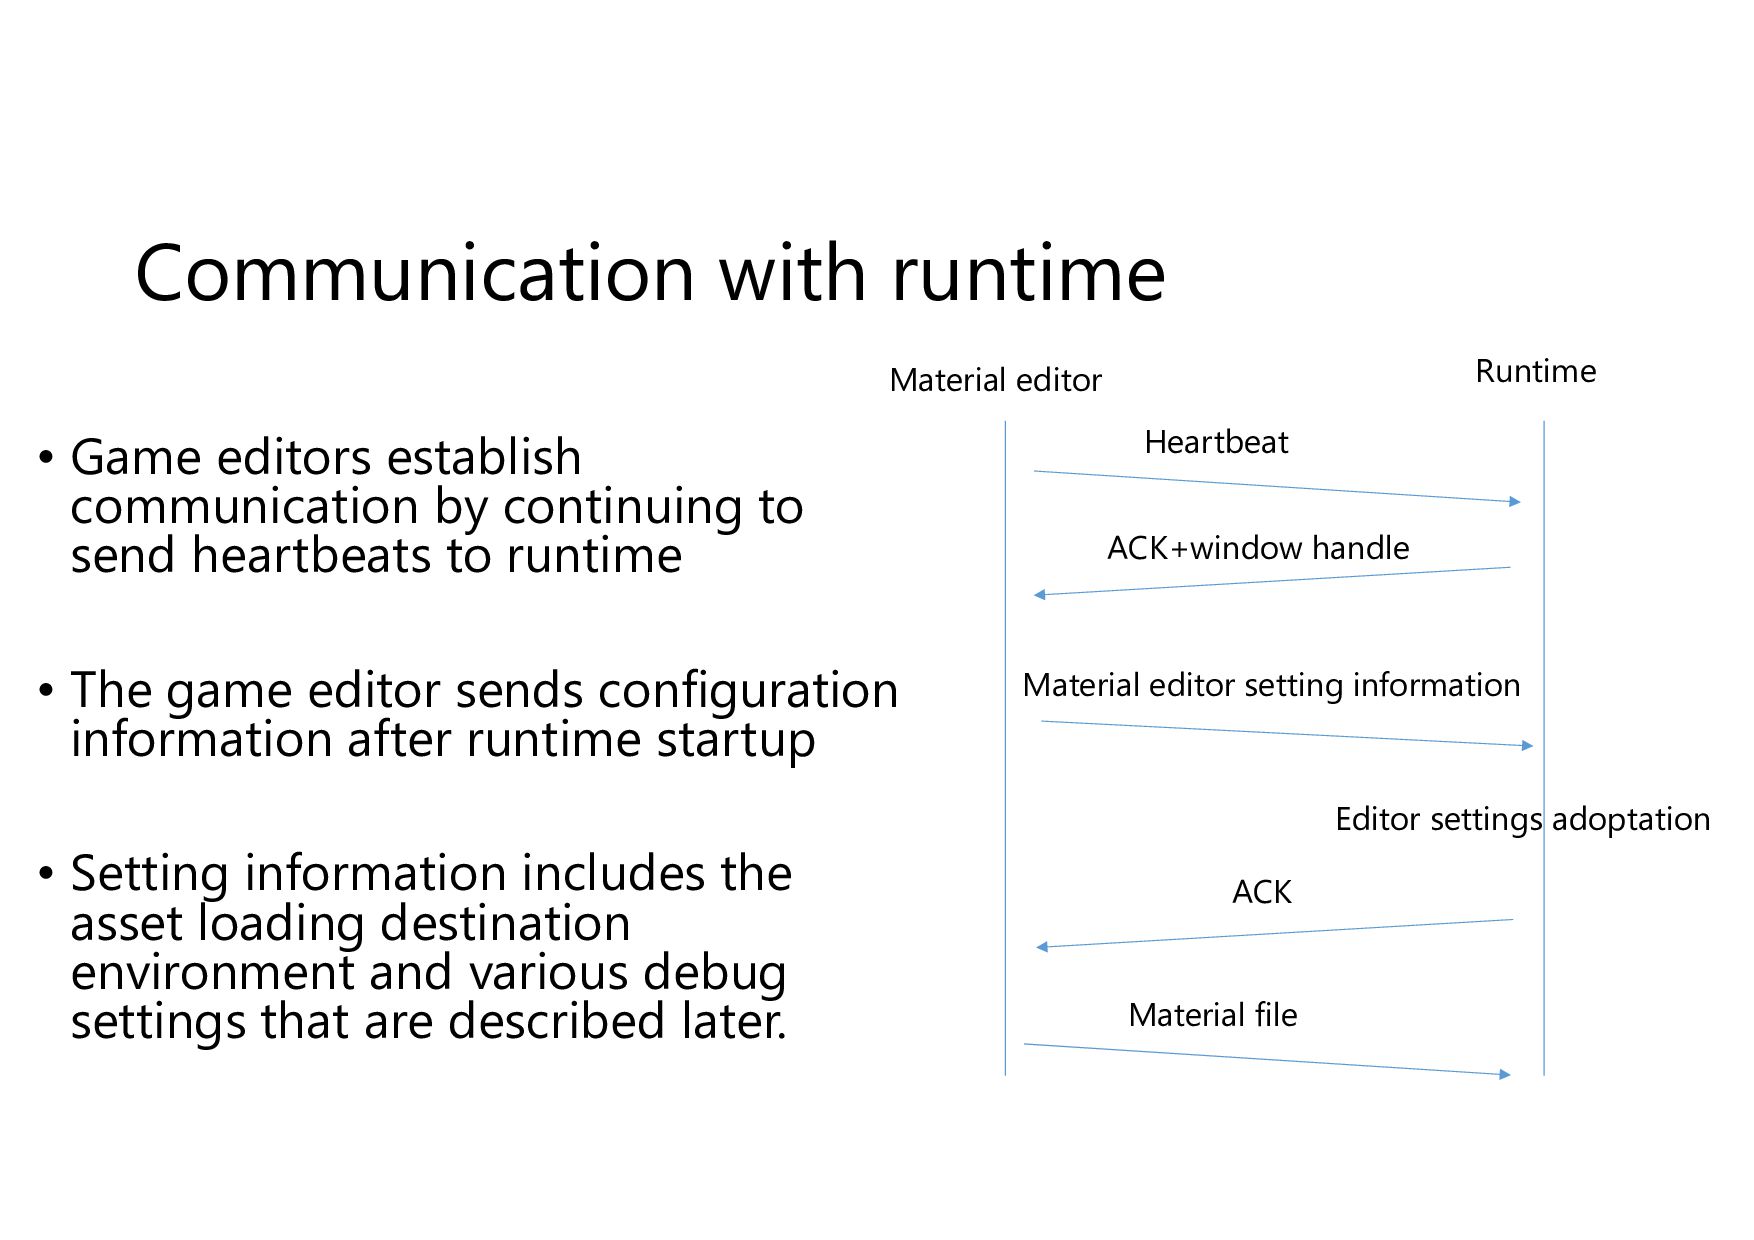
to send heartbeats to runtime • The game editor sends configuration information after runtime startup • Setting information includes the asset loading destination environment and various debug settings that are described later. Material editor Runtime Material editor setting information Heartbeat Editor settings adoptation Material file ACK+window handle ACK
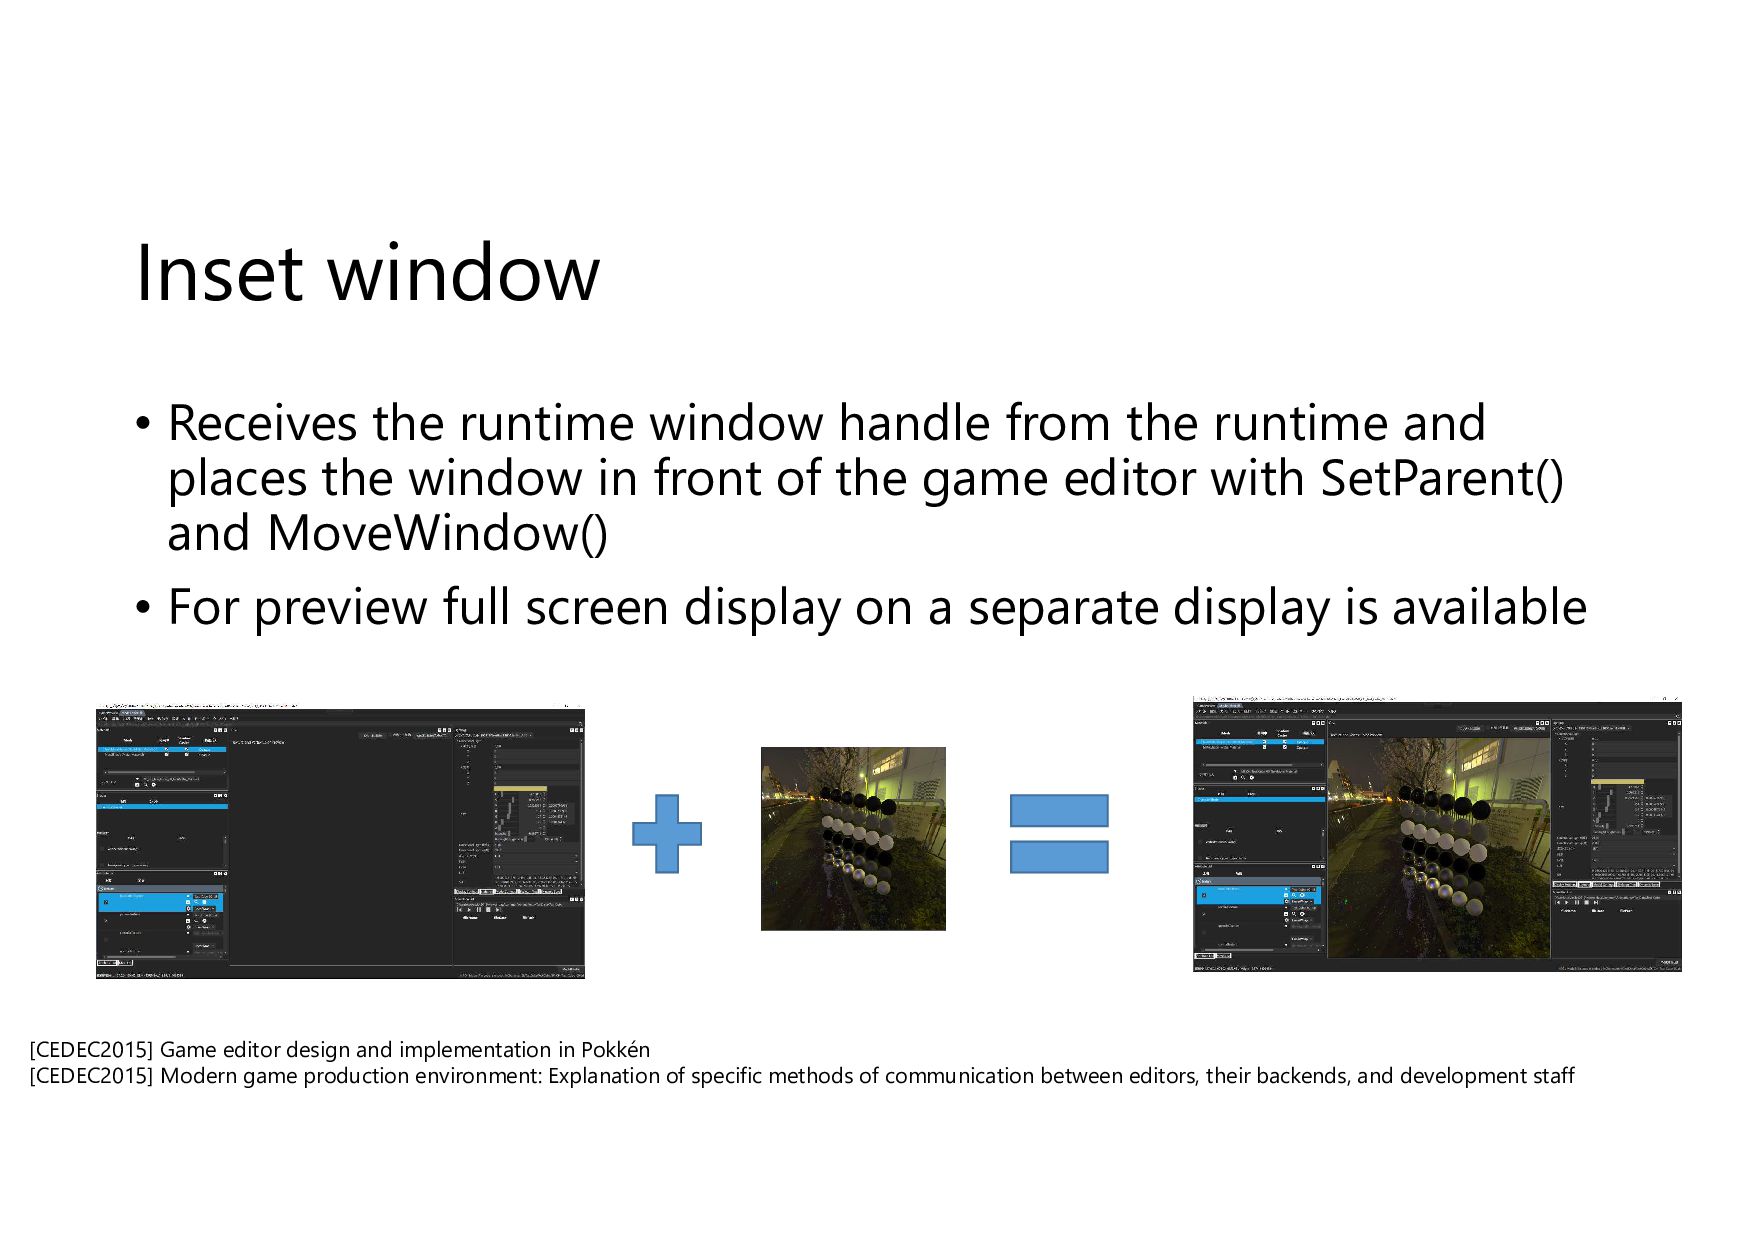
runtime and places the window in front of the game editor with SetParent() and MoveWindow() • For preview full screen display on a separate display is available [CEDEC2015] Game editor design and implementation in Pokkén [CEDEC2015] Modern game production environment: Explanation of specific methods of communication between editors, their backends, and development staff
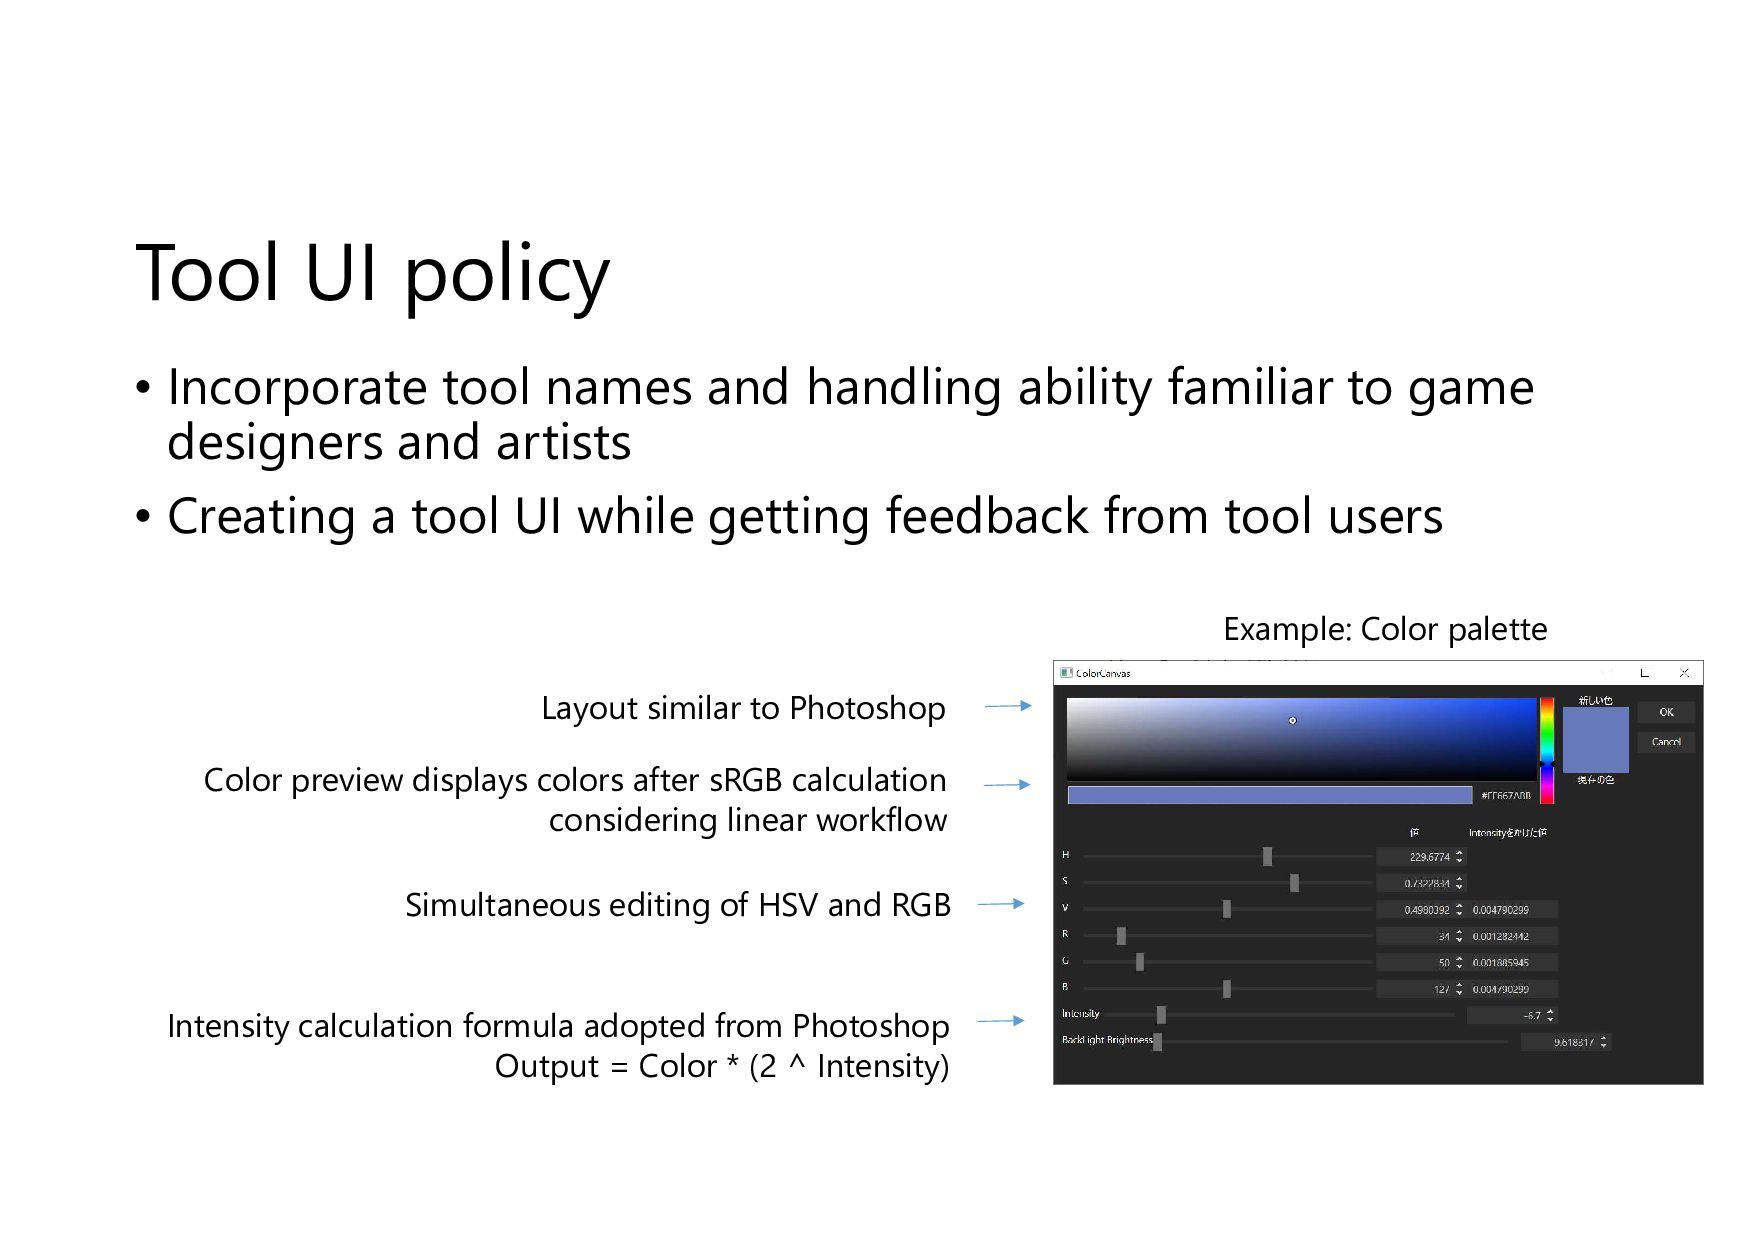
familiar to game designers and artists • Creating a tool UI while getting feedback from tool users Color preview displays colors after sRGB calculation considering linear workflow Layout similar to Photoshop Simultaneous editing of HSV and RGB Intensity calculation formula adopted from Photoshop Output = Color * (2 ^ Intensity) Example: Color palette
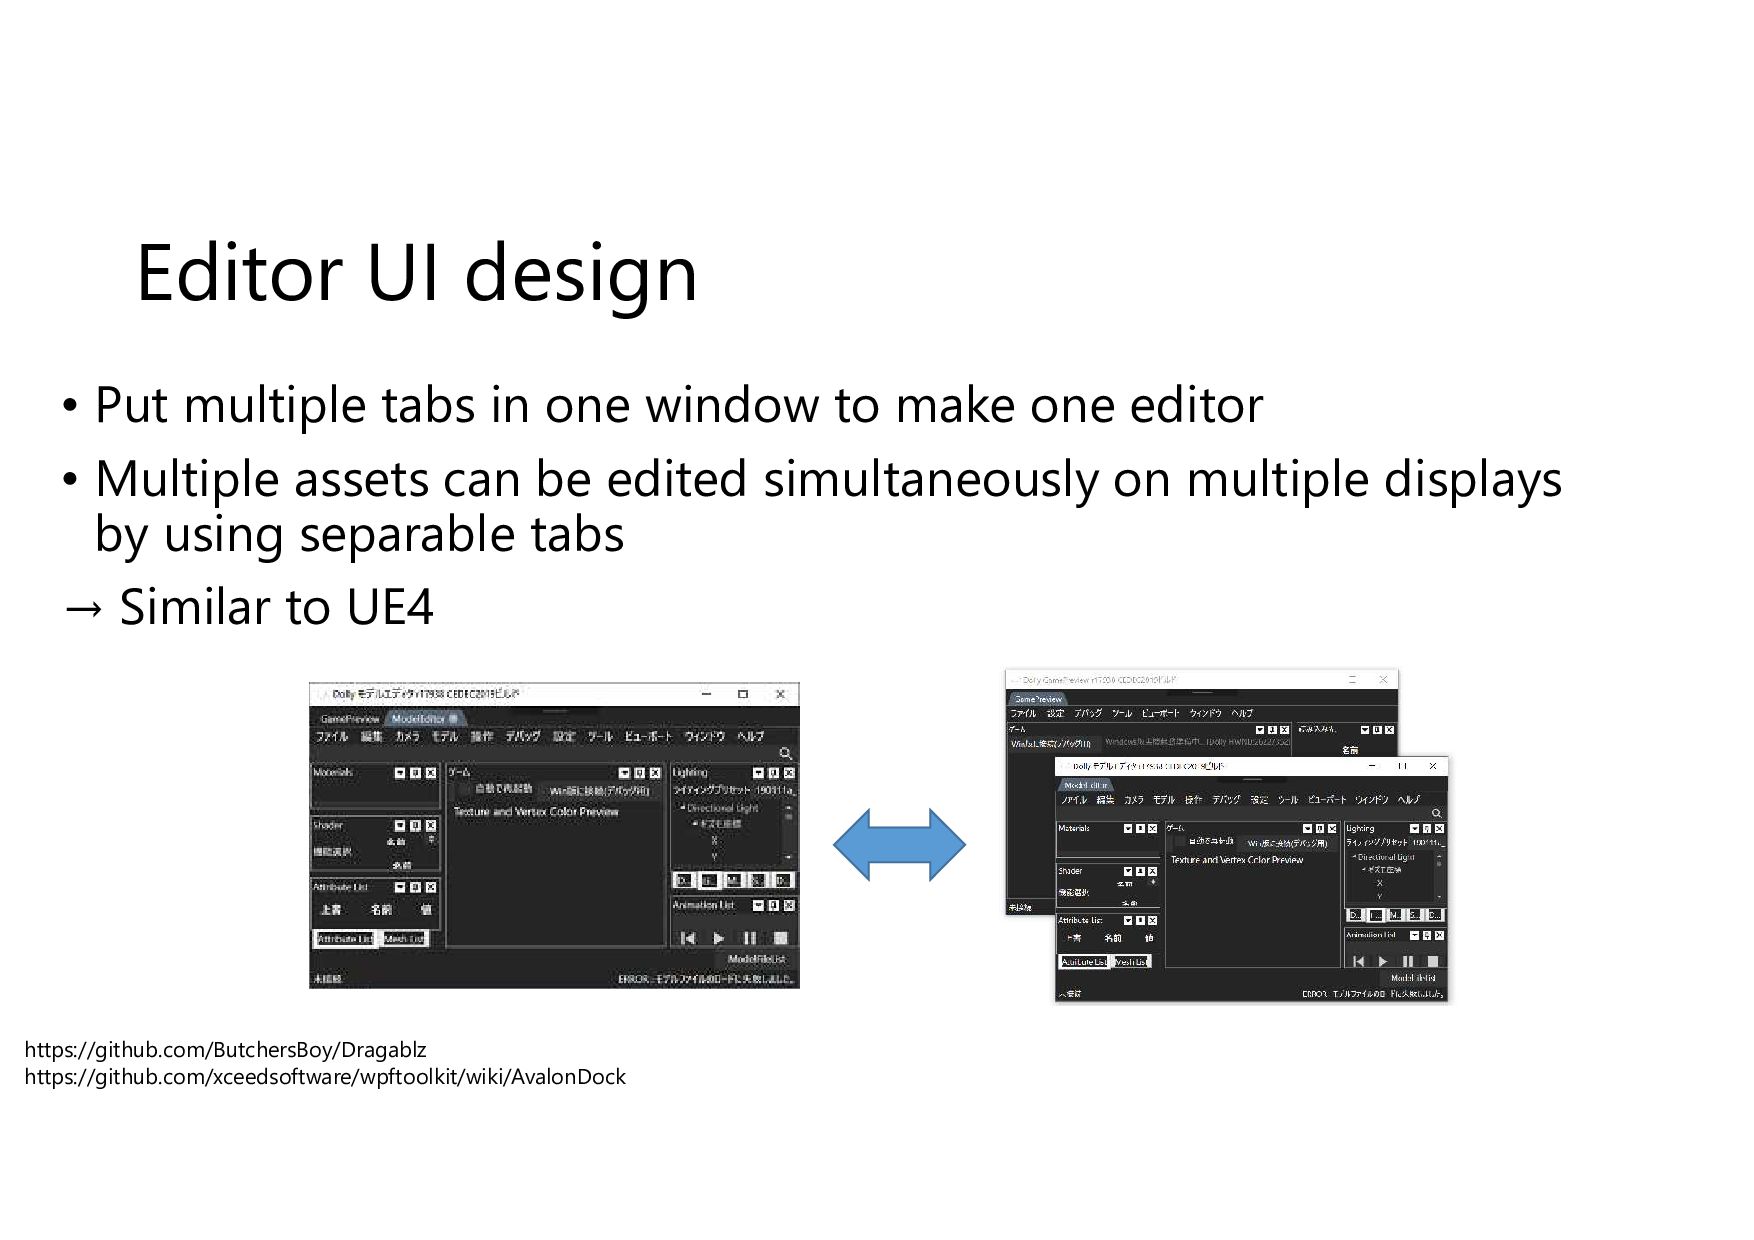
to make one editor • Multiple assets can be edited simultaneously on multiple displays by using separable tabs → Similar to UE4 https://github.com/ButchersBoy/Dragablz https://github.com/xceedsoftware/wpftoolkit/wiki/AvalonDock
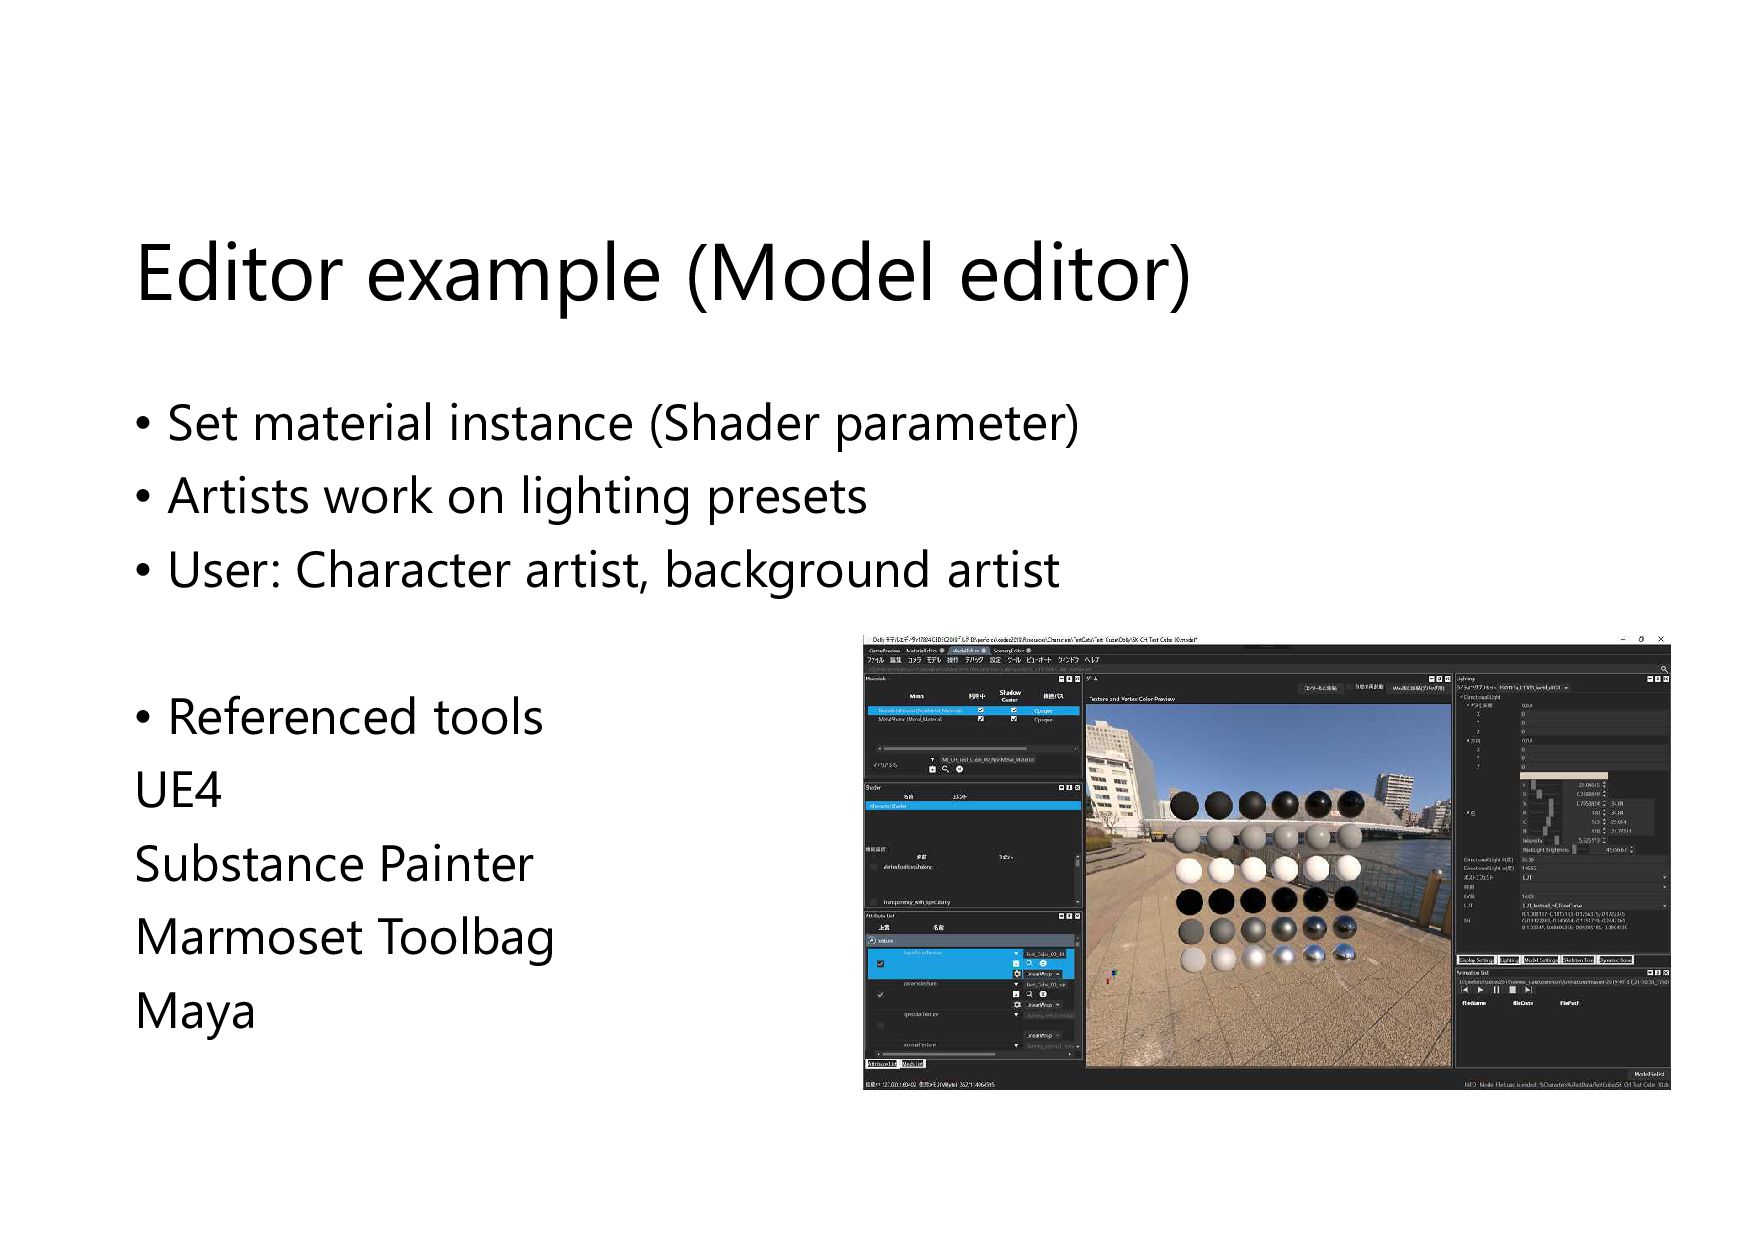
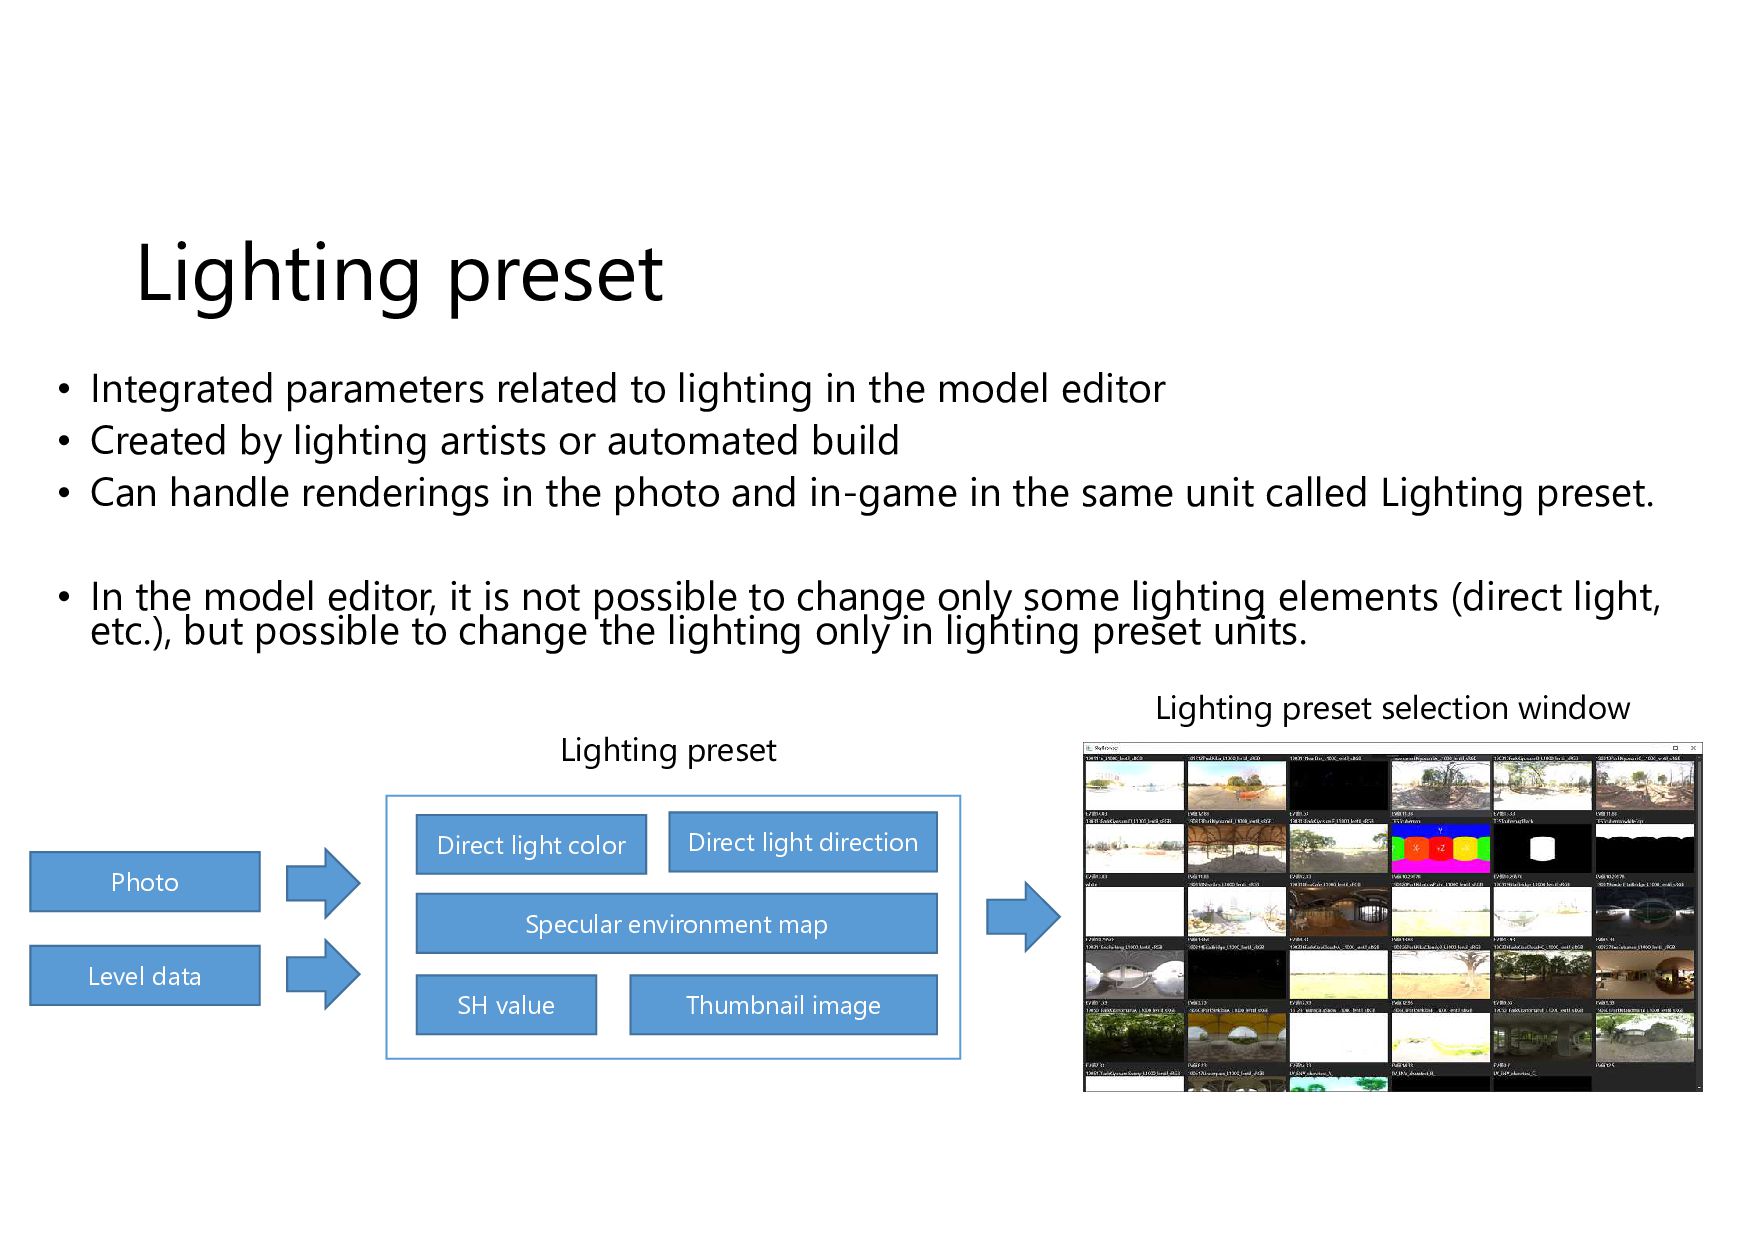
model editor • Created by lighting artists or automated build • Can handle renderings in the photo and in-game in the same unit called Lighting preset. • In the model editor, it is not possible to change only some lighting elements (direct light, etc.), but possible to change the lighting only in lighting preset units. Lighting preset Direct light direction Direct light color Specular environment map SH value Thumbnail image Lighting preset selection window Photo Level data
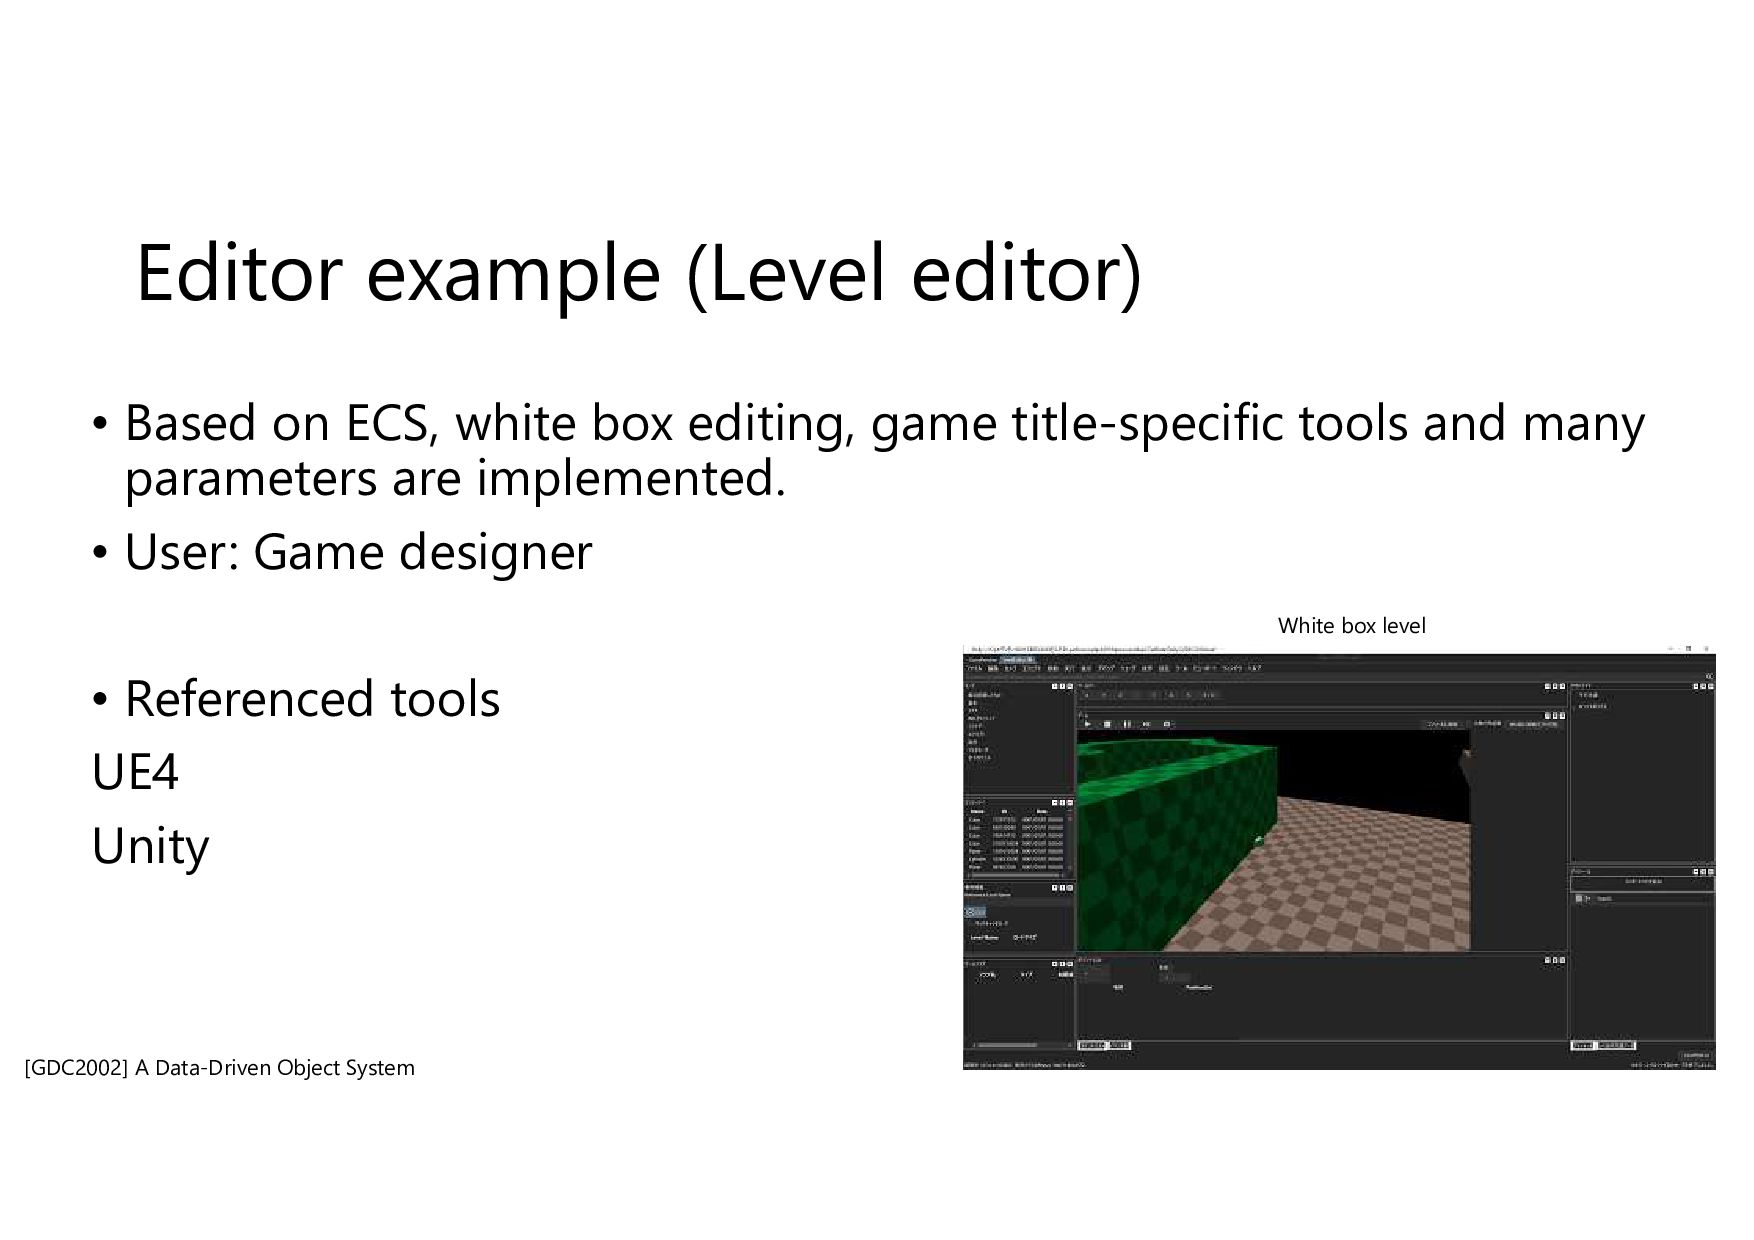
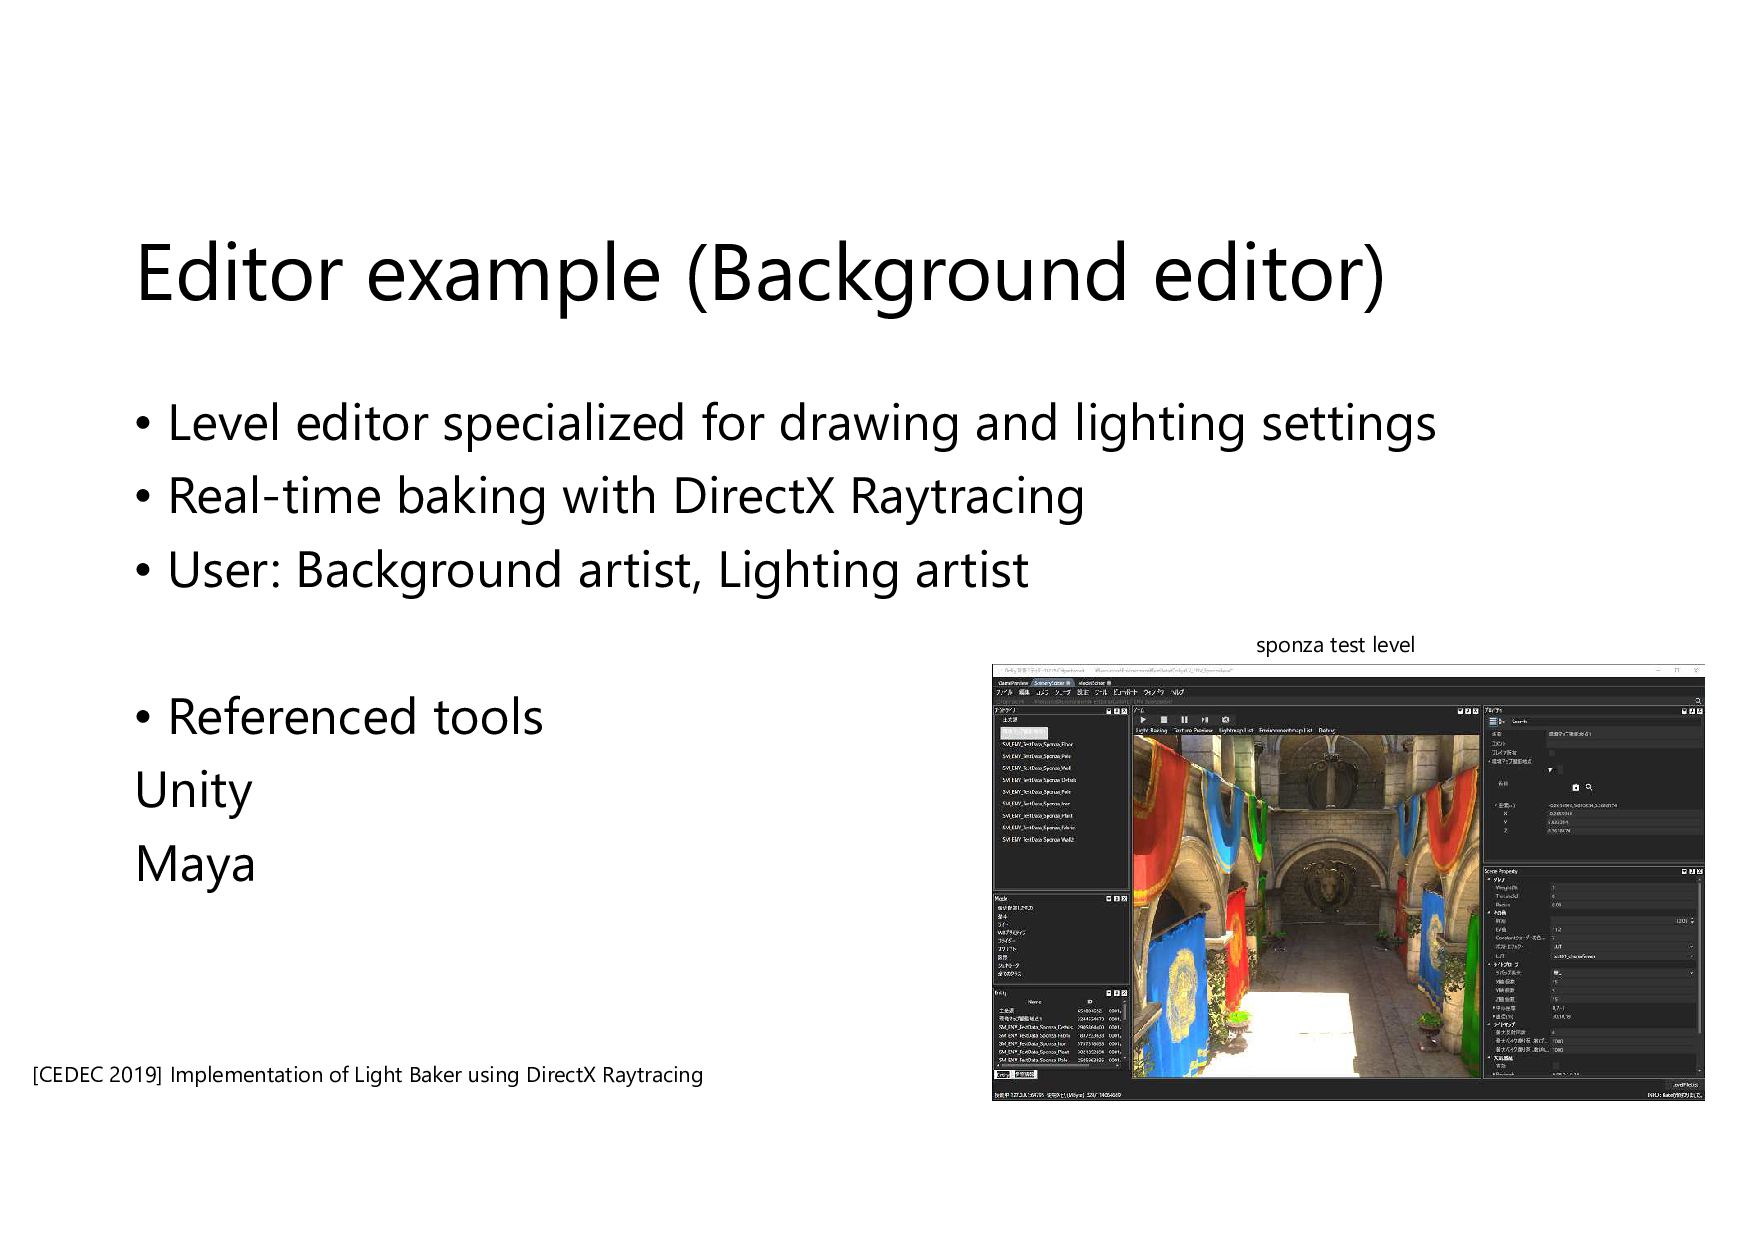
editing, game title-specific tools and many parameters are implemented. • User: Game designer • Referenced tools UE4 Unity [GDC2002] A Data-Driven Object System White box level
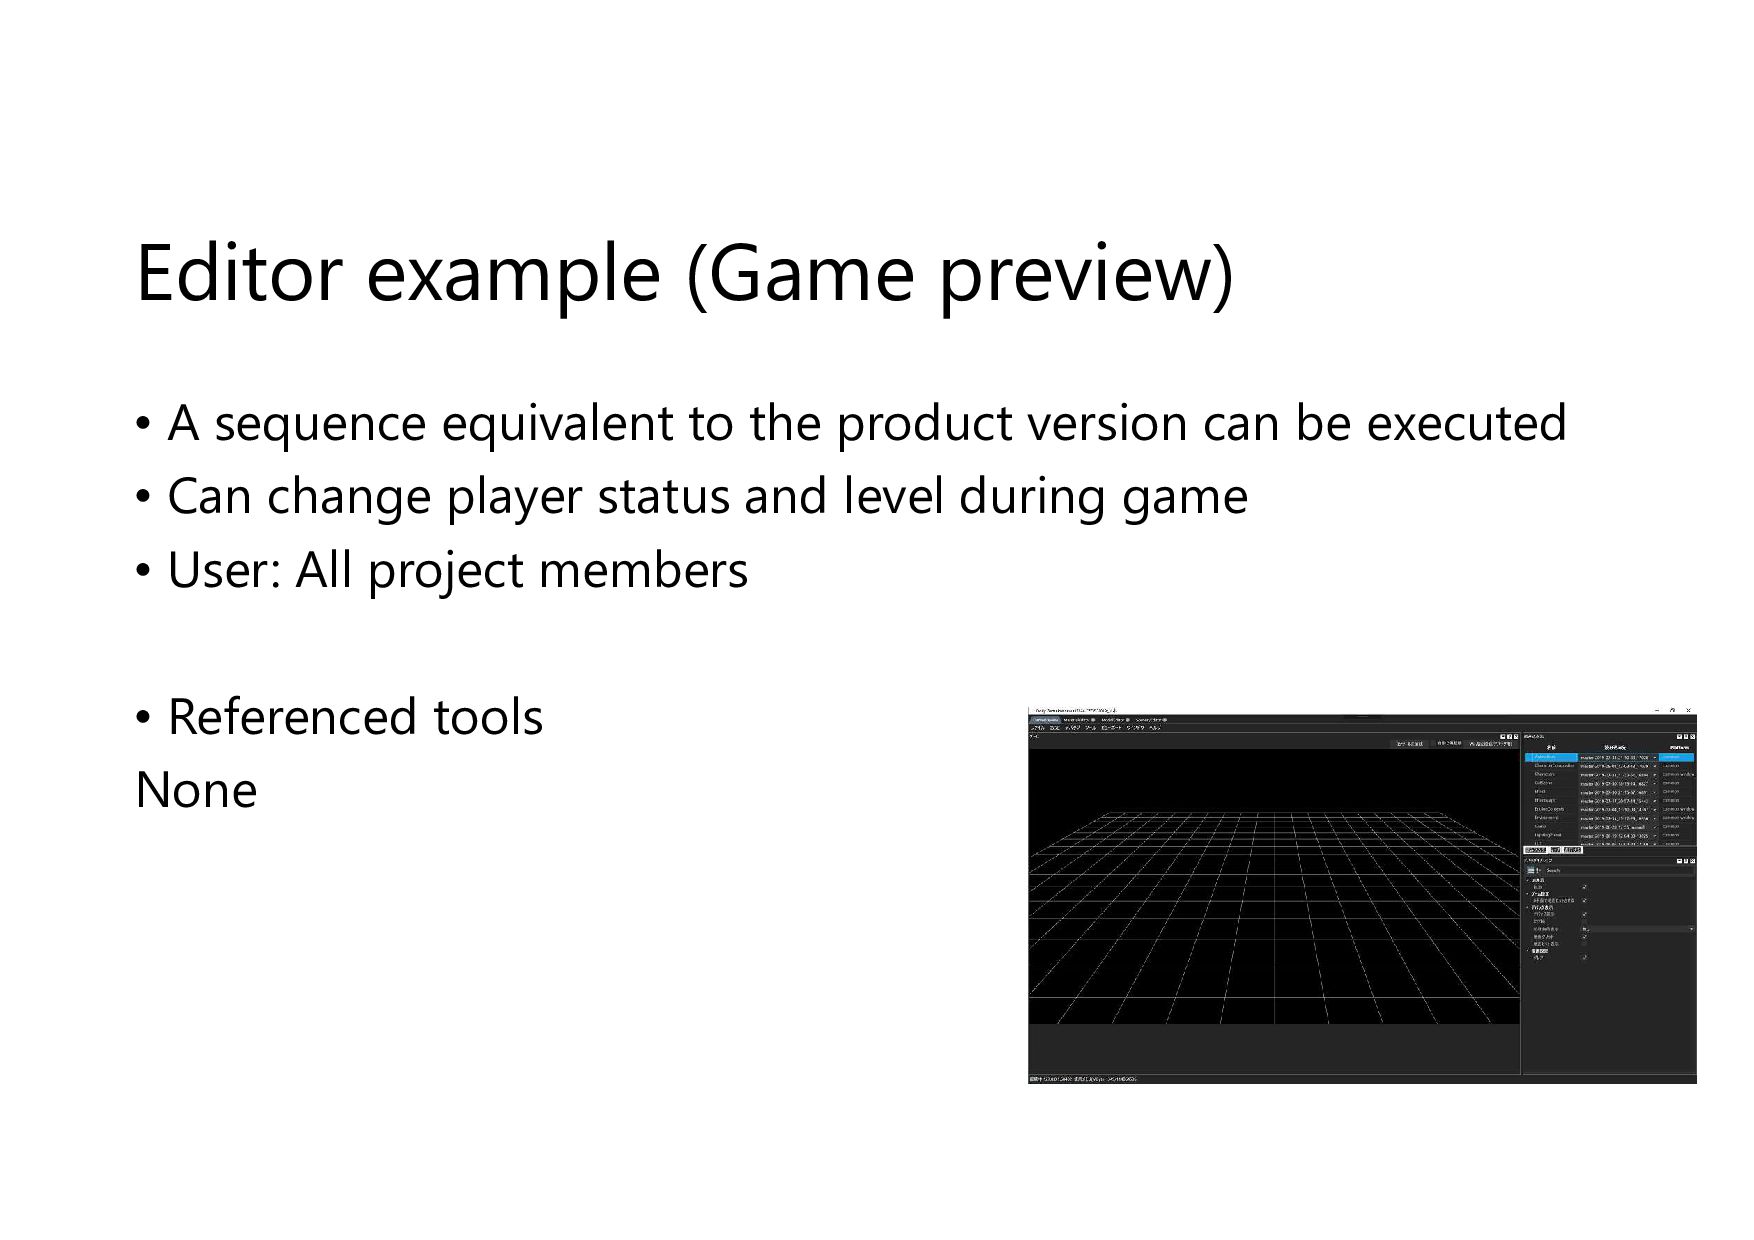
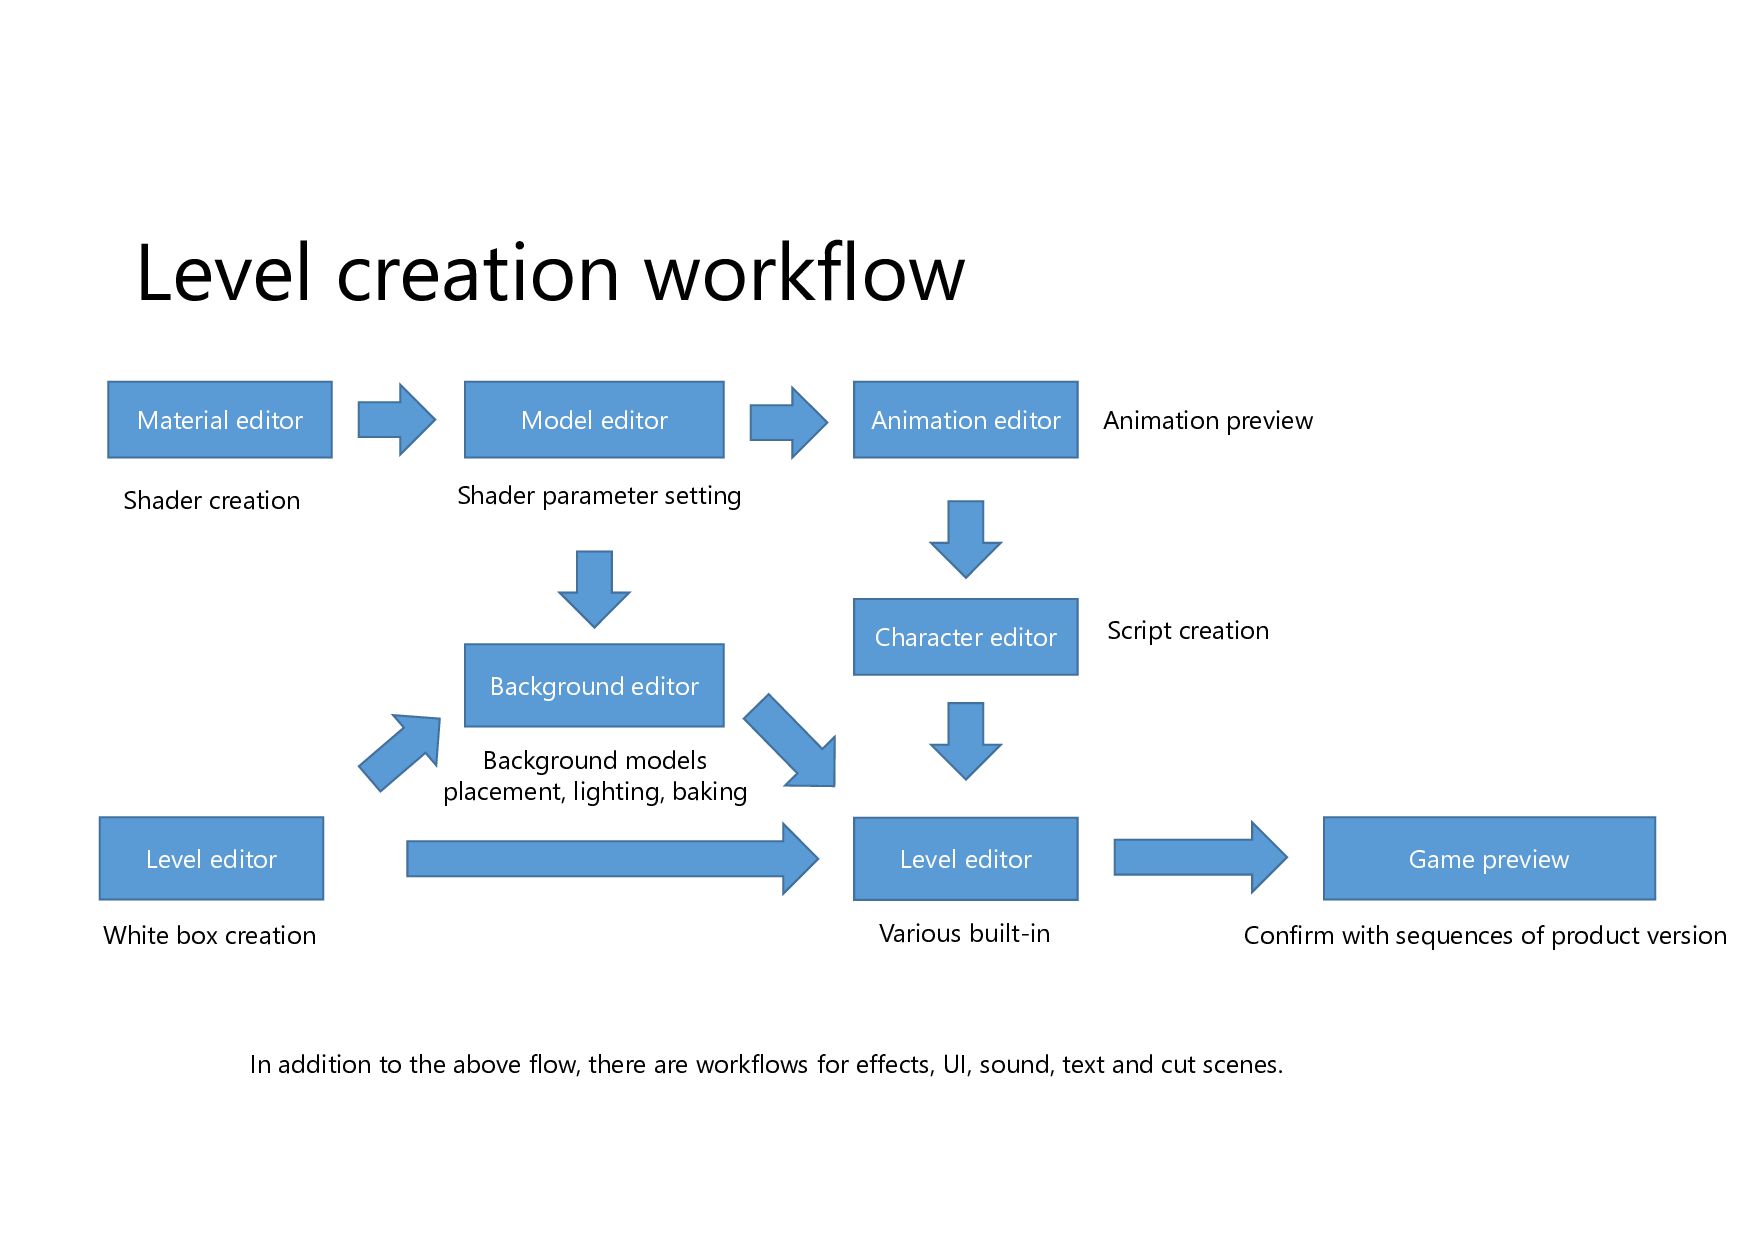
editor Animation editor Character editor Game preview Level editor White box creation Script creation Various built-in Background models placement, lighting, baking Shader creation Shader parameter setting Animation preview Confirm with sequences of product version In addition to the above flow, there are workflows for effects, UI, sound, text and cut scenes.
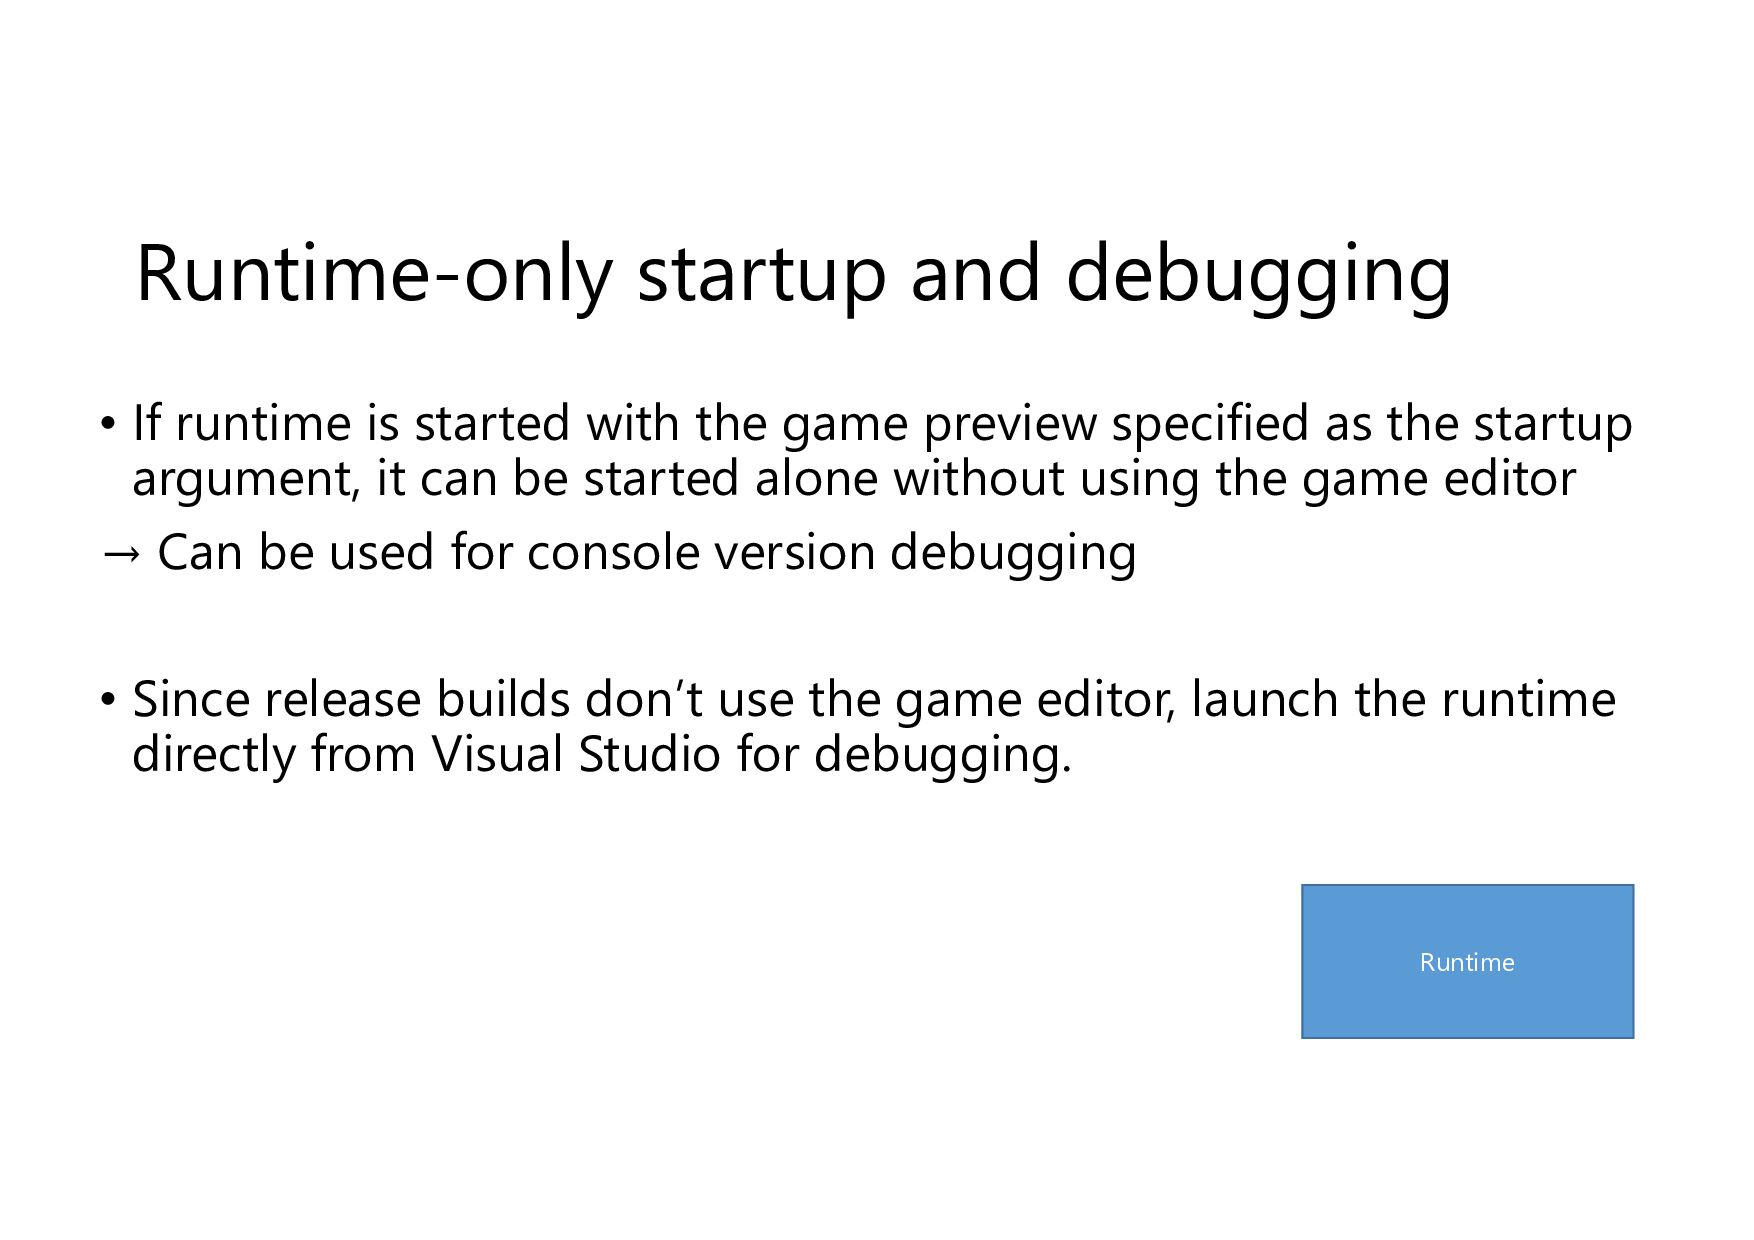
the game preview specified as the startup argument, it can be started alone without using the game editor → Can be used for console version debugging • Since release builds don’t use the game editor, launch the runtime directly from Visual Studio for debugging. Runtime
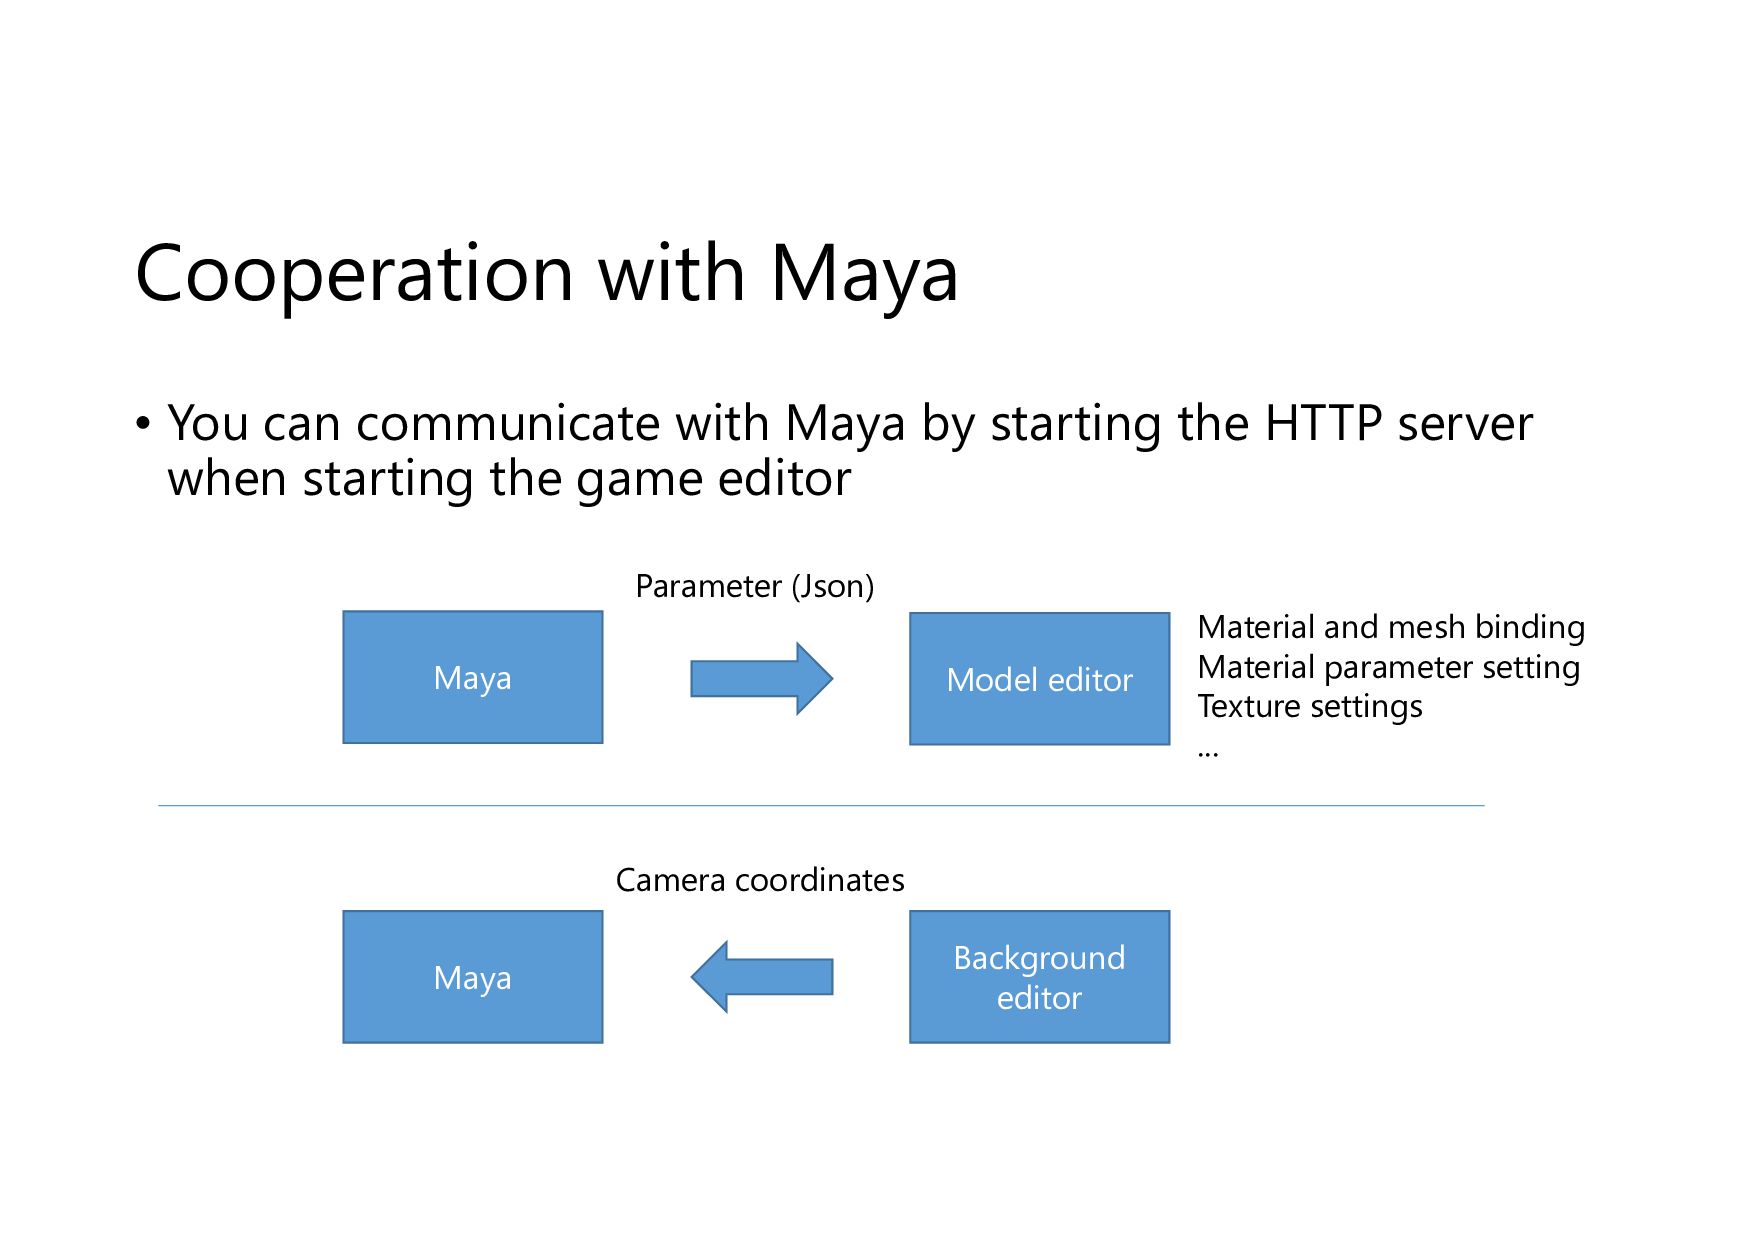
starting the HTTP server when starting the game editor Model editor Maya Parameter (Json) Background editor Maya Camera coordinates Material and mesh binding Material parameter setting Texture settings ...
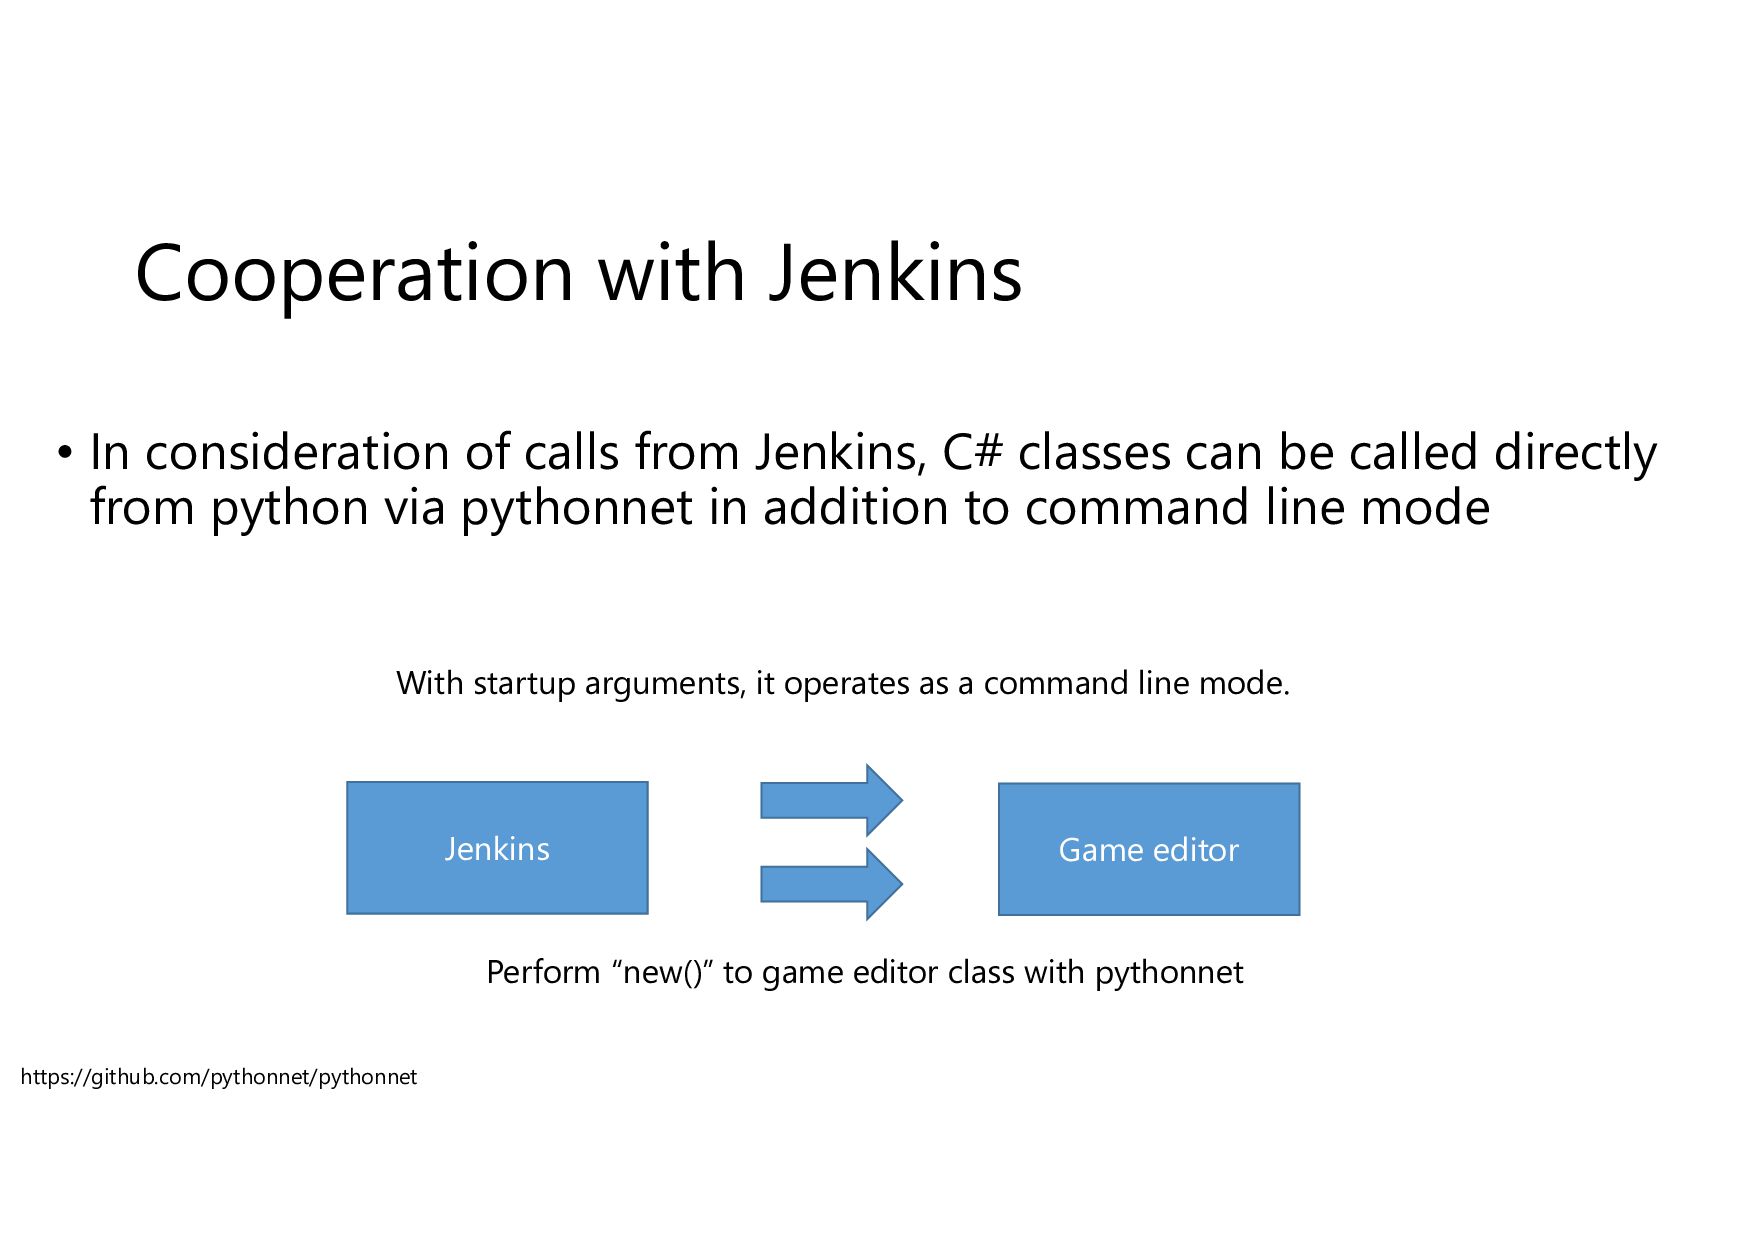
C# classes can be called directly from python via pythonnet in addition to command line mode Jenkins Game editor With startup arguments, it operates as a command line mode. Perform “new()” to game editor class with pythonnet https://github.com/pythonnet/pythonnet
game editor, a bug report is automatically posted to Slack • Bug reports include game editor screenshots and configuration files • Bug reports can also be sent manually from the menu https://github.com/Inumedia/SlackAPI
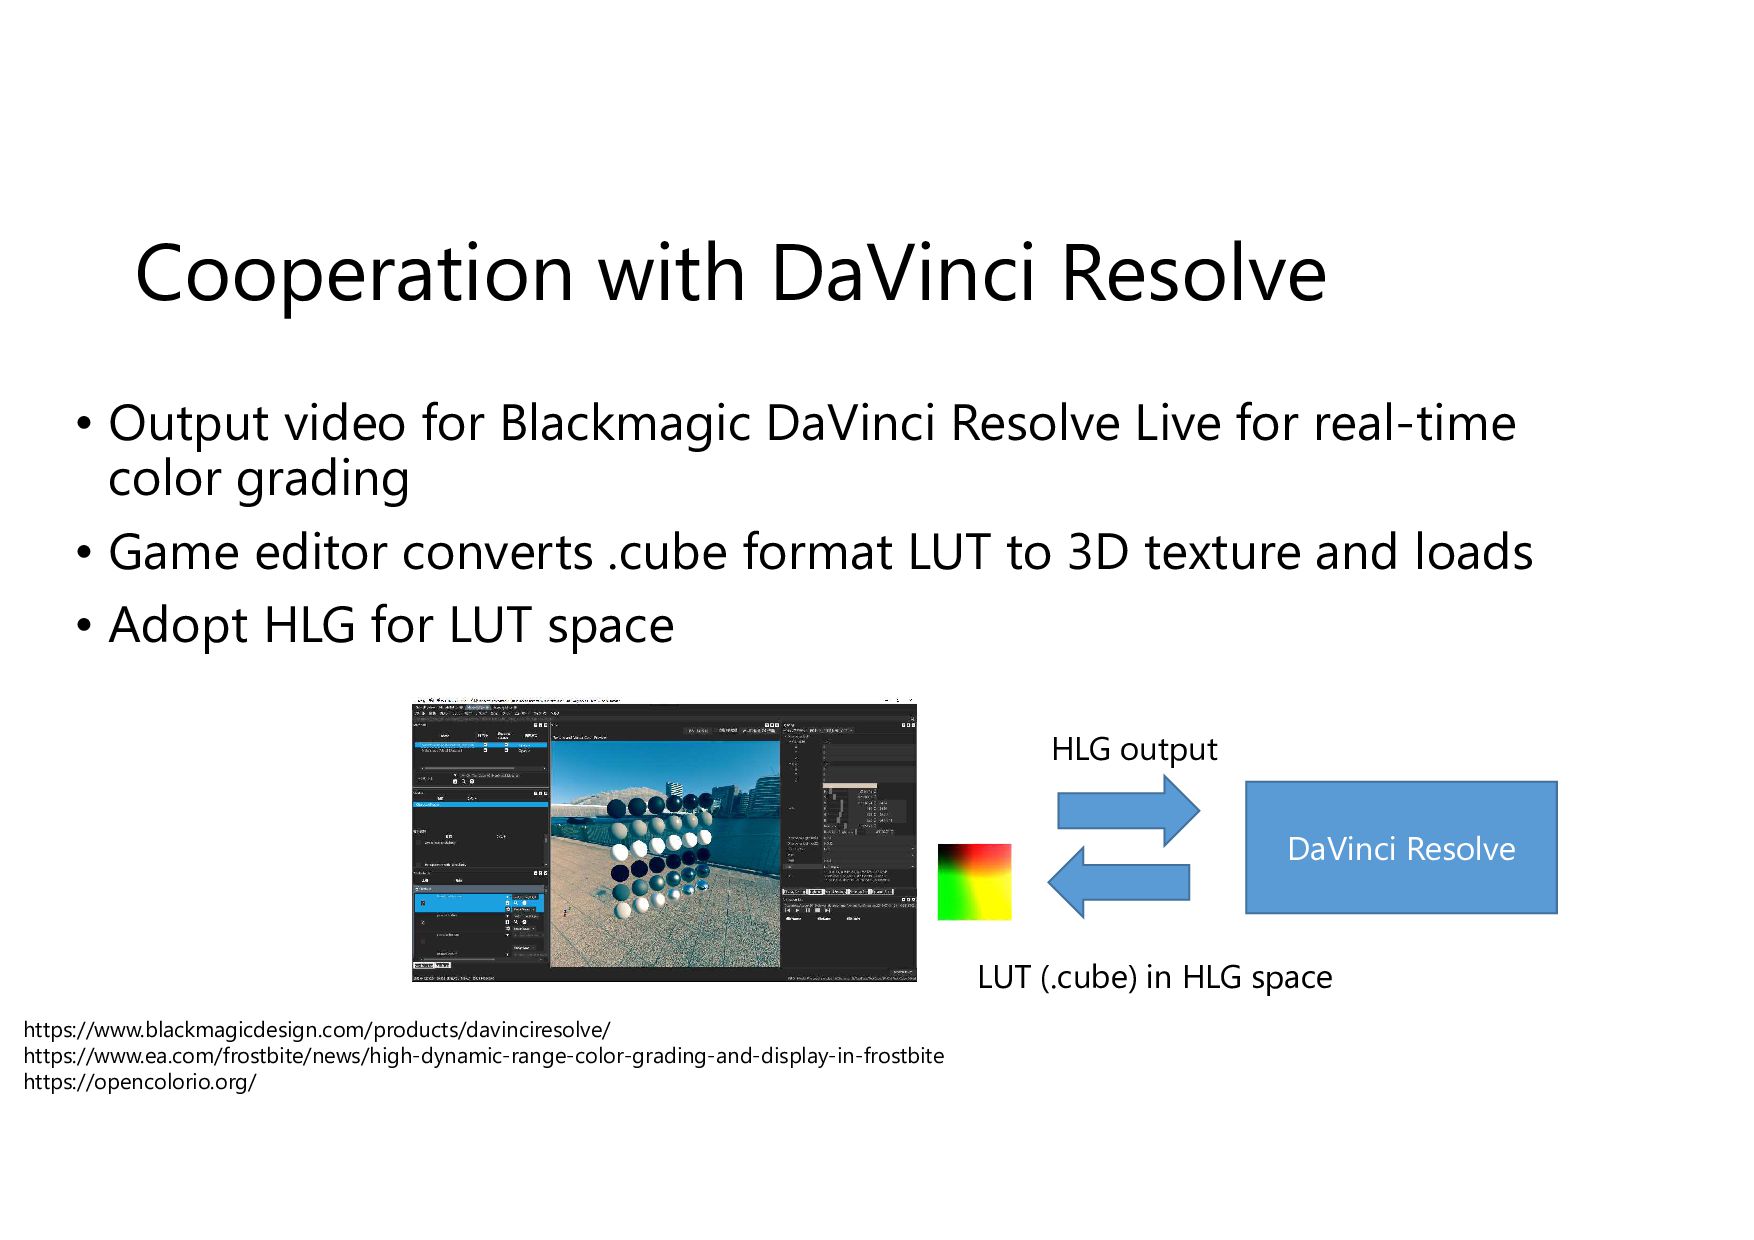
Resolve Live for real-time color grading • Game editor converts .cube format LUT to 3D texture and loads • Adopt HLG for LUT space DaVinci Resolve HLG output LUT (.cube) in HLG space https://www.blackmagicdesign.com/products/davinciresolve/ https://www.ea.com/frostbite/news/high-dynamic-range-color-grading-and-display-in-frostbite https://opencolorio.org/
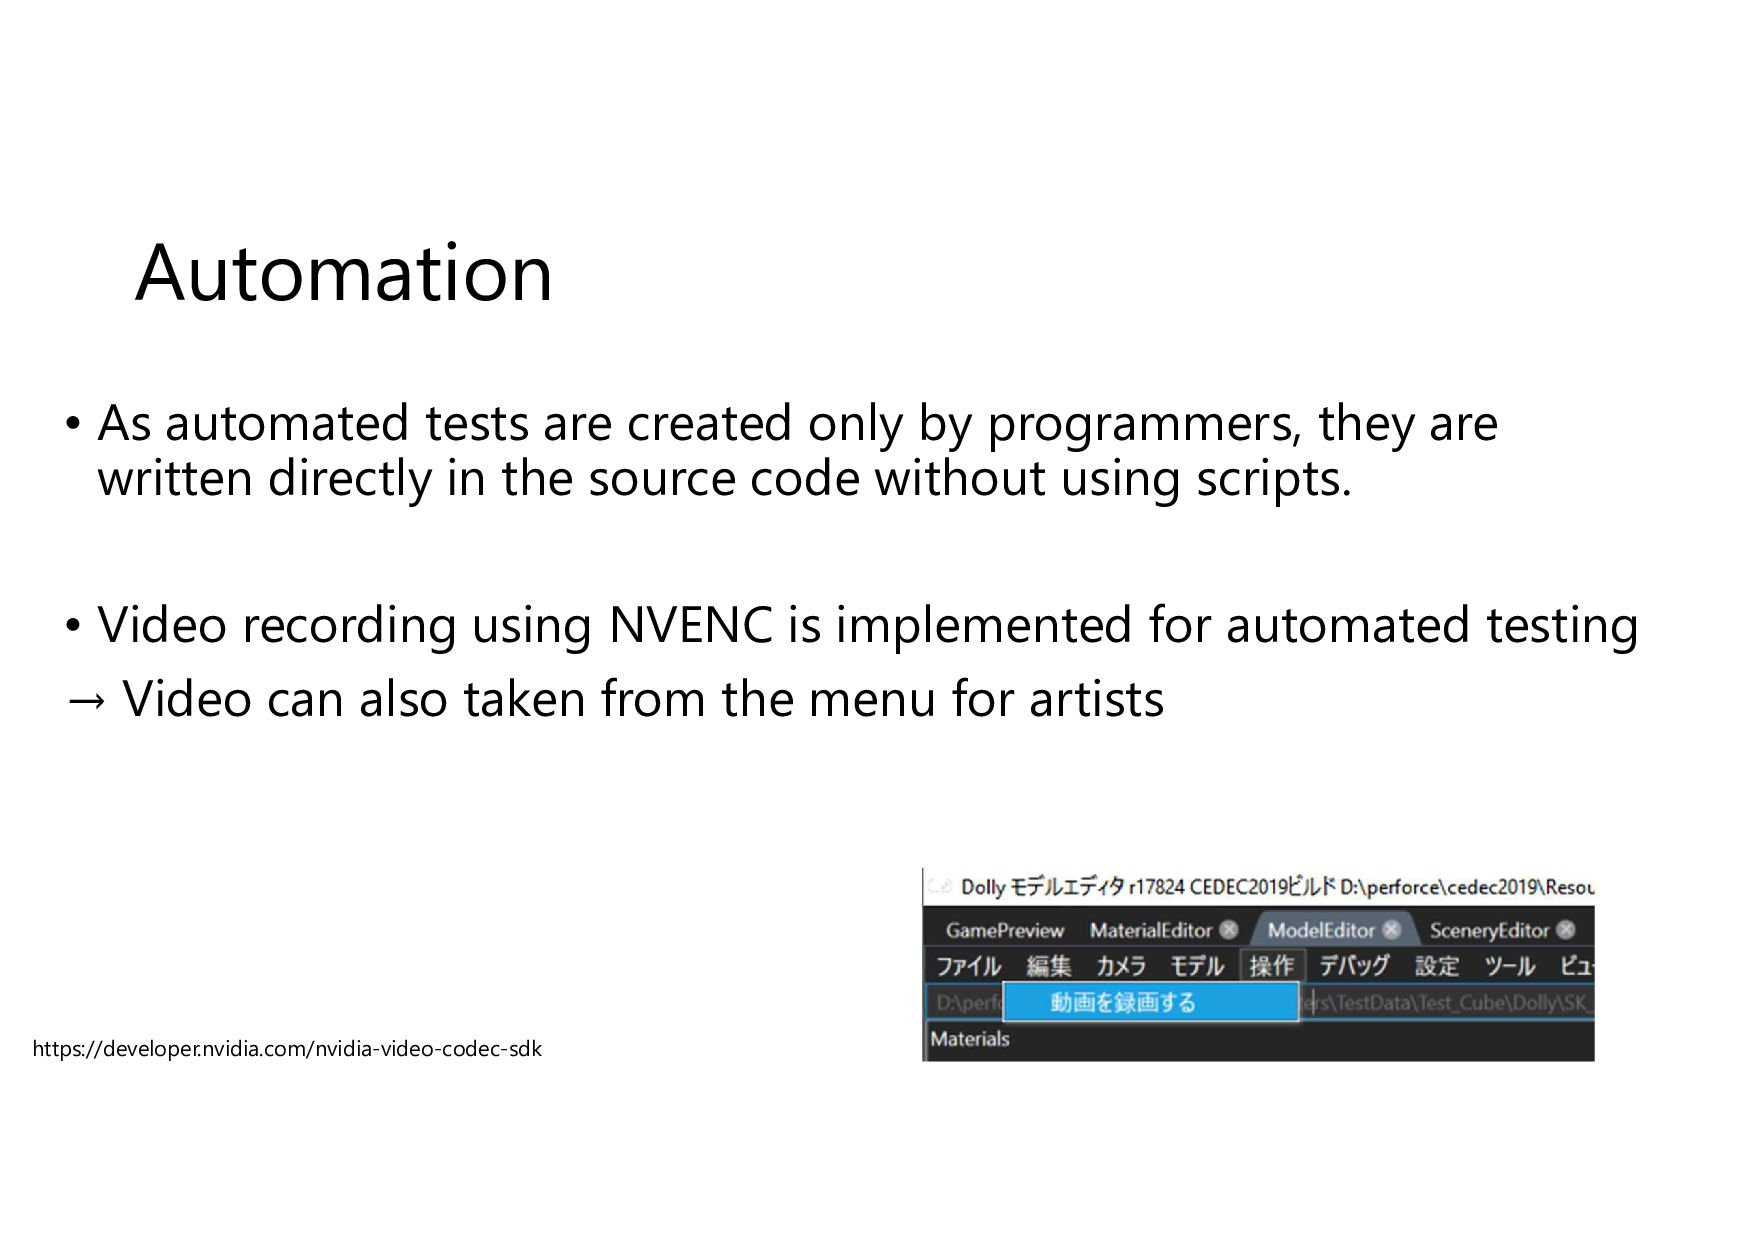
they are written directly in the source code without using scripts. • Video recording using NVENC is implemented for automated testing → Video can also taken from the menu for artists https://developer.nvidia.com/nvidia-video-codec-sdk
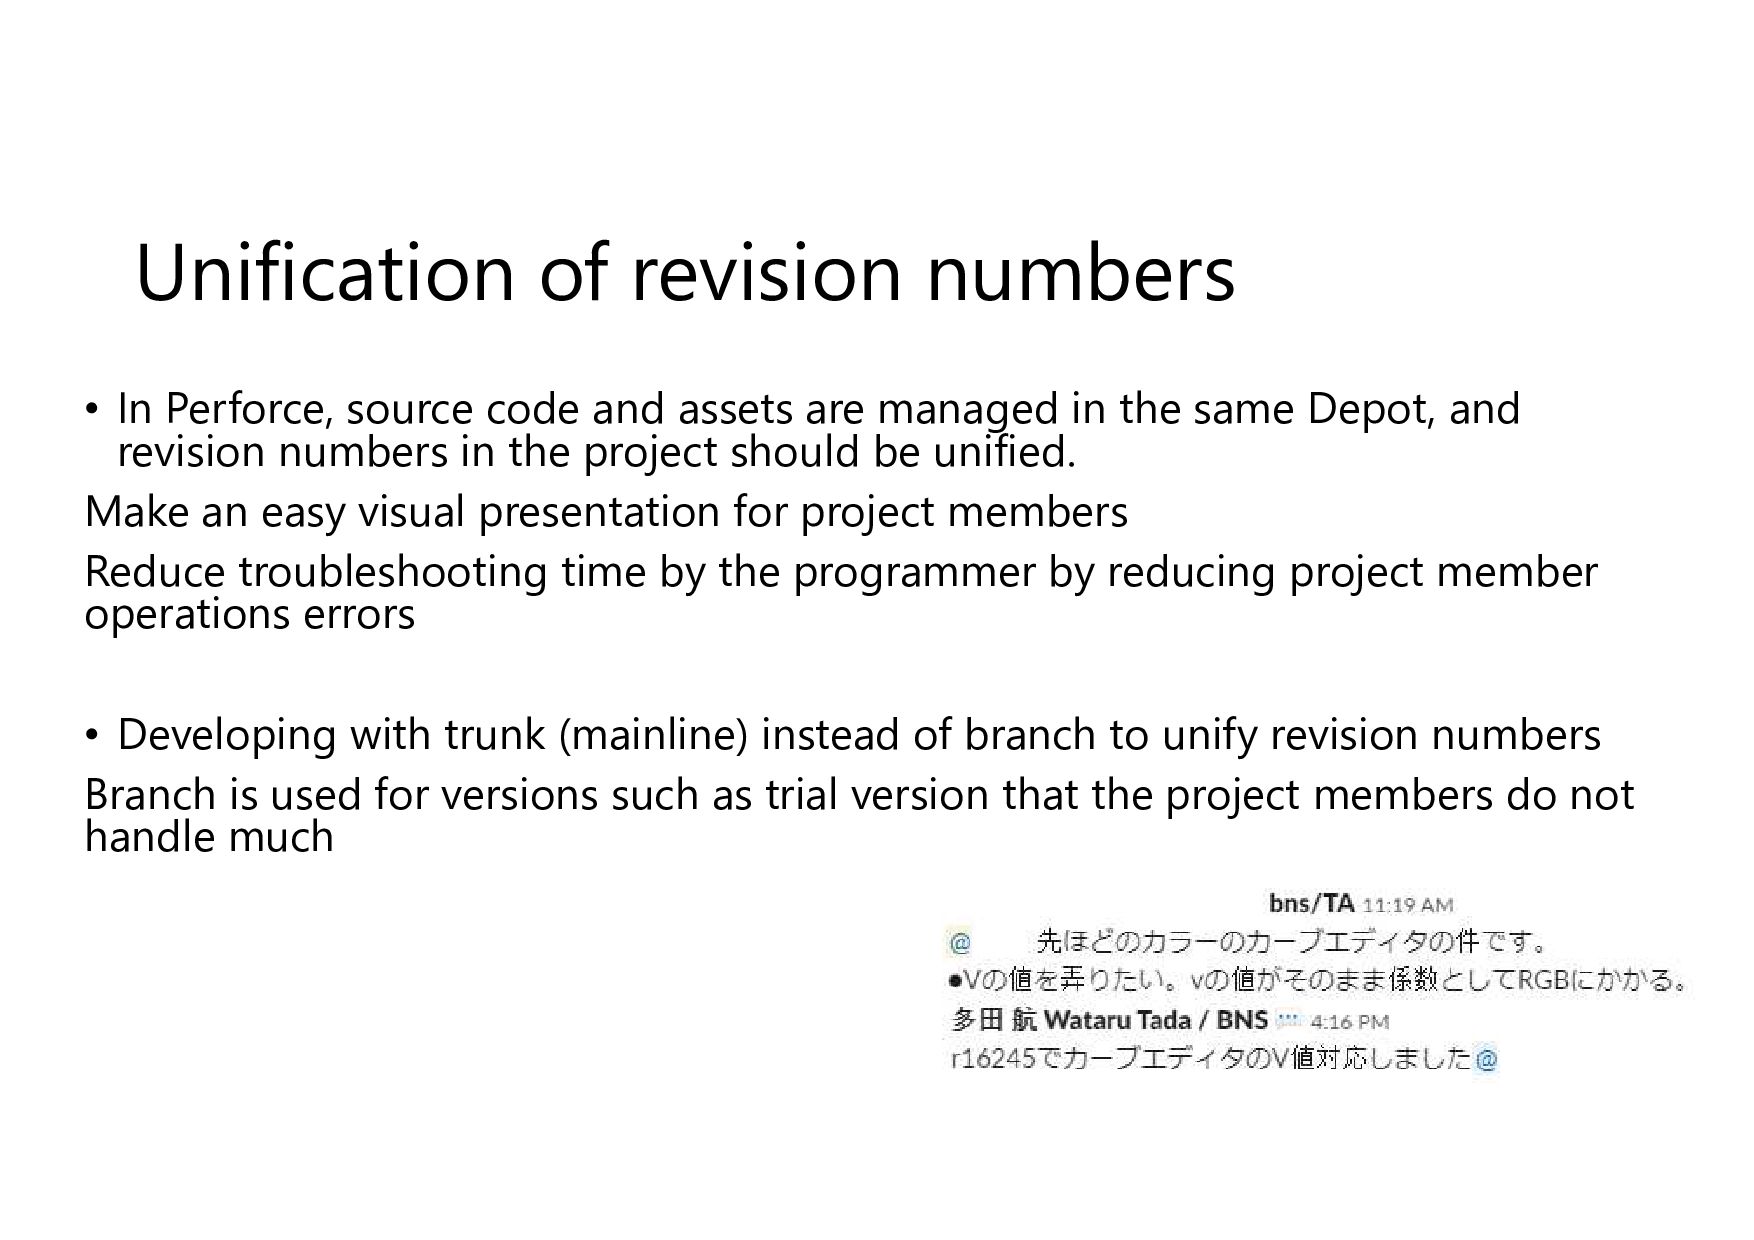
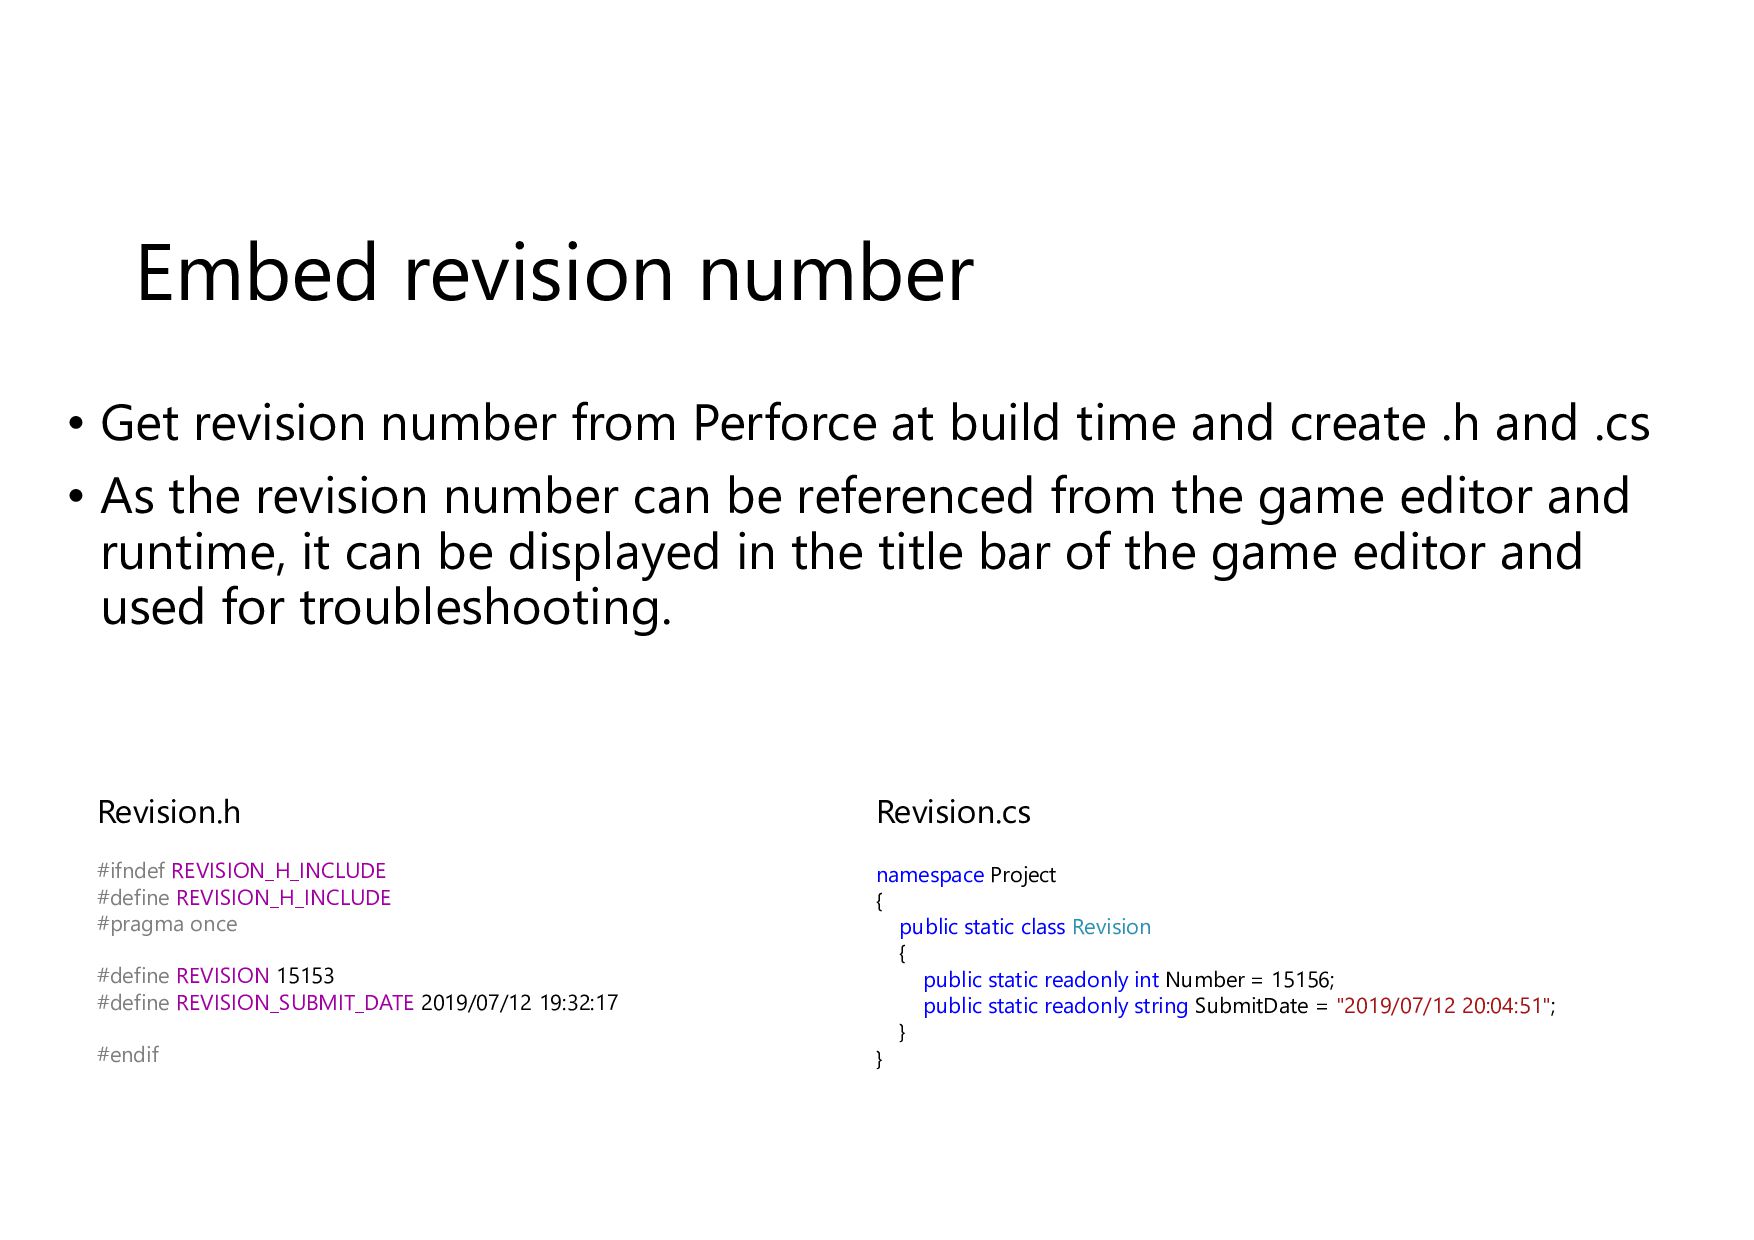
assets are managed in the same Depot, and revision numbers in the project should be unified. Make an easy visual presentation for project members Reduce troubleshooting time by the programmer by reducing project member operations errors • Developing with trunk (mainline) instead of branch to unify revision numbers Branch is used for versions such as trial version that the project members do not handle much
build time and create .h and .cs • As the revision number can be referenced from the game editor and runtime, it can be displayed in the title bar of the game editor and used for troubleshooting. #ifndef REVISION_H_INCLUDE #define REVISION_H_INCLUDE #pragma once #define REVISION 15153 #define REVISION_SUBMIT_DATE 2019/07/12 19:32:17 #endif namespace Project { public static class Revision { public static readonly int Number = 15156; public static readonly string SubmitDate = "2019/07/12 20:04:51"; } } Revision.h Revision.cs
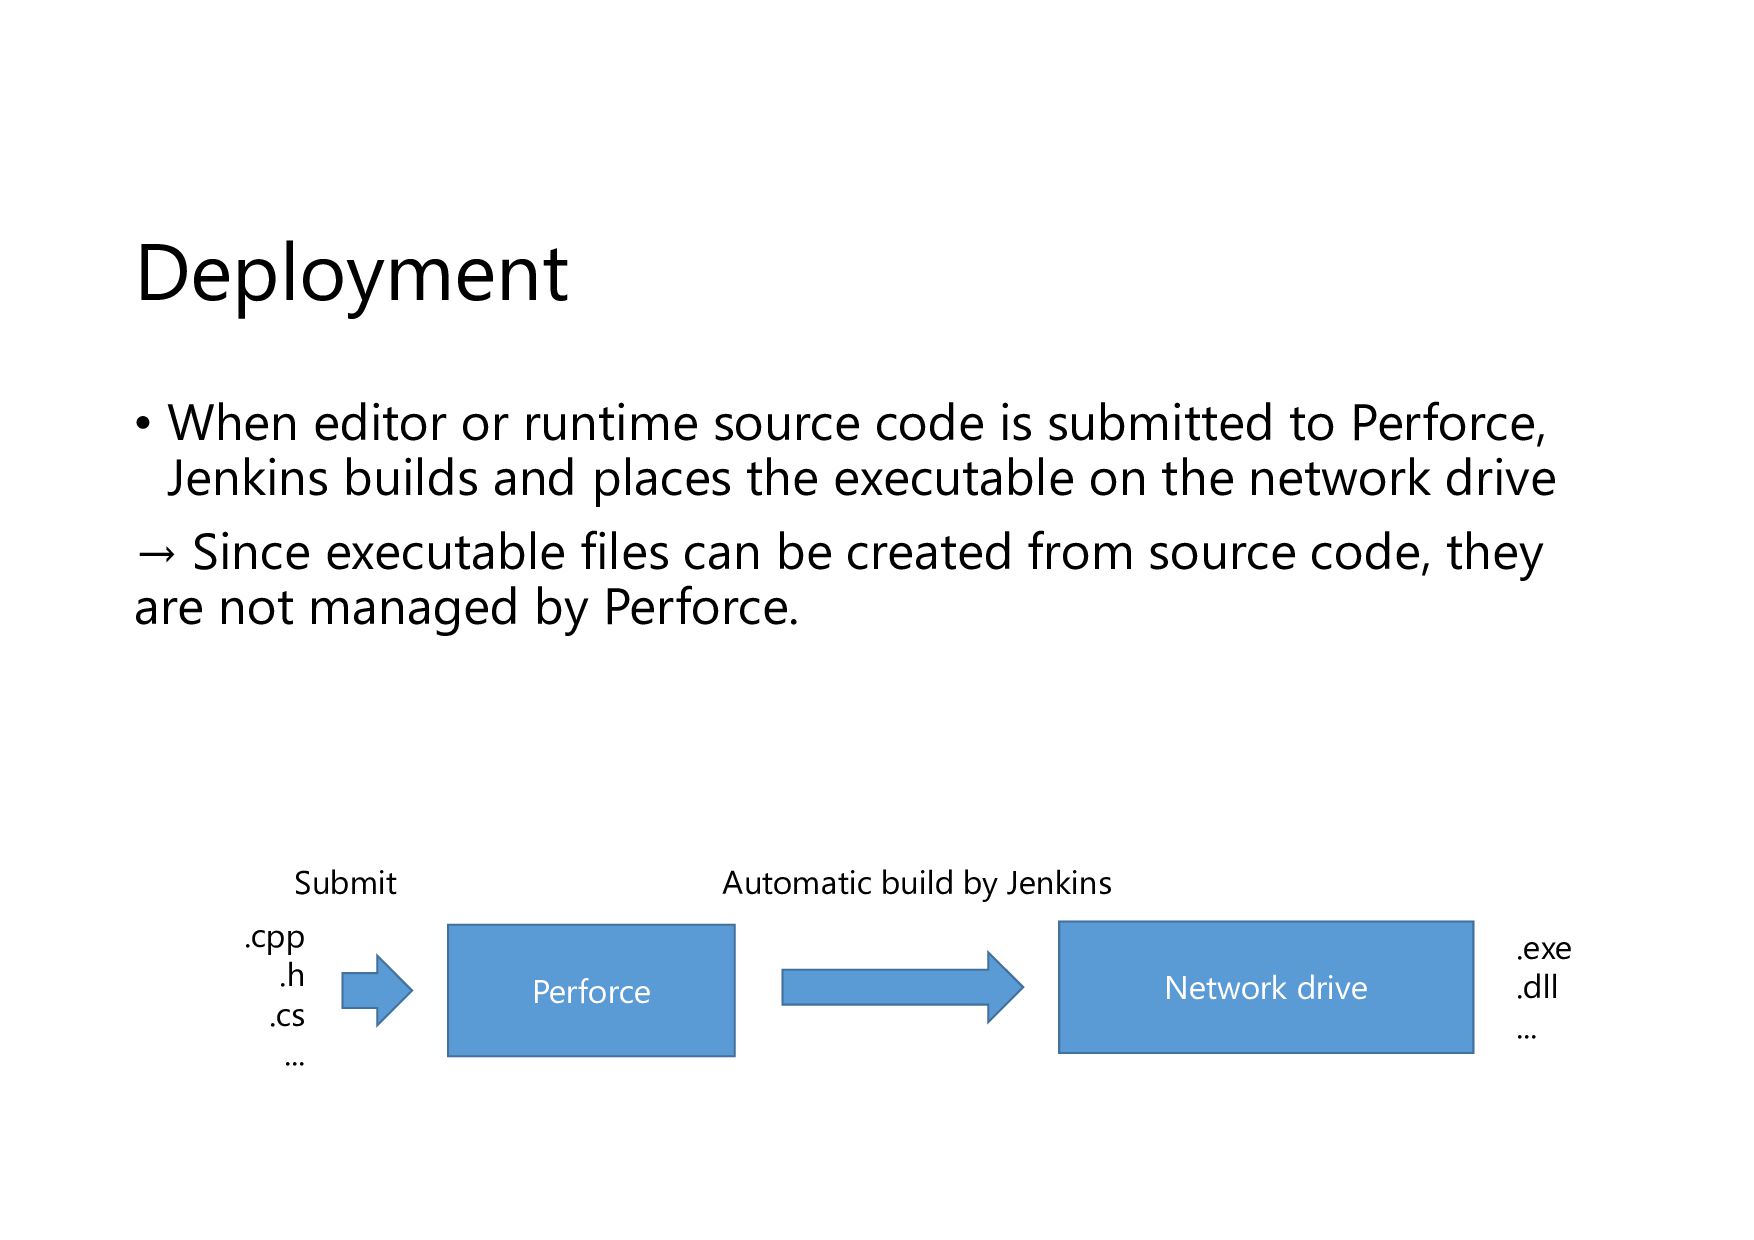
to Perforce, Jenkins builds and places the executable on the network drive → Since executable files can be created from source code, they are not managed by Perforce. Perforce Network drive Submit Automatic build by Jenkins .exe .dll ... .cpp .h .cs ...
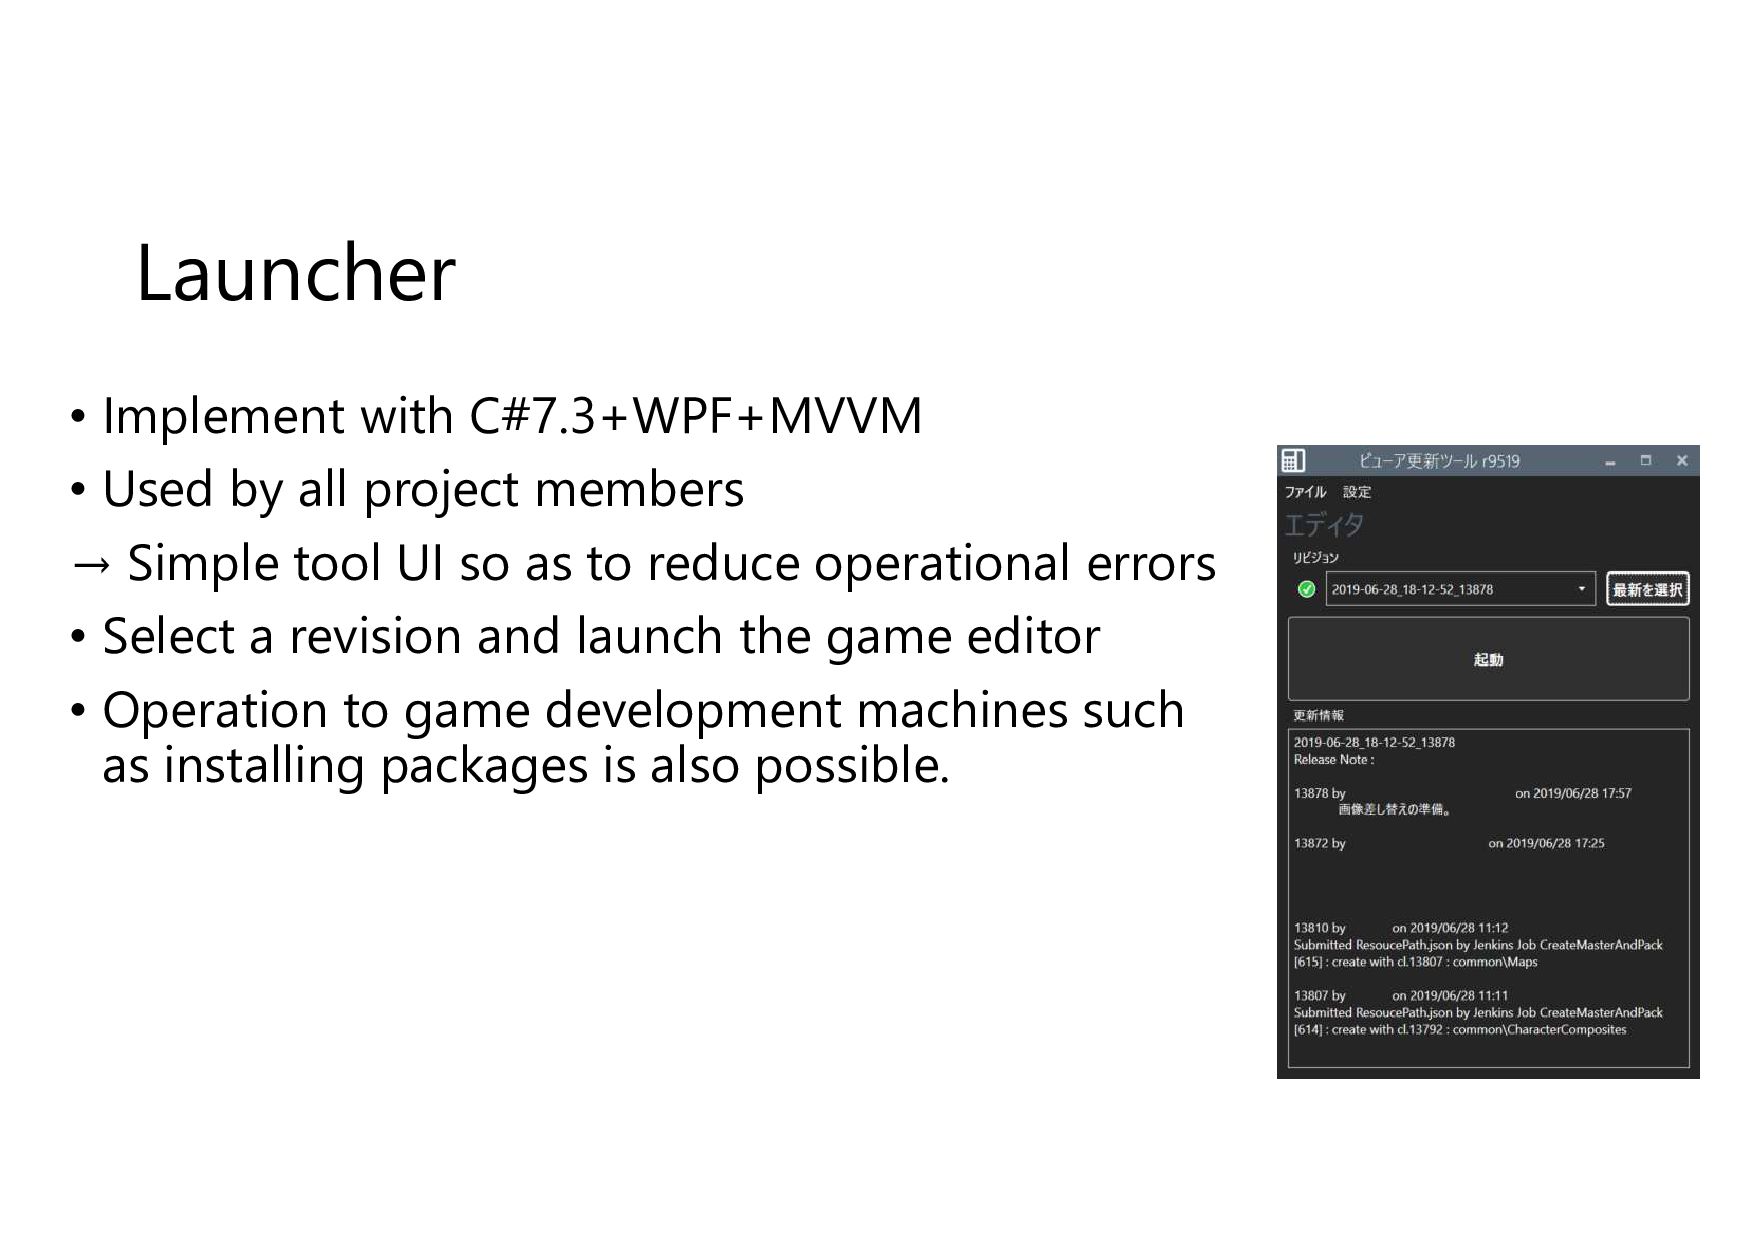
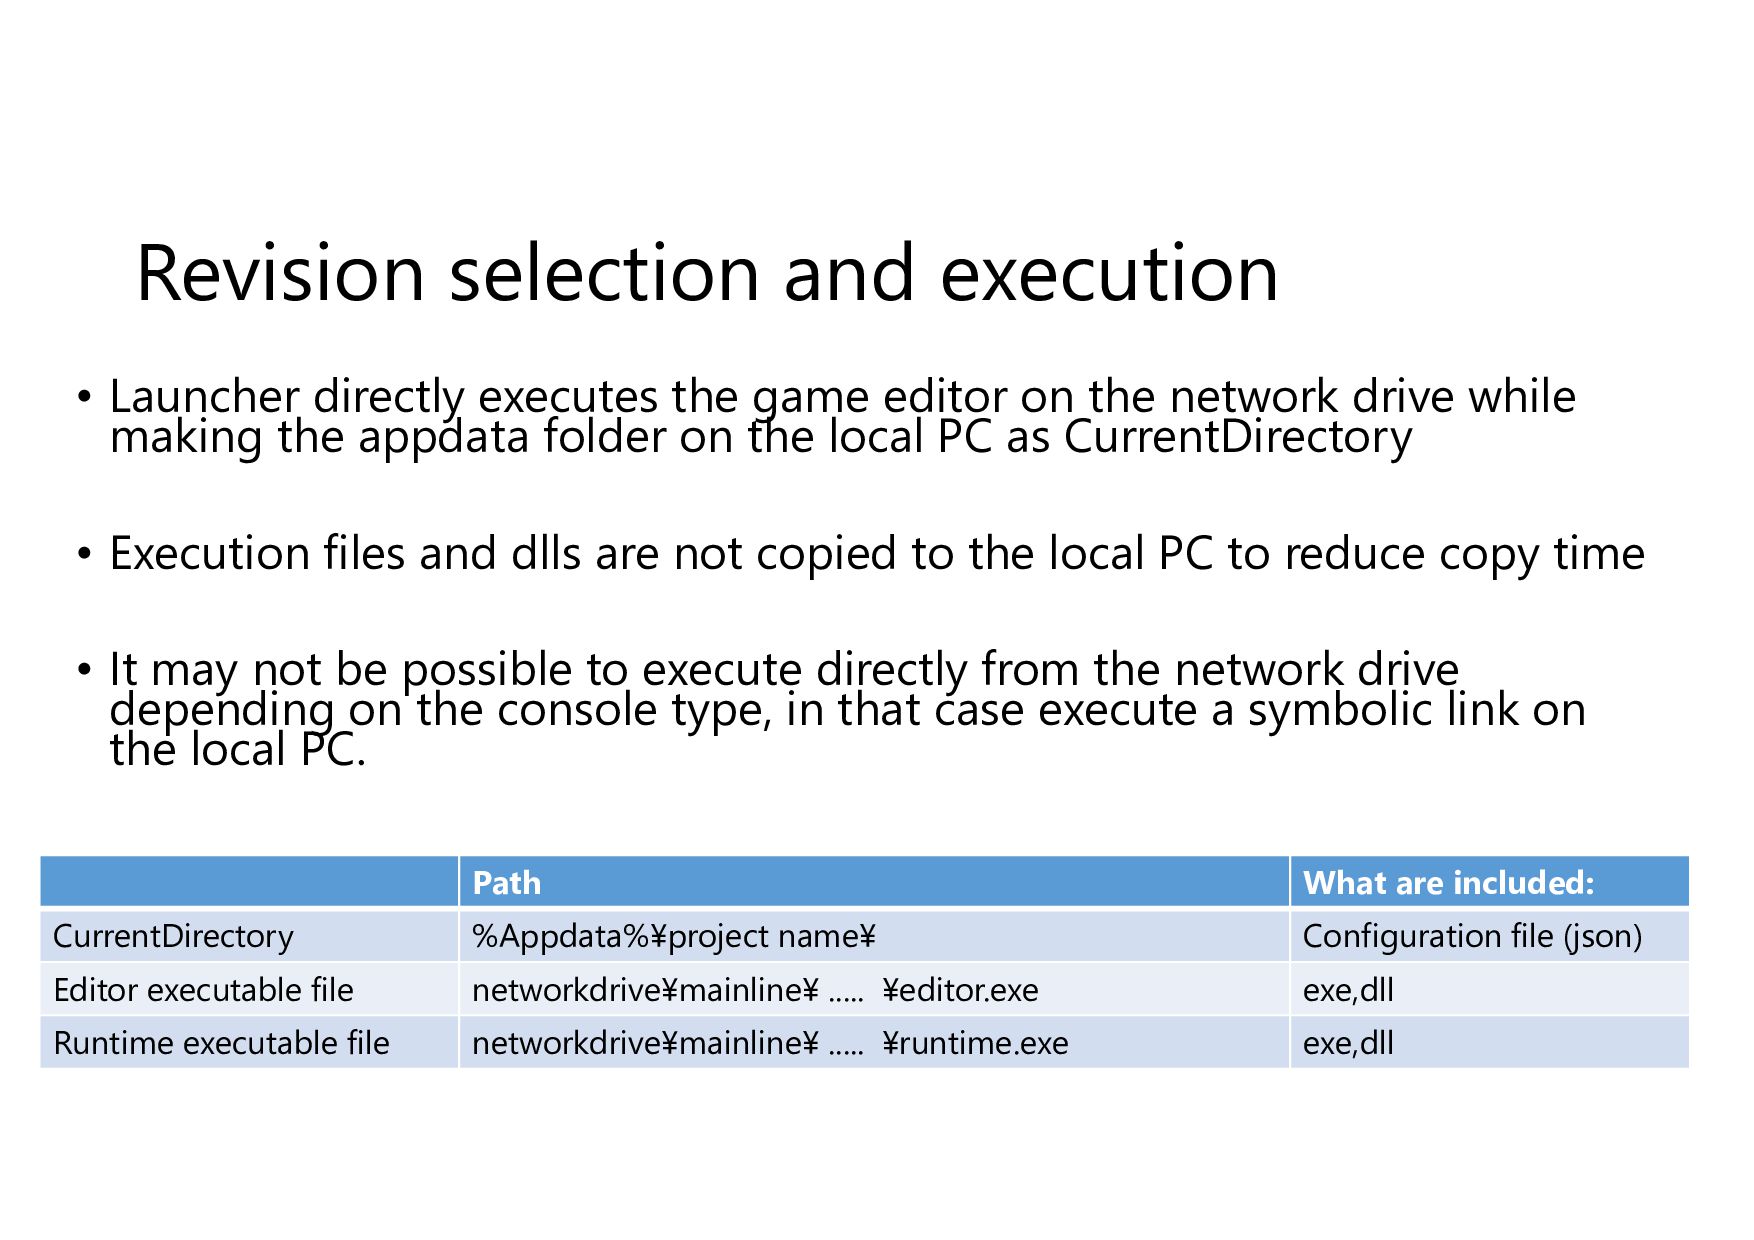
members → Simple tool UI so as to reduce operational errors • Select a revision and launch the game editor • Operation to game development machines such as installing packages is also possible.
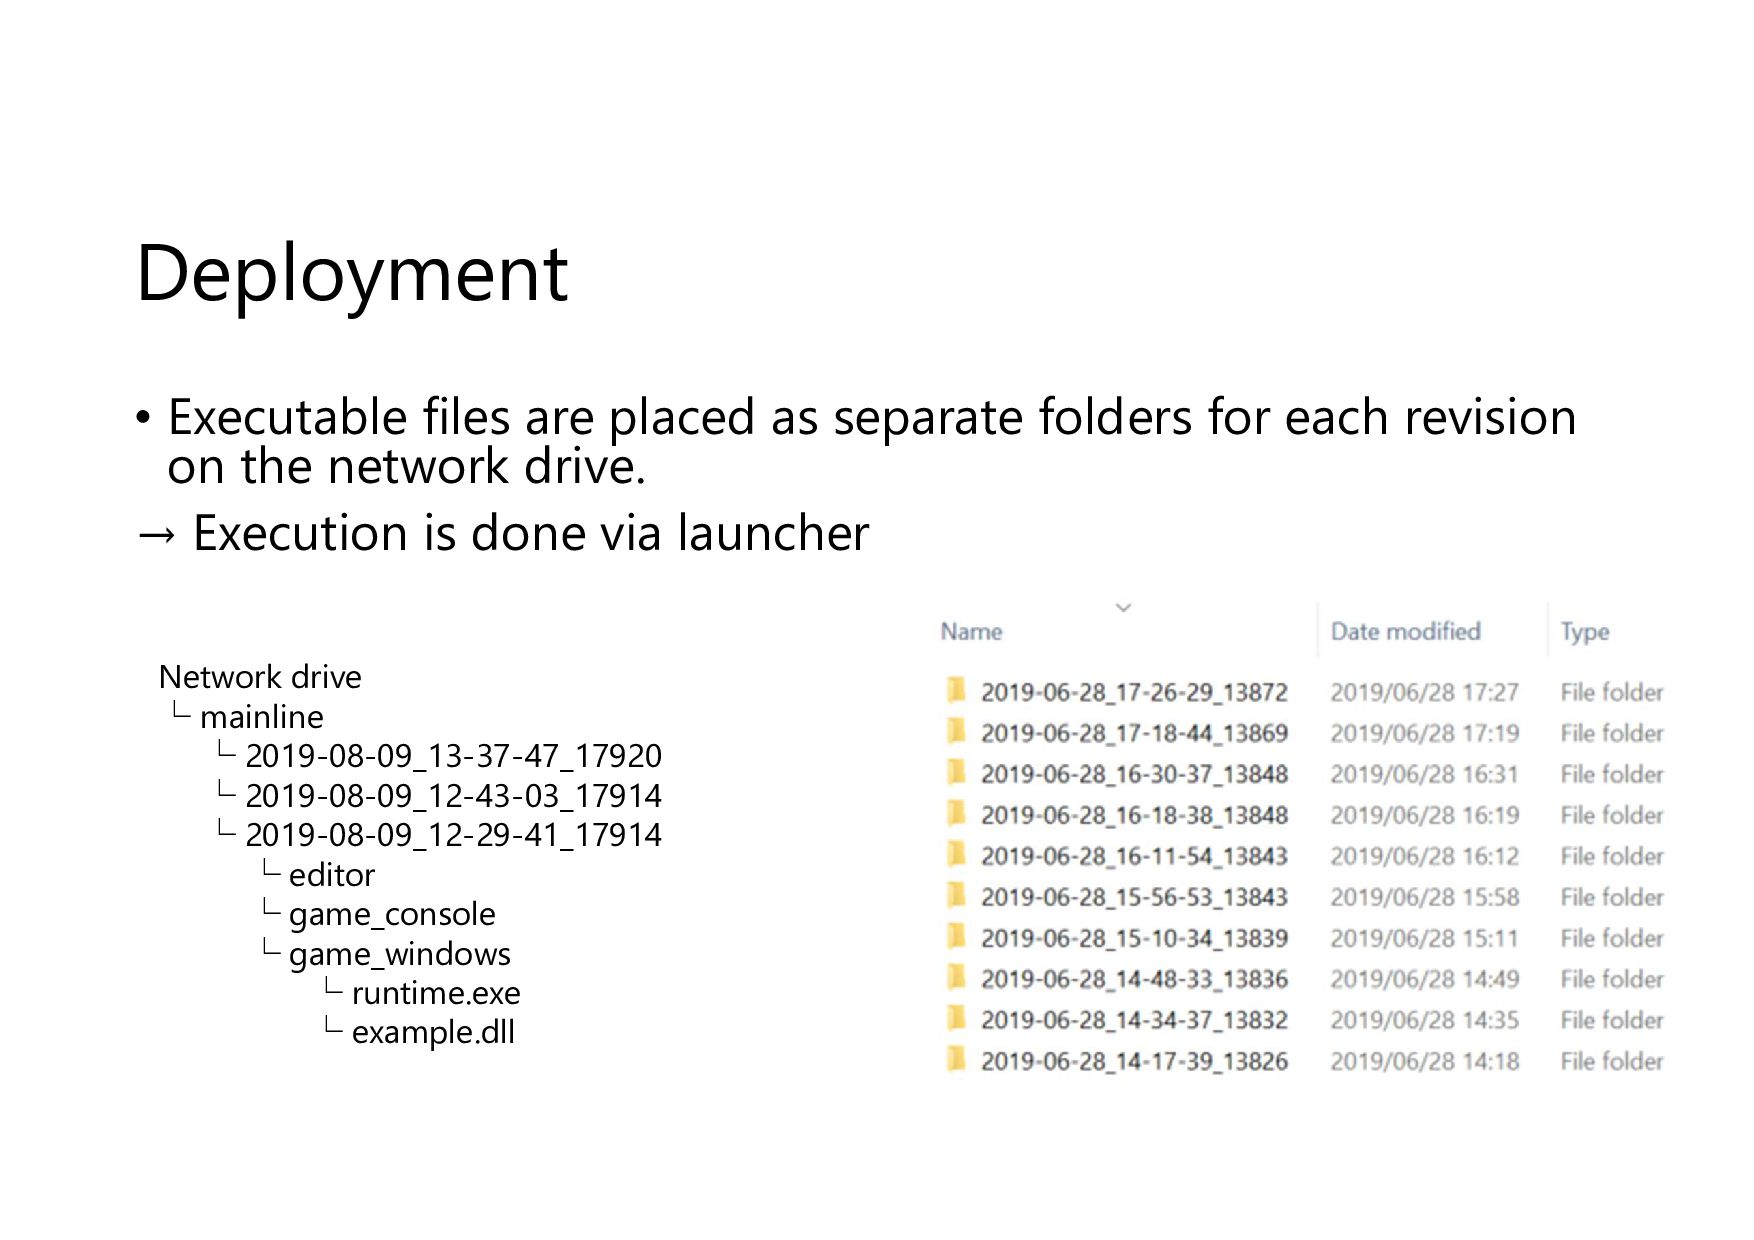
editor on the network drive while making the appdata folder on the local PC as CurrentDirectory • Execution files and dlls are not copied to the local PC to reduce copy time • It may not be possible to execute directly from the network drive depending on the console type, in that case execute a symbolic link on the local PC. Path What are included: CurrentDirectory %Appdata%¥project name¥ Configuration file (json) Editor executable file networkdrive¥mainline¥ ..... ¥editor.exe exe,dll Runtime executable file networkdrive¥mainline¥ ..... ¥runtime.exe exe,dll
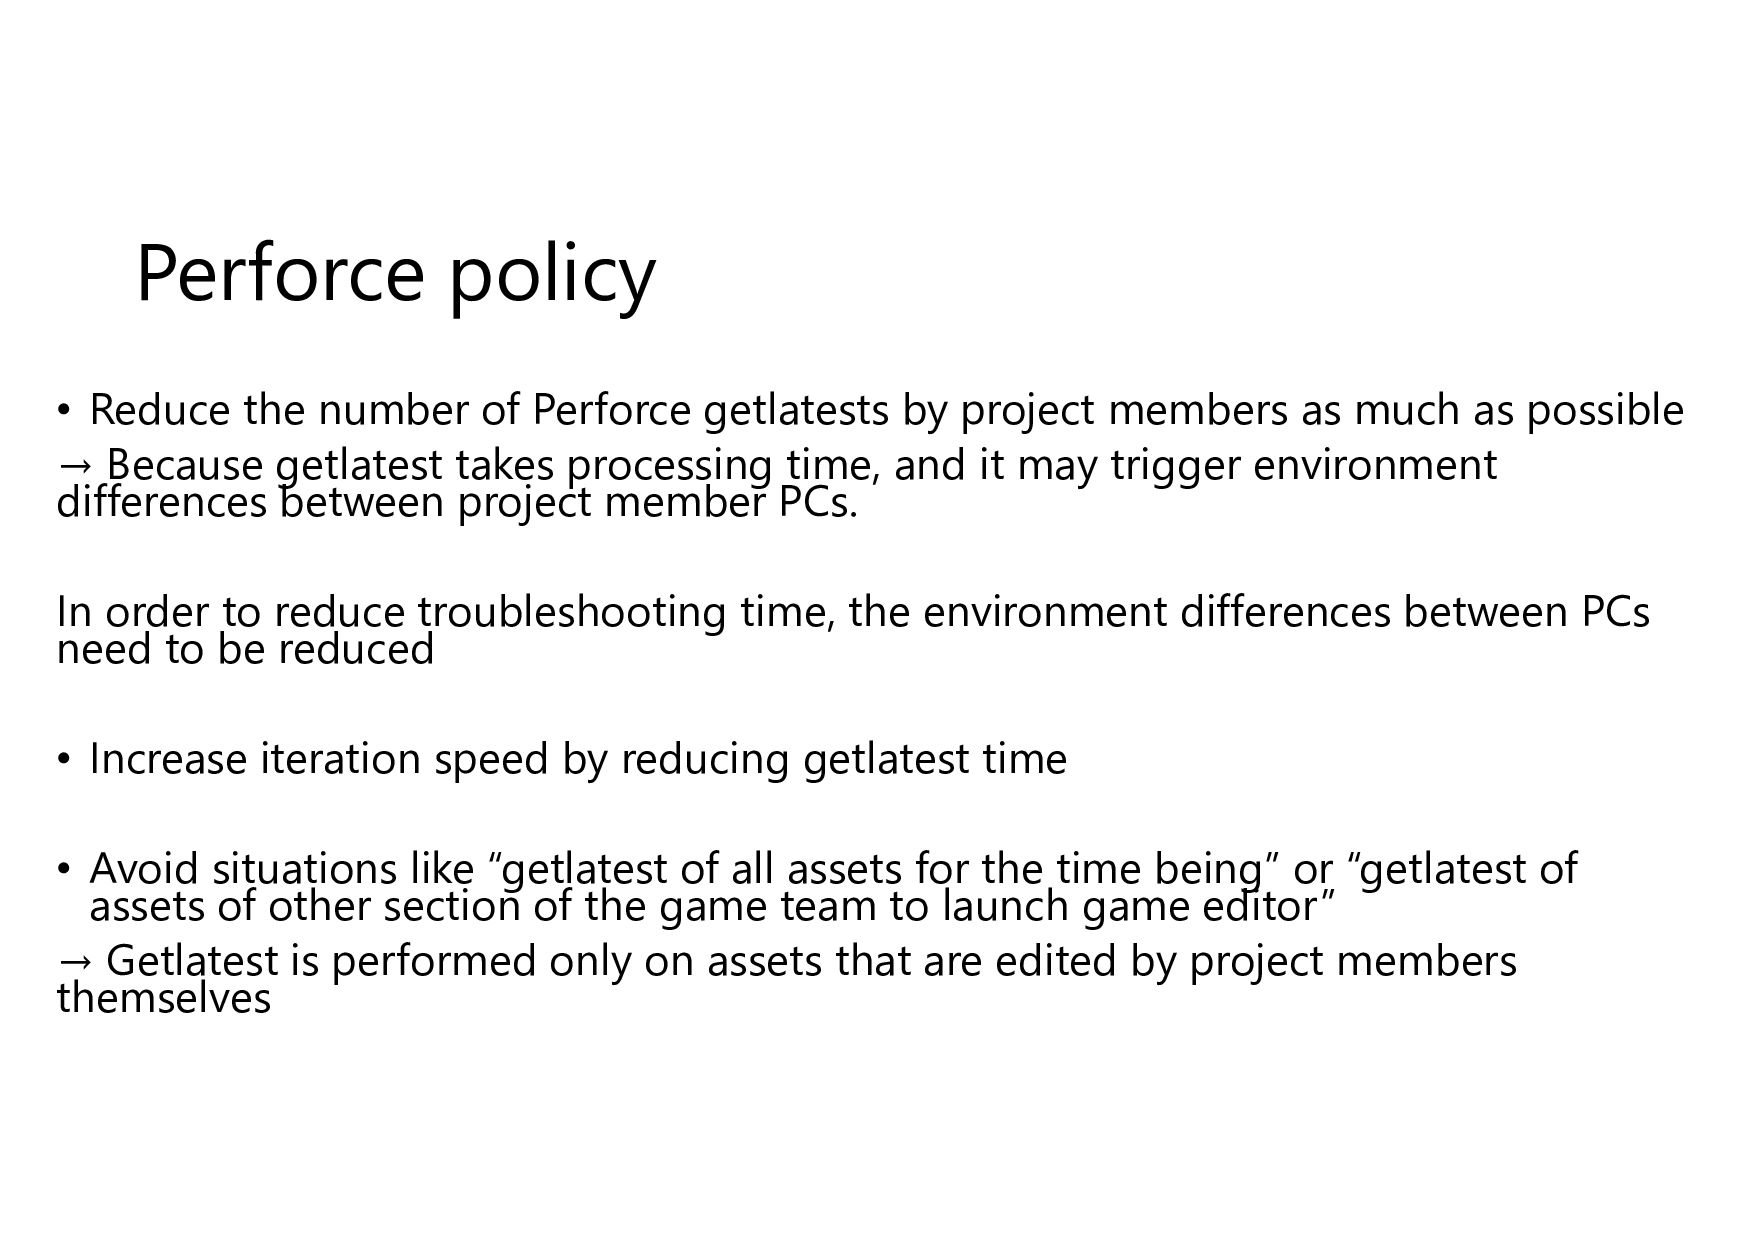
project members as much as possible → Because getlatest takes processing time, and it may trigger environment differences between project member PCs. In order to reduce troubleshooting time, the environment differences between PCs need to be reduced • Increase iteration speed by reducing getlatest time • Avoid situations like “getlatest of all assets for the time being” or “getlatest of assets of other section of the game team to launch game editor” → Getlatest is performed only on assets that are edited by project members themselves
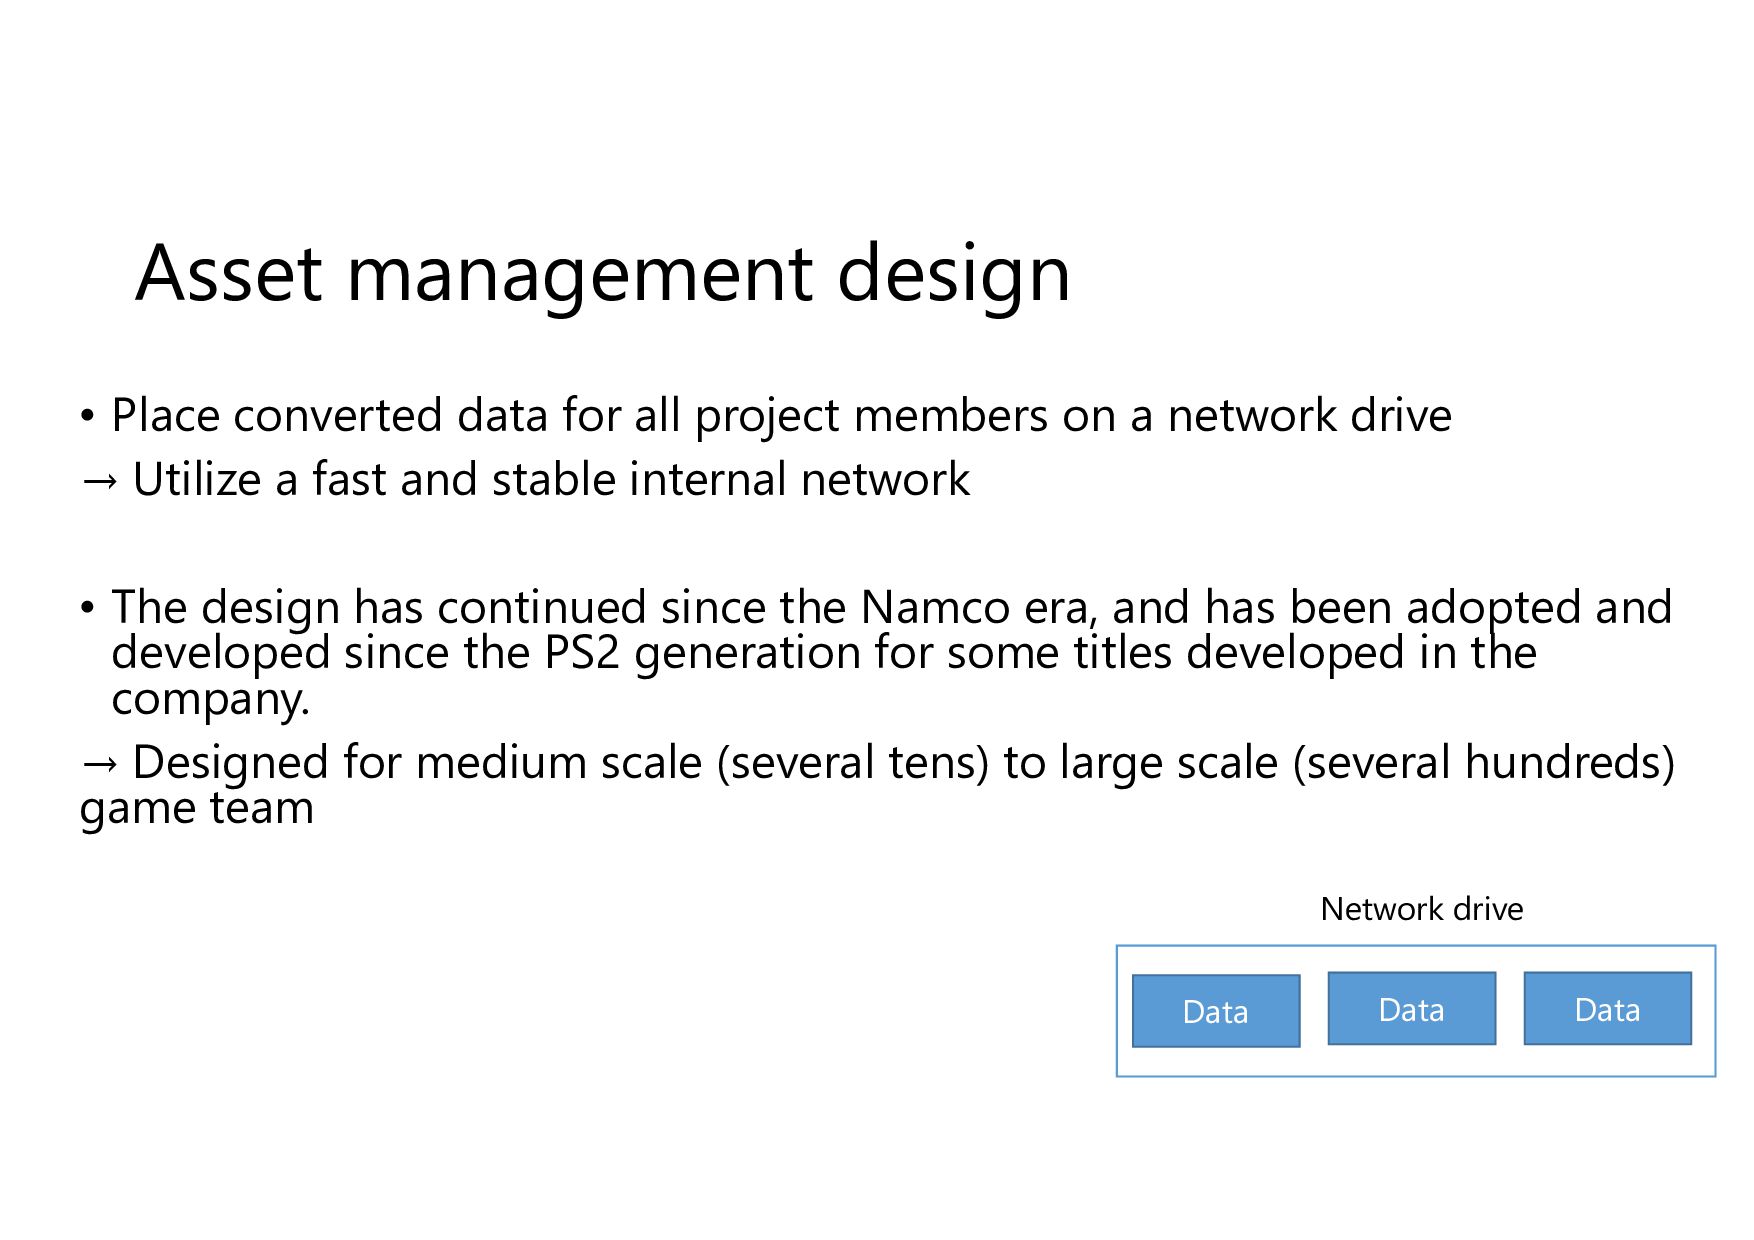
members on a network drive → Utilize a fast and stable internal network • The design has continued since the Namco era, and has been adopted and developed since the PS2 generation for some titles developed in the company. → Designed for medium scale (several tens) to large scale (several hundreds) game team Data Network drive Data Data
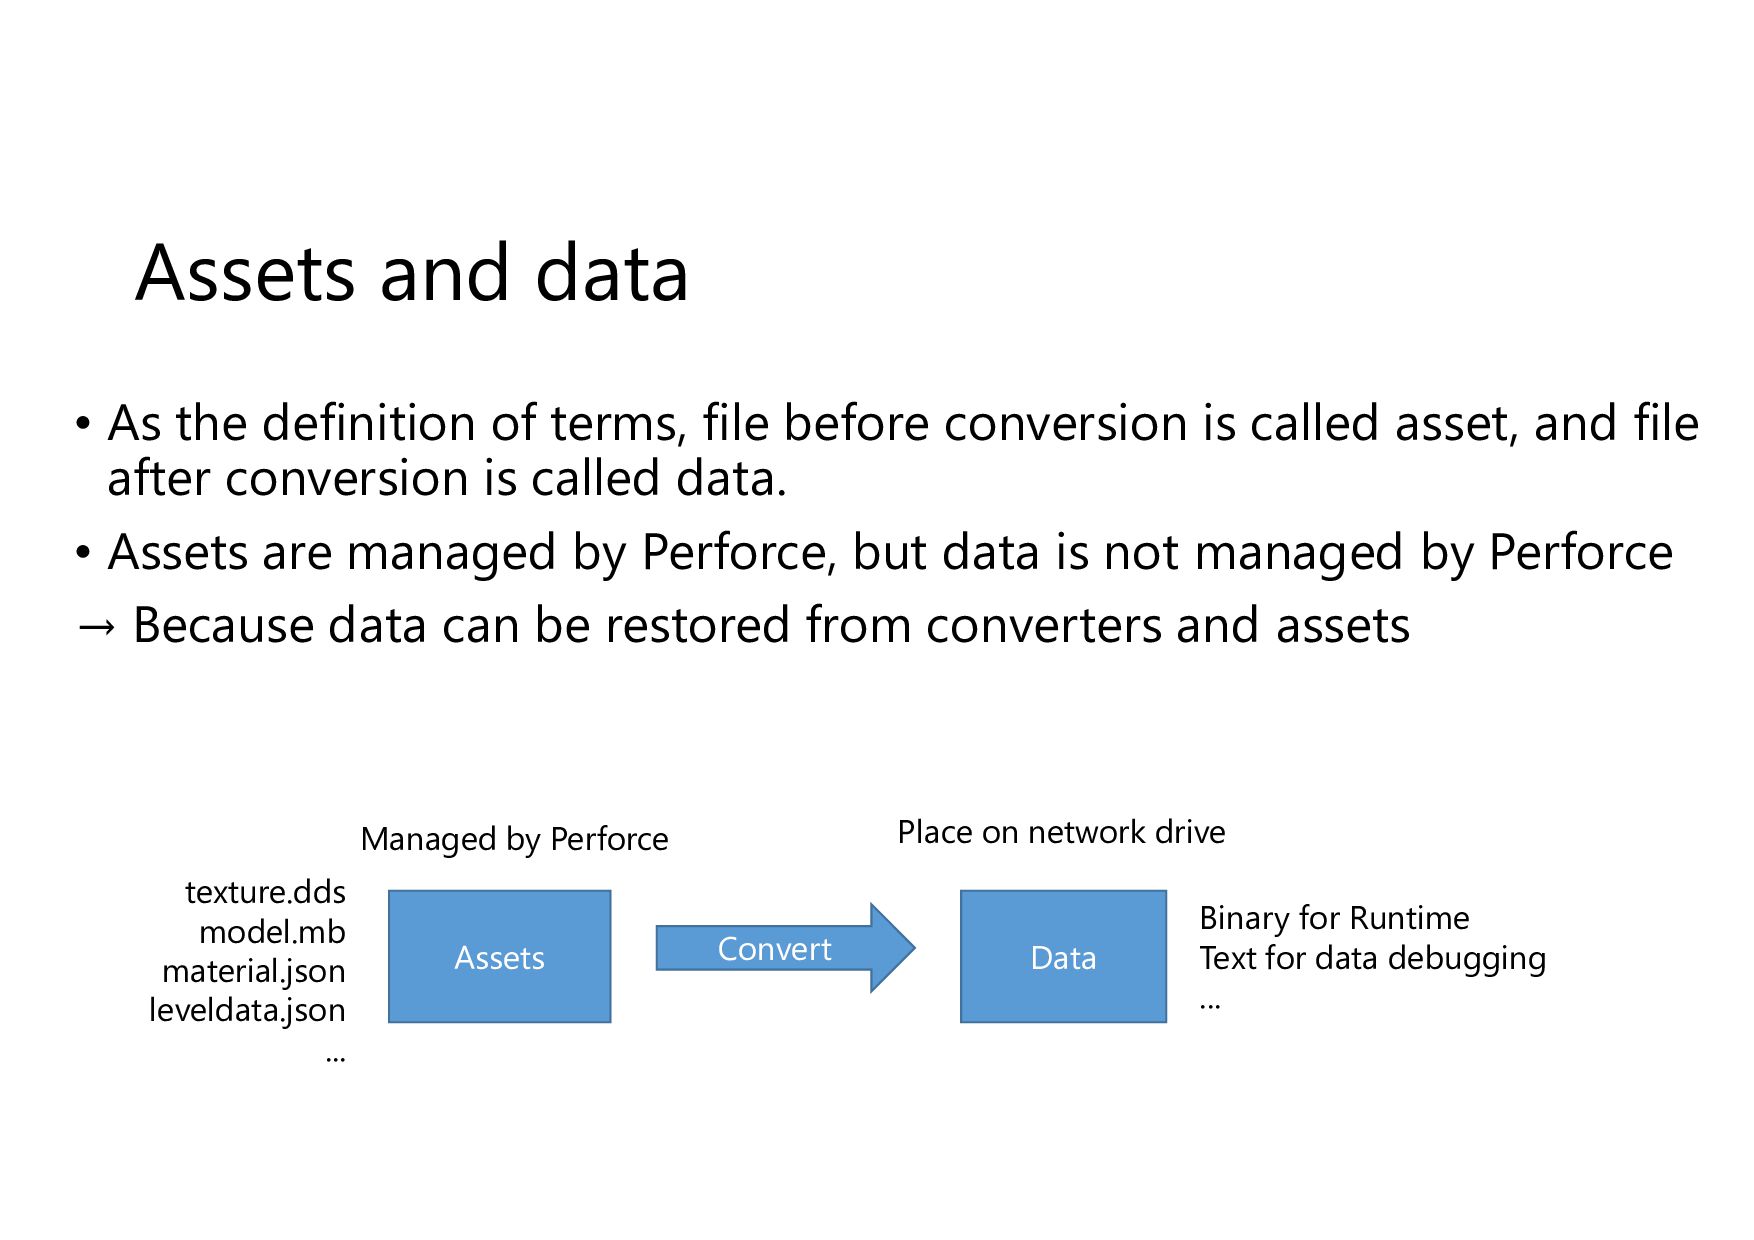
before conversion is called asset, and file after conversion is called data. • Assets are managed by Perforce, but data is not managed by Perforce → Because data can be restored from converters and assets Assets Data Convert Binary for Runtime Text for data debugging ... Place on network drive Managed by Perforce texture.dds model.mb material.json leveldata.json ...
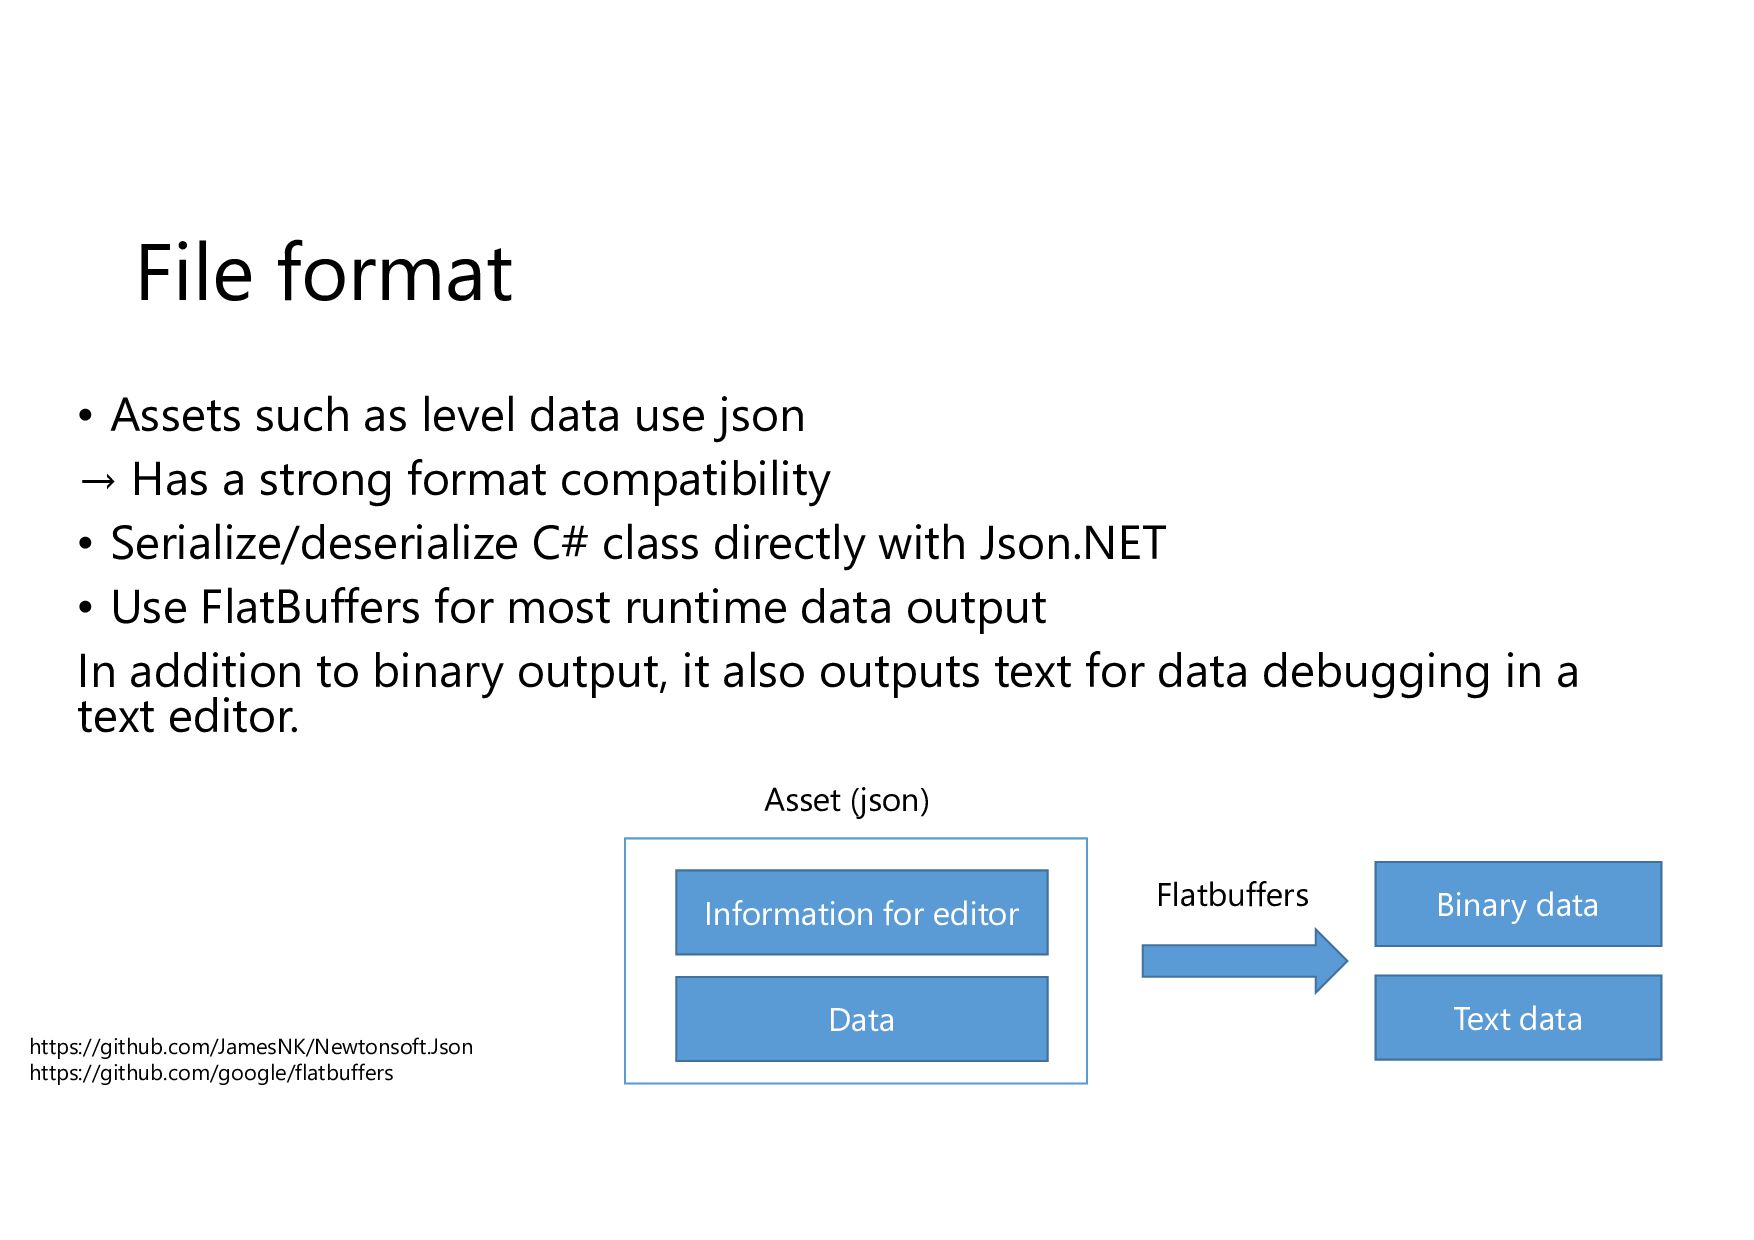
→ Has a strong format compatibility • Serialize/deserialize C# class directly with Json.NET • Use FlatBuffers for most runtime data output In addition to binary output, it also outputs text for data debugging in a text editor. Binary data Text data Asset (json) Information for editor https://github.com/JamesNK/Newtonsoft.Json https://github.com/google/flatbuffers Data Flatbuffers
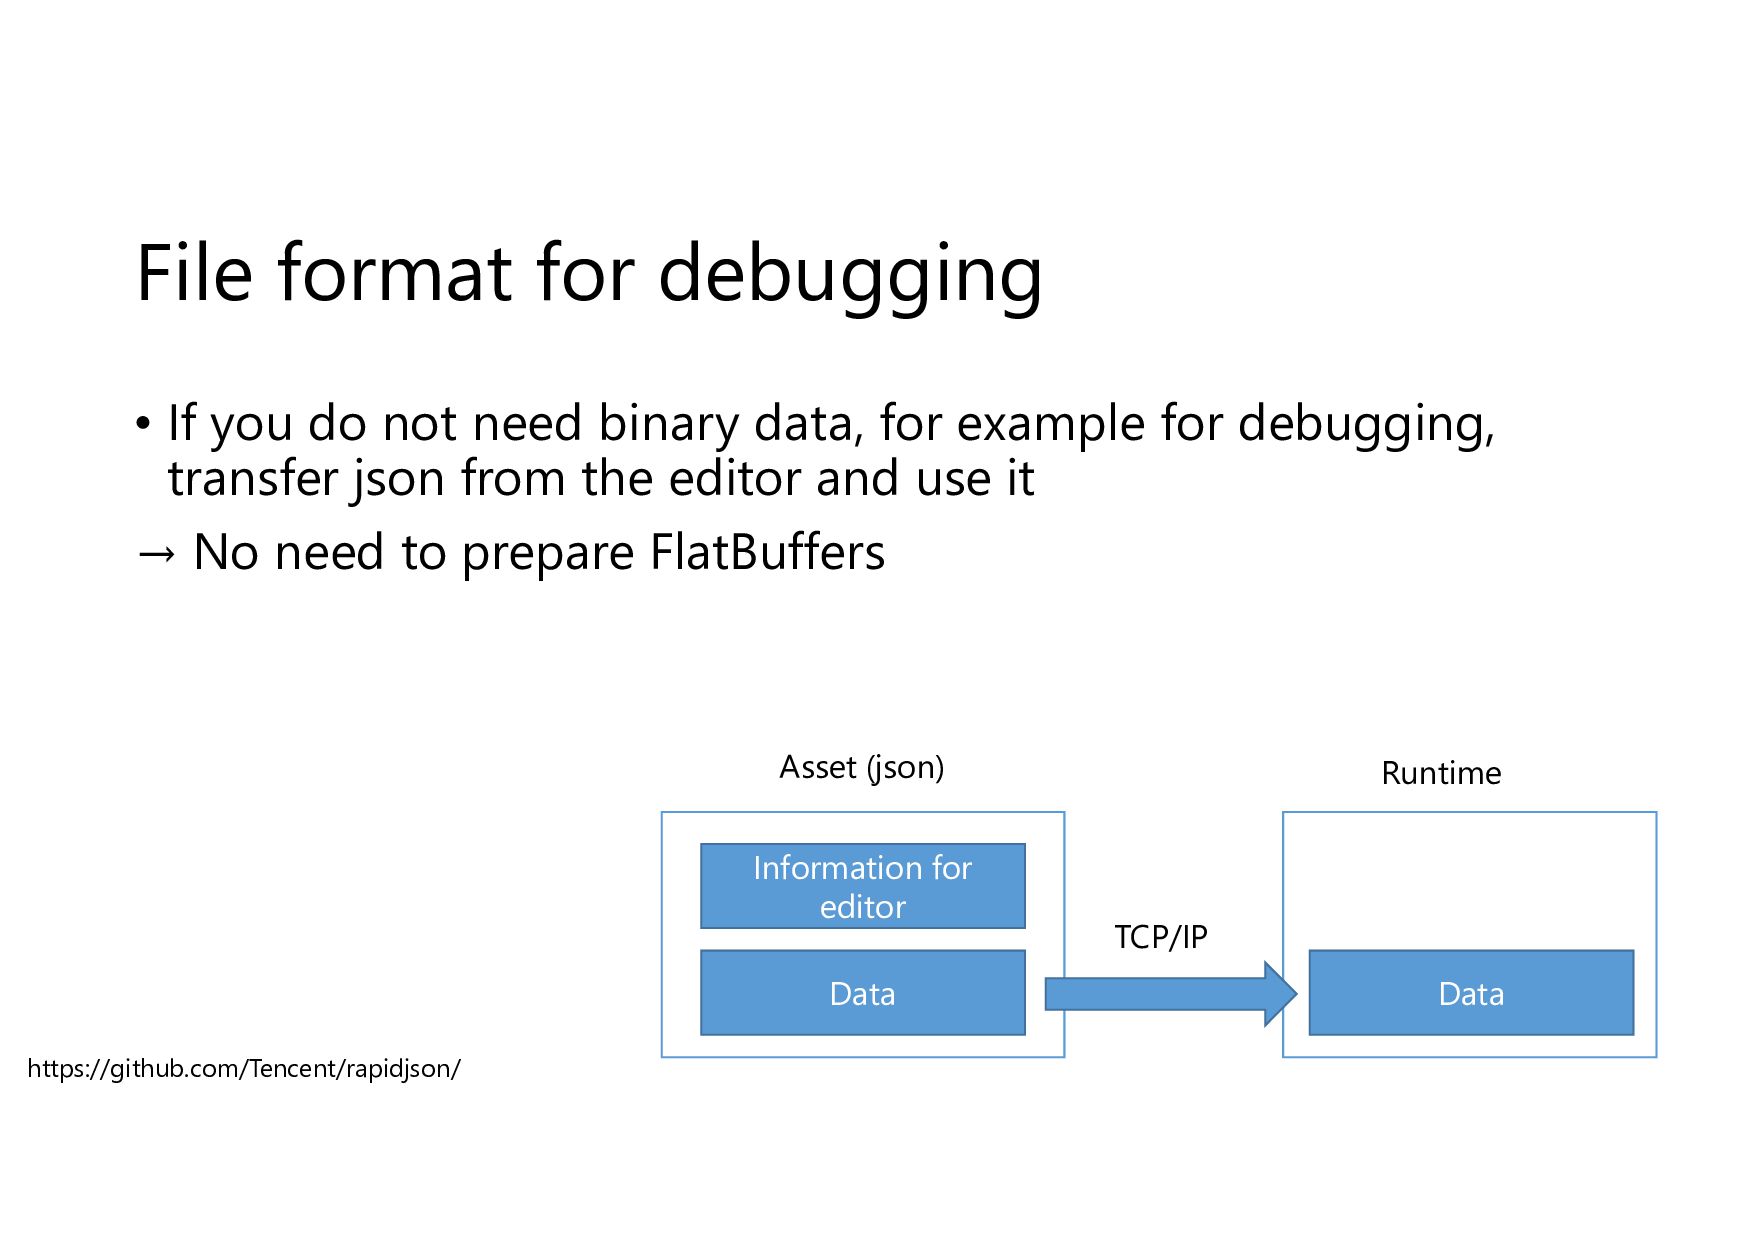
binary data, for example for debugging, transfer json from the editor and use it → No need to prepare FlatBuffers https://github.com/Tencent/rapidjson/ Asset (json) Information for editor Data TCP/IP Runtime Data
frequently in order to implement requests from project member immediately → Asset format is not defined, serialize/deserialize C# class directly in Json.NET • Default value is set when adding C# class field • The value is ignored when deleting the field
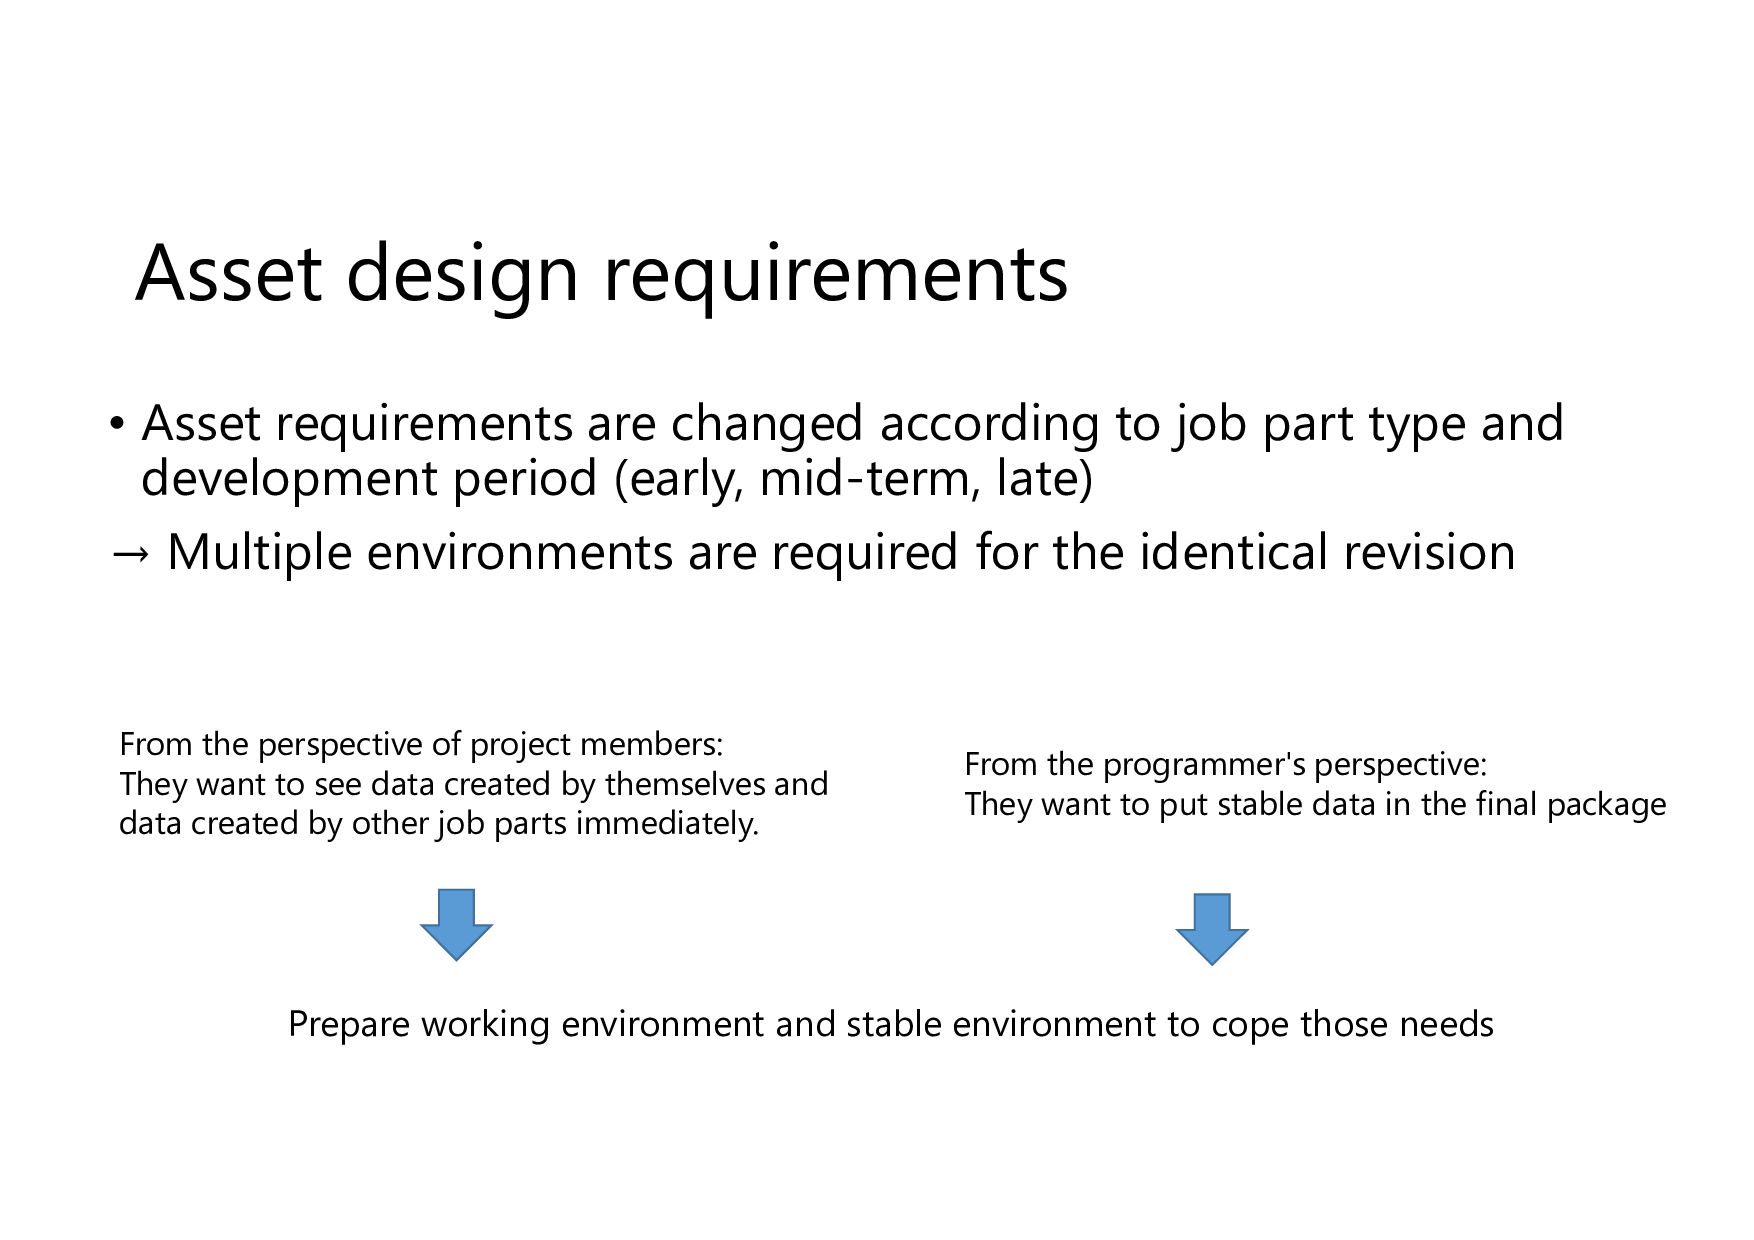
job part type and development period (early, mid-term, late) → Multiple environments are required for the identical revision Prepare working environment and stable environment to cope those needs From the programmer's perspective: They want to put stable data in the final package From the perspective of project members: They want to see data created by themselves and data created by other job parts immediately.
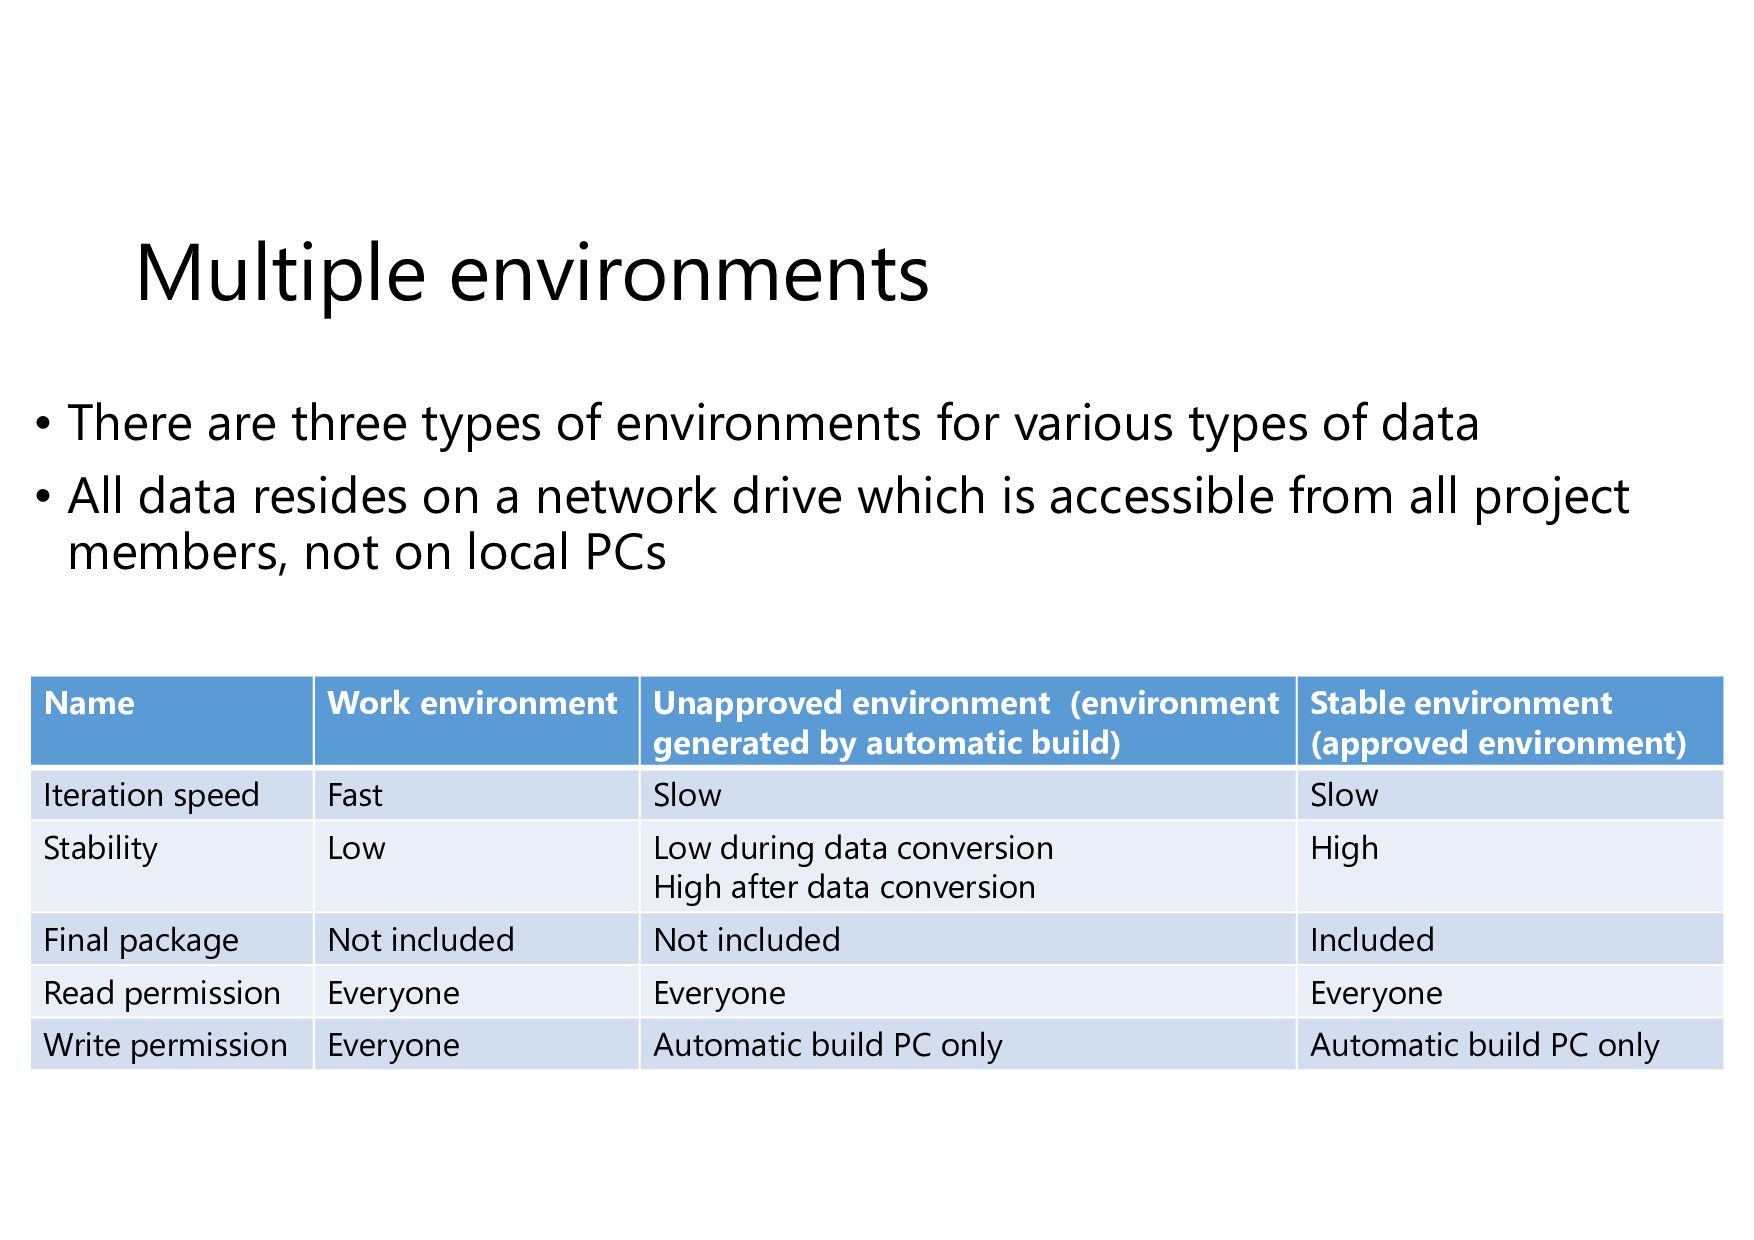
various types of data • All data resides on a network drive which is accessible from all project members, not on local PCs Name Work environment Unapproved environment (environment generated by automatic build) Stable environment (approved environment) Iteration speed Fast Slow Slow Stability Low Low during data conversion High after data conversion High Final package Not included Not included Included Read permission Everyone Everyone Everyone Write permission Everyone Automatic build PC only Automatic build PC only
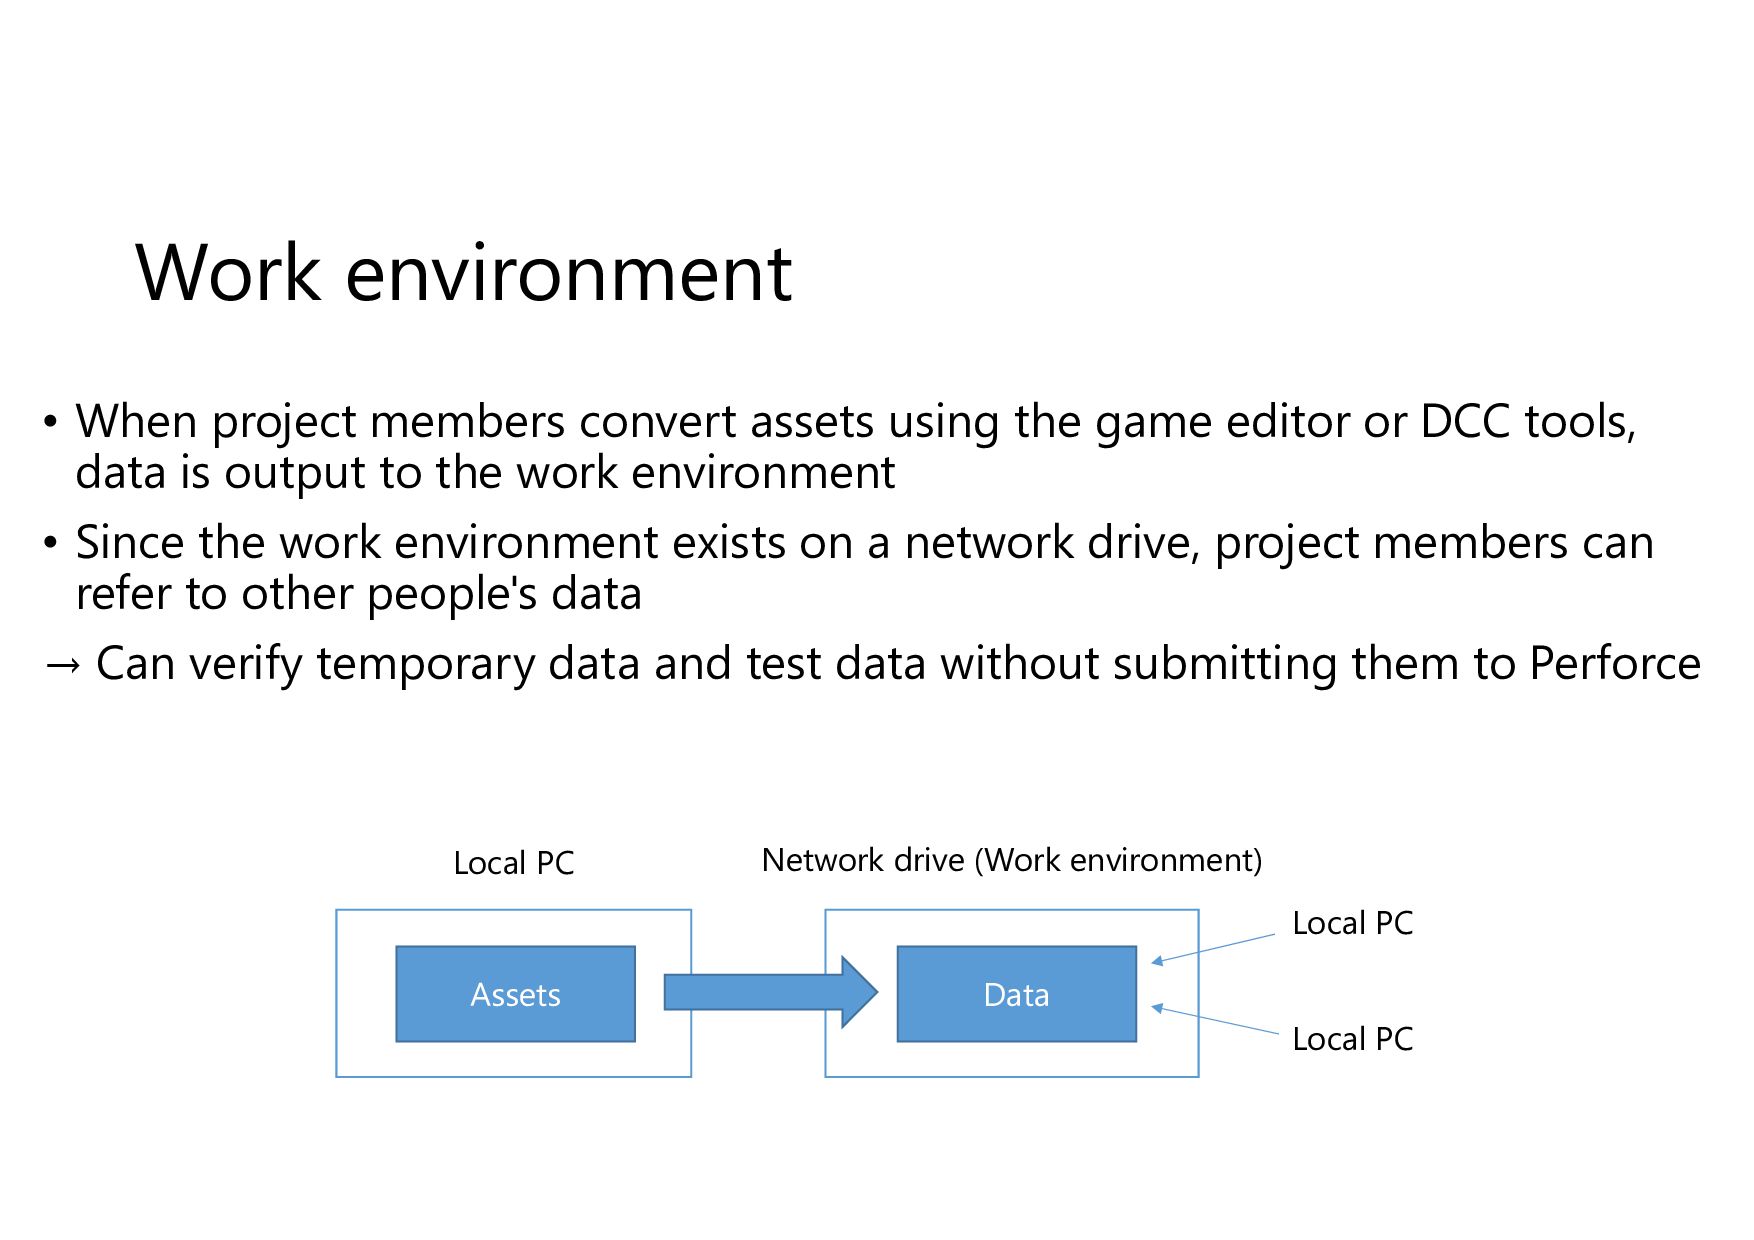
game editor or DCC tools, data is output to the work environment • Since the work environment exists on a network drive, project members can refer to other people's data → Can verify temporary data and test data without submitting them to Perforce Assets Data Local PC Network drive (Work environment) Local PC Local PC
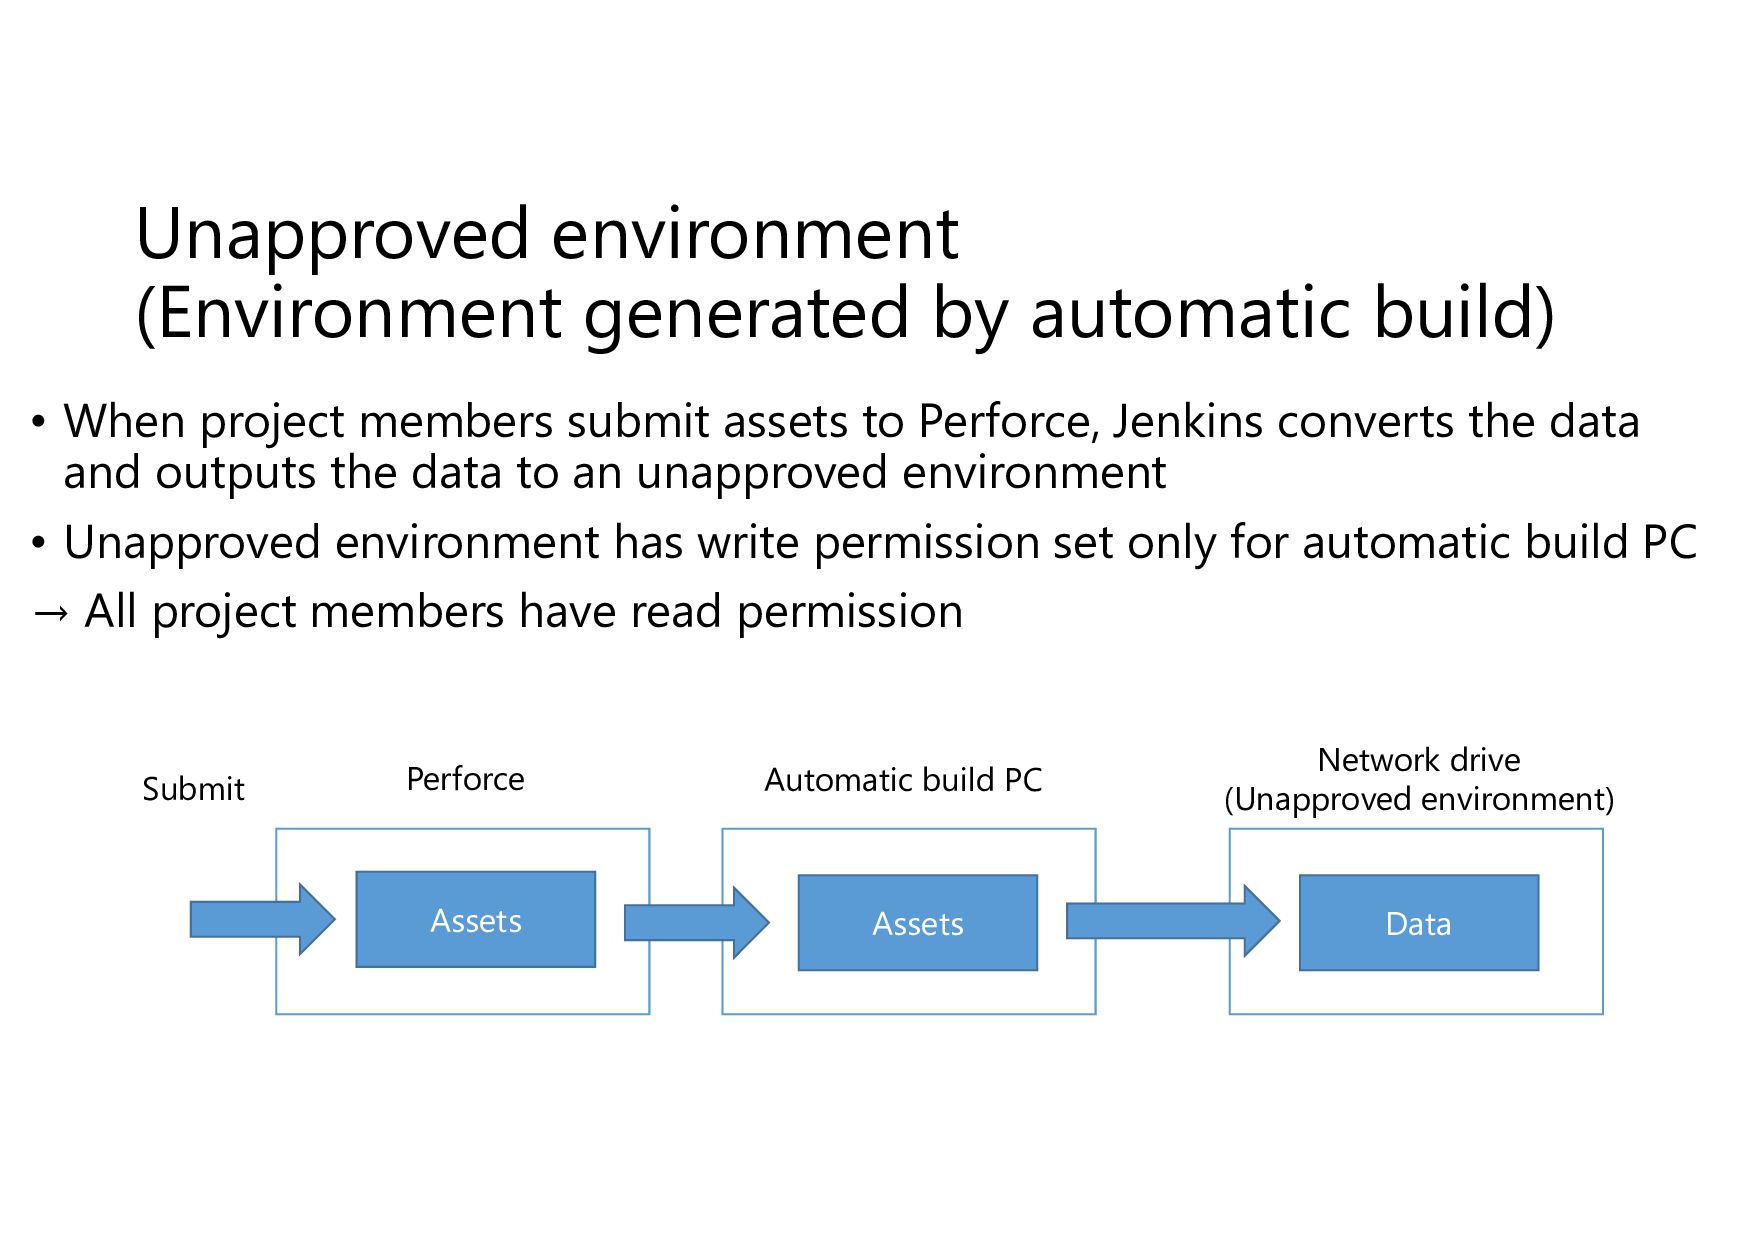
members submit assets to Perforce, Jenkins converts the data and outputs the data to an unapproved environment • Unapproved environment has write permission set only for automatic build PC → All project members have read permission Assets Data Automatic build PC Network drive (Unapproved environment) Perforce Assets Submit
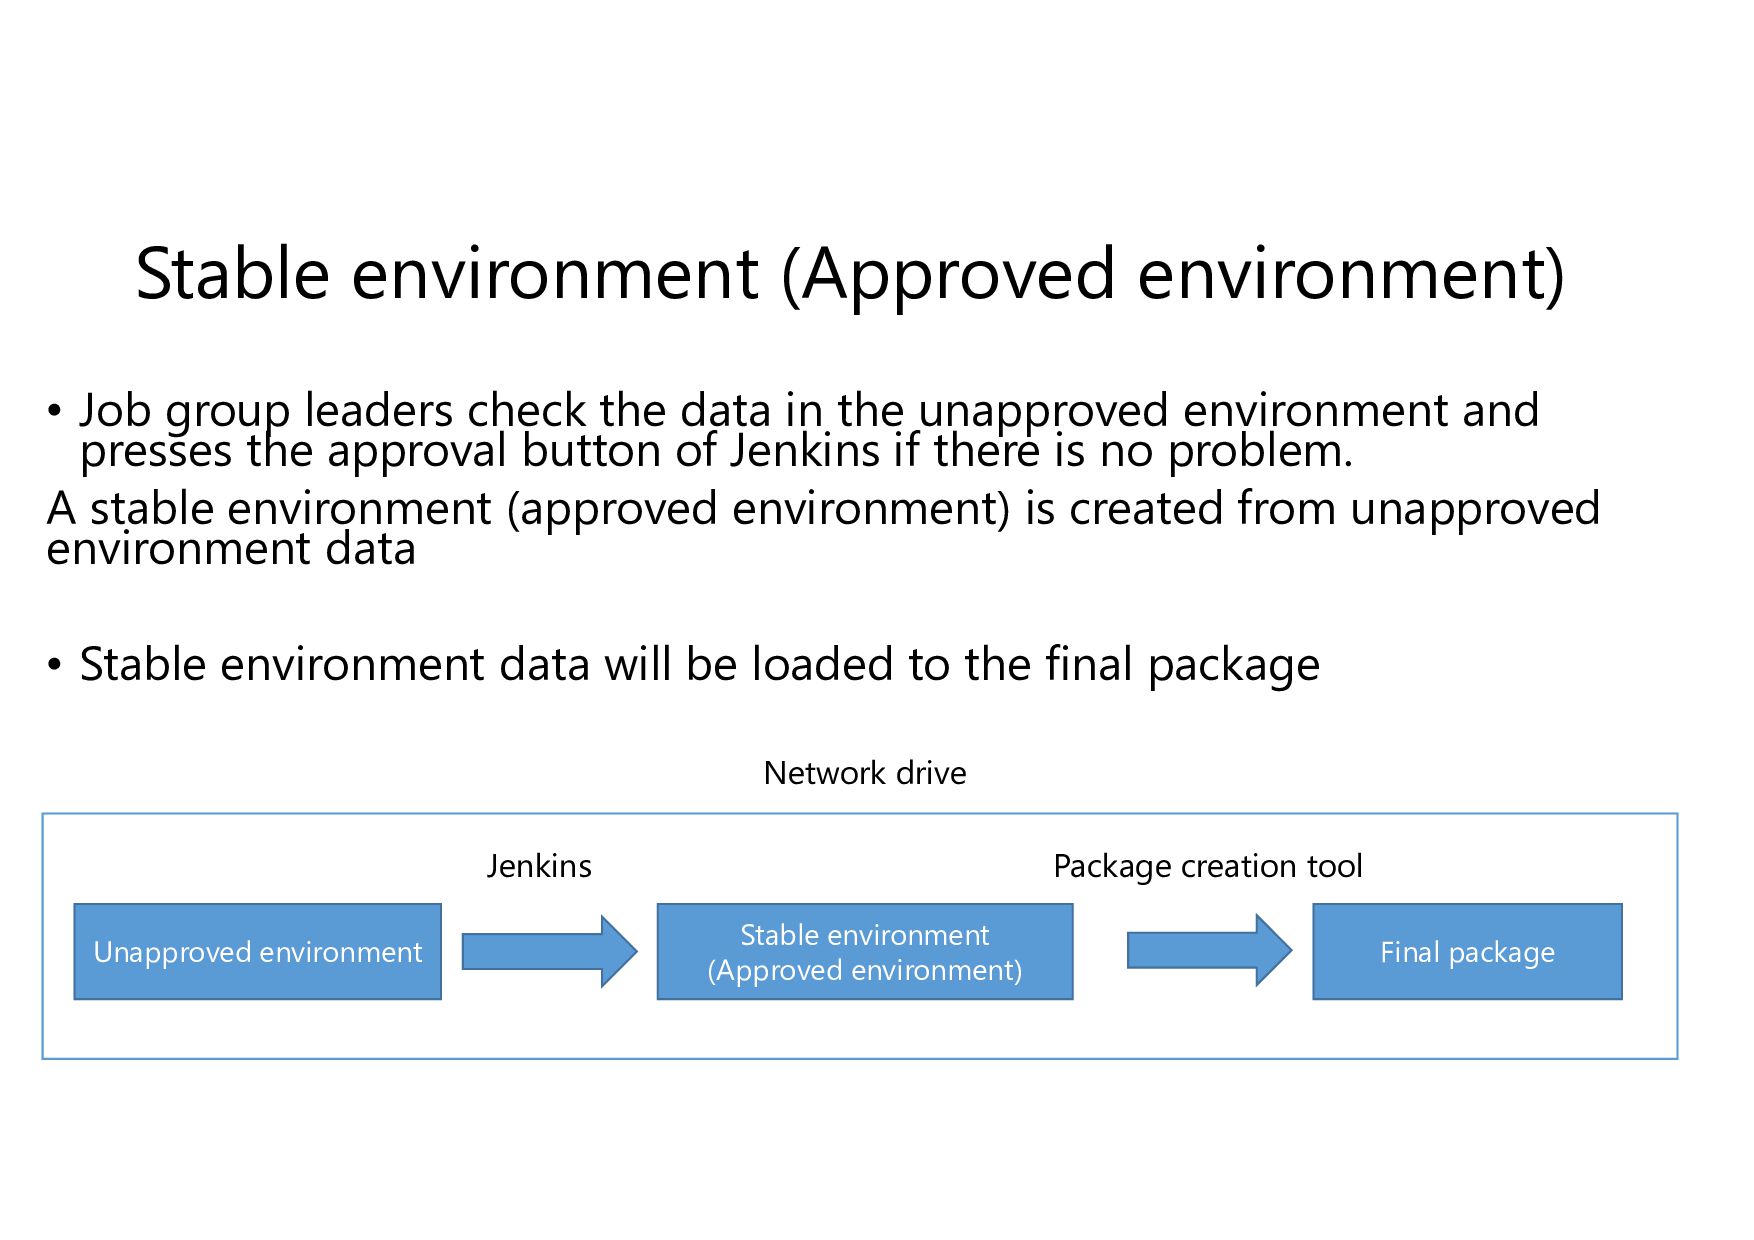
data in the unapproved environment and presses the approval button of Jenkins if there is no problem. A stable environment (approved environment) is created from unapproved environment data • Stable environment data will be loaded to the final package Unapproved environment Jenkins Stable environment (Approved environment) Final package Network drive Package creation tool
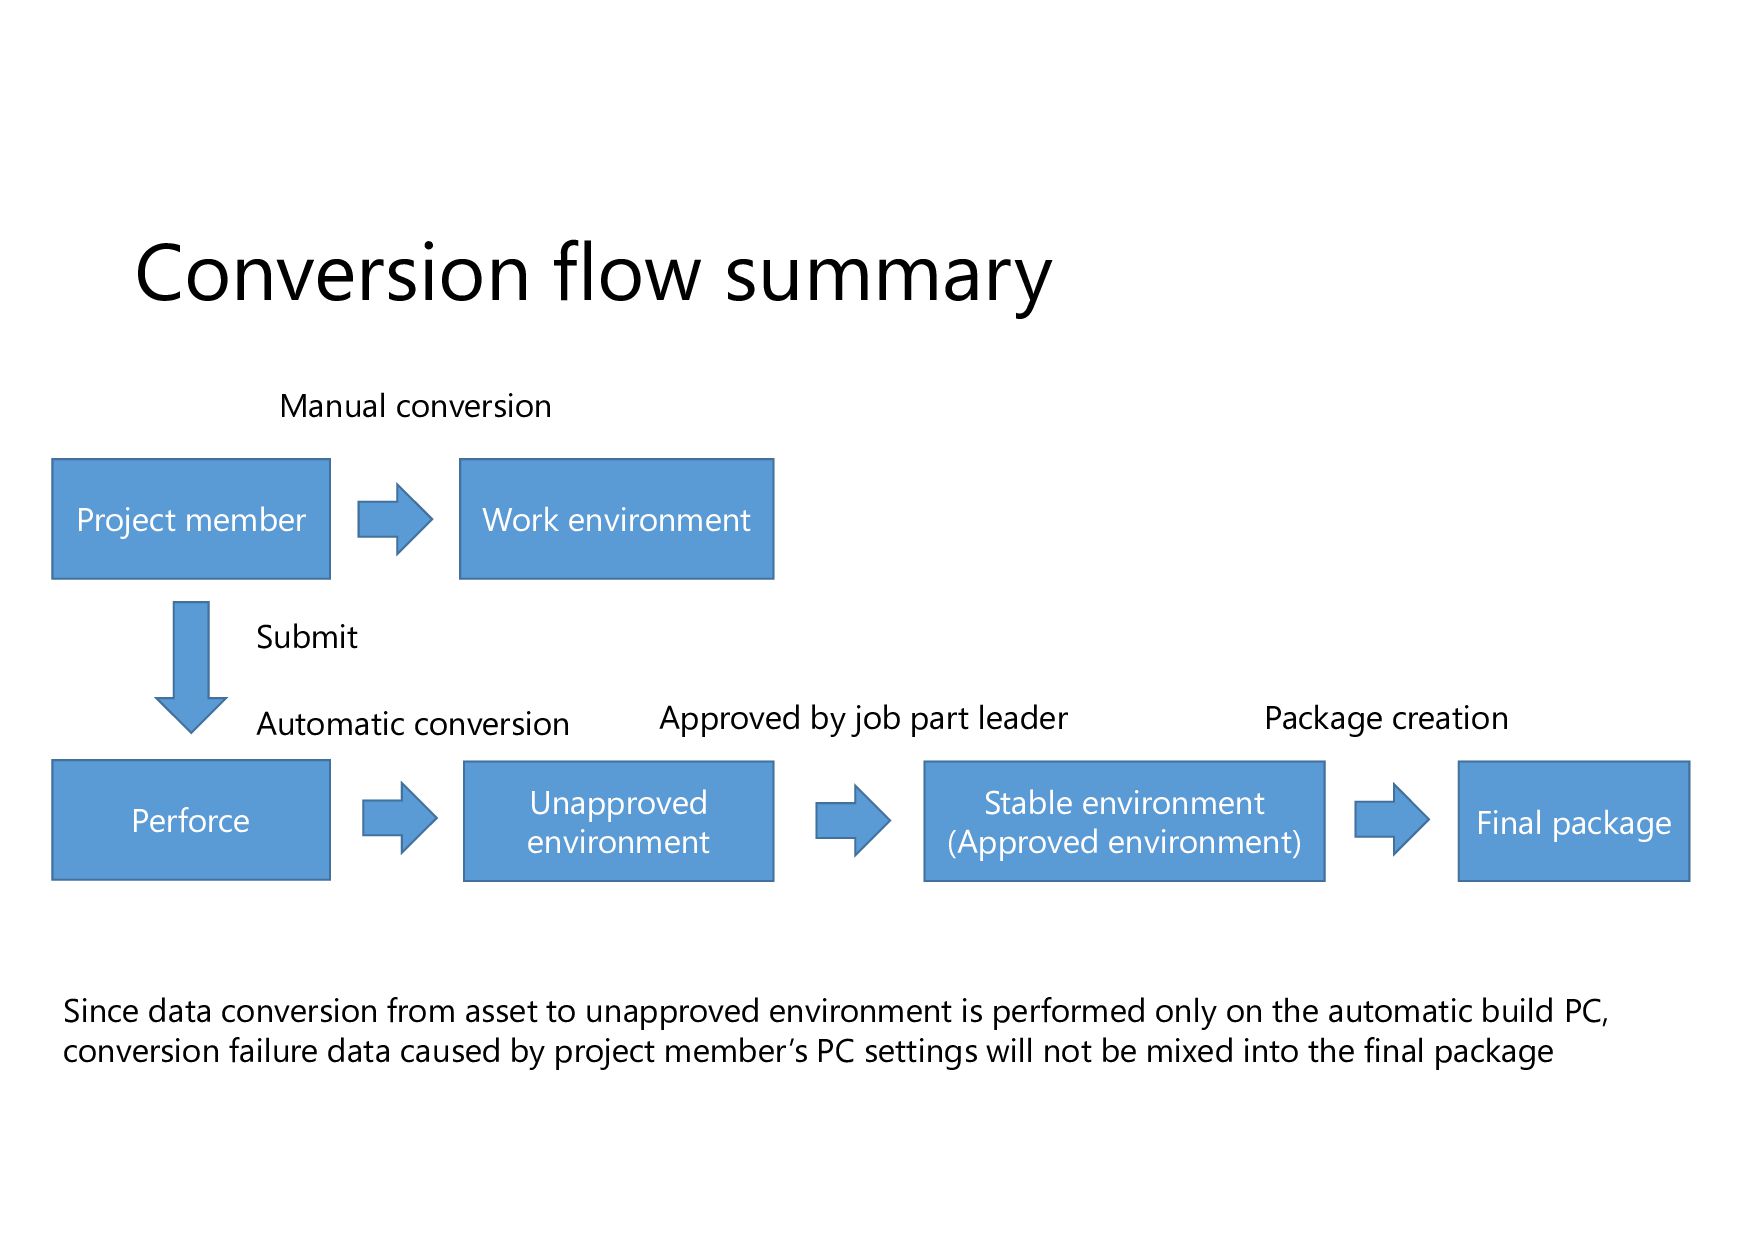
member Perforce Work environment Since data conversion from asset to unapproved environment is performed only on the automatic build PC, conversion failure data caused by project member’s PC settings will not be mixed into the final package Final package Submit Manual conversion Automatic conversion Approved by job part leader Package creation
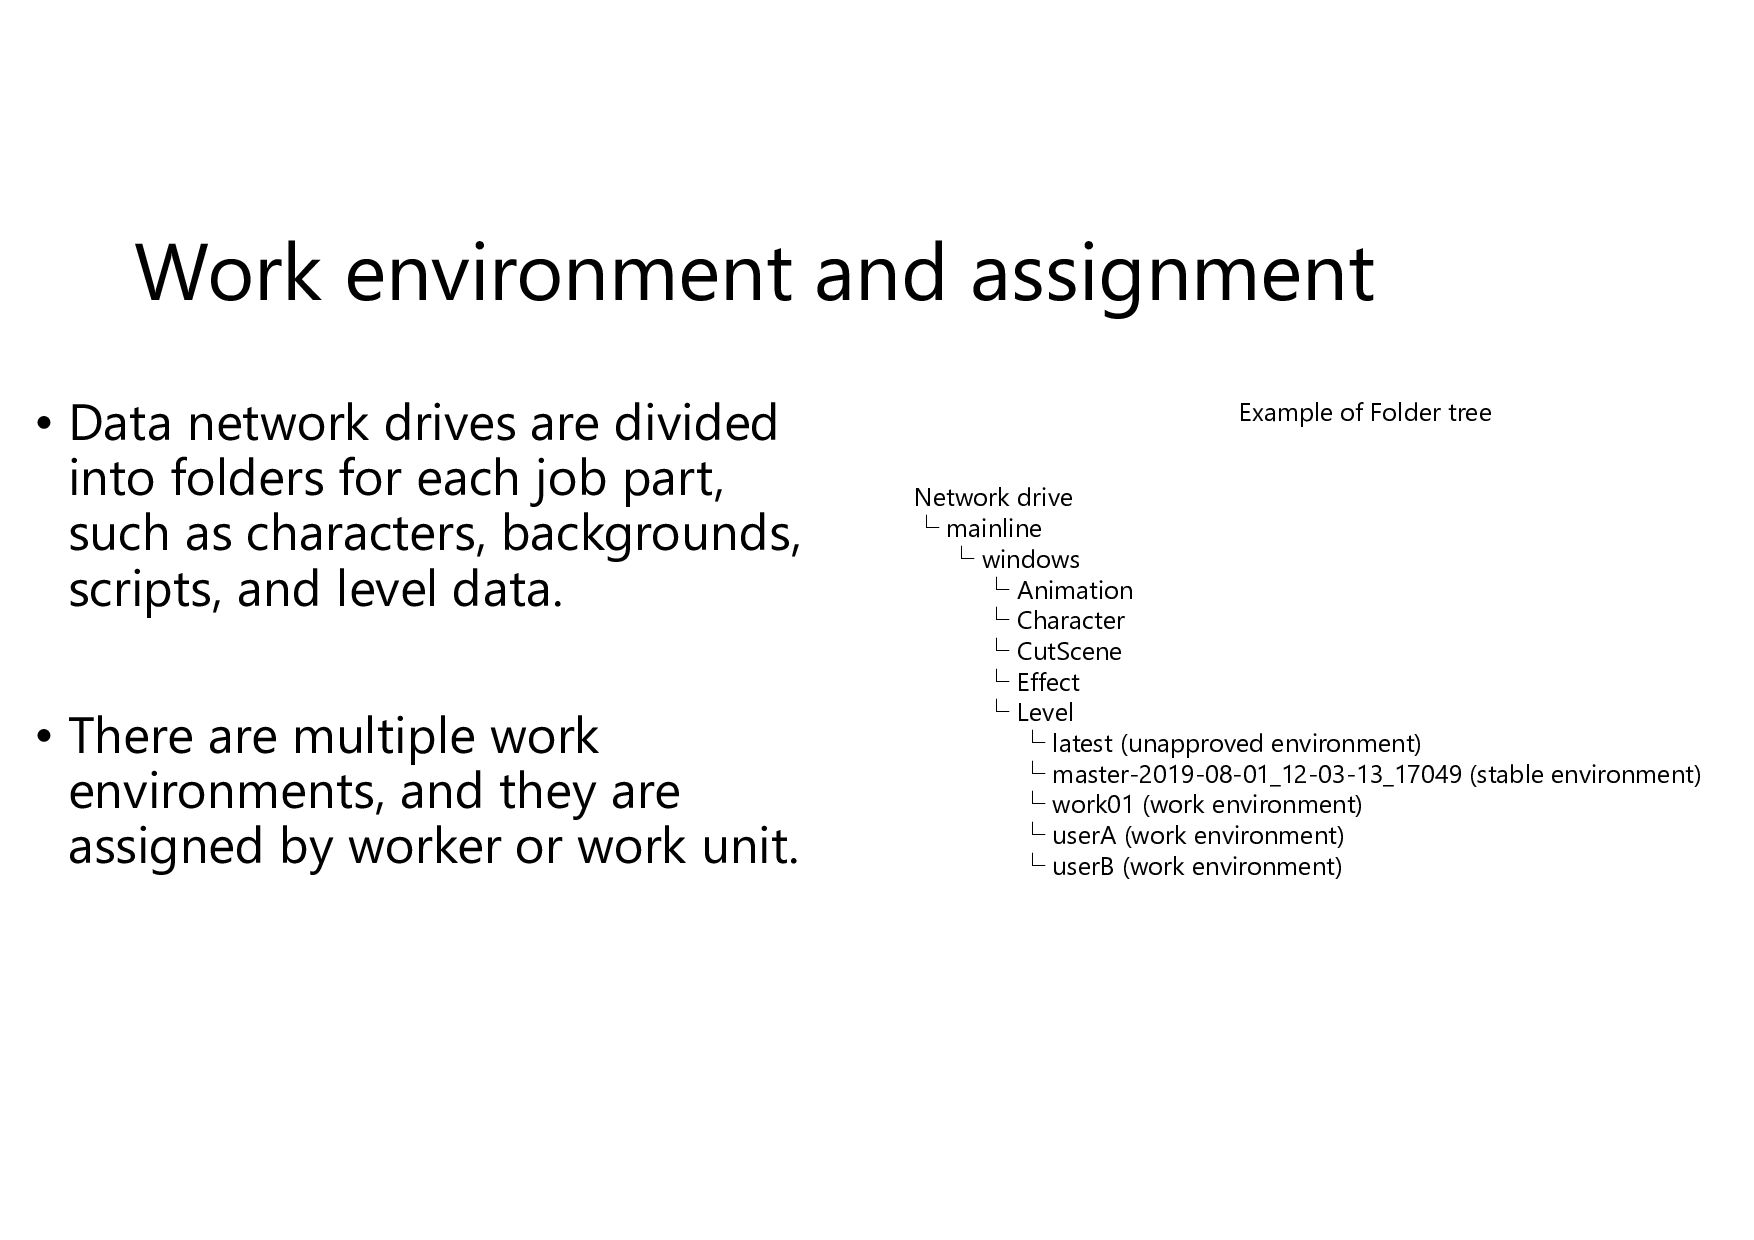
into folders for each job part, such as characters, backgrounds, scripts, and level data. • There are multiple work environments, and they are assigned by worker or work unit. Network drive └ mainline └ windows └ Animation └ Character └ CutScene └ Effect └ Level └ latest (unapproved environment) └ master-2019-08-01_12-03-13_17049 (stable environment) └ work01 (work environment) └ userA (work environment) └ userB (work environment) Example of Folder tree
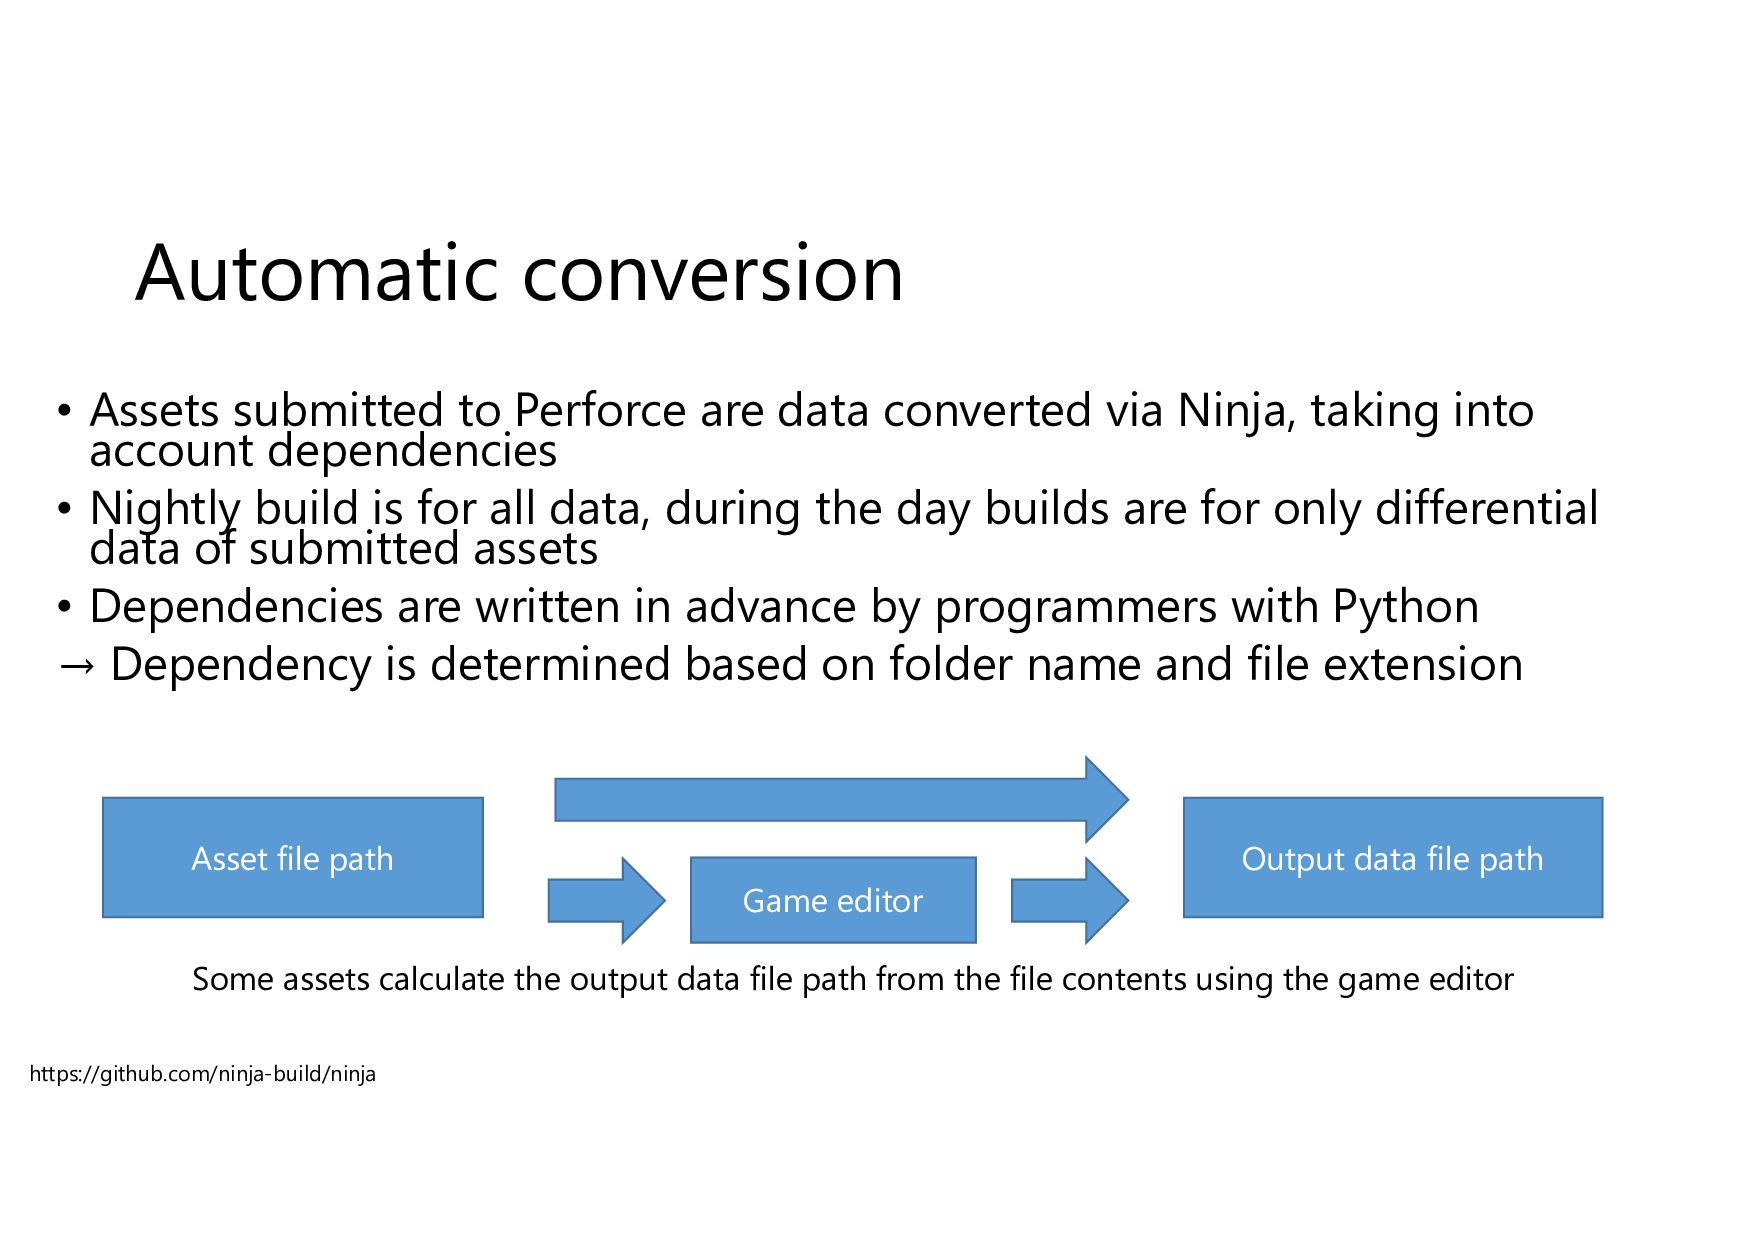
via Ninja, taking into account dependencies • Nightly build is for all data, during the day builds are for only differential data of submitted assets • Dependencies are written in advance by programmers with Python → Dependency is determined based on folder name and file extension Asset file path Output data file path Game editor Some assets calculate the output data file path from the file contents using the game editor https://github.com/ninja-build/ninja
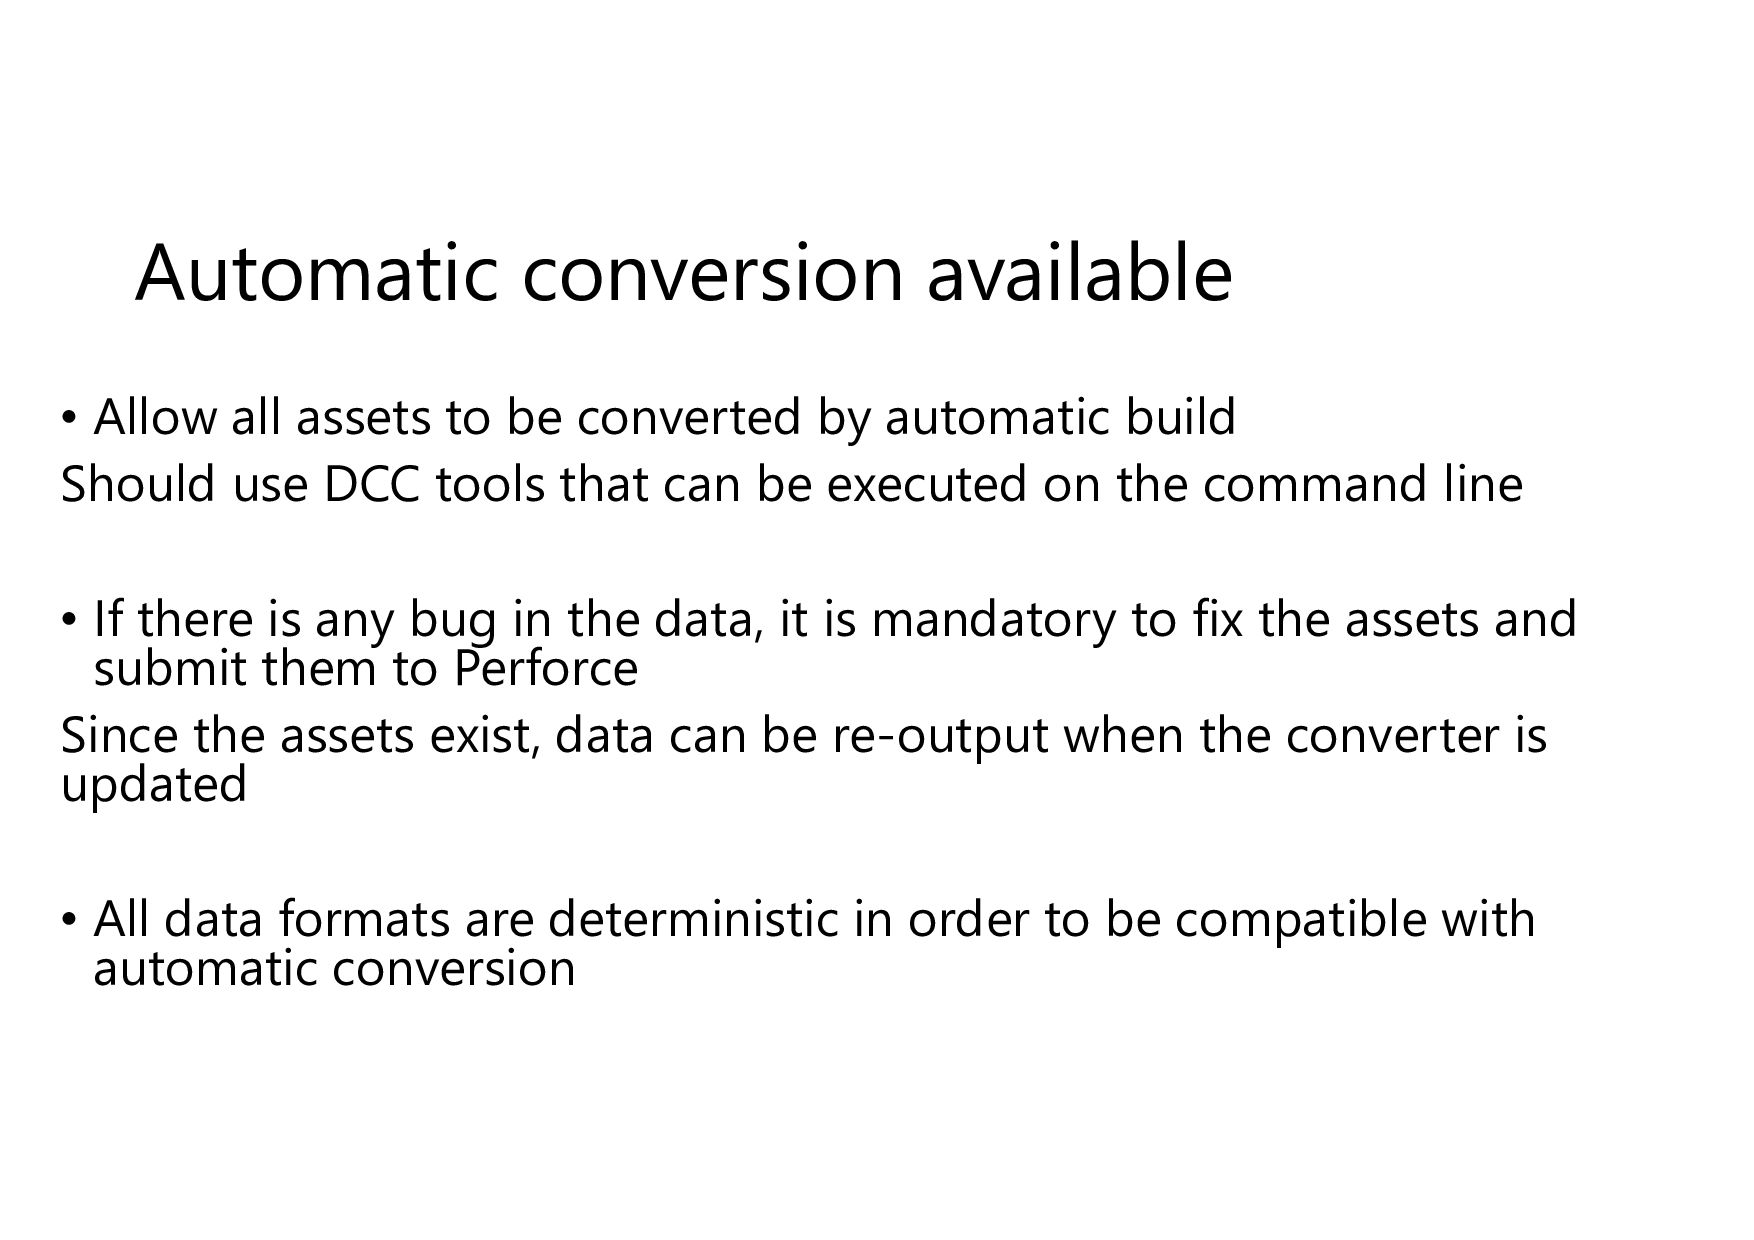
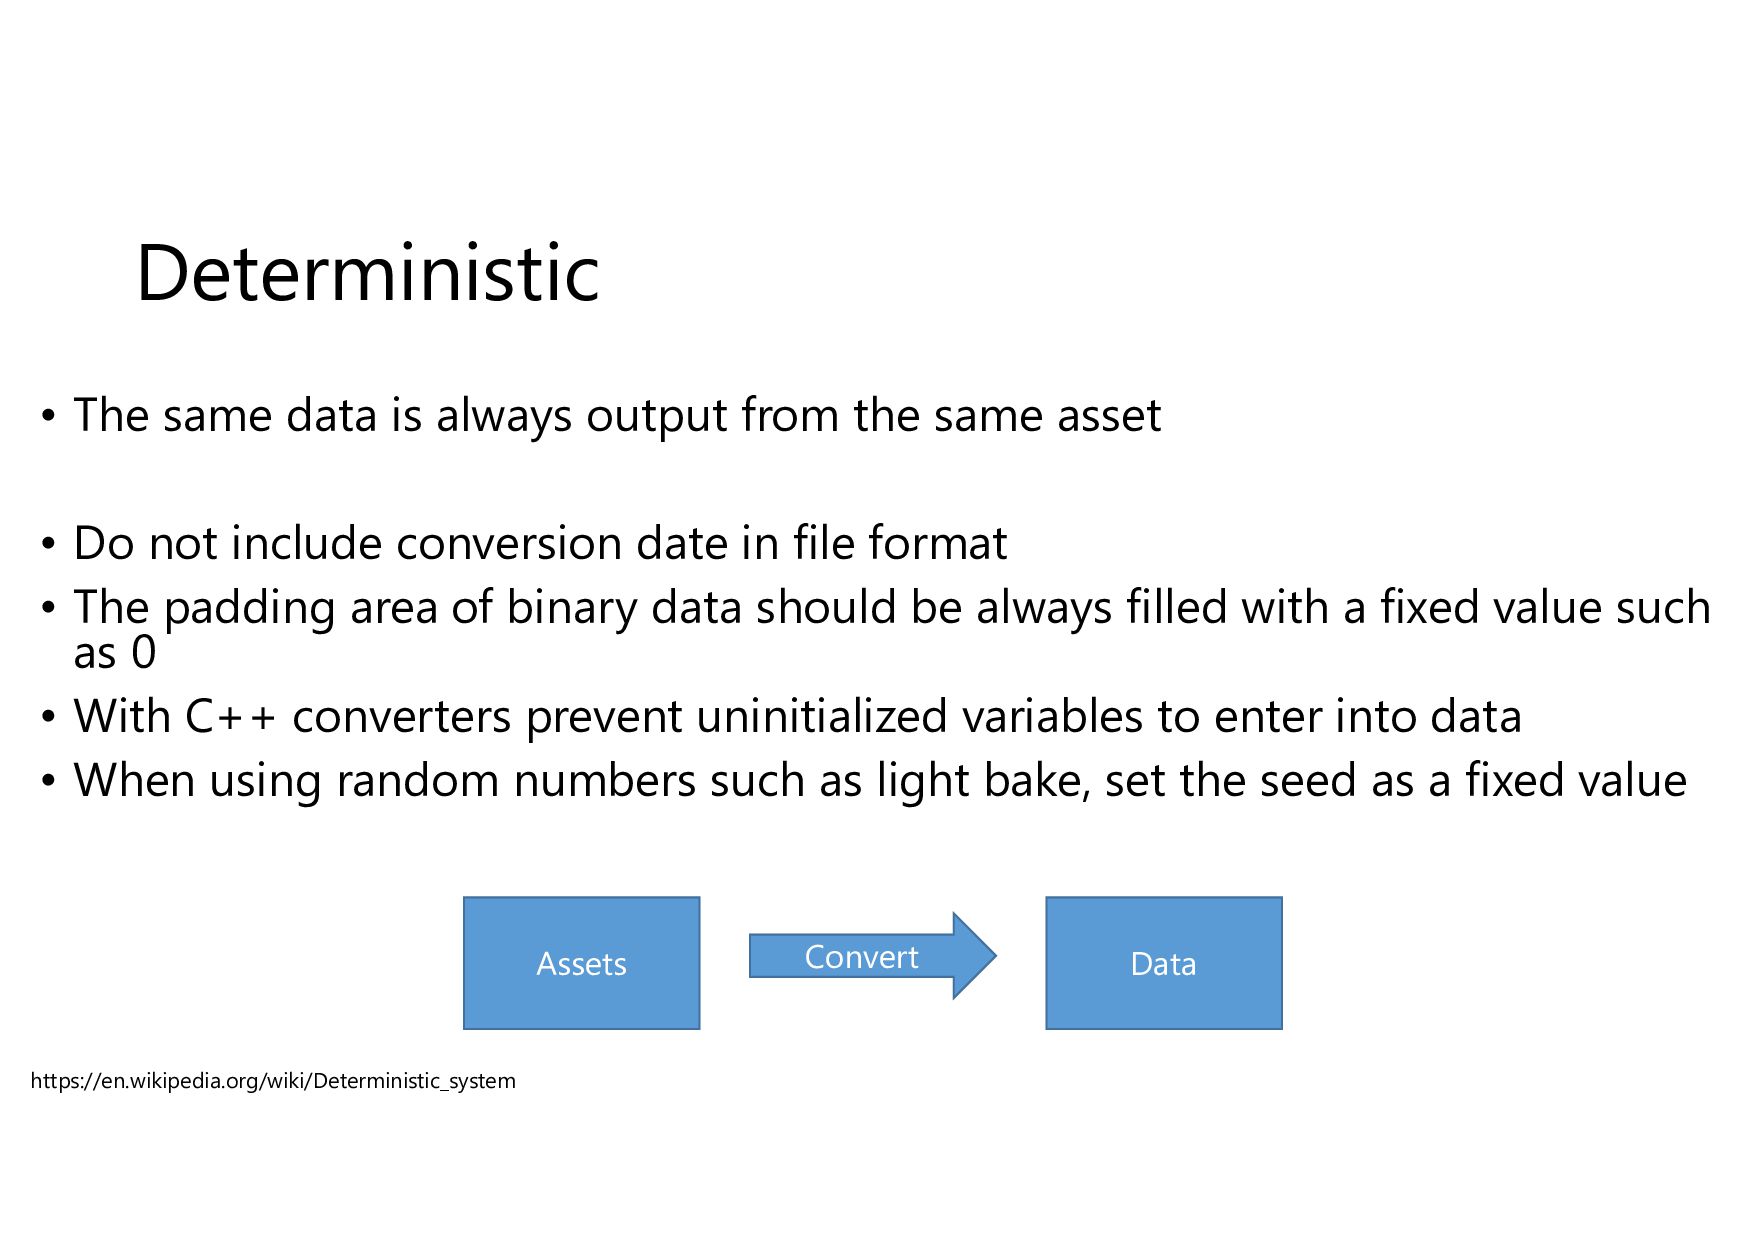
by automatic build Should use DCC tools that can be executed on the command line • If there is any bug in the data, it is mandatory to fix the assets and submit them to Perforce Since the assets exist, data can be re-output when the converter is updated • All data formats are deterministic in order to be compatible with automatic conversion
same asset • Do not include conversion date in file format • The padding area of binary data should be always filled with a fixed value such as 0 • With C++ converters prevent uninitialized variables to enter into data • When using random numbers such as light bake, set the seed as a fixed value Assets Data Convert https://en.wikipedia.org/wiki/Deterministic_system
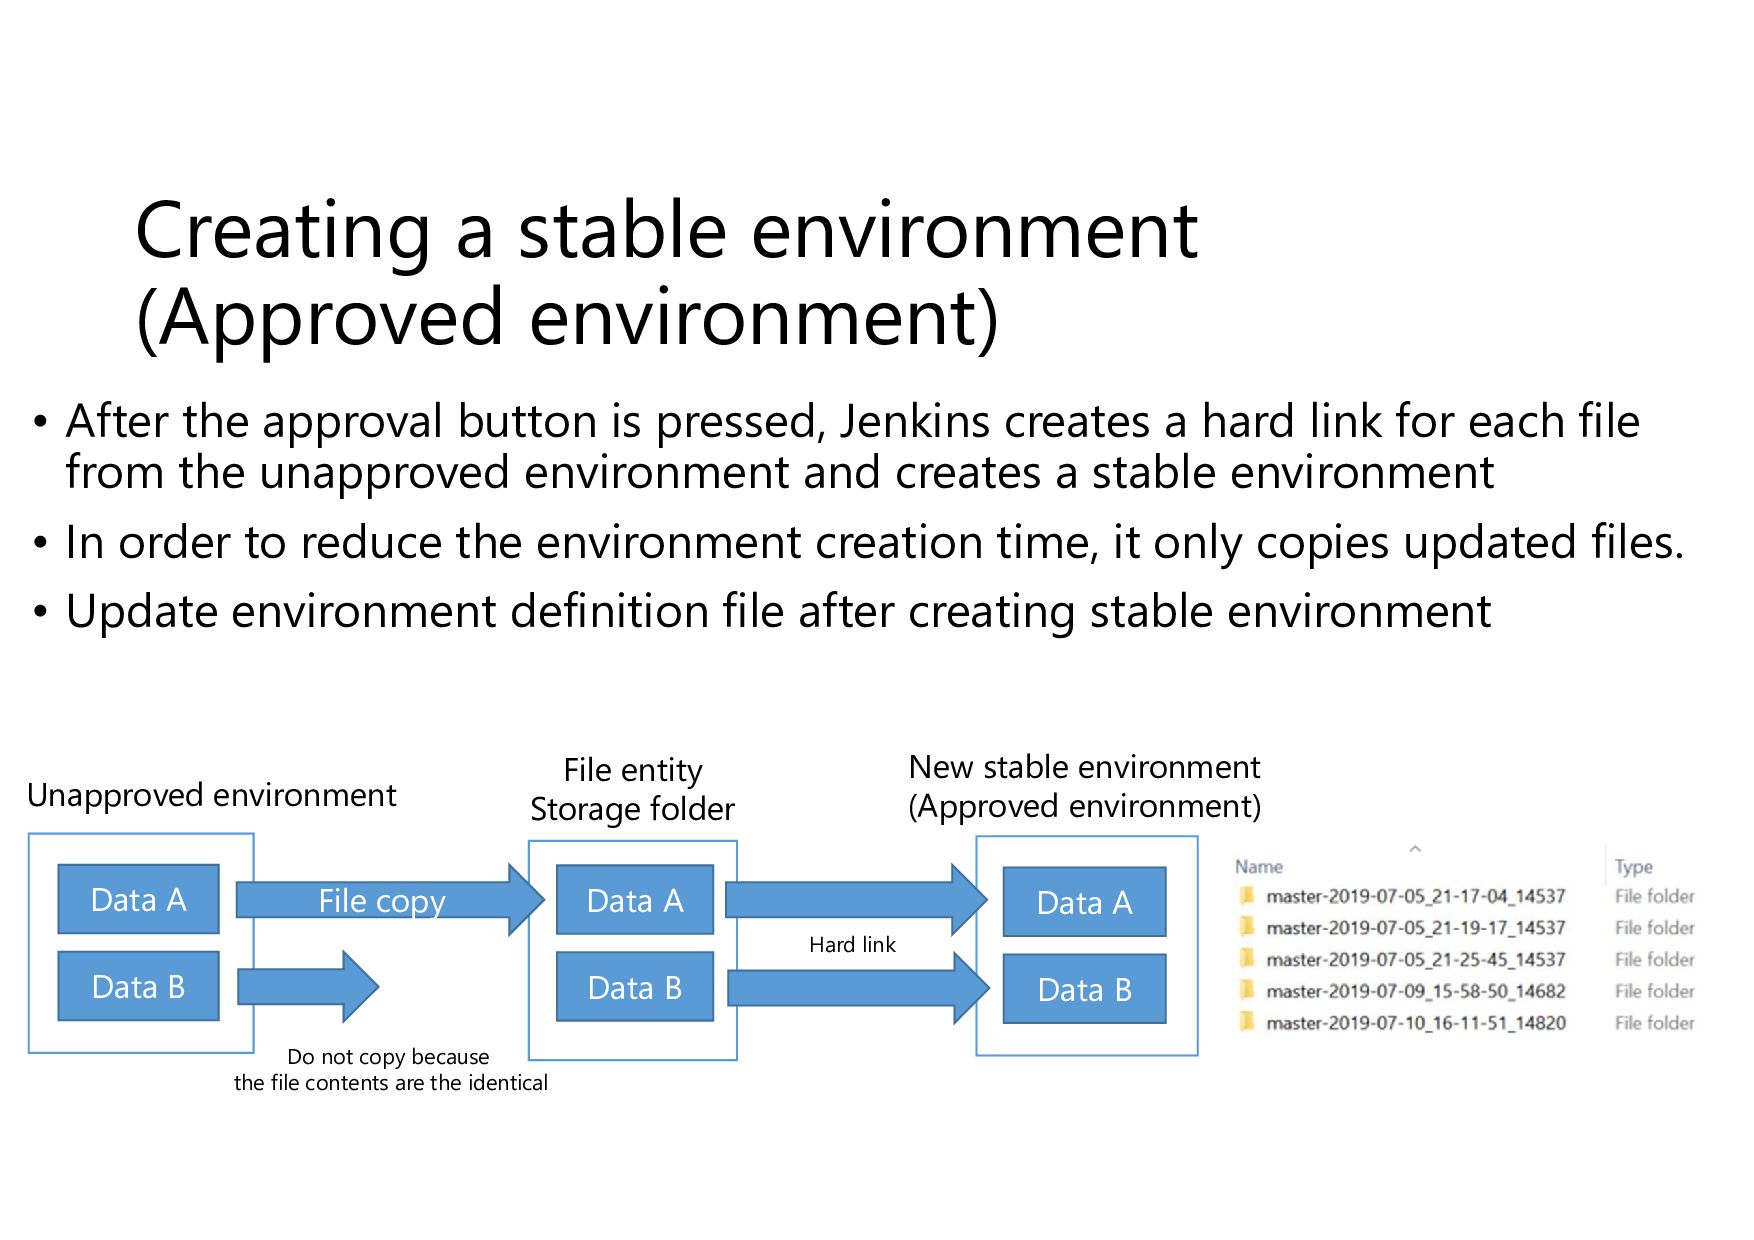
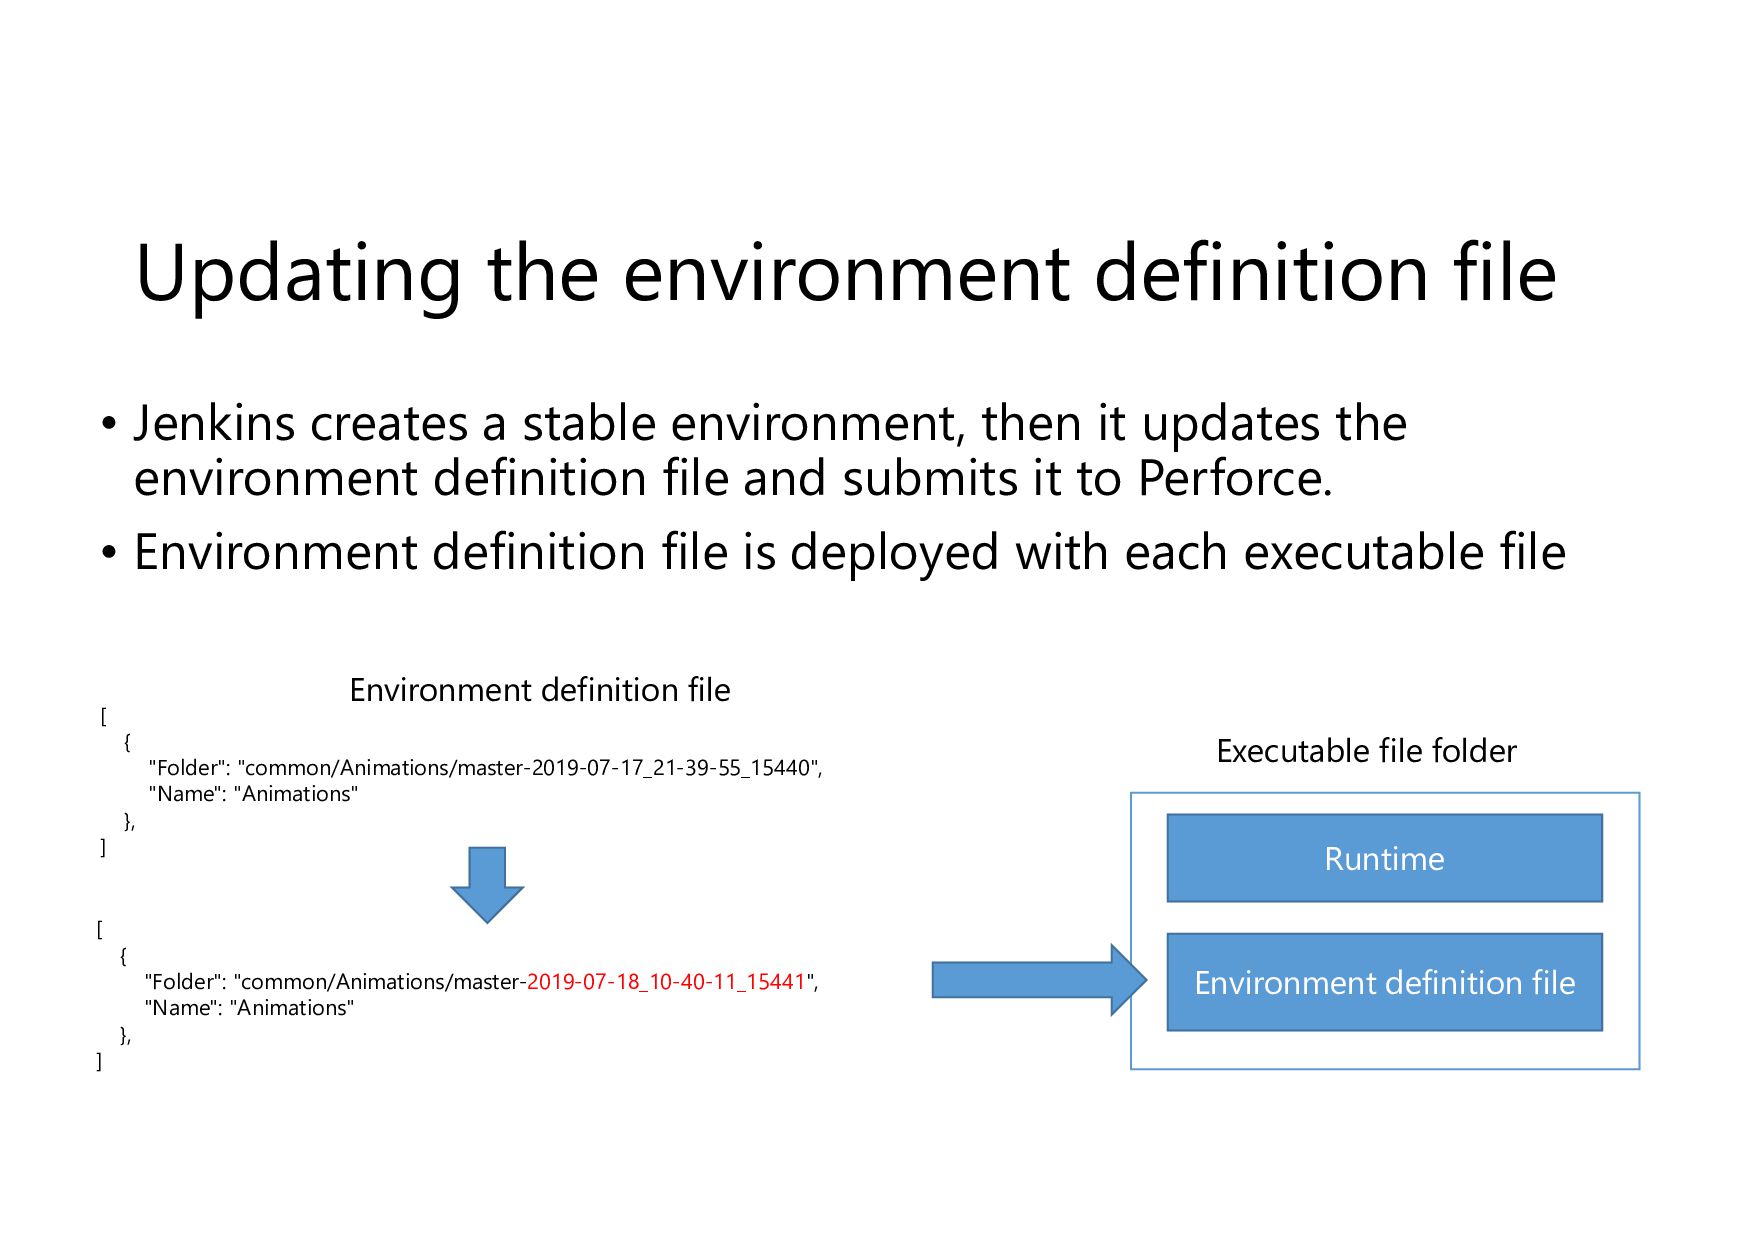
button is pressed, Jenkins creates a hard link for each file from the unapproved environment and creates a stable environment • In order to reduce the environment creation time, it only copies updated files. • Update environment definition file after creating stable environment File copy File entity Storage folder Unapproved environment New stable environment (Approved environment) Data A Data B Data A Data B Data A Data B Do not copy because the file contents are the identical Hard link
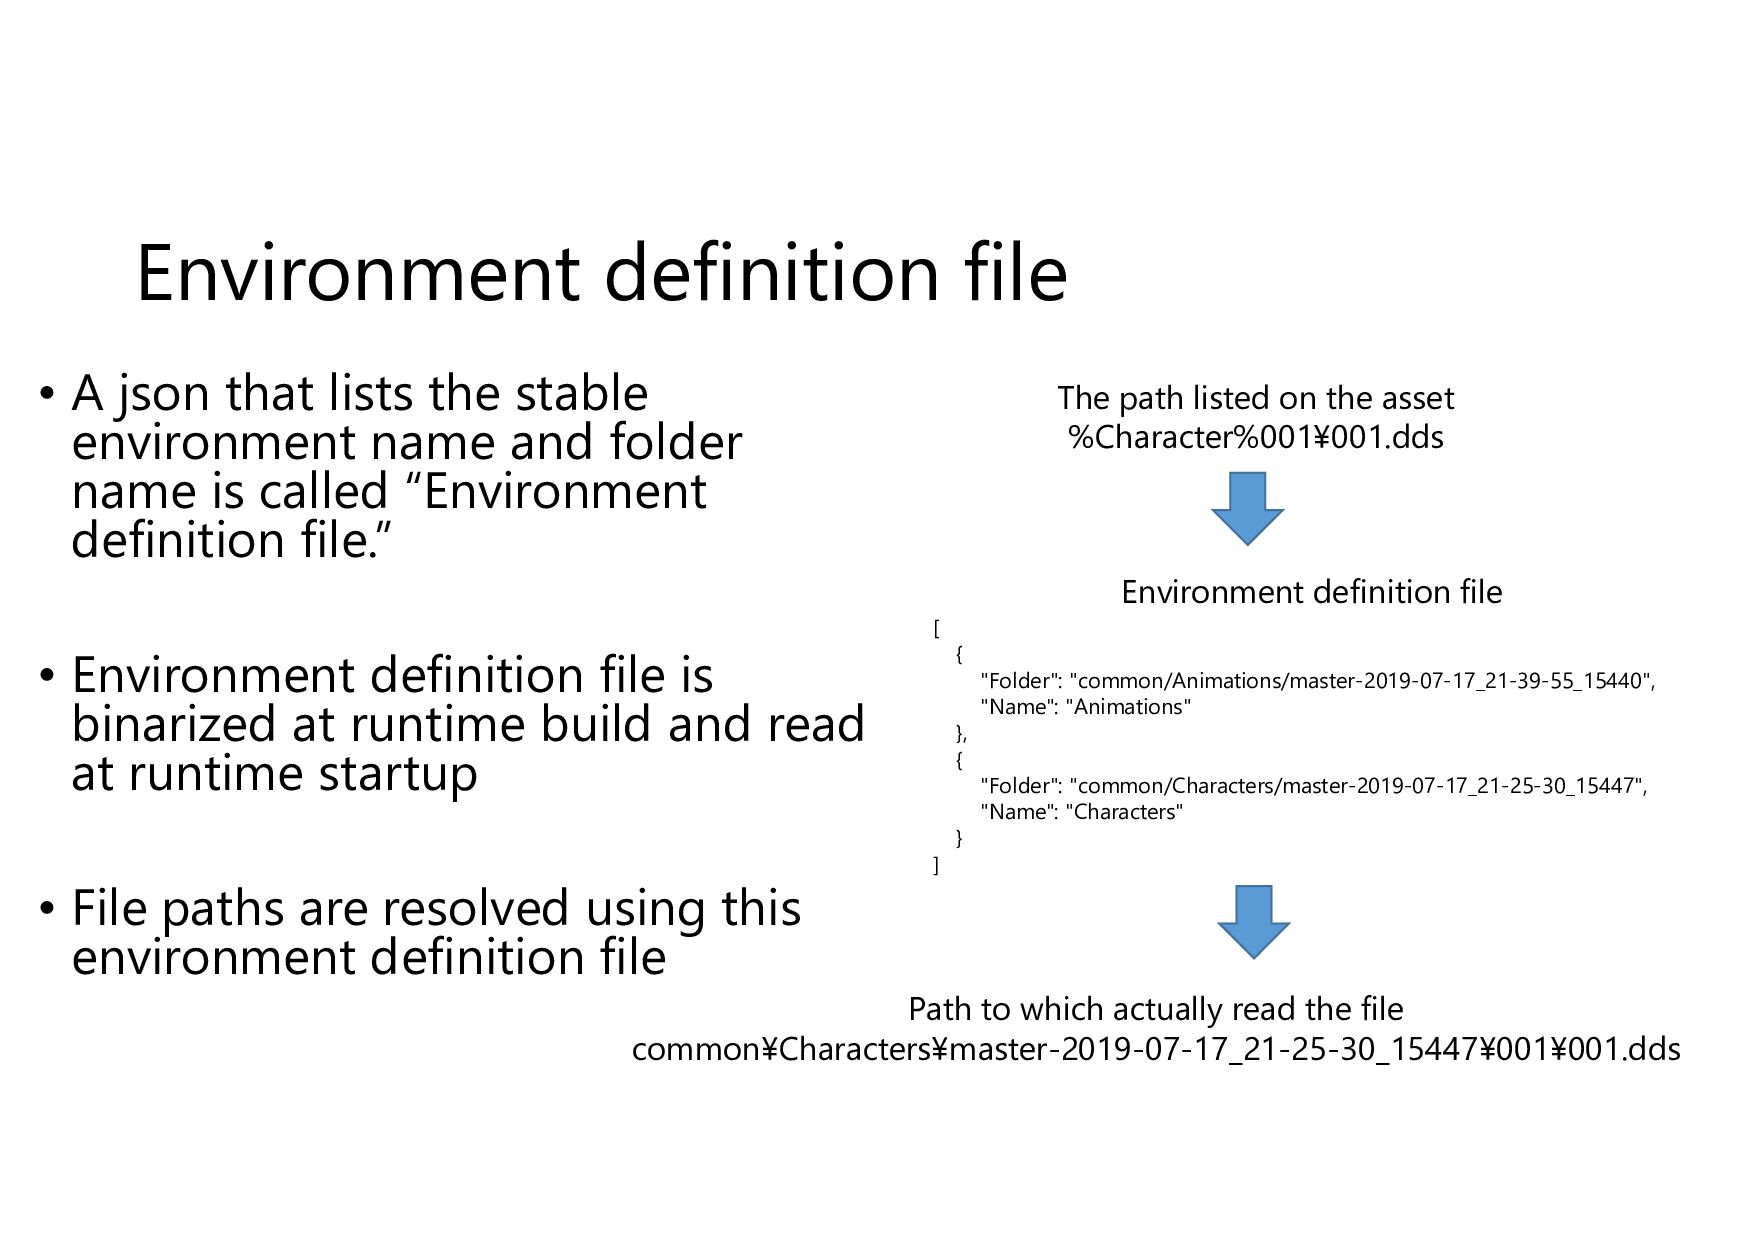
environment name and folder name is called “Environment definition file.” • Environment definition file is binarized at runtime build and read at runtime startup • File paths are resolved using this environment definition file The path listed on the asset %Character%001¥001.dds Path to which actually read the file common¥Characters¥master-2019-07-17_21-25-30_15447¥001¥001.dds [ { "Folder": "common/Animations/master-2019-07-17_21-39-55_15440", "Name": "Animations" }, { "Folder": "common/Characters/master-2019-07-17_21-25-30_15447", "Name": "Characters" } ] Environment definition file
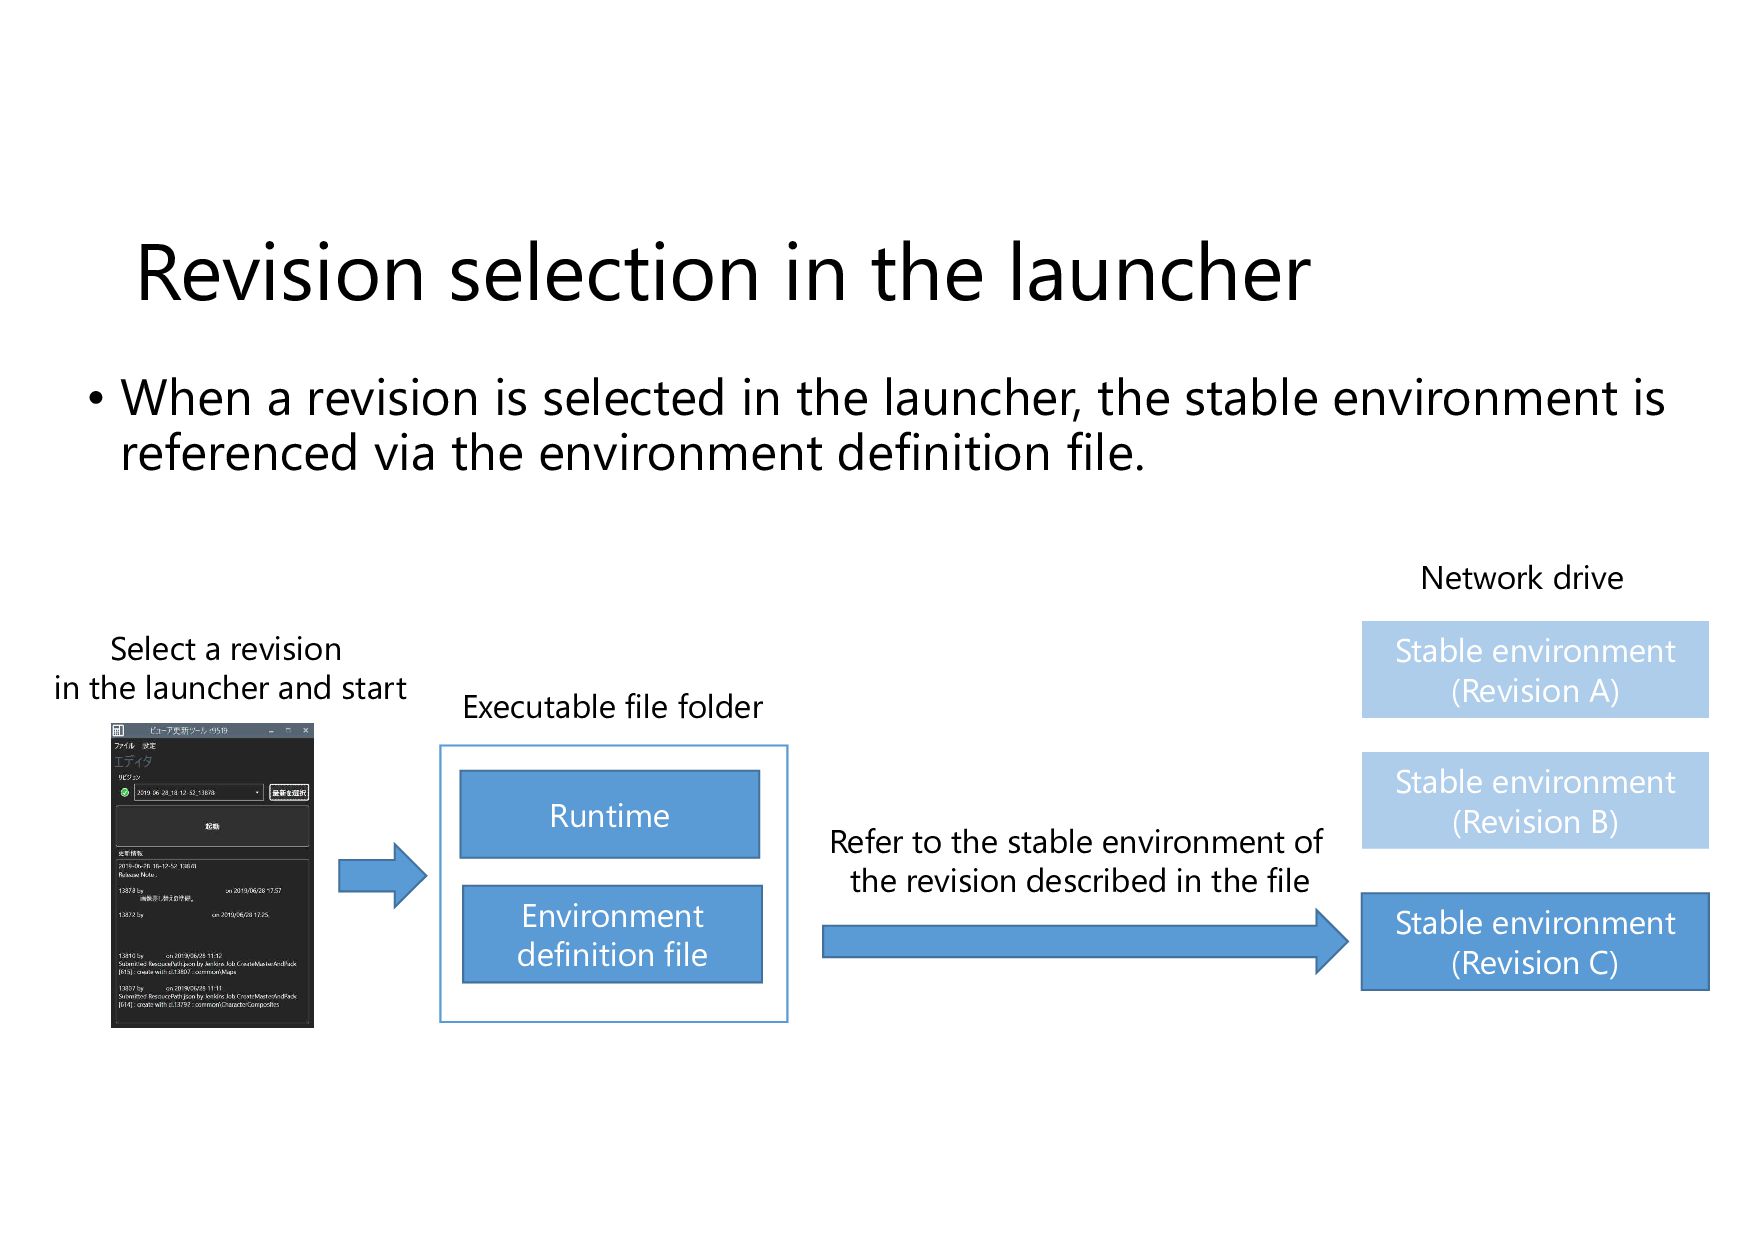
selected in the launcher, the stable environment is referenced via the environment definition file. Environment definition file Stable environment (Revision C) Select a revision in the launcher and start Executable file folder Runtime Refer to the stable environment of the revision described in the file Stable environment (Revision B) Stable environment (Revision A) Network drive
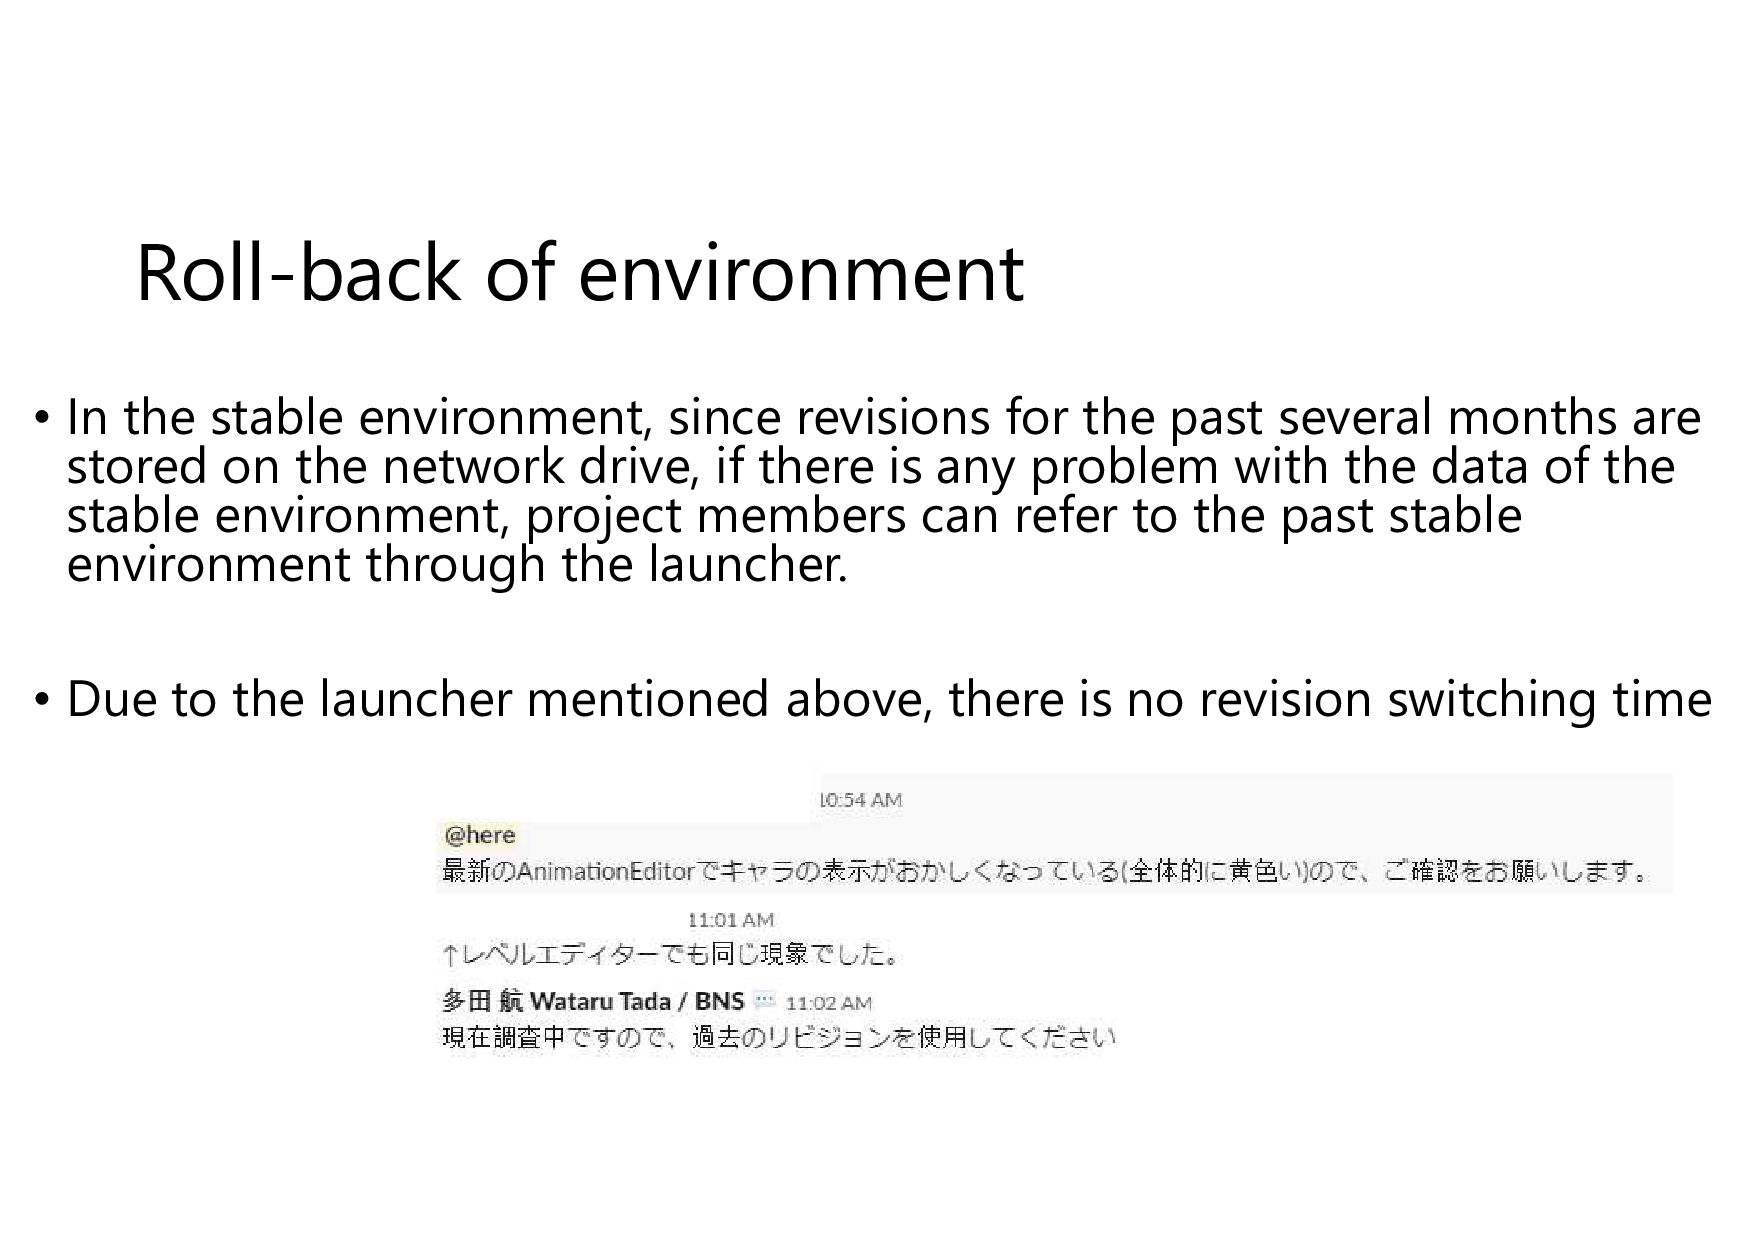
for the past several months are stored on the network drive, if there is any problem with the data of the stable environment, project members can refer to the past stable environment through the launcher. • Due to the launcher mentioned above, there is no revision switching time
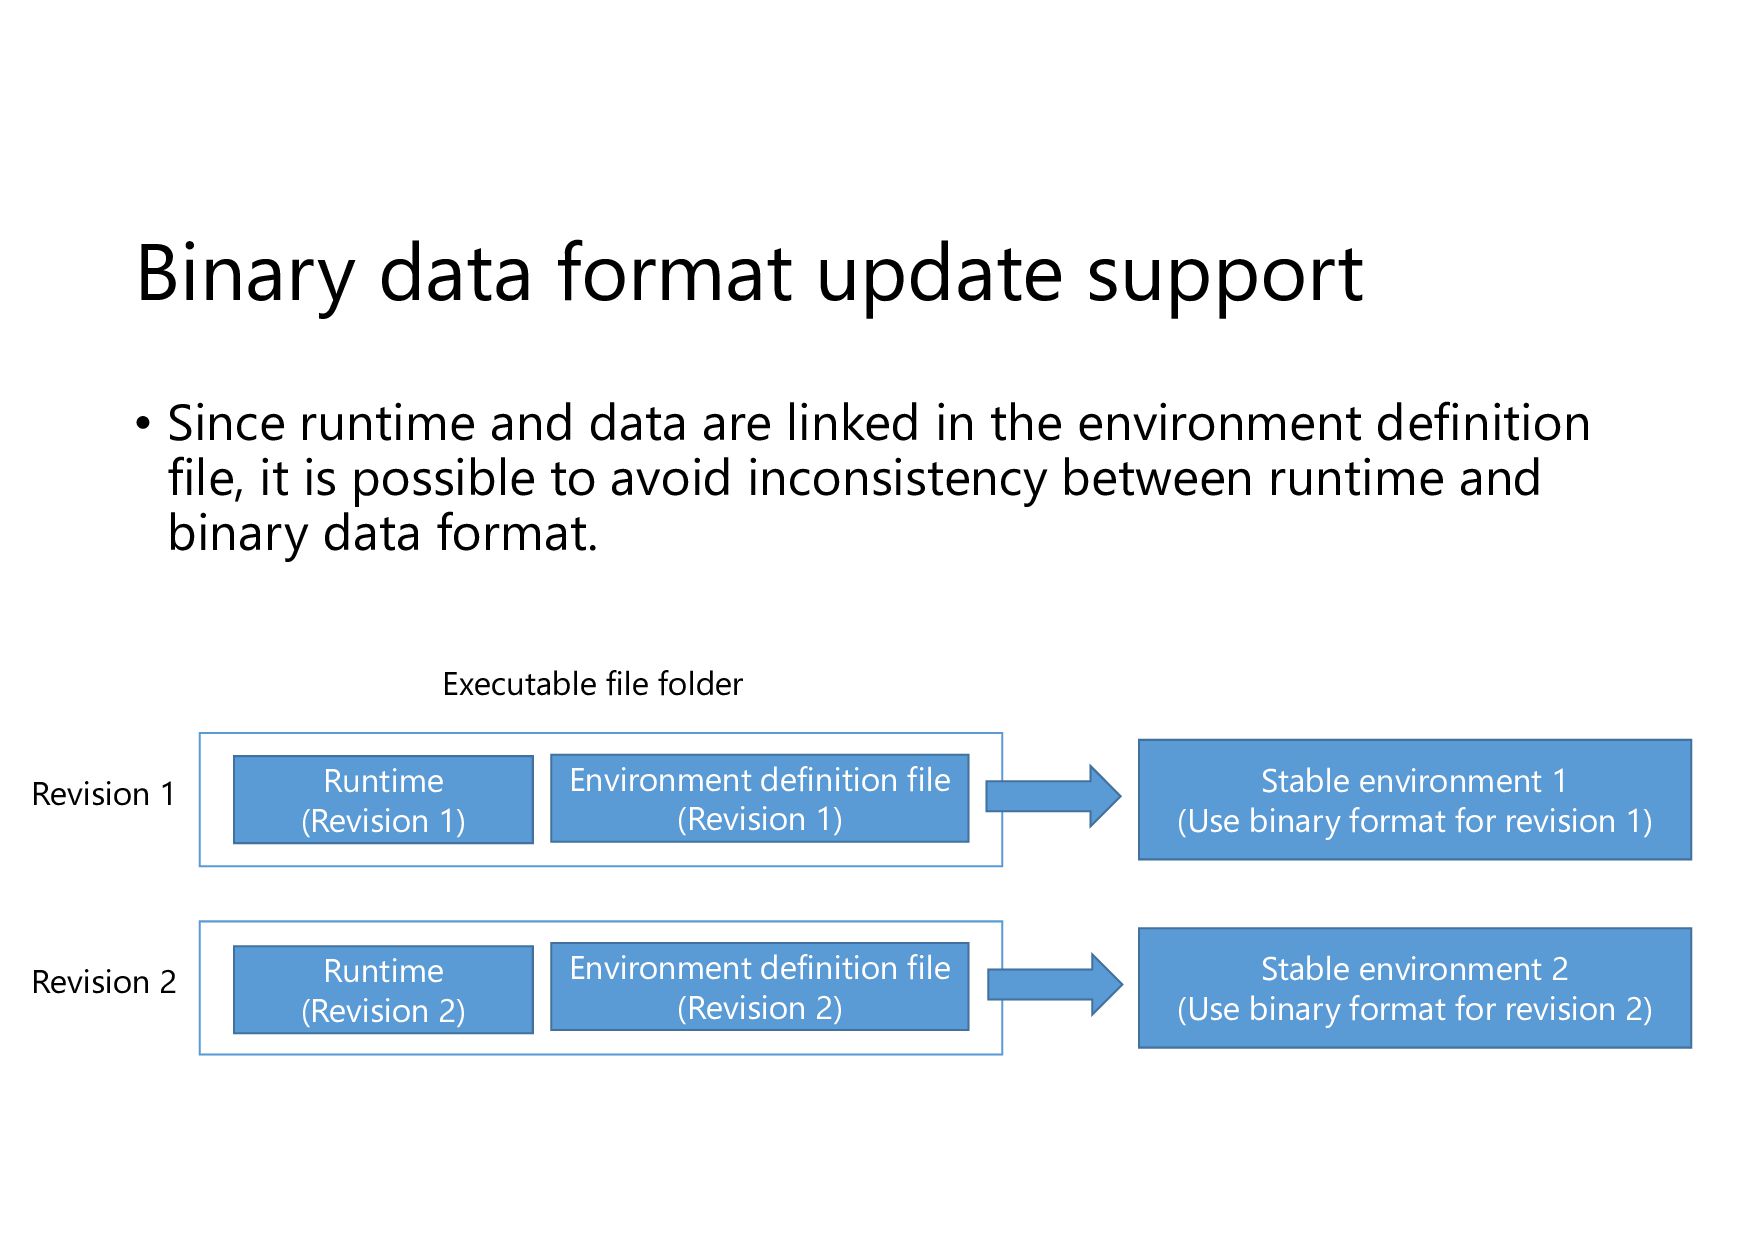
are linked in the environment definition file, it is possible to avoid inconsistency between runtime and binary data format. Environment definition file (Revision 1) Revision 1 Runtime (Revision 1) Stable environment 1 (Use binary format for revision 1) Environment definition file (Revision 2) Revision 2 Runtime (Revision 2) Stable environment 2 (Use binary format for revision 2) Executable file folder
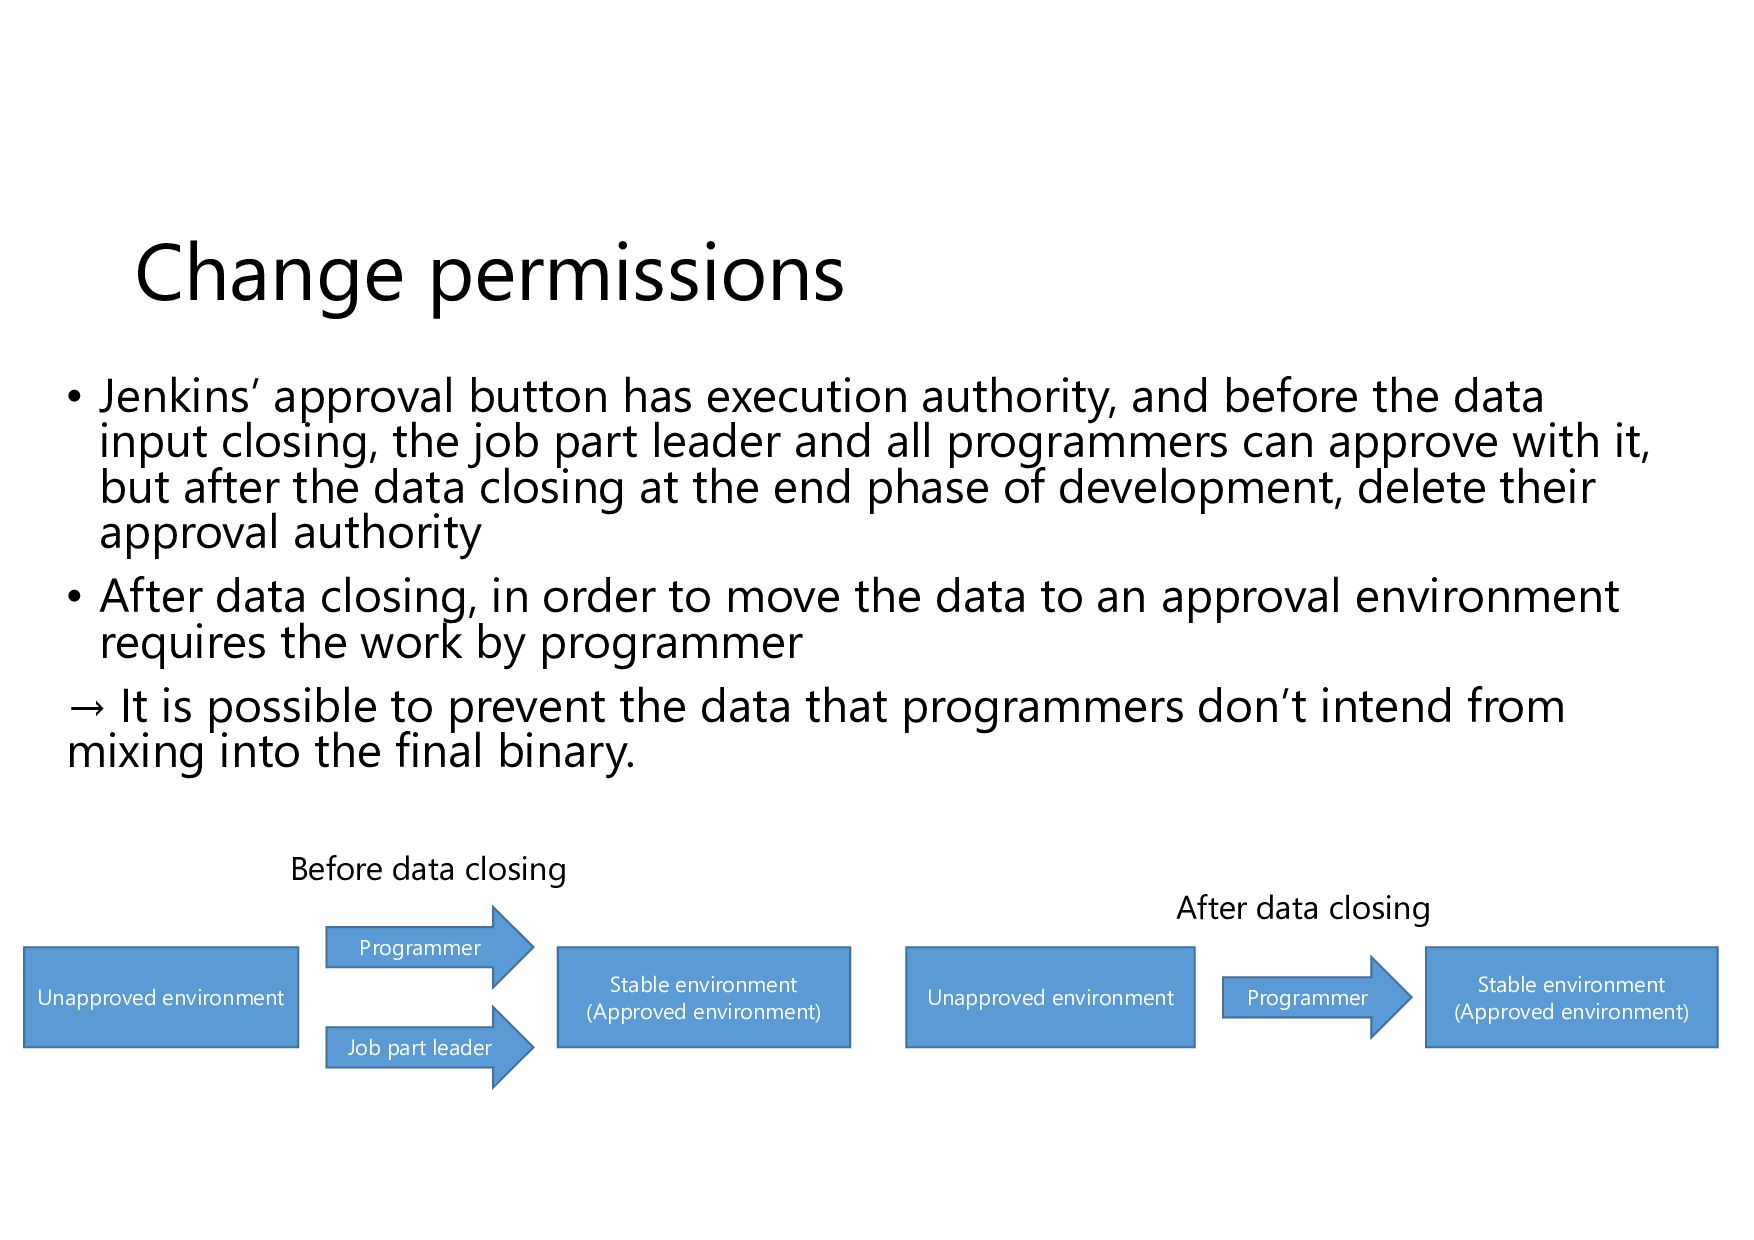
before the data input closing, the job part leader and all programmers can approve with it, but after the data closing at the end phase of development, delete their approval authority • After data closing, in order to move the data to an approval environment requires the work by programmer → It is possible to prevent the data that programmers don’t intend from mixing into the final binary. Unapproved environment Stable environment (Approved environment) Programmer Job part leader Unapproved environment Stable environment (Approved environment) Programmer Before data closing After data closing
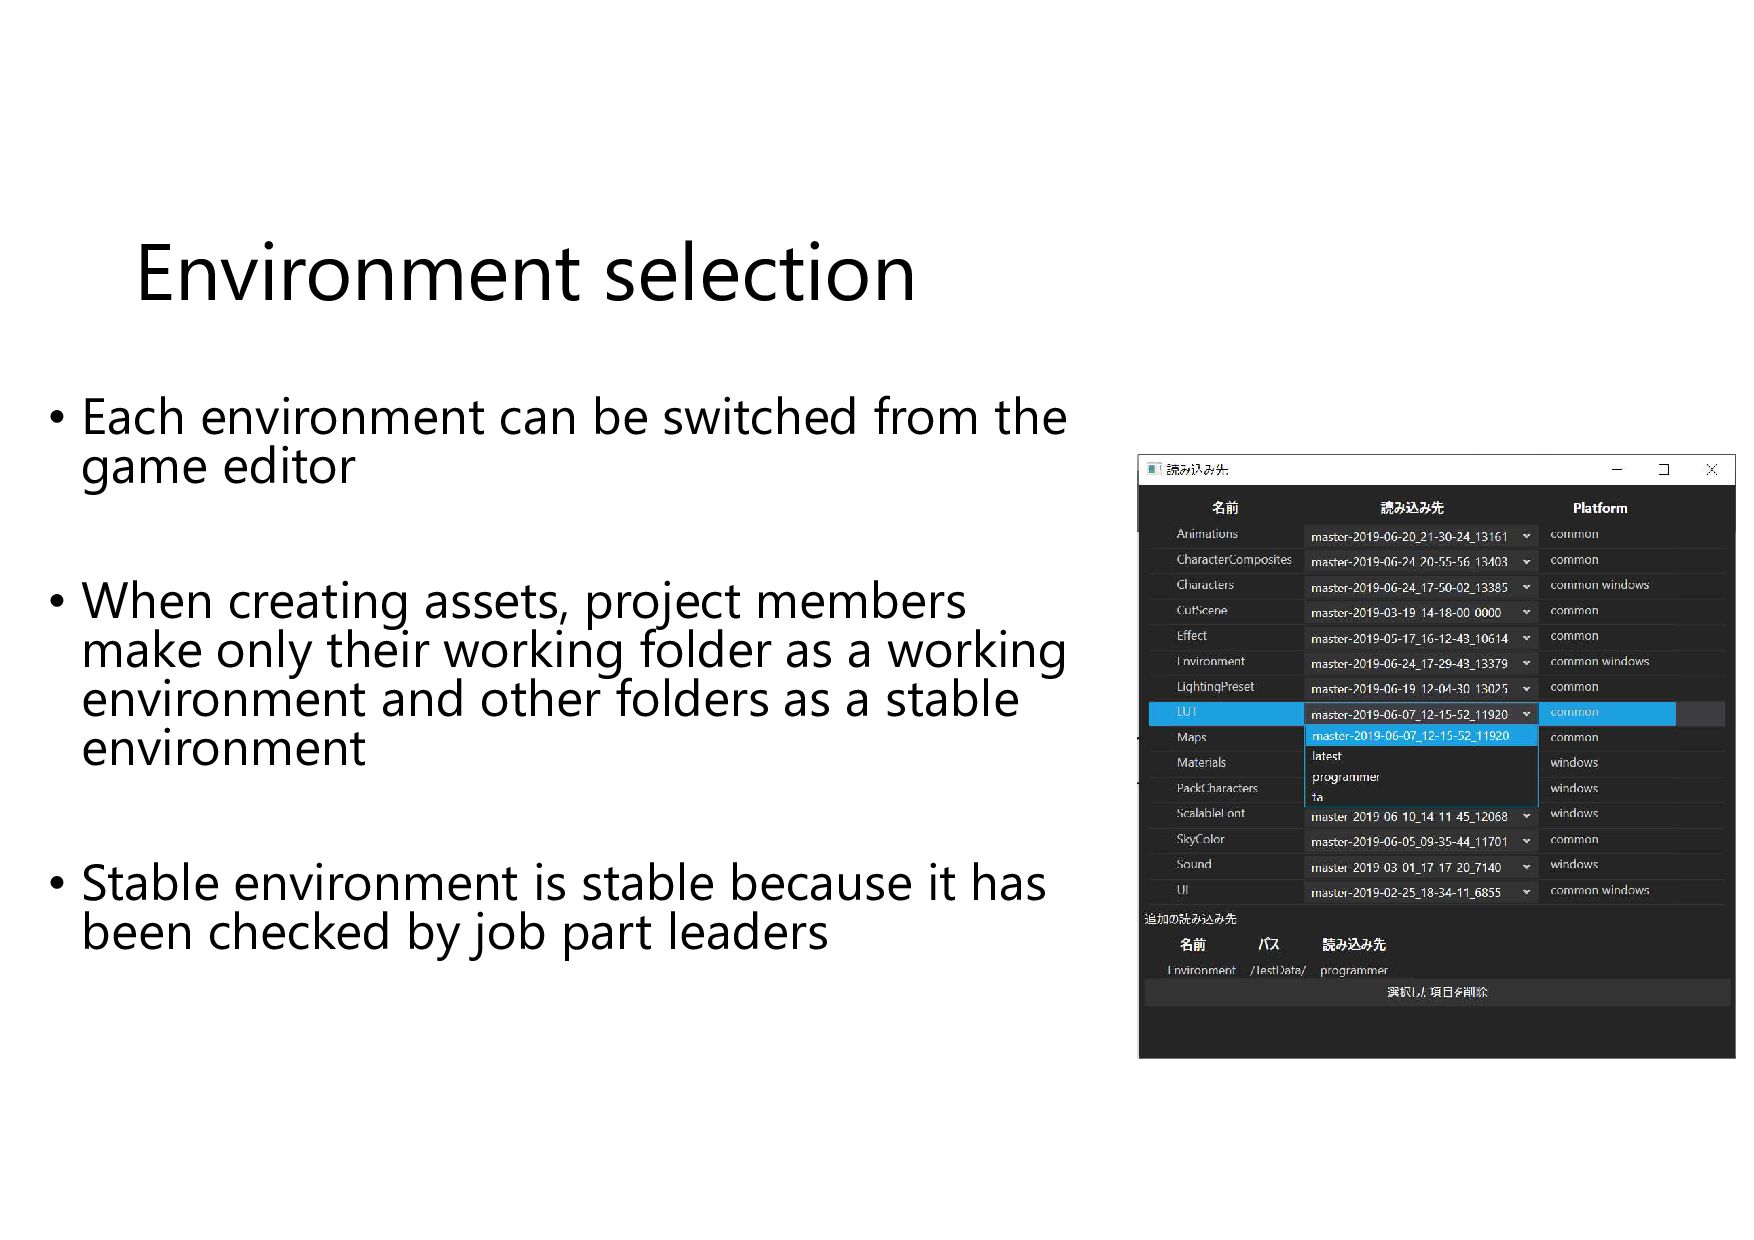
game editor • When creating assets, project members make only their working folder as a working environment and other folders as a stable environment • Stable environment is stable because it has been checked by job part leaders
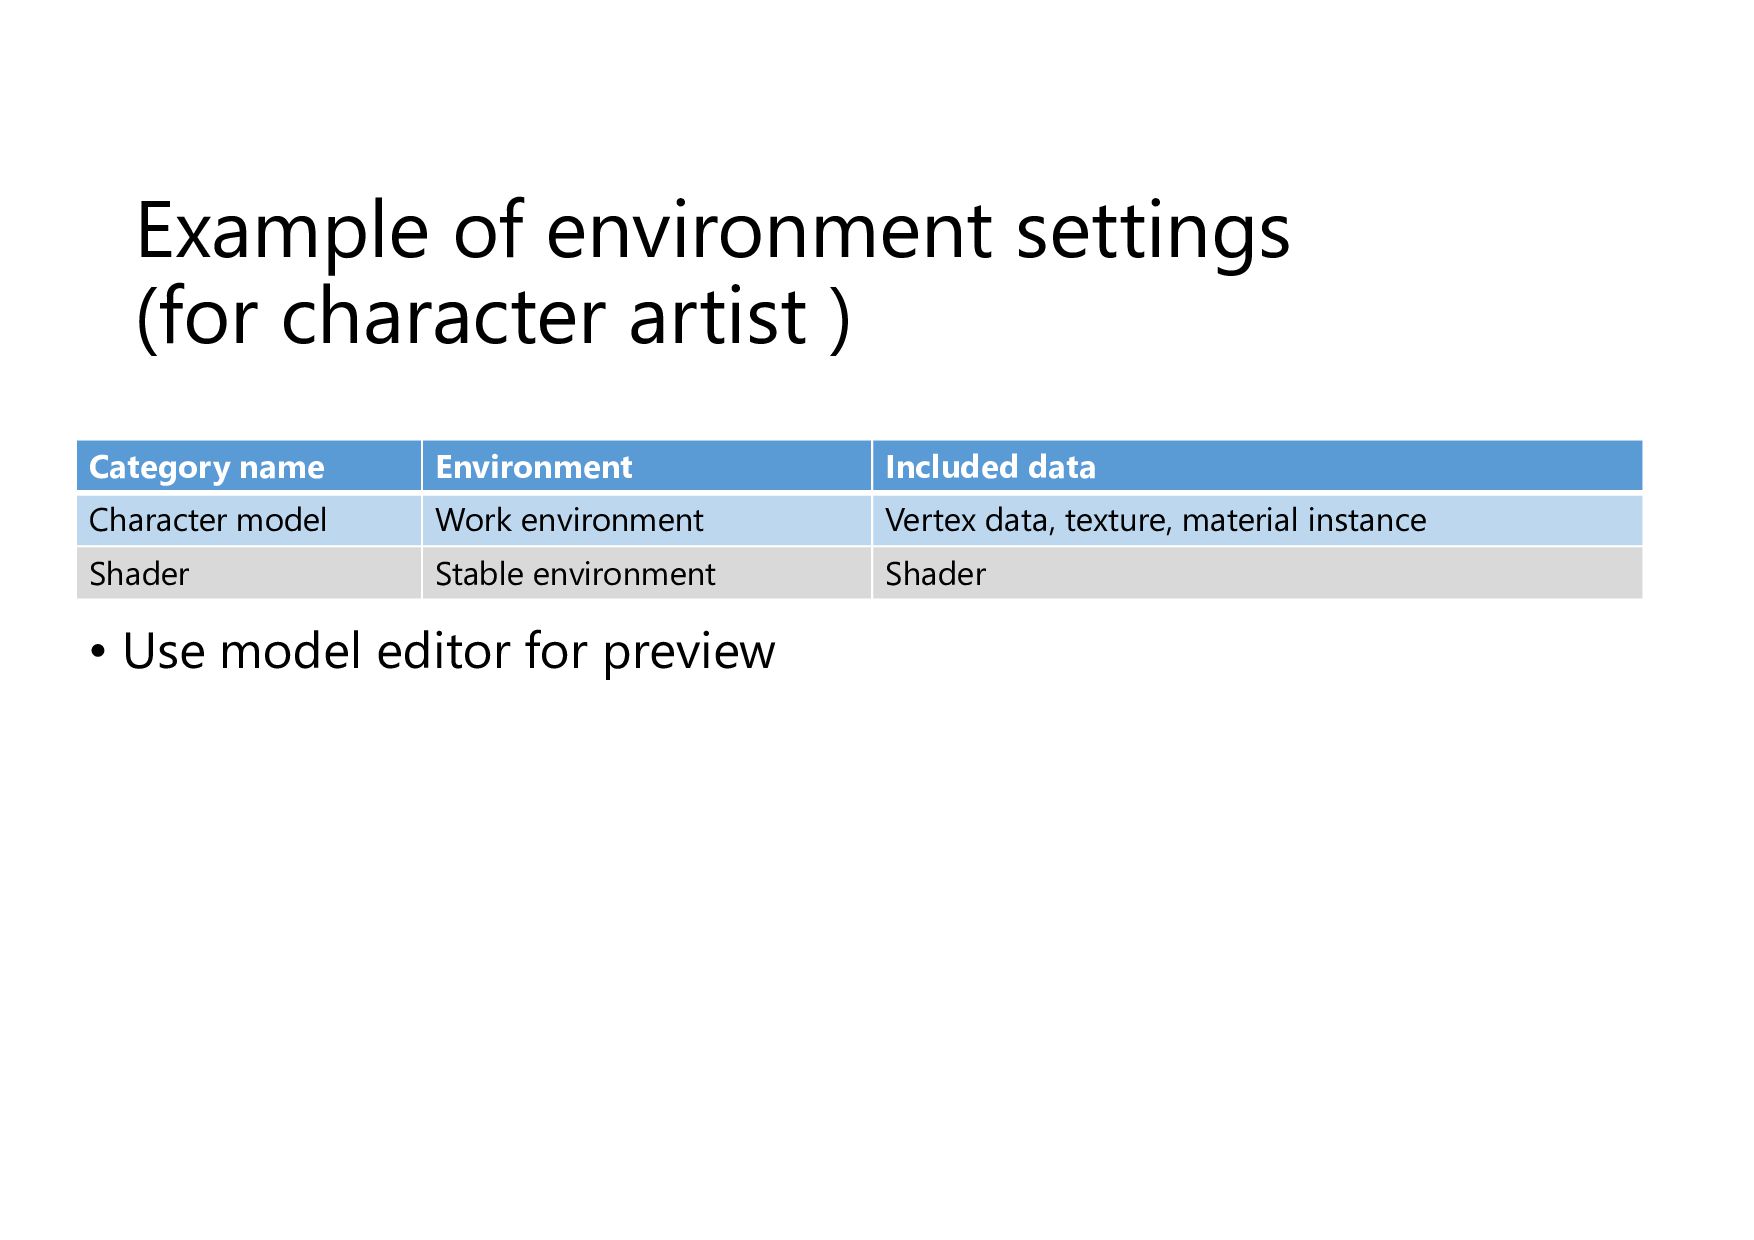
model editor for preview Category name Environment Included data Character model Work environment Vertex data, texture, material instance Shader Stable environment Shader
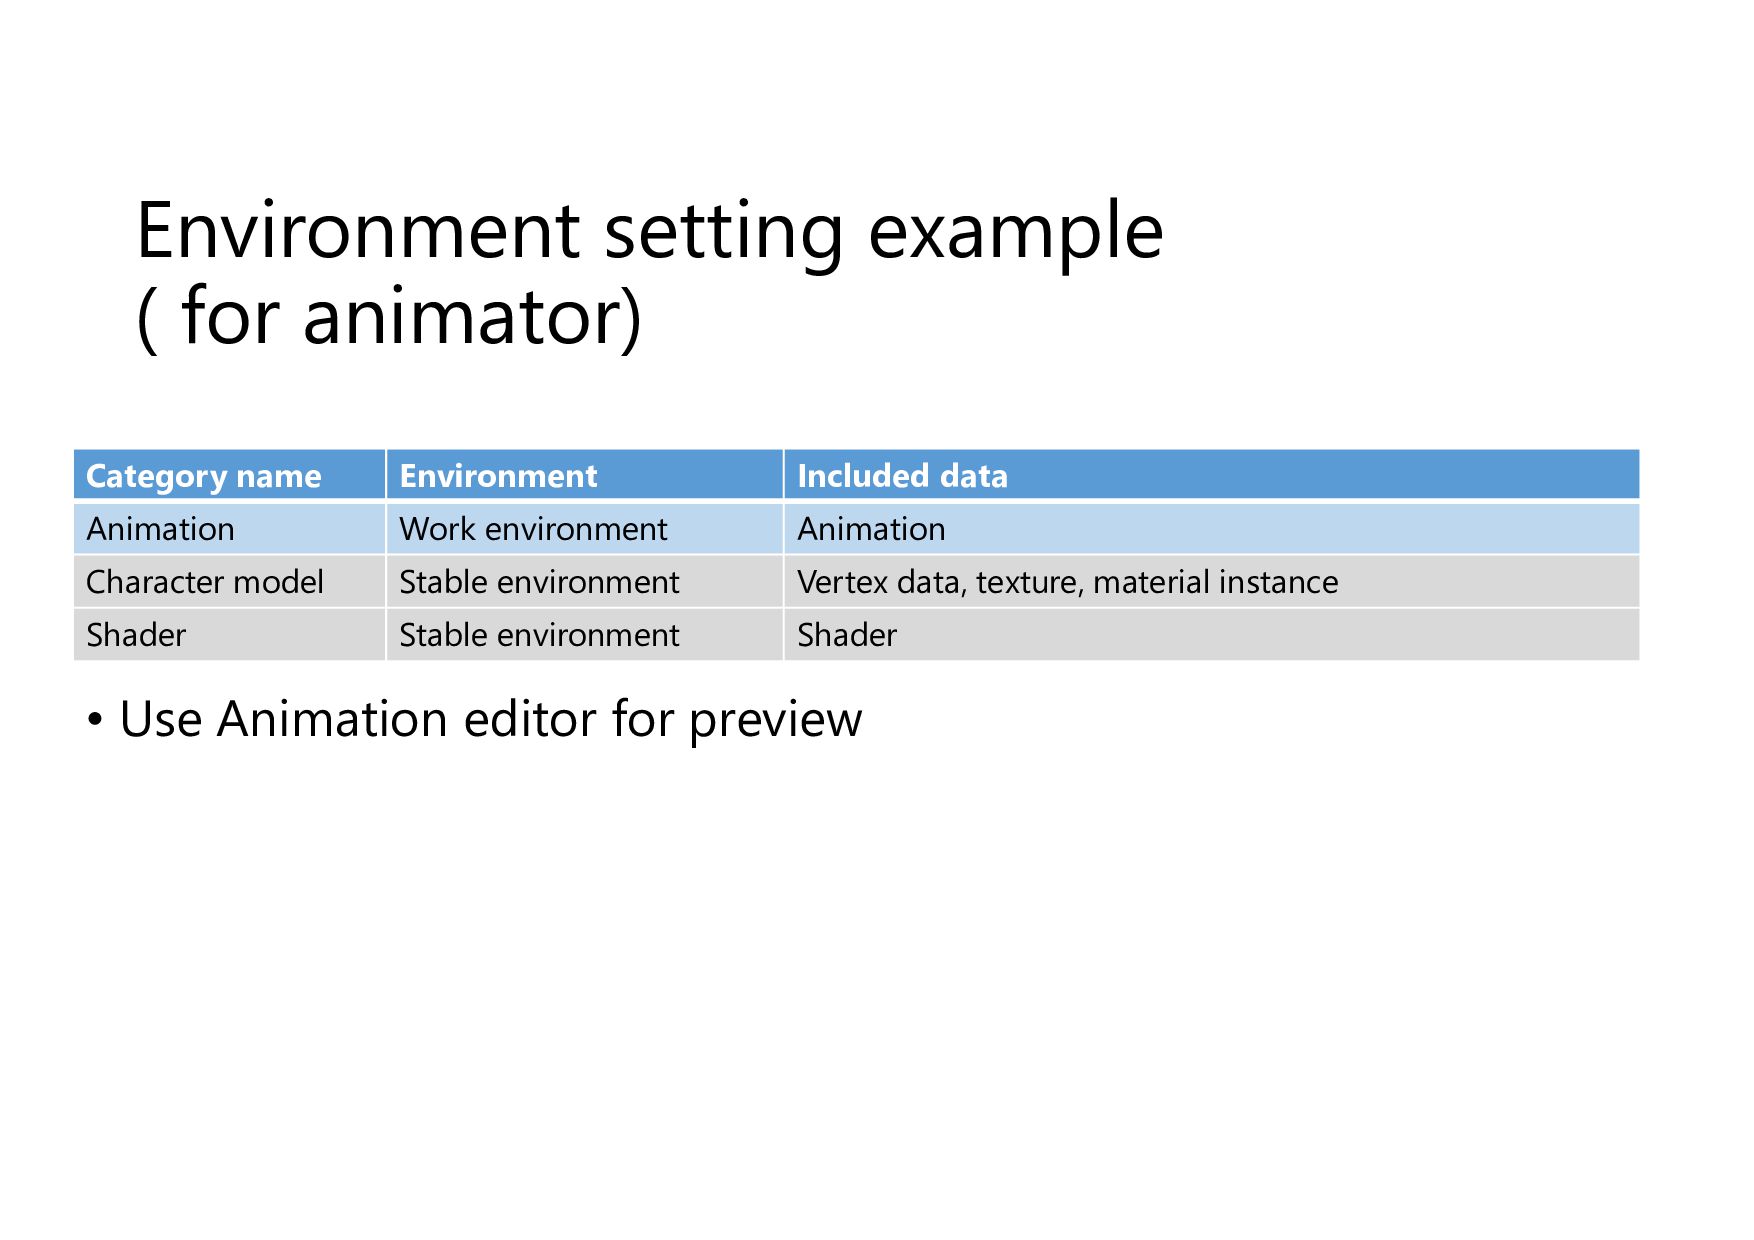
for preview Category name Environment Included data Animation Work environment Animation Character model Stable environment Vertex data, texture, material instance Shader Stable environment Shader
for preview • Animation is used as a working environment in order to work closely with animators → Immediately after the animator outputs the animation data (without using Perforce), the character scripter can refer to that animation data. Category name Environment Included data Character script Work environment Character script Animation Work environment Animation Character model Stable environment Vertex data, texture, material instance Shader Stable environment Shader
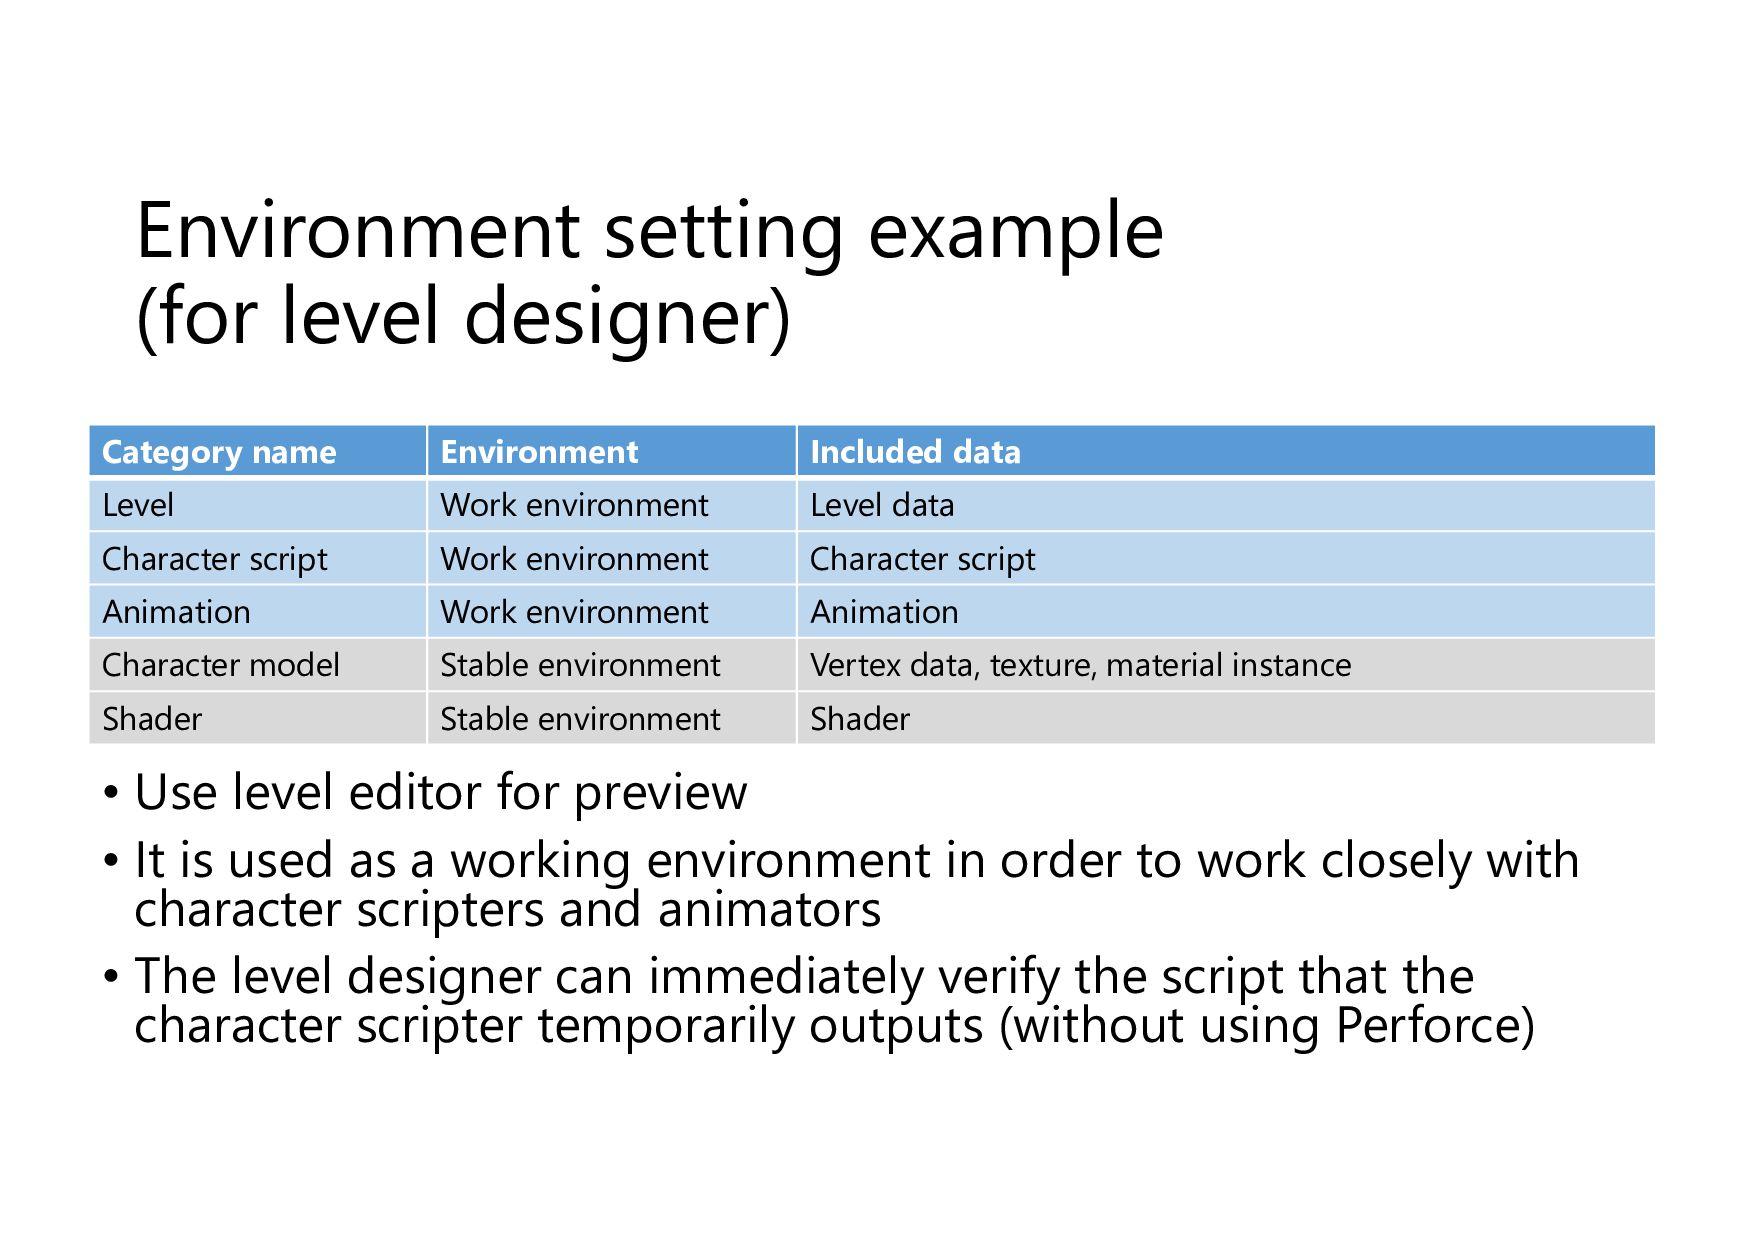
data Level Work environment Level data Character script Work environment Character script Animation Work environment Animation Character model Stable environment Vertex data, texture, material instance Shader Stable environment Shader • Use level editor for preview • It is used as a working environment in order to work closely with character scripters and animators • The level designer can immediately verify the script that the character scripter temporarily outputs (without using Perforce)
categories stable • This is also used for final package Category name Environment Included data Level Stable environment Level data Character script Stable environment Character script Animation Stable environment Animation Character model Stable environment Vertex data, texture, material instance Shader Stable environment Shader
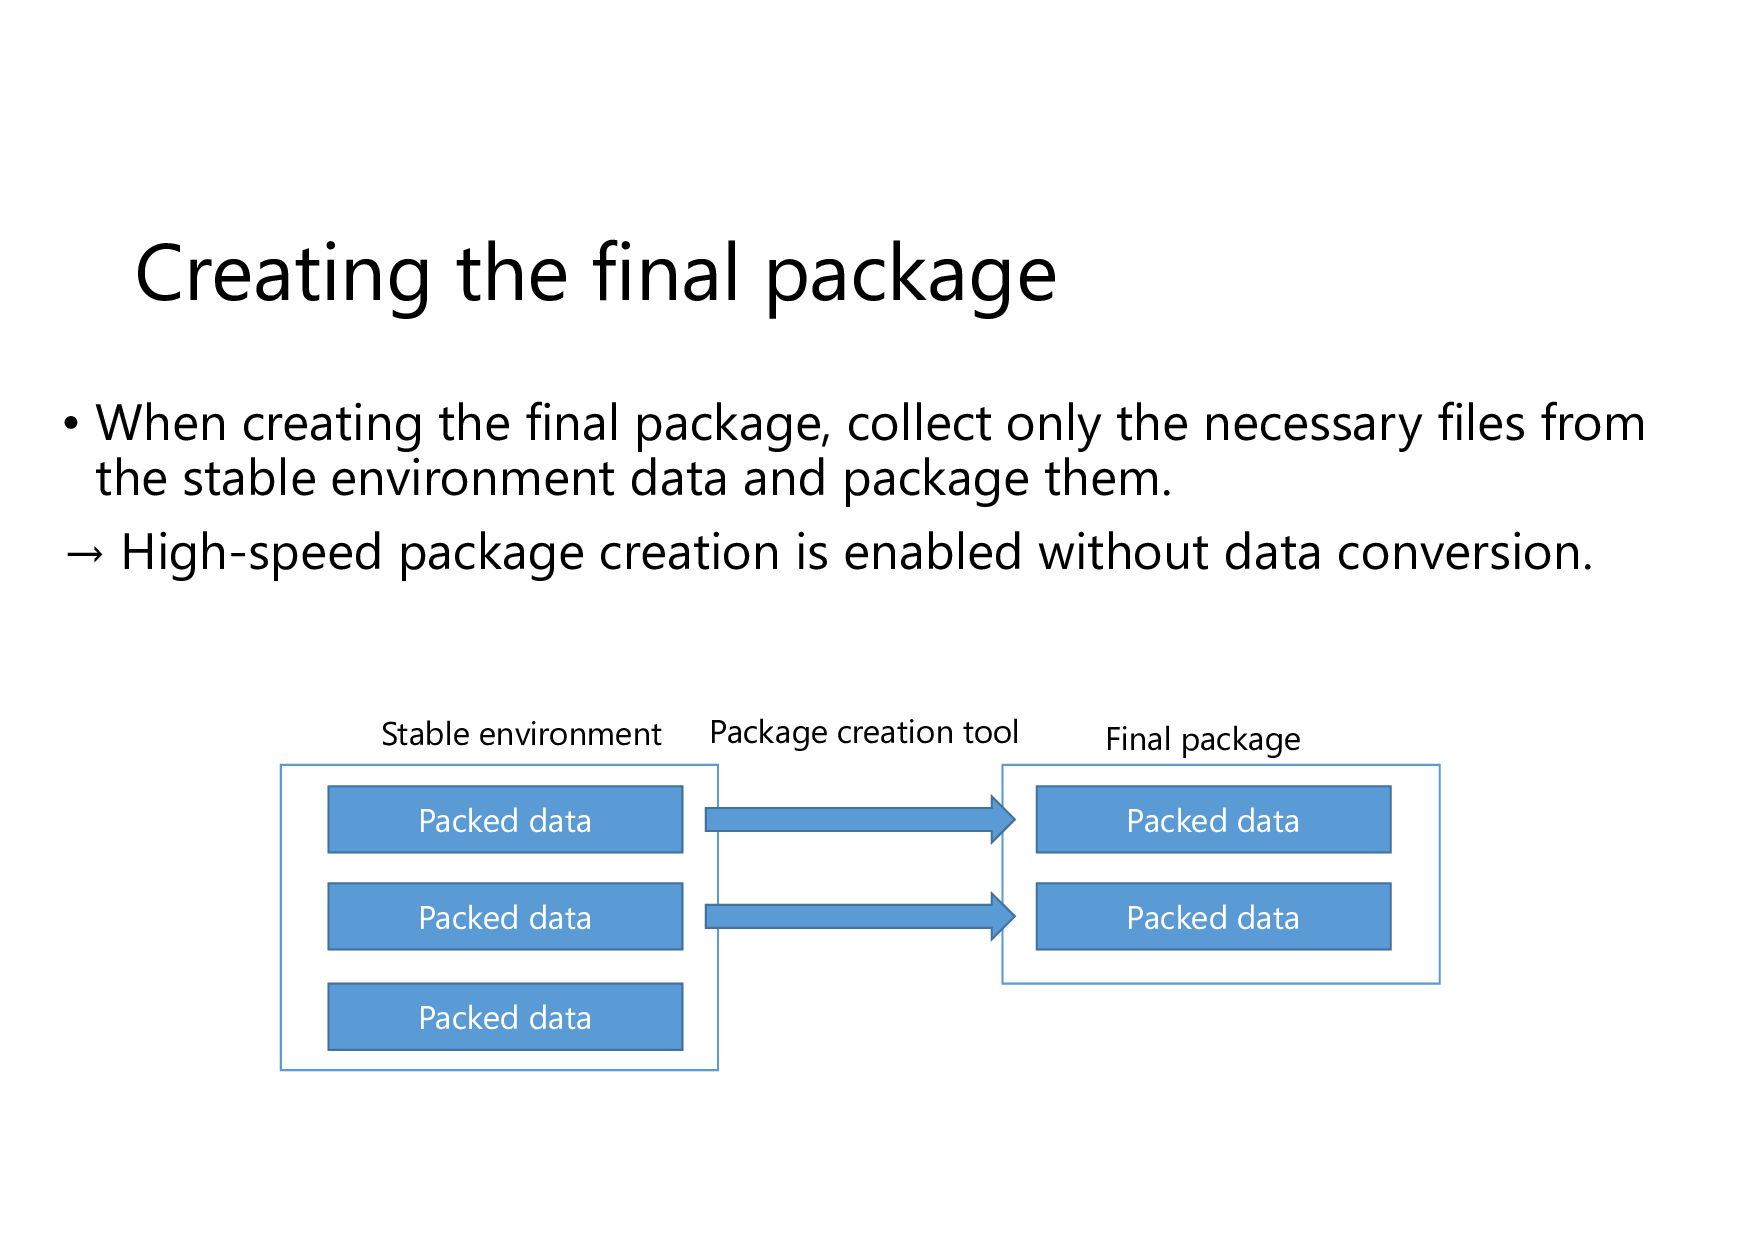
collect only the necessary files from the stable environment data and package them. → High-speed package creation is enabled without data conversion. Stable environment Packed data Packed data Packed data Final package Packed data Packed data Package creation tool
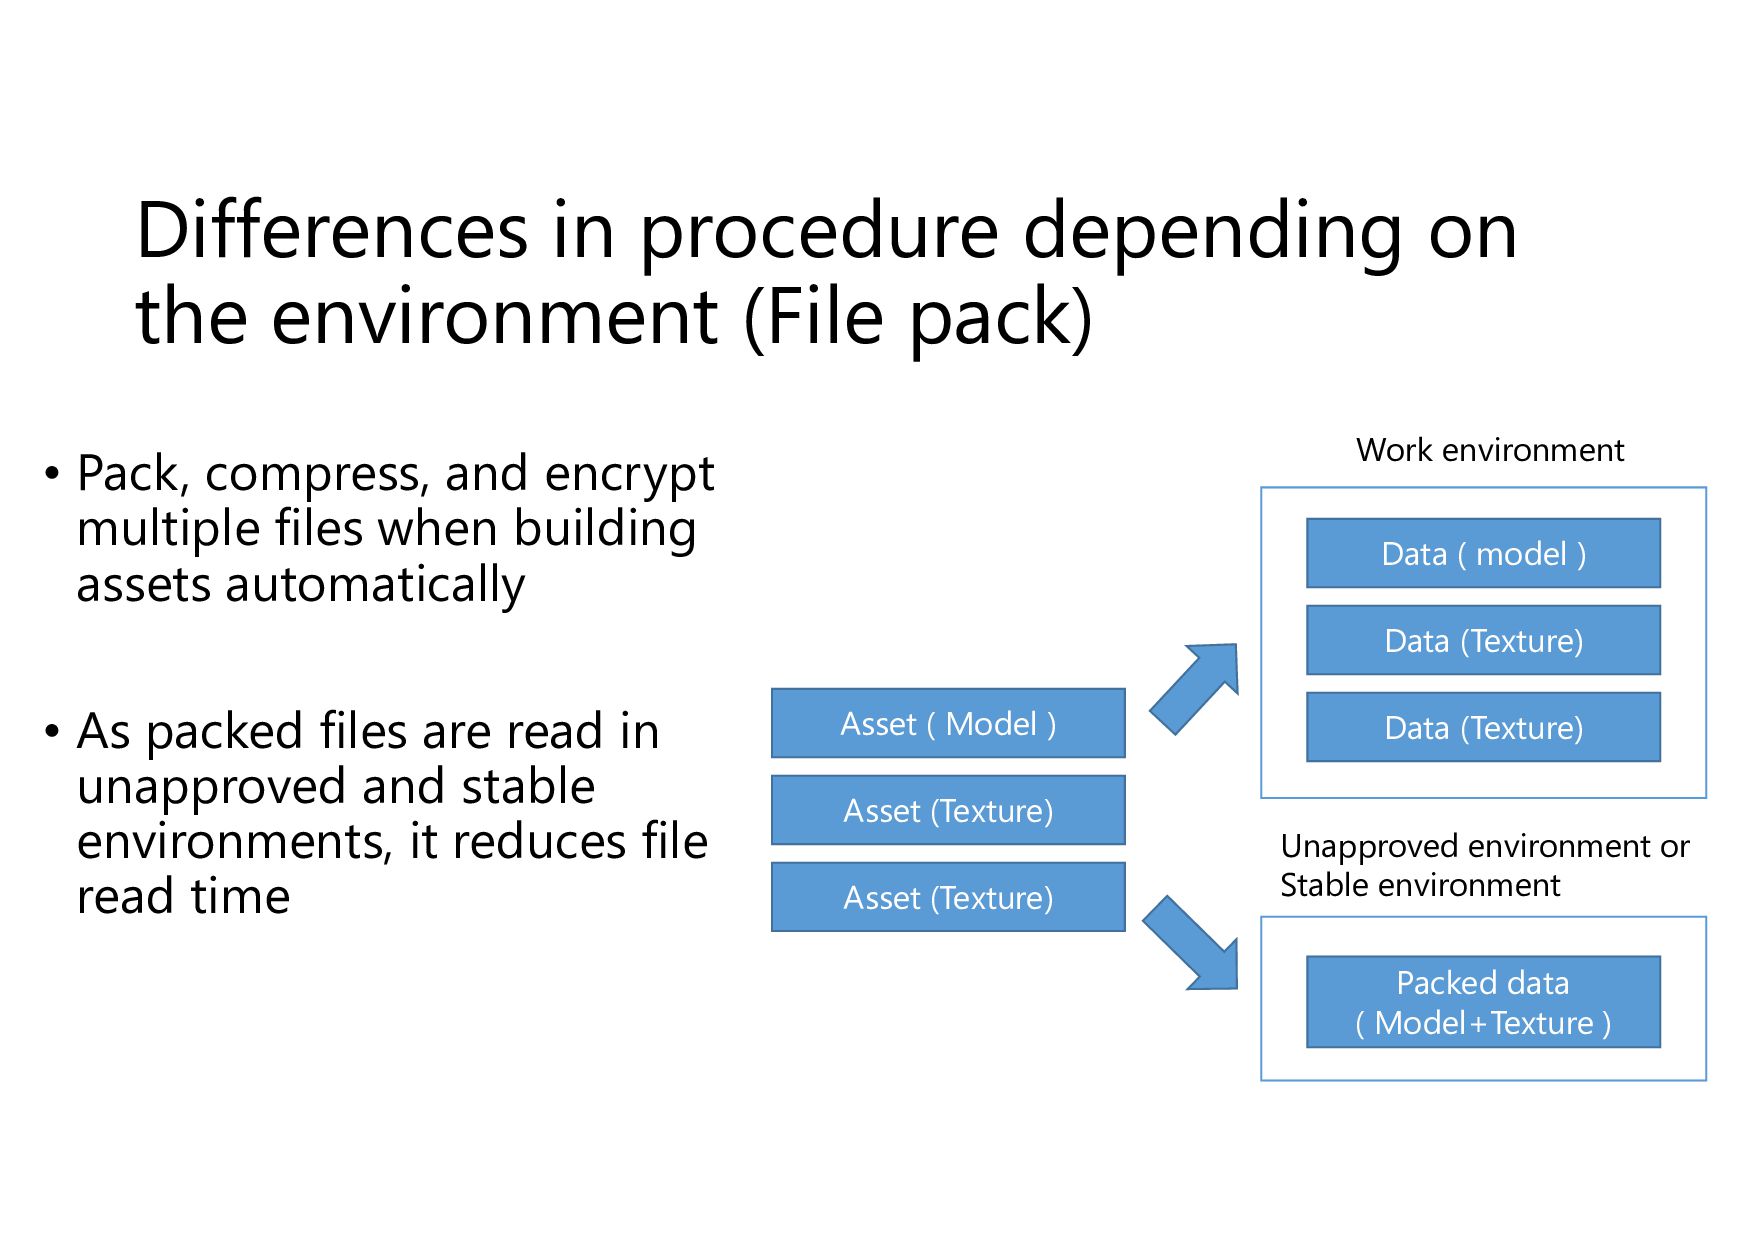
Pack, compress, and encrypt multiple files when building assets automatically • As packed files are read in unapproved and stable environments, it reduces file read time Unapproved environment or Stable environment Work environment Asset ( Model ) Asset (Texture) Asset (Texture) Data ( model ) Data (Texture) Data (Texture) Packed data ( Model+Texture )
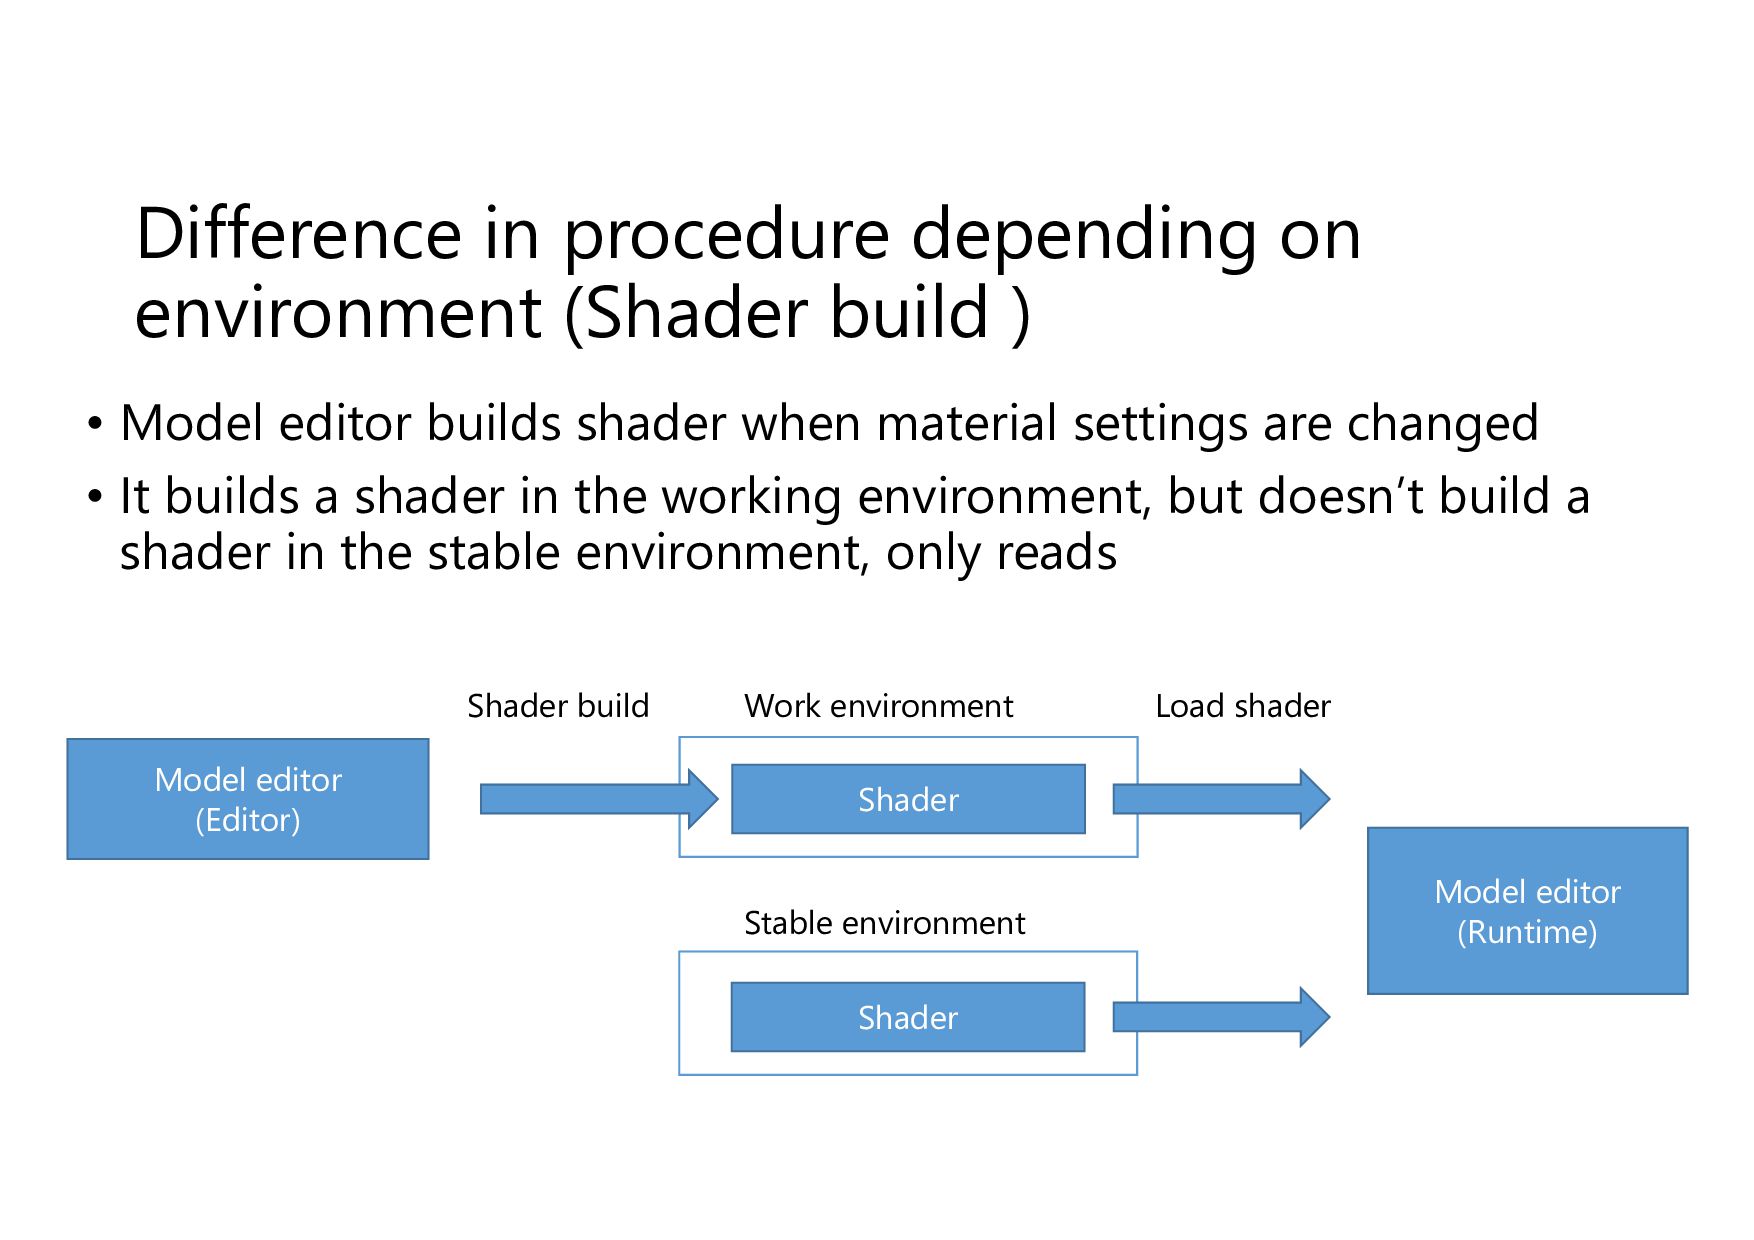
Model editor builds shader when material settings are changed • It builds a shader in the working environment, but doesn’t build a shader in the stable environment, only reads Model editor (Editor) Work environment Model editor (Runtime) Shader Stable environment Shader Shader build Load shader
network drive, the defect can be reproduced at the programmer's desk. 1. Allow project members to press the bug report button 2. Specify in the game editor the work environment described in the Slack bug report → Reproduce the environment of project members (Depending on the defect, assets may be required)
automatic build, old data remains and causes data bugs → Overwrite periodically manually using a stable environment • Since the switching of the work environment is in units of folders, detailed control is not possible → USD’s non-destructively edit is ideal, but our design is not enough yet https://graphics.pixar.com/usd/docs/index.html [CEDEC2017] Introduction to Pixar USD: Building a new content pipeline
management has become possible. • Incorporating it into the game editor allows anyone switch between working and stable environments • By making past revisions easy to execute, even in the case that a problem occurs in the latest revision, we don’t have to stop the work of other project members. → Reduced pressure of time in fixing bugs of programmers
Architecture and Real-time Procedural Shading & Texturing Techniques [GDC2007] • Parallel Futures of a Game Engine [DICE2009] • Forensic Debugging: How to Autopsy, Repair, and Reanimate a Release-built Game [GDC2011] • Cutting the Pipe: Achieving Sub-Second Iteration Times [GDC2012] • Robustification Through Introspection and Analysis Tools [GDC2012] • Working Together: Solutions for Collaborative Asset Creation [GDC2013] • Horizon and Beyond: A Look into Tomb Raider's Tools [GDC2013] • Photorealism Through the Eyes of a FOX: The Core of Metal Gear Solid Ground Zeroes [GDC2013] • Authoring Tools Framework: Open Source from Sony's Worldwide Studios [GDC2014] • Physics for Game Programmers: Debugging Physics [GDC2014] • Data-Oriented Design and C++ [CppCon2014] • Lessons from the Core Engine Architecture of Destiny [GDC2015] • Design and implementation of game editor in Pokkén [CEDEC2015] • Modern game production environment: Explanation of specific methods of communication between editors, their backends, and development staff [CEDEC2015] • Designing a game engine for rapid iteration [CEDEC2016] • Introduction to Pixar USD: Building a new content pipeline [CEDEC2017]
![References • A Data-Driven Object System [GDC2002] • Frostbite Rendering](https://files.speakerdeck.com/presentations/f92d65ad87a04c2fbf05db76a34d702a/slide_74.jpg)