Combat 6: Fires of Liberation (2007) Ace Combat: Assault Horizon (2011) Tales of Card Evolve (2012) THE IDOLM@STER MILLION LIVE! (2013) Pokkén Tournament (2015) Pokkén Tournament DX (2017) • Past talks: Continuous integration of ACE COMBAT ASSAULT HORIZON: CEDEC2011 In-game camera production example in “ACE COMBAT ASSAULT HORIZON” in-game camera production example”: CEDEC2011 Game editor design and implementation in Pokkén: CEDEC2015 Basic design of game editor and stable and fast asset management in console video game development : CEDEC2019 Implementation of Light Baker using DirectX Raytracing: CEDEC2019 • In the current game team, I’m in charge of programming of graphics, tools, systems and assets
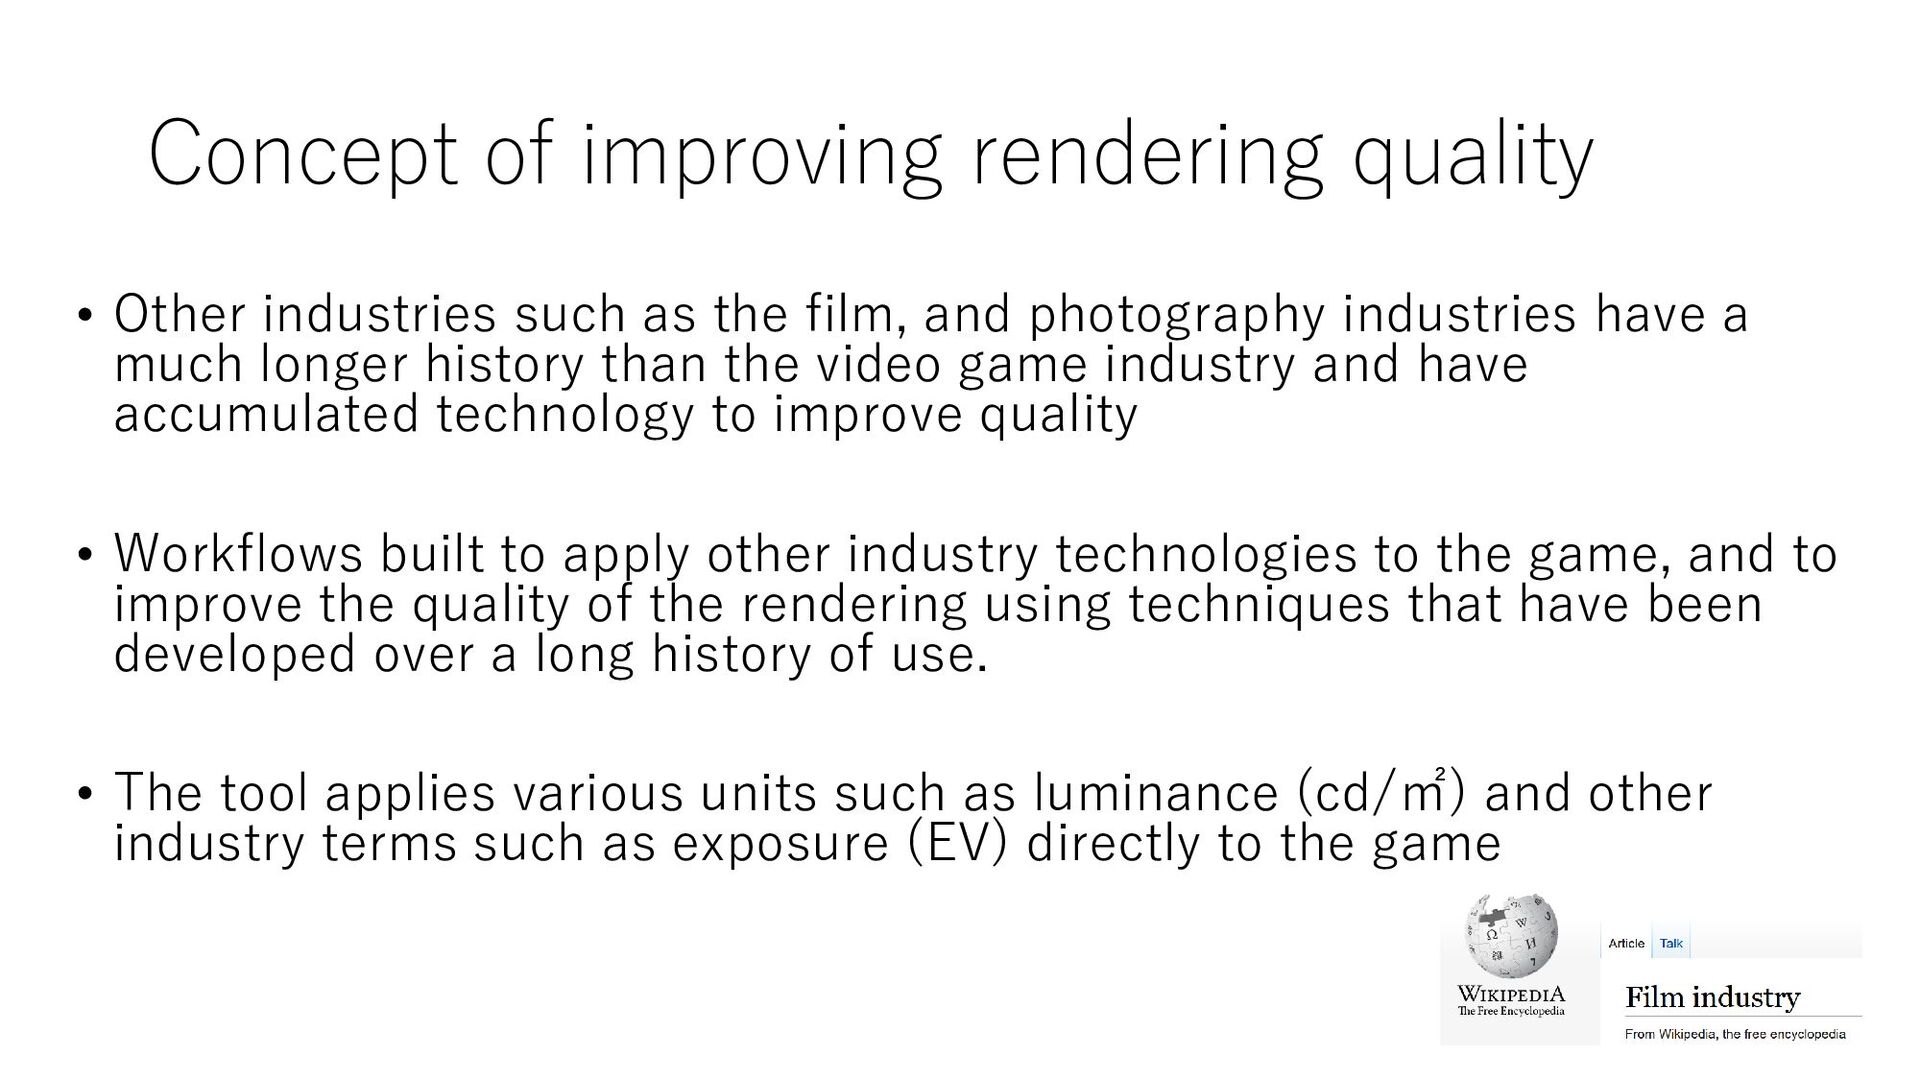
the film, and photography industries have a much longer history than the video game industry and have accumulated technology to improve quality • Workflows built to apply other industry technologies to the game, and to improve the quality of the rendering using techniques that have been developed over a long history of use. • The tool applies various units such as luminance (cd/㎡) and other industry terms such as exposure (EV) directly to the game
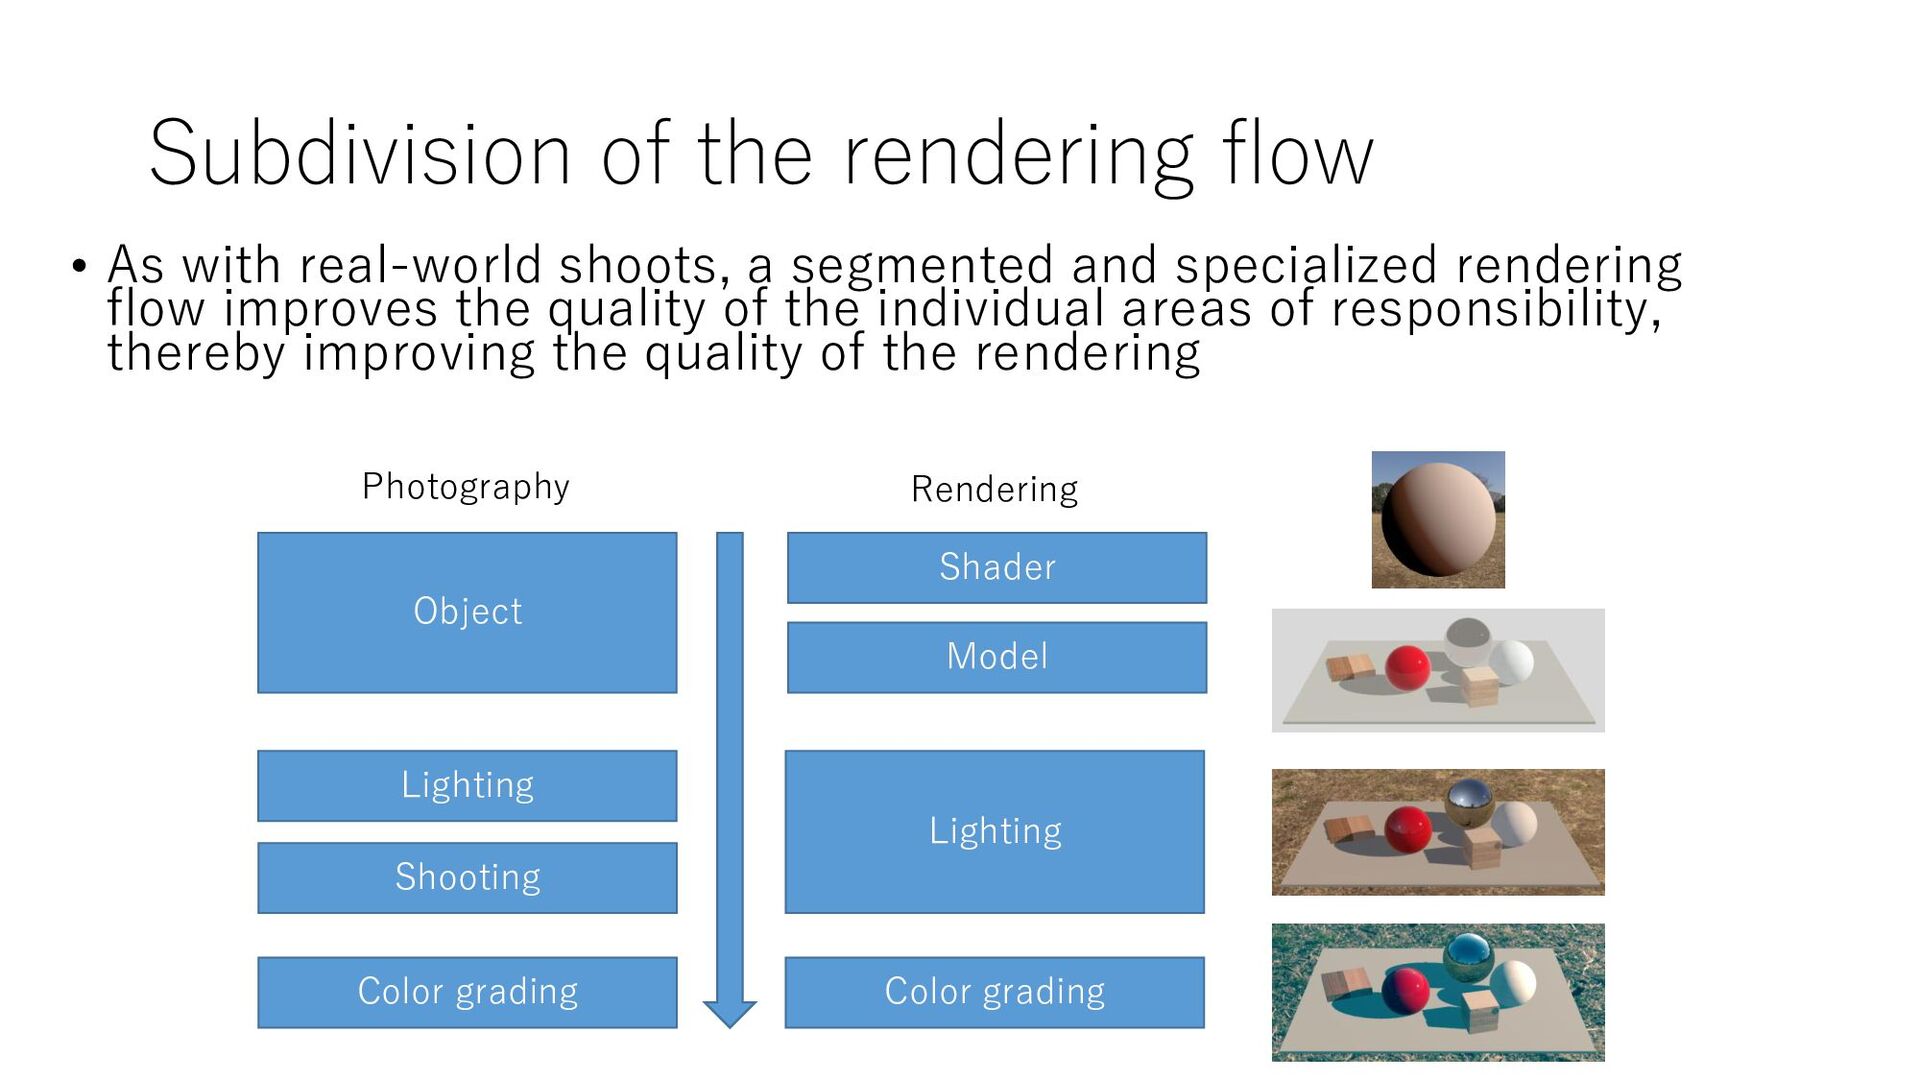
a segmented and specialized rendering flow improves the quality of the individual areas of responsibility, thereby improving the quality of the rendering Shader Model Lighting Color grading Object Lighting Shooting Color grading Photography Rendering
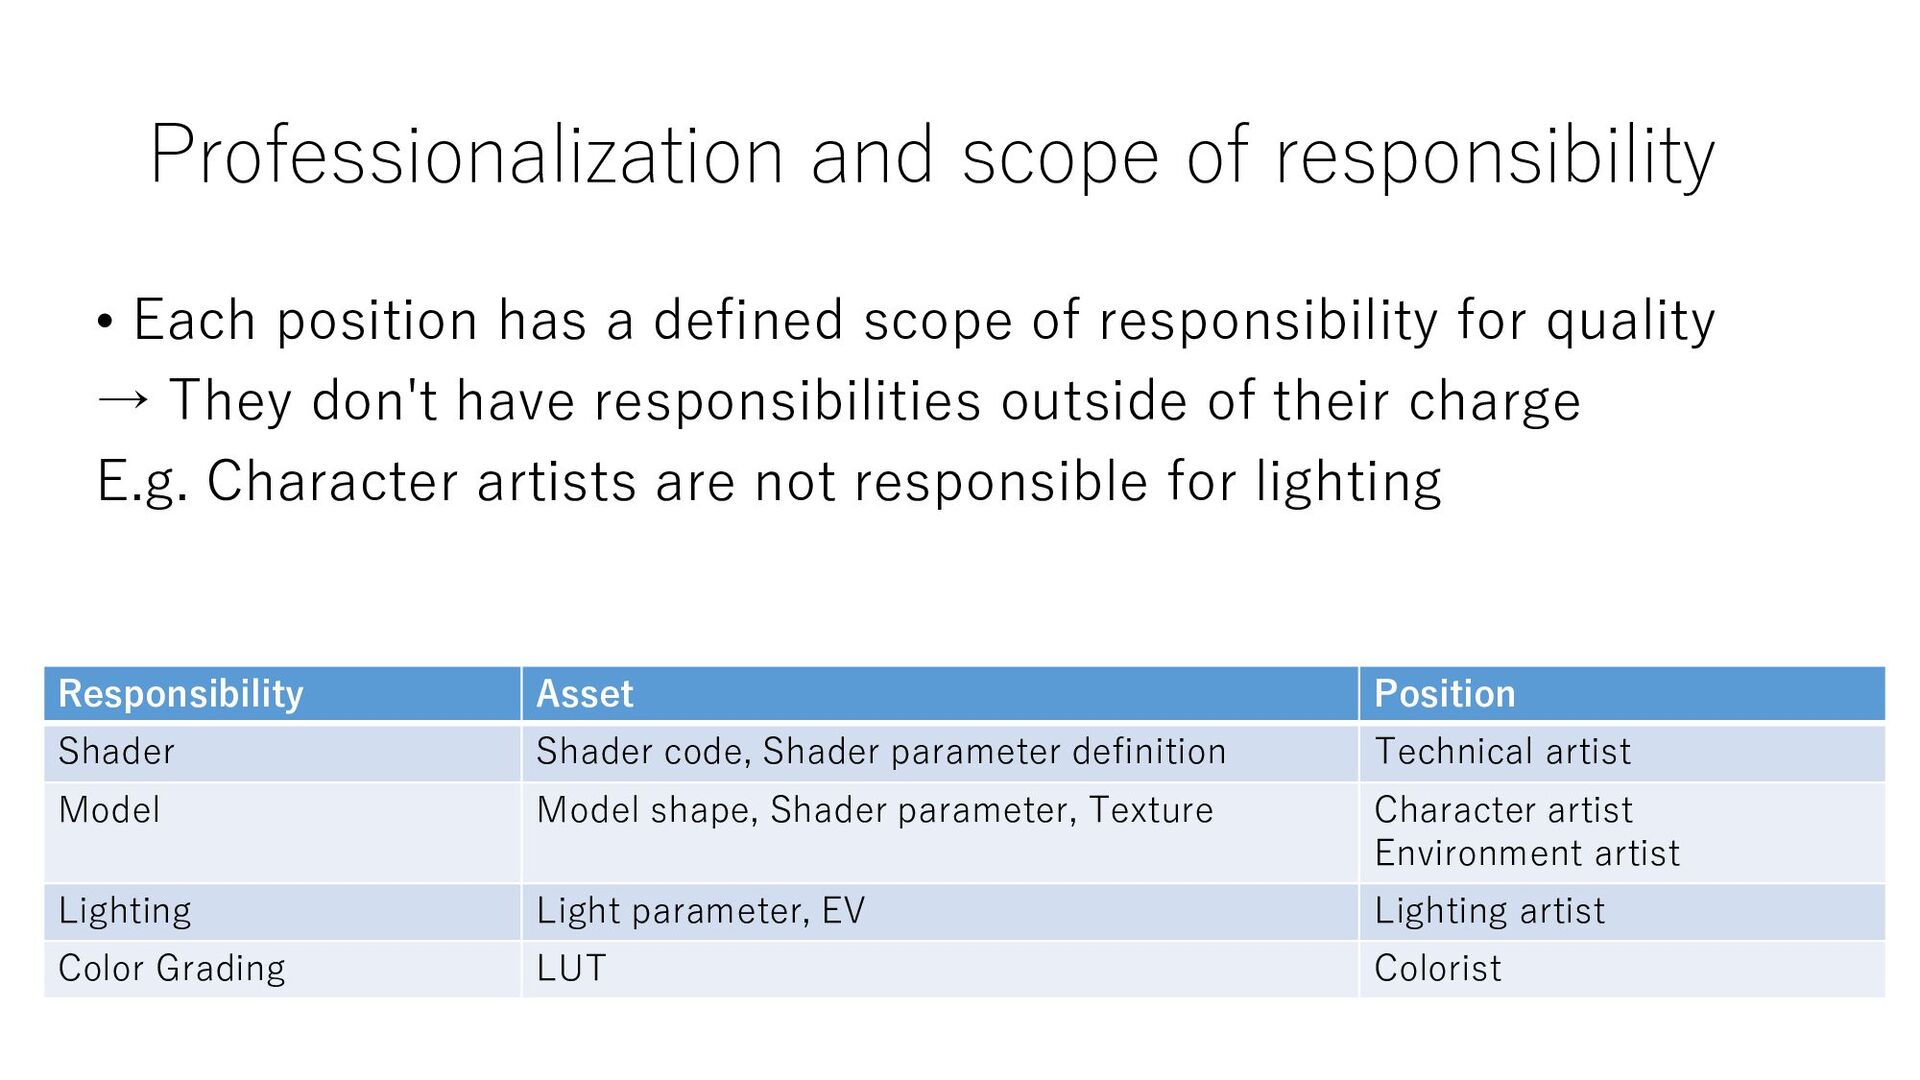
defined scope of responsibility for quality → They don't have responsibilities outside of their charge E.g. Character artists are not responsible for lighting Responsibility Asset Position Shader Shader code, Shader parameter definition Technical artist Model Model shape, Shader parameter, Texture Character artist Environment artist Lighting Light parameter, EV Lighting artist Color Grading LUT Colorist
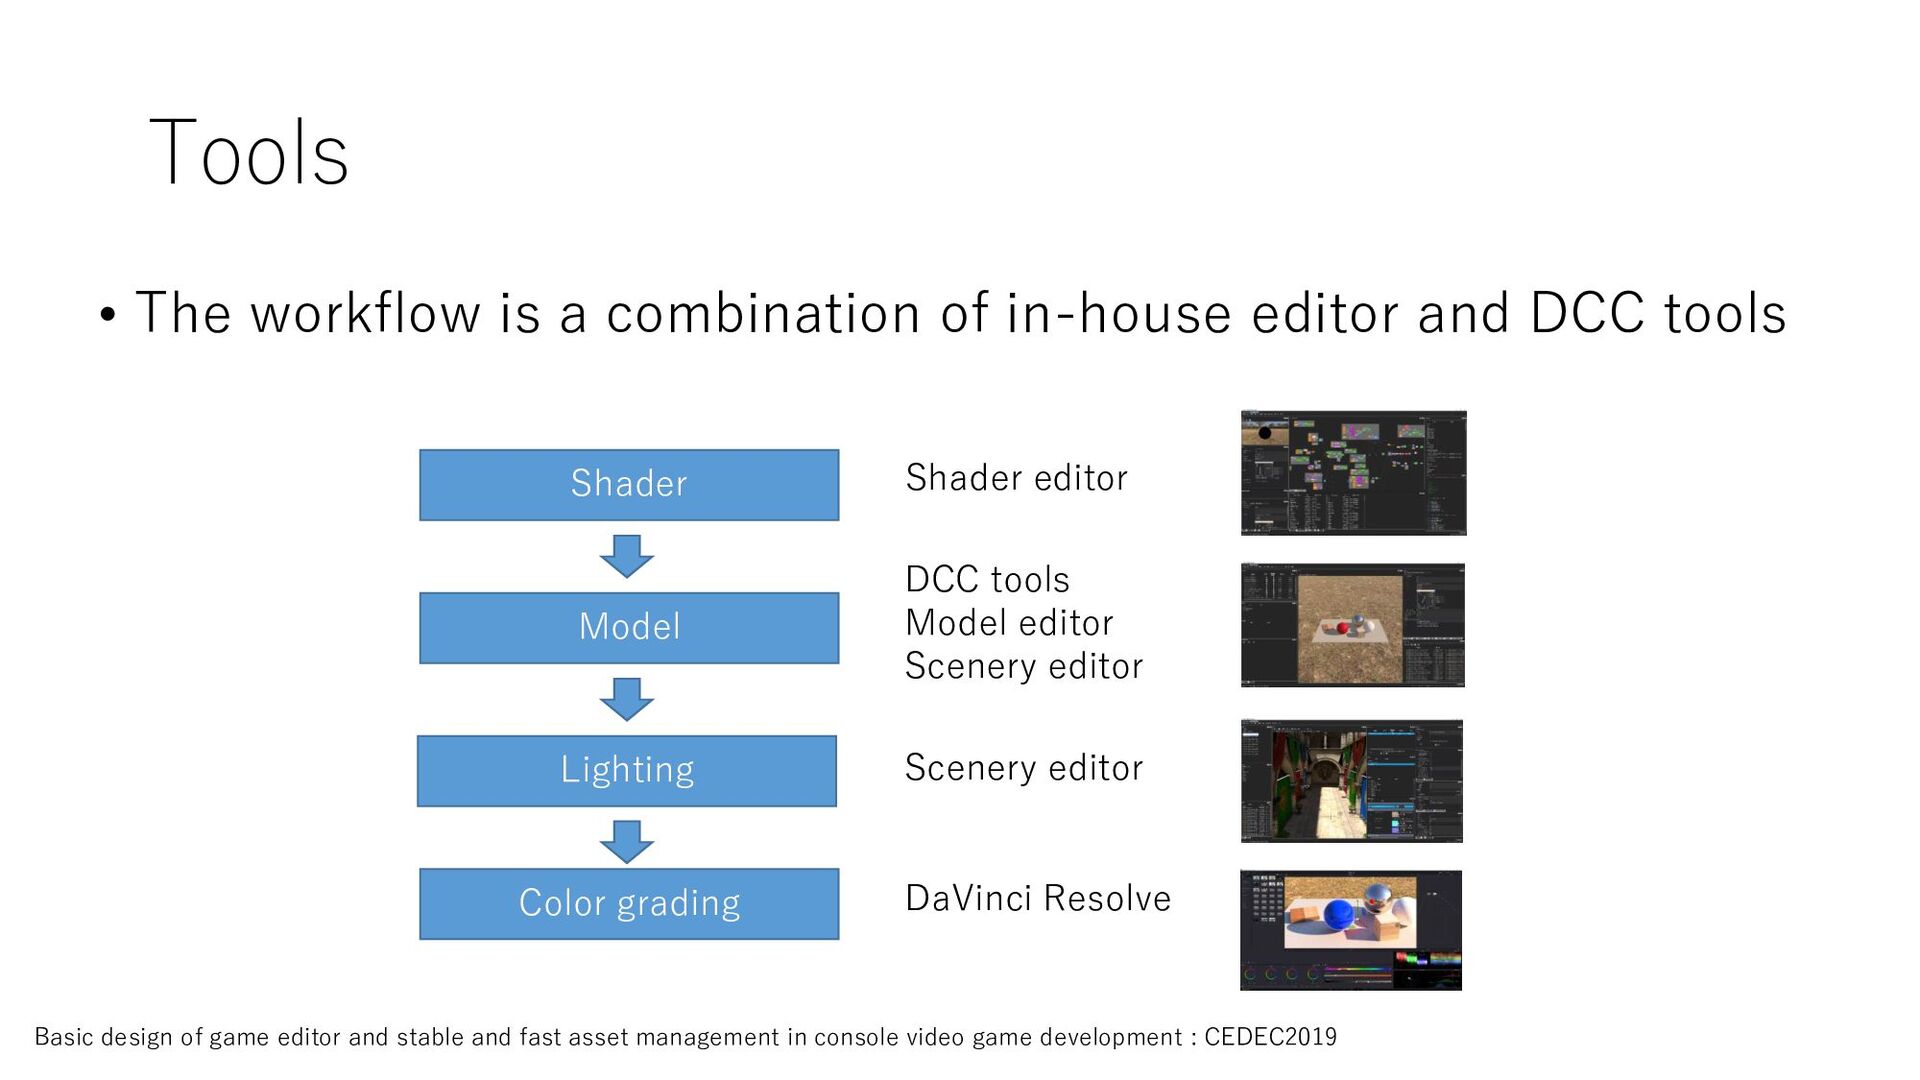
editor DaVinci Resolve Basic design of game editor and stable and fast asset management in console video game development : CEDEC2019 • The workflow is a combination of in-house editor and DCC tools Shader Model Lighting Color grading
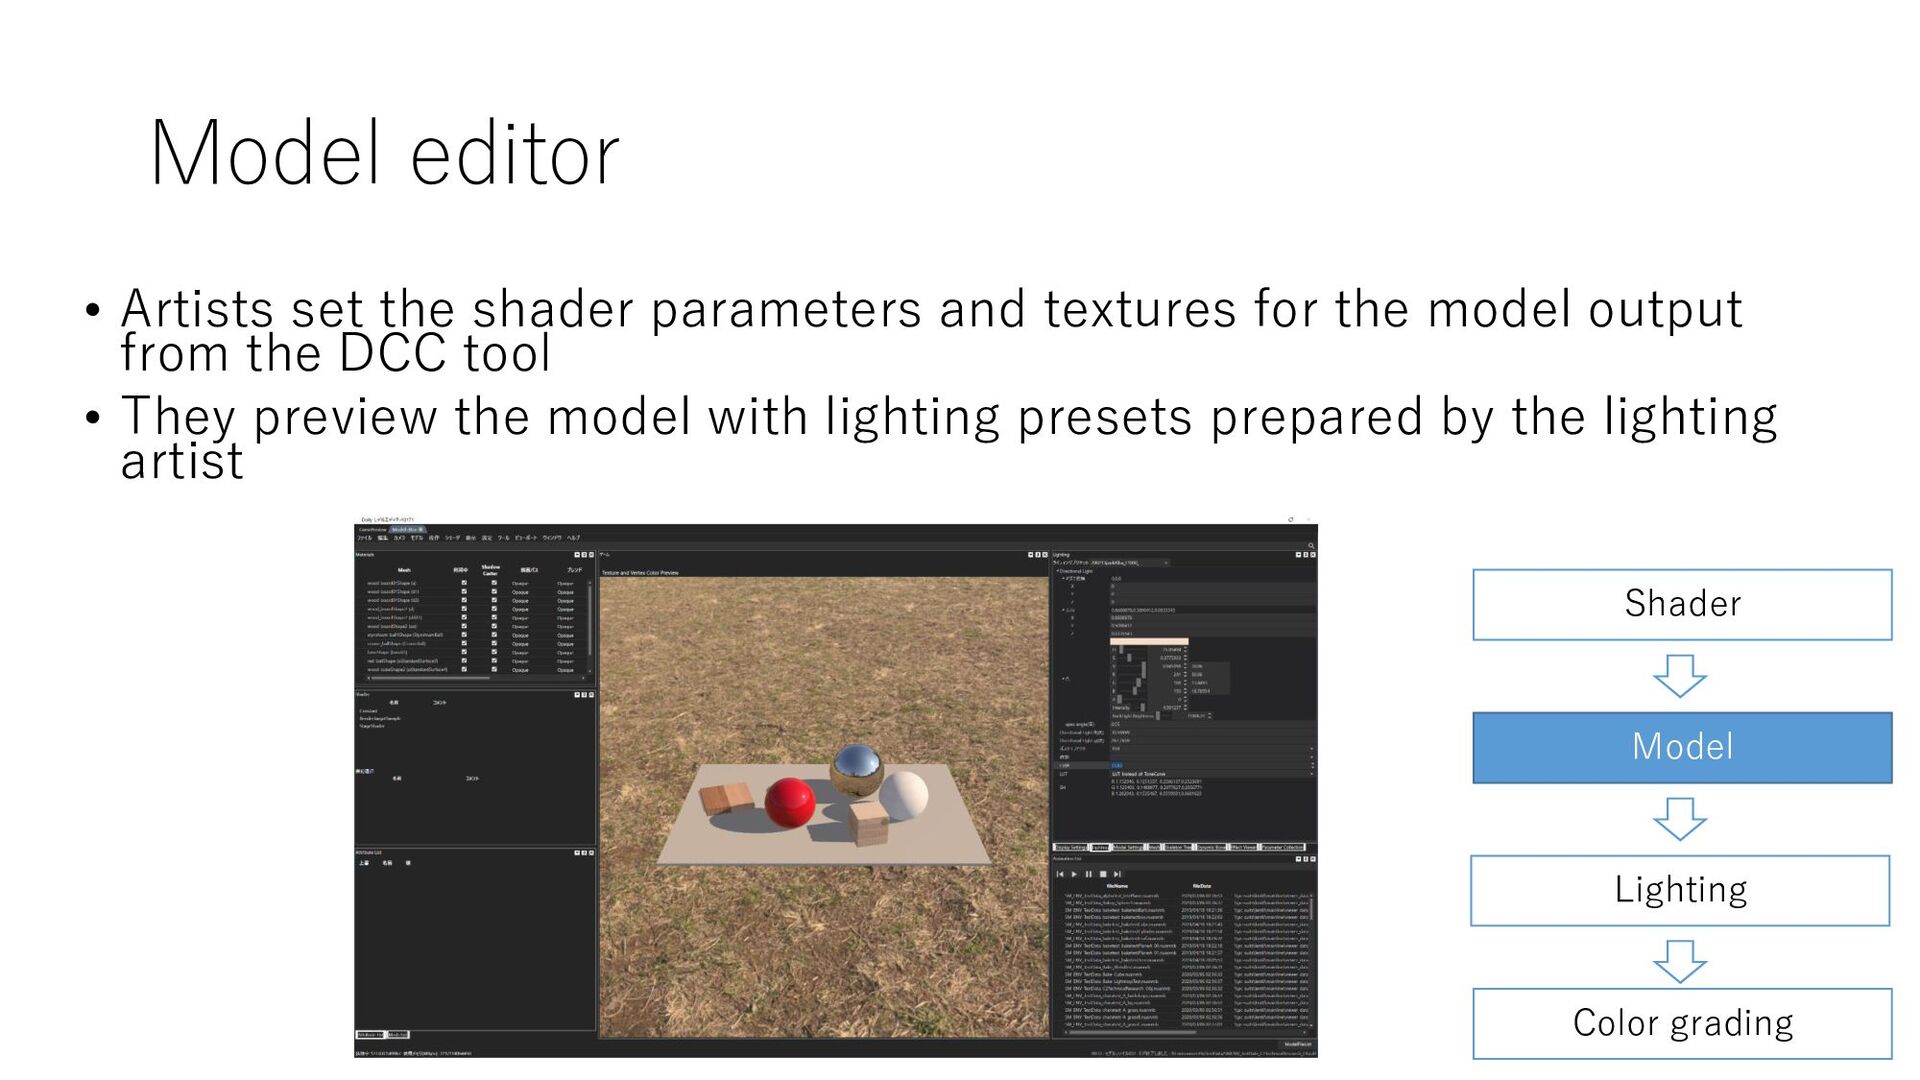
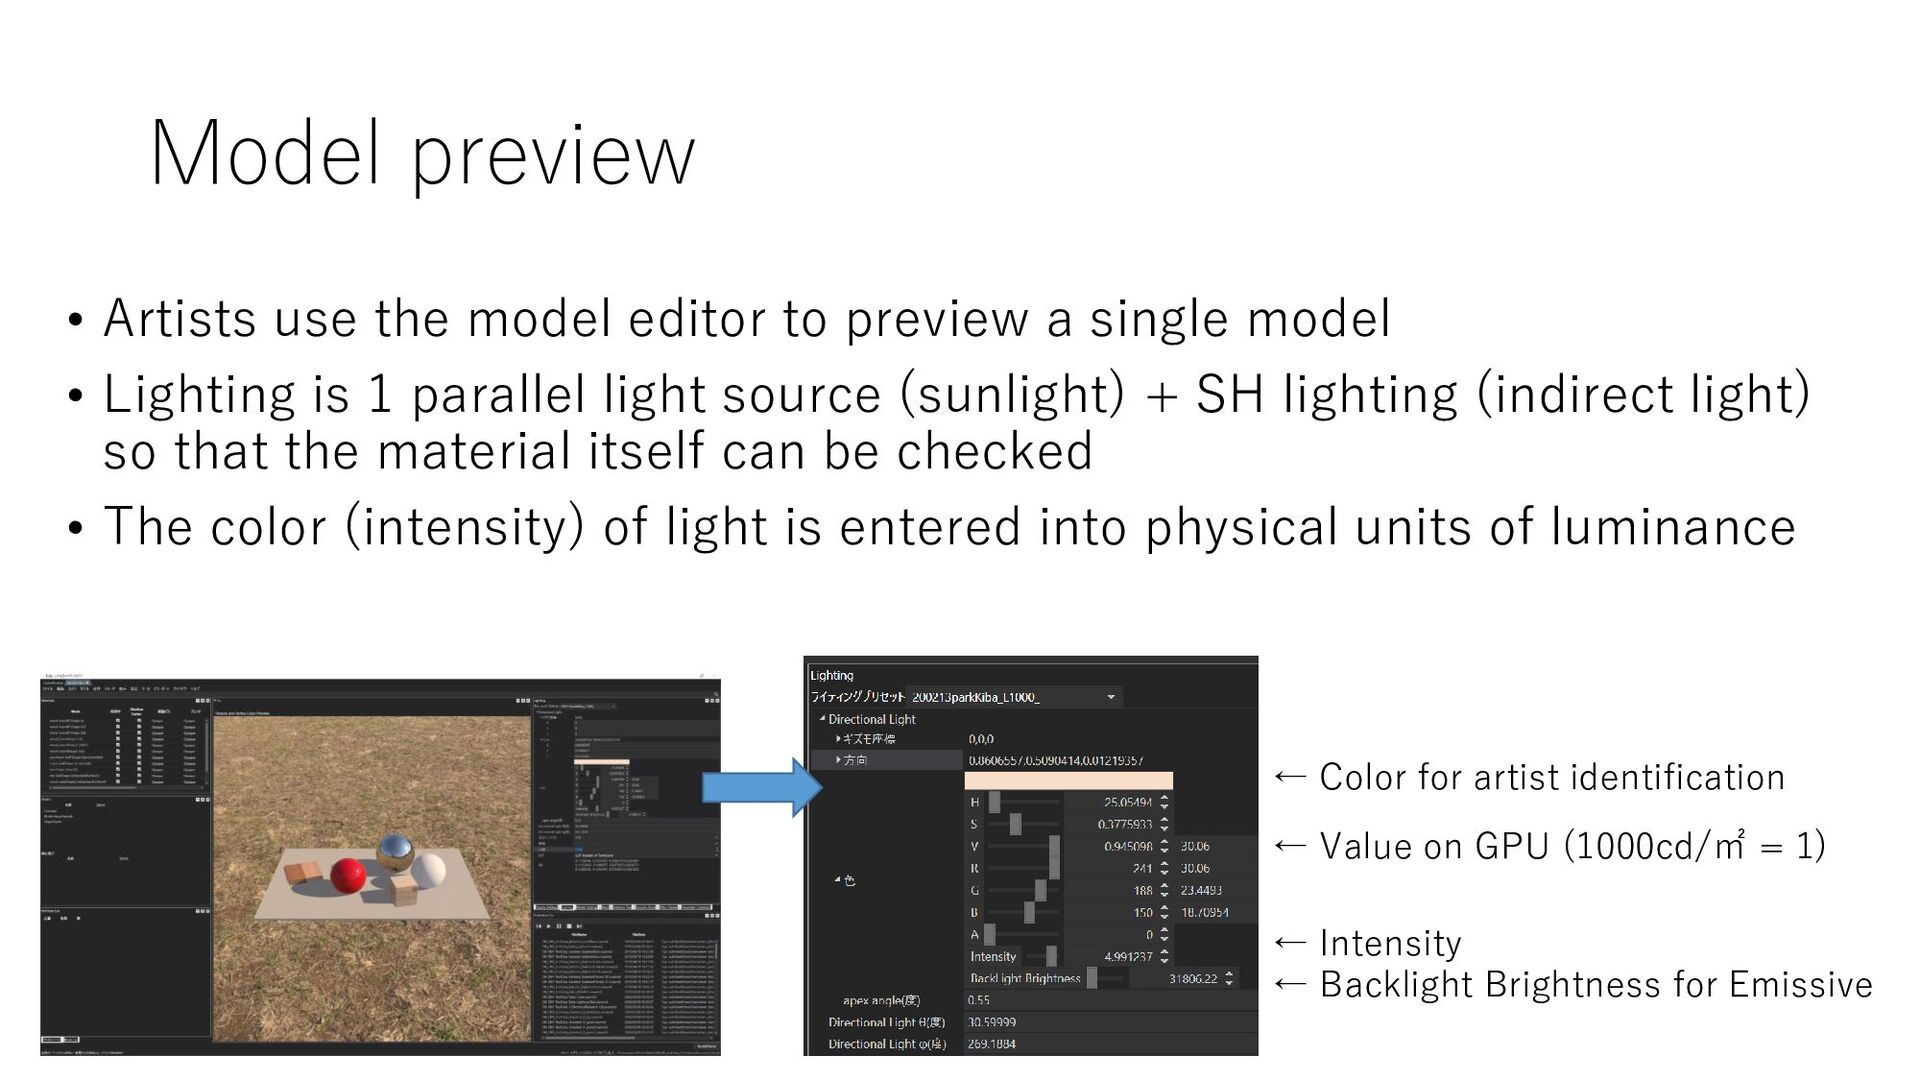
for the model output from the DCC tool • They preview the model with lighting presets prepared by the lighting artist Shader Model Lighting Color grading
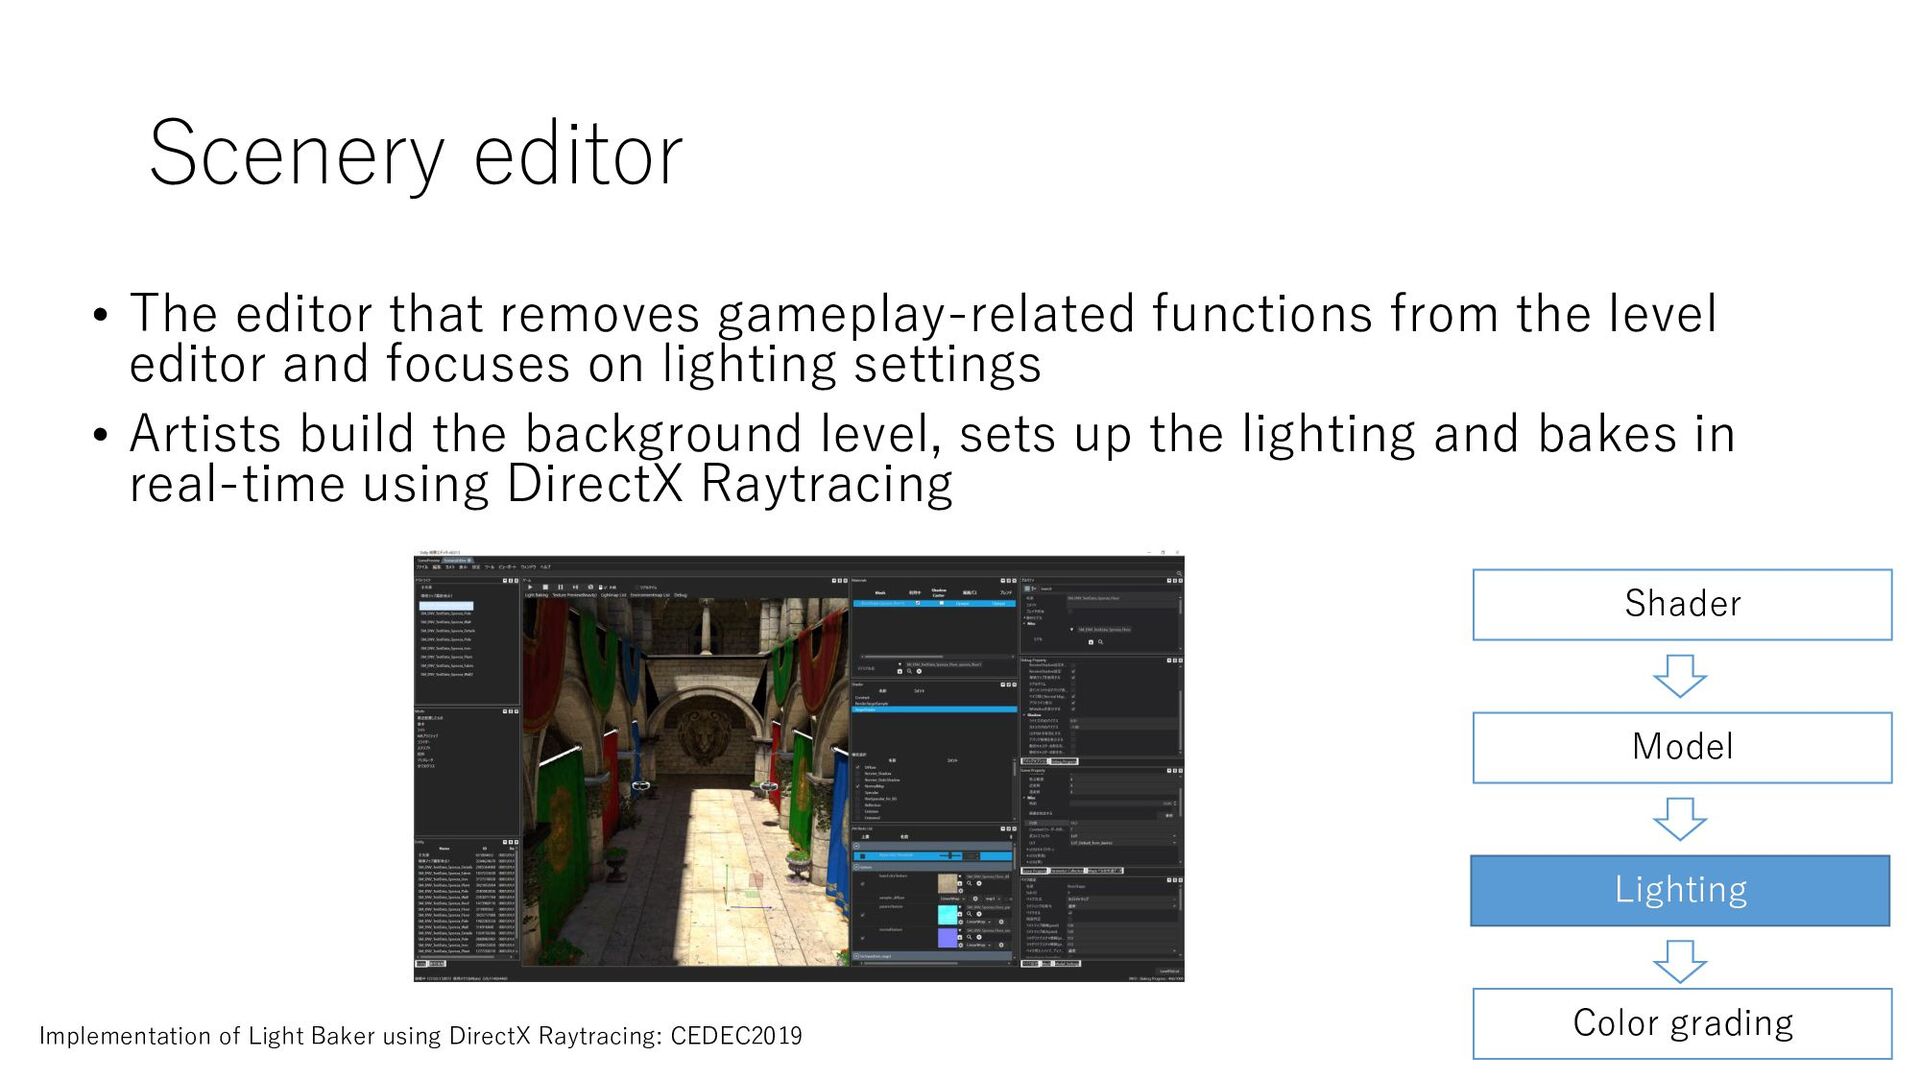
the level editor and focuses on lighting settings • Artists build the background level, sets up the lighting and bakes in real-time using DirectX Raytracing Shader Model Lighting Color grading Implementation of Light Baker using DirectX Raytracing: CEDEC2019
physical units to the rendering in order to apply lighting techniques used in film and photography to the rendering • Textures such as Base Color are in the range of real-world values • Artists use the game editor to enter values in physical units • The render target is drawn with the value of the physical units Photo Rendering
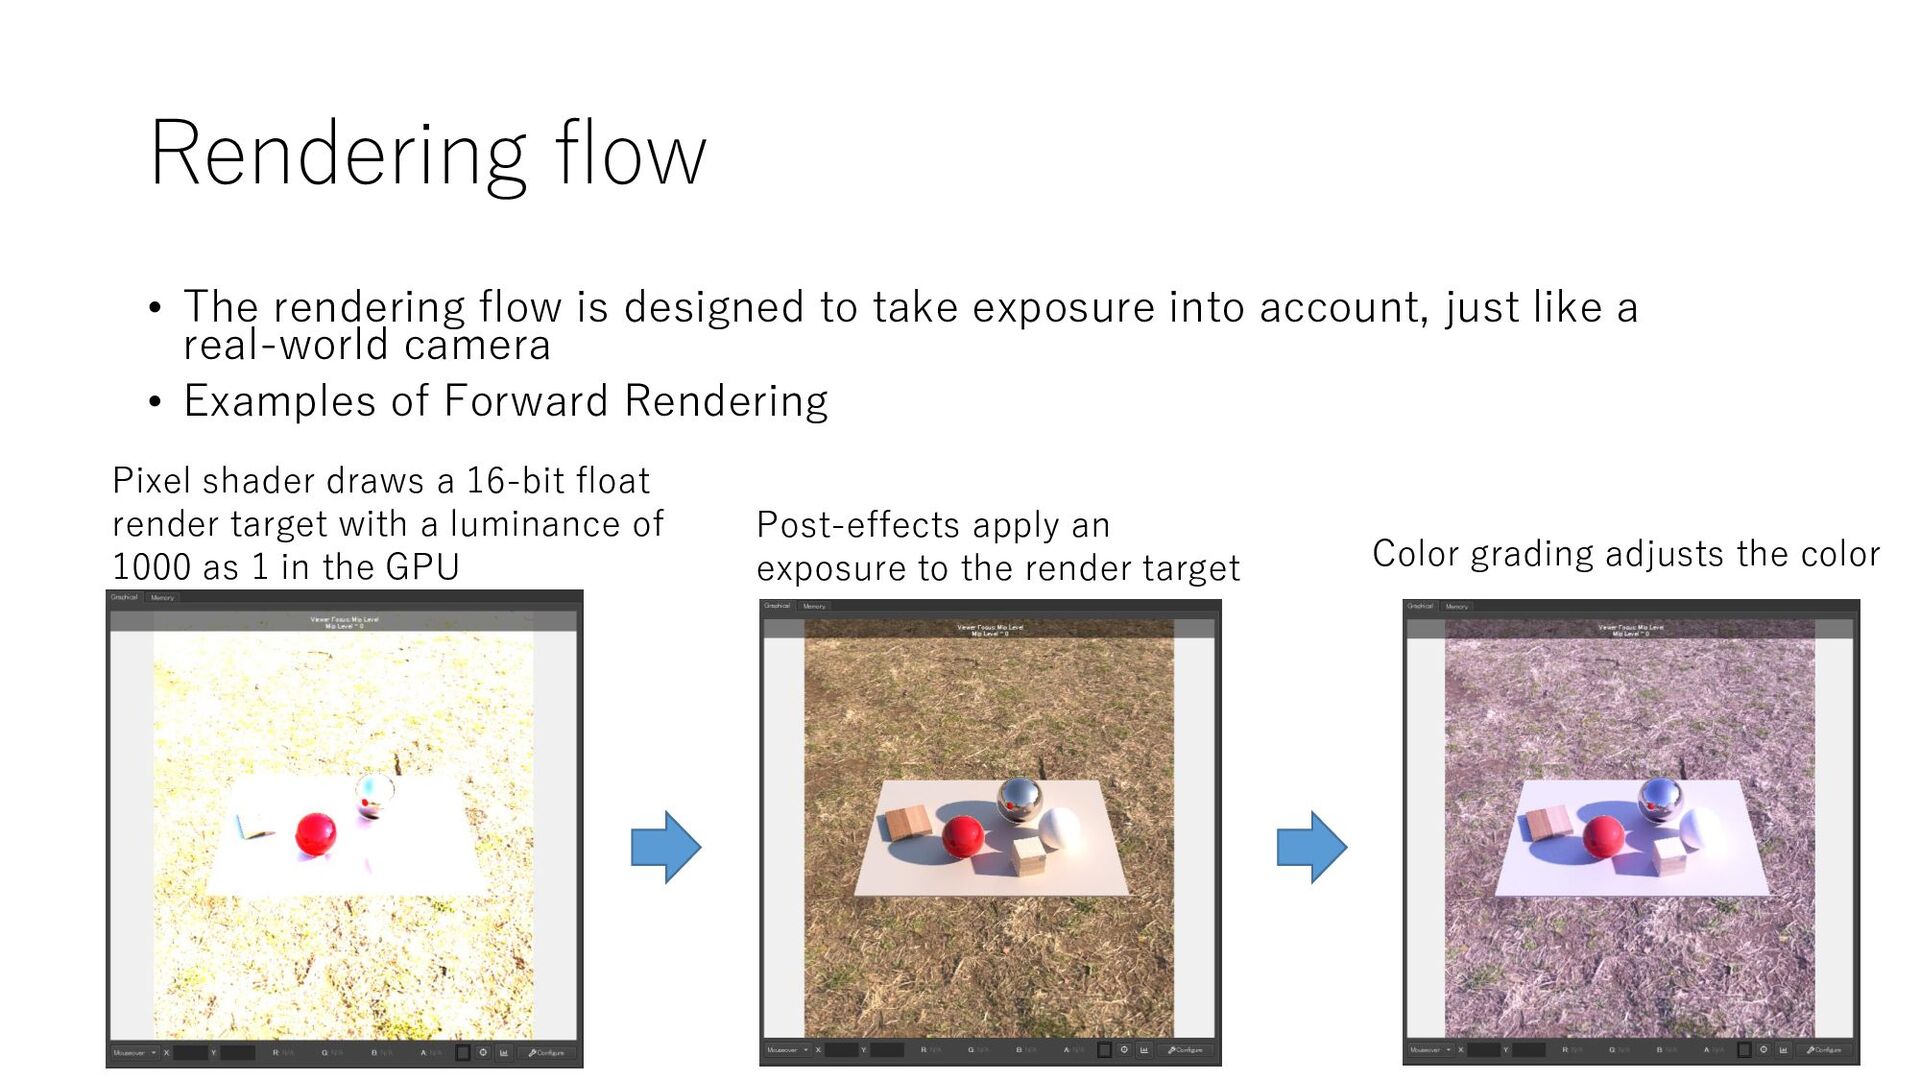
with a luminance of 1000 as 1 in the GPU Post-effects apply an exposure to the render target Color grading adjusts the color • The rendering flow is designed to take exposure into account, just like a real-world camera • Examples of Forward Rendering
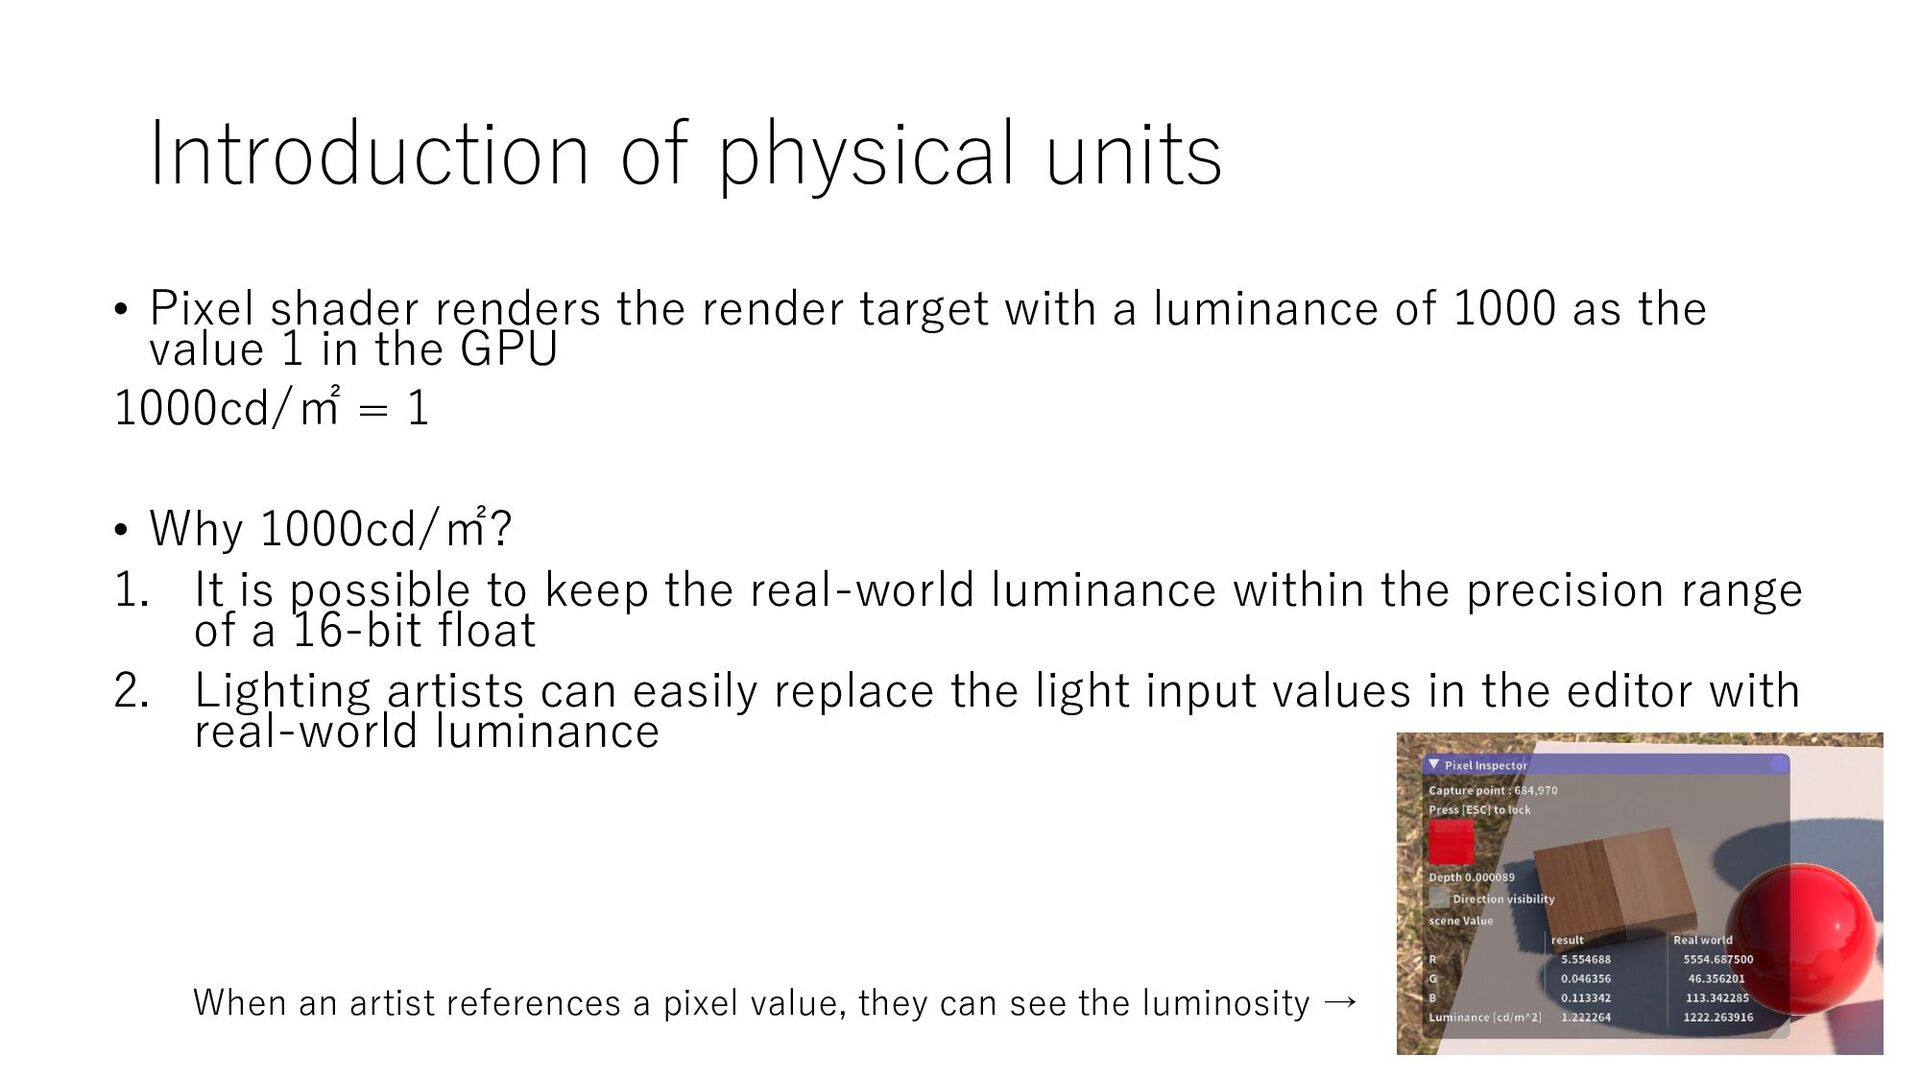
target with a luminance of 1000 as the value 1 in the GPU 1000cd/㎡ = 1 • Why 1000cd/㎡? 1. It is possible to keep the real-world luminance within the precision range of a 16-bit float 2. Lighting artists can easily replace the light input values in the editor with real-world luminance When an artist references a pixel value, they can see the luminosity →
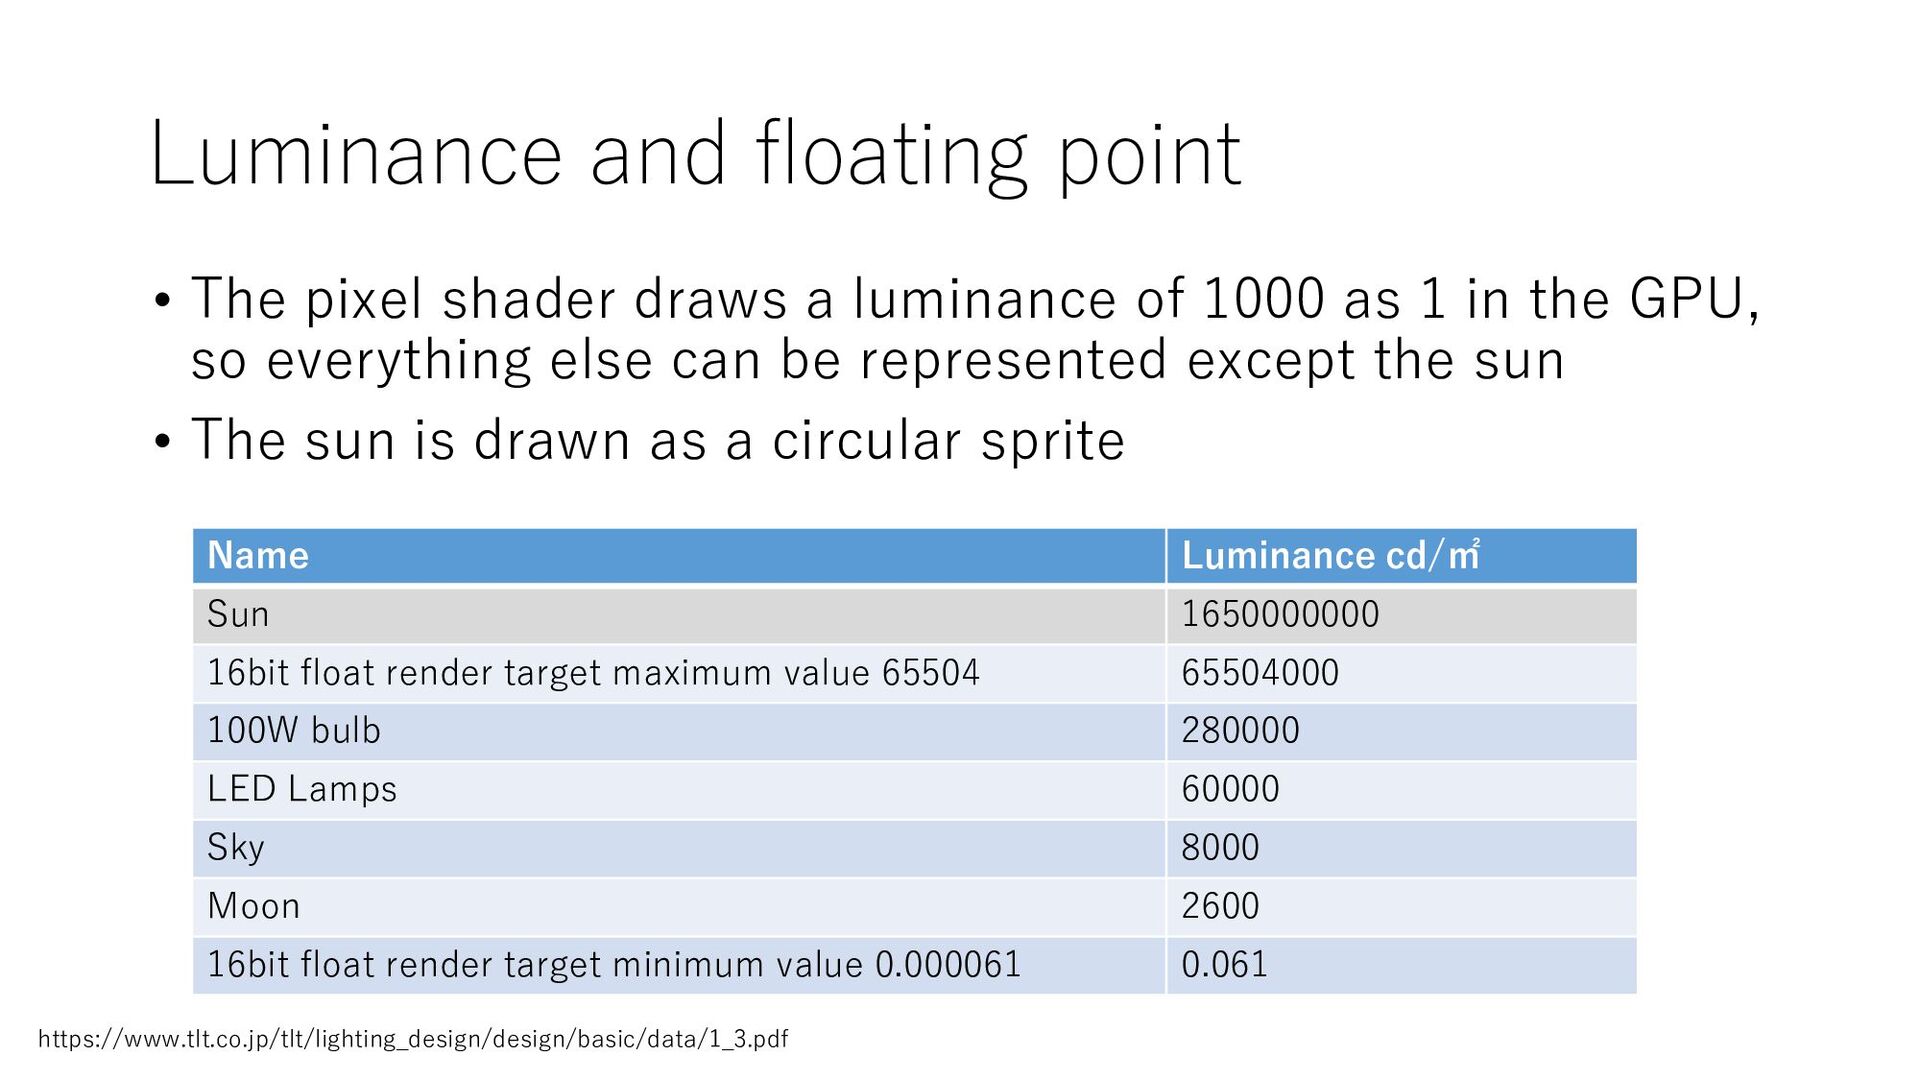
luminance of 1000 as 1 in the GPU, so everything else can be represented except the sun • The sun is drawn as a circular sprite Name Luminance cd/㎡ Sun 1650000000 16bit float render target maximum value 65504 65504000 100W bulb 280000 LED Lamps 60000 Sky 8000 Moon 2600 16bit float render target minimum value 0.000061 0.061 https://www.tlt.co.jp/tlt/lighting_design/design/basic/data/1_3.pdf
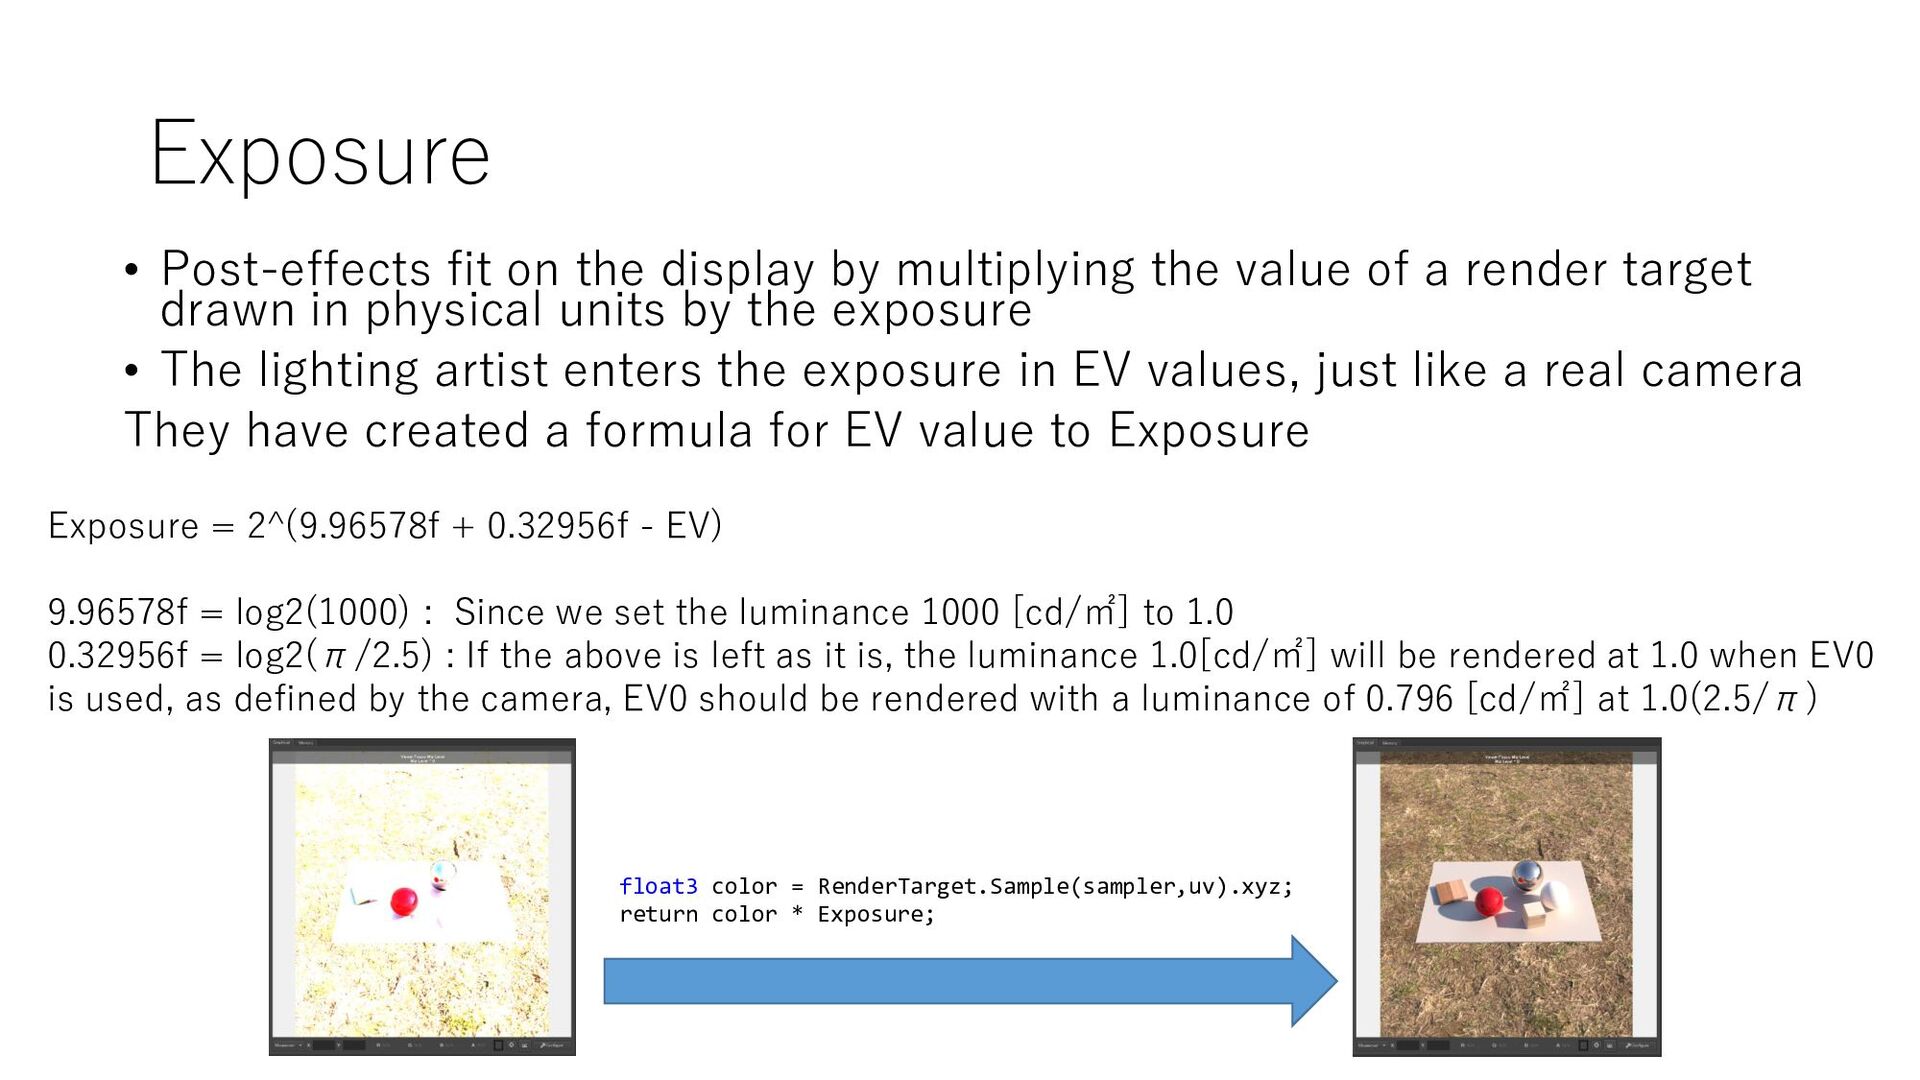
value of a render target drawn in physical units by the exposure • The lighting artist enters the exposure in EV values, just like a real camera They have created a formula for EV value to Exposure Exposure = 2^(9.96578f + 0.32956f - EV) 9.96578f = log2(1000) : Since we set the luminance 1000 [cd/㎡] to 1.0 0.32956f = log2(π/2.5) : If the above is left as it is, the luminance 1.0[cd/㎡] will be rendered at 1.0 when EV0 is used, as defined by the camera, EV0 should be rendered with a luminance of 0.796 [cd/㎡] at 1.0(2.5/π) float3 color = RenderTarget.Sample(sampler,uv).xyz; return color * Exposure;
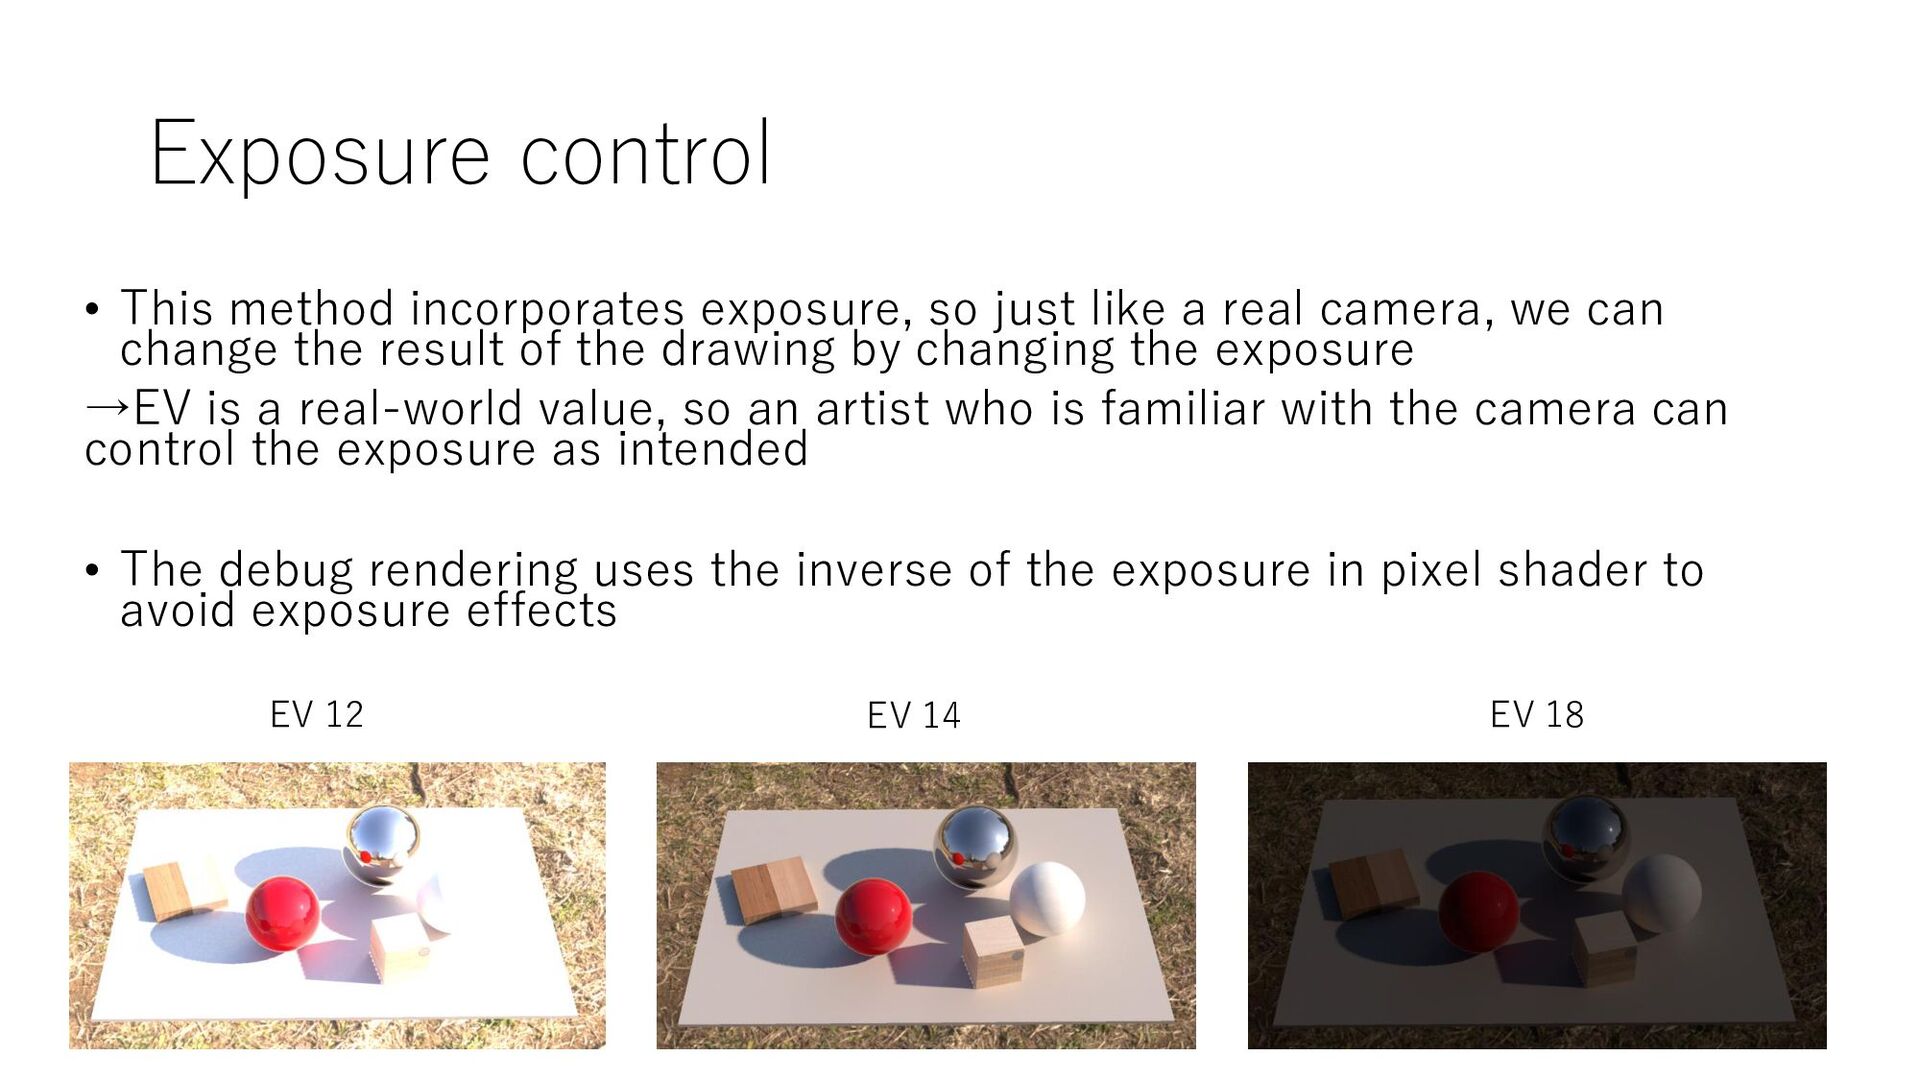
a real camera, we can change the result of the drawing by changing the exposure →EV is a real-world value, so an artist who is familiar with the camera can control the exposure as intended • The debug rendering uses the inverse of the exposure in pixel shader to avoid exposure effects EV 12 EV 14 EV 18
a single model • Lighting is 1 parallel light source (sunlight) + SH lighting (indirect light) so that the material itself can be checked • The color (intensity) of light is entered into physical units of luminance ← Backlight Brightness for Emissive ← Value on GPU (1000cd/㎡ = 1) ← Color for artist identification ← Intensity
introduced, multiple parallel light sources were used as a substitute for indirect light, but nowadays, only one parallel light source (the sun or the moon) is needed to represent indirect light, such as SH • If additional lighting is needed, such as three-point lighting, use a reflector or surface light source, as in reality → Artists can bring their photography skills to the game
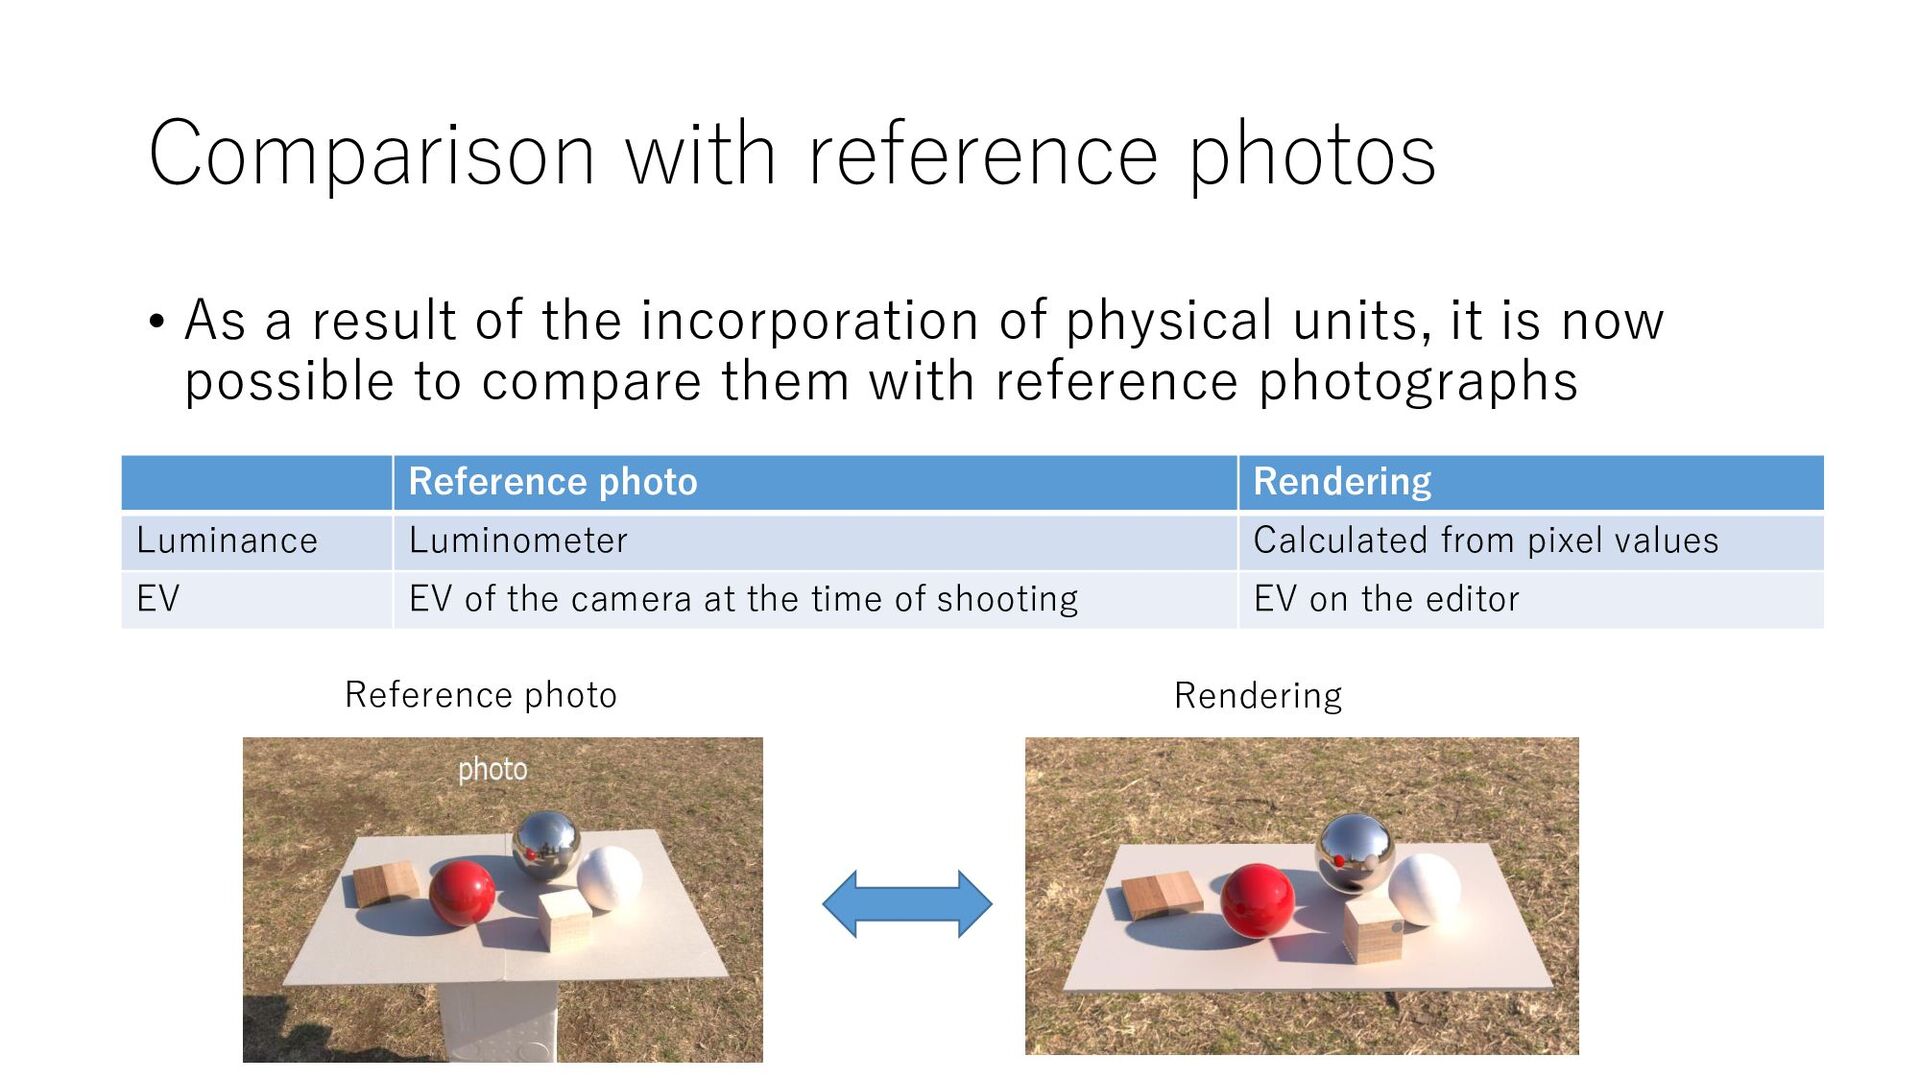
incorporation of physical units, it is now possible to compare them with reference photographs Reference photo Rendering Luminance Luminometer Calculated from pixel values EV EV of the camera at the time of shooting EV on the editor Reference photo Rendering
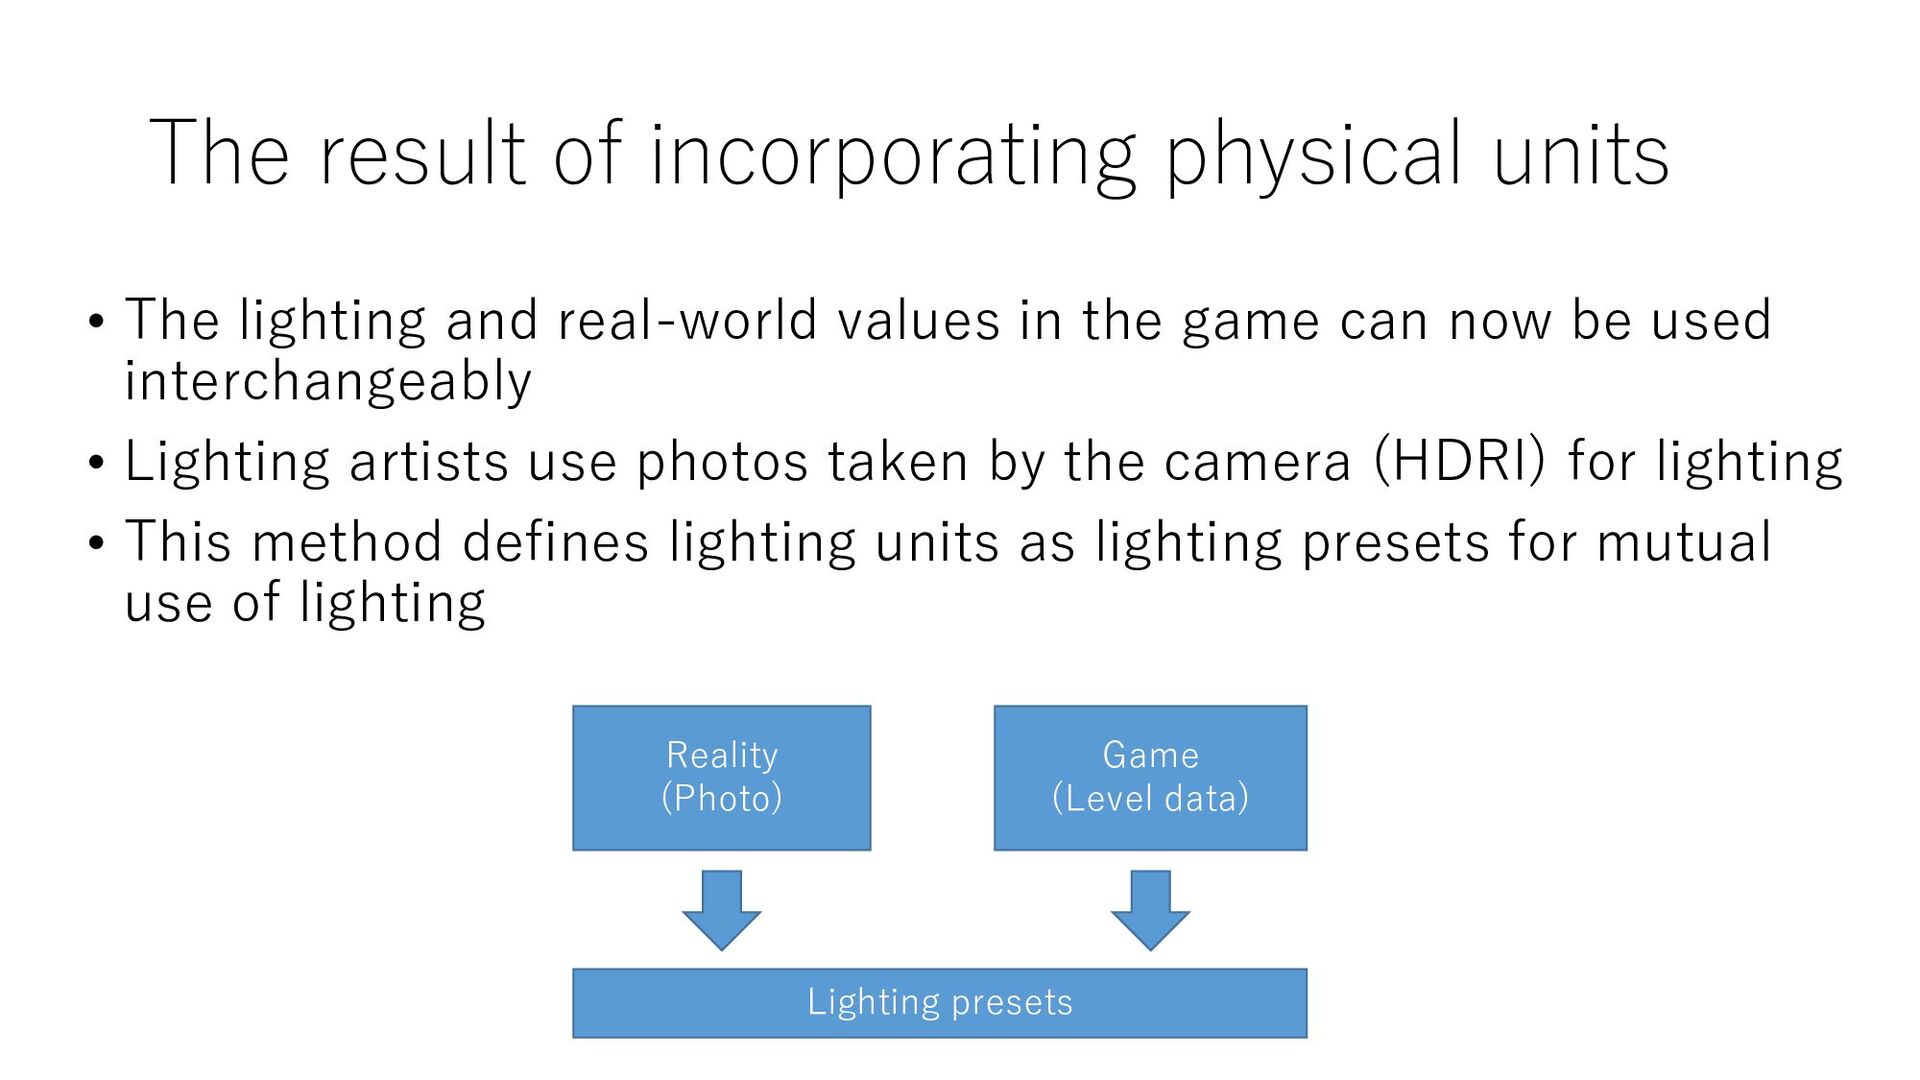
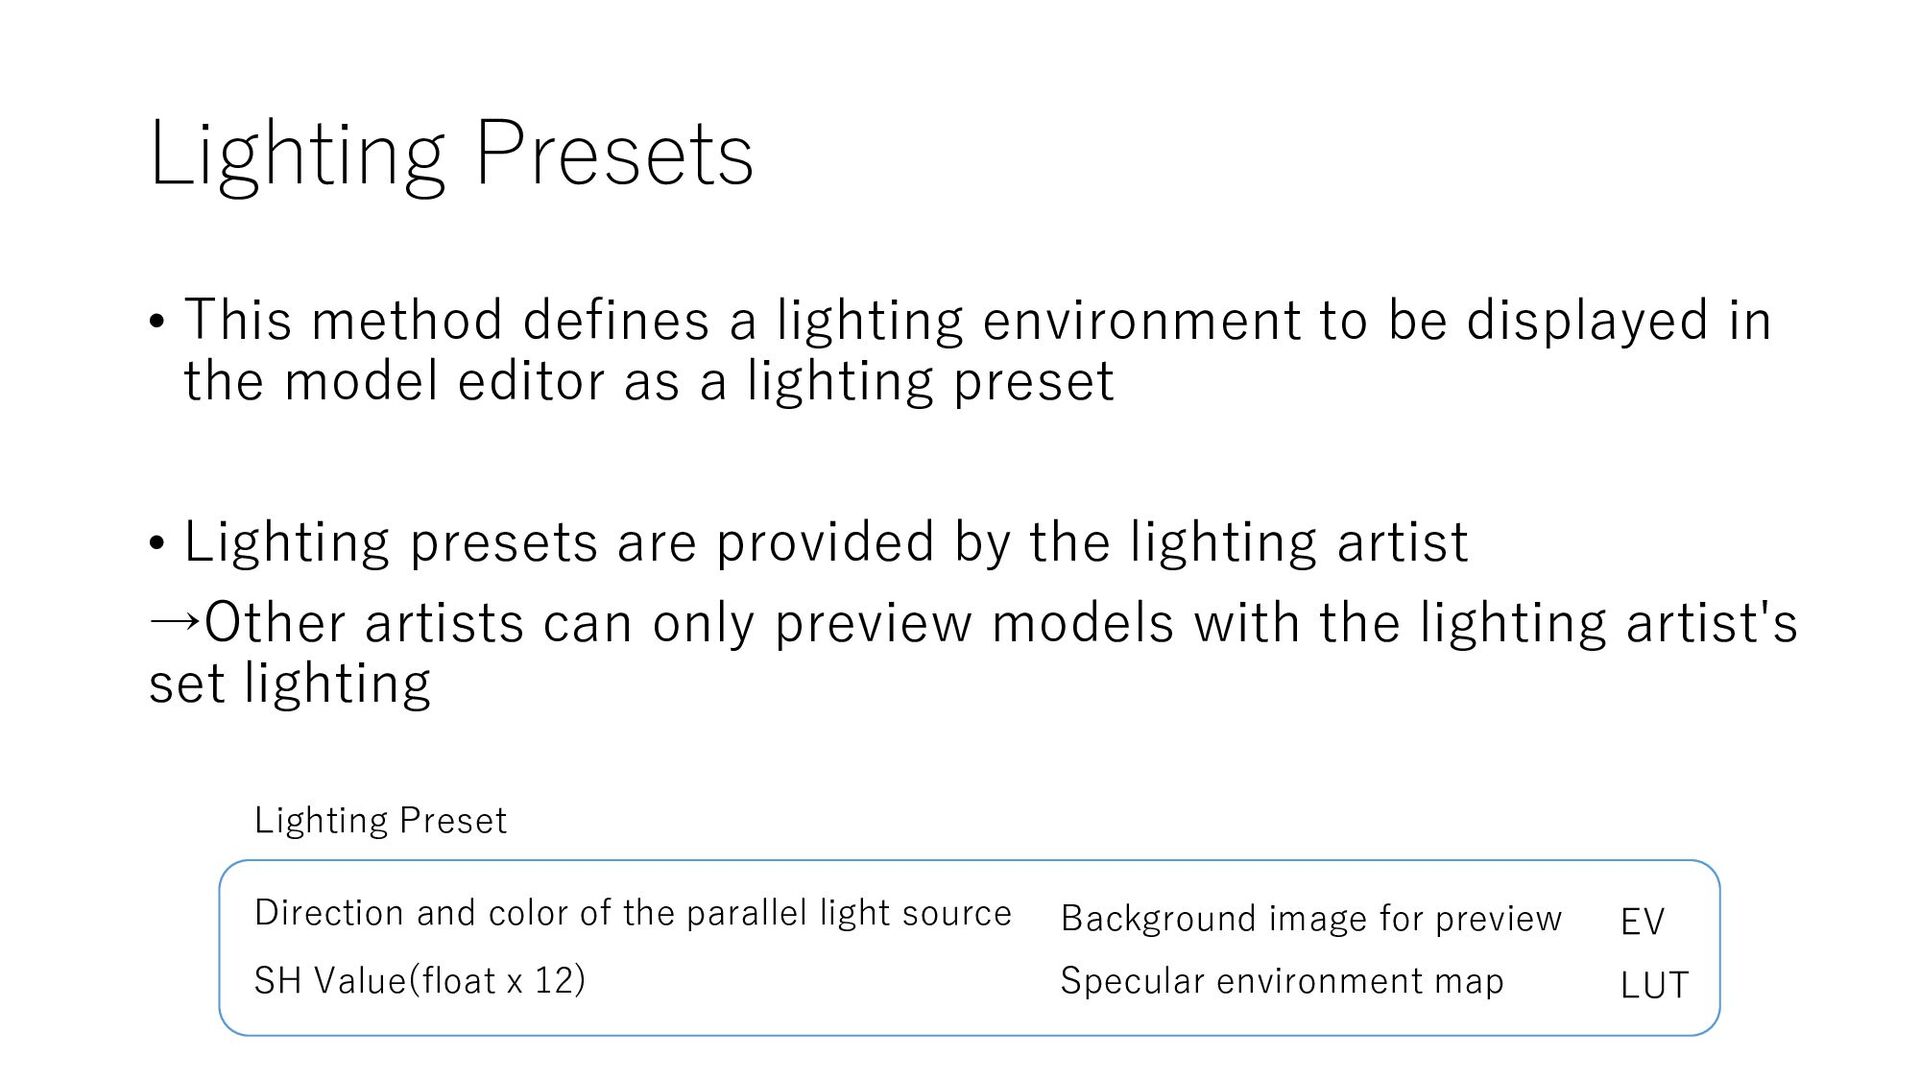
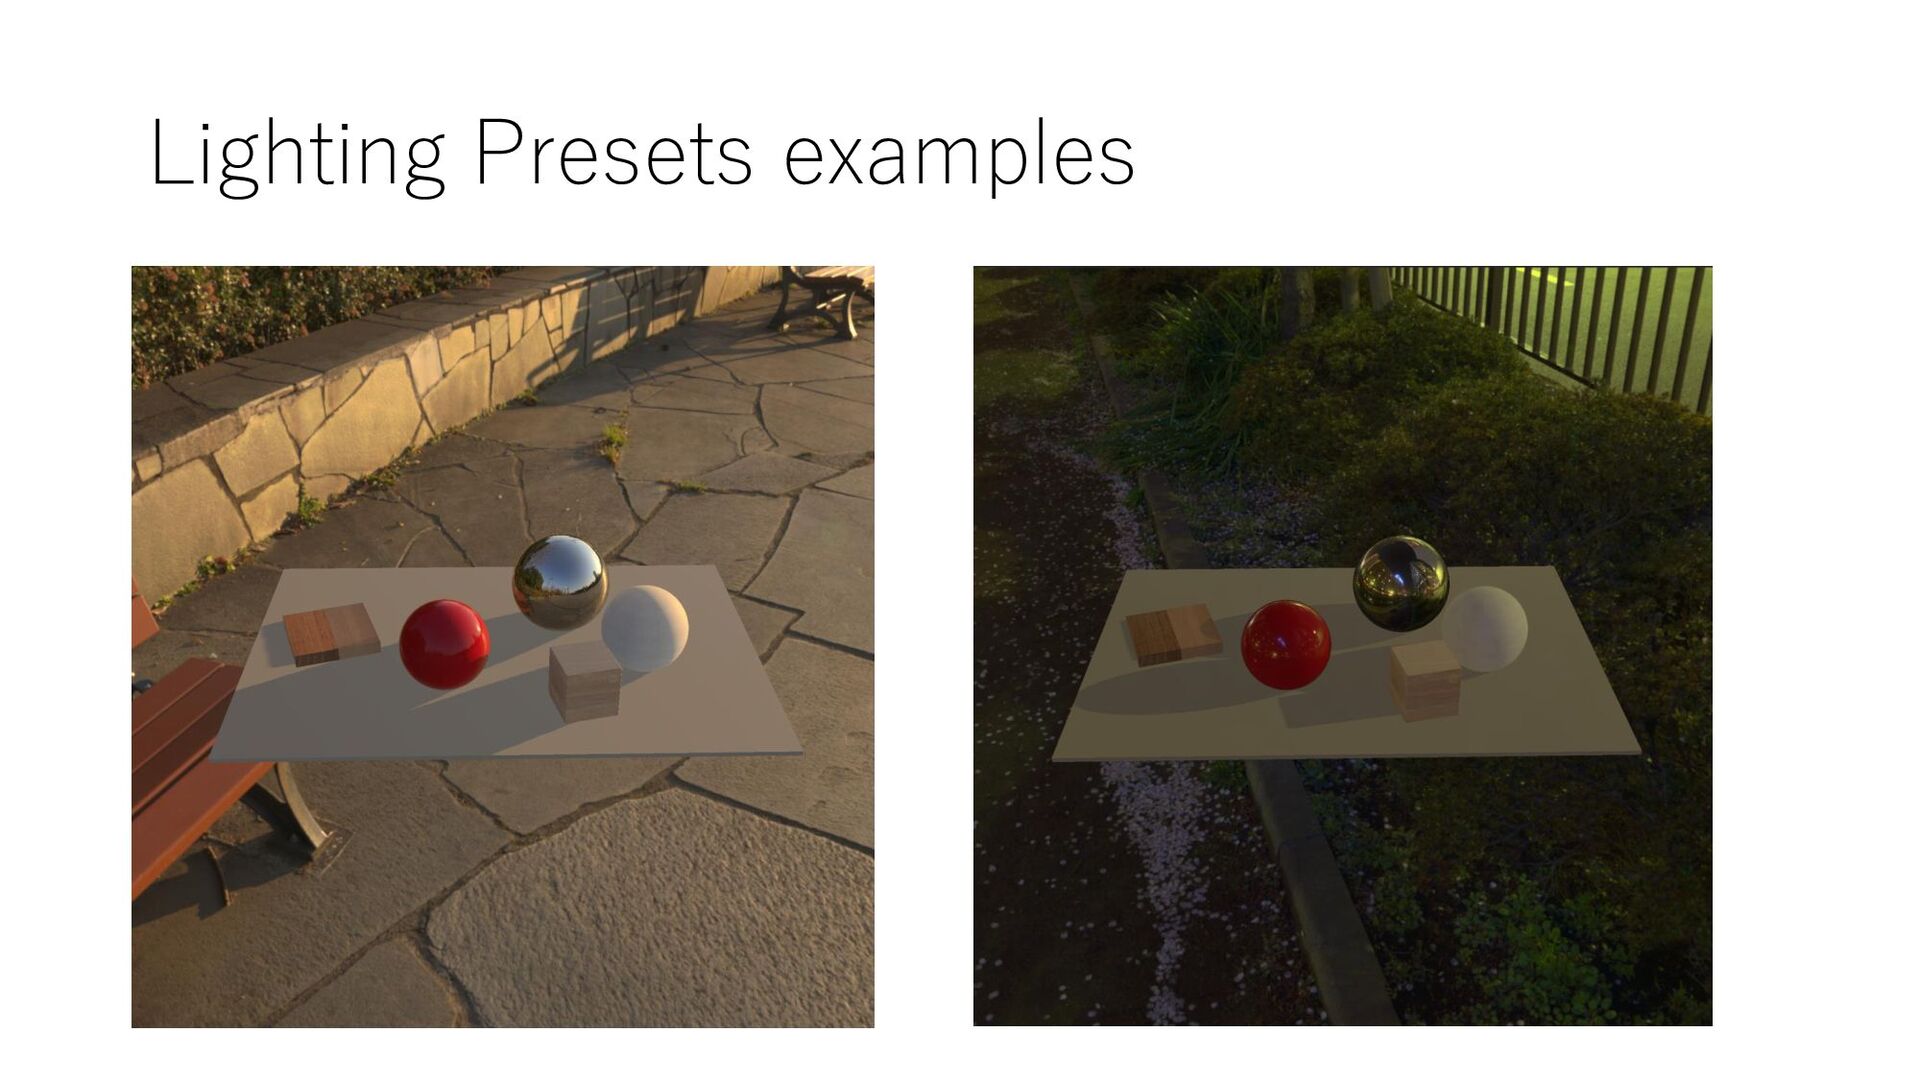
real-world values in the game can now be used interchangeably • Lighting artists use photos taken by the camera (HDRI) for lighting • This method defines lighting units as lighting presets for mutual use of lighting Reality (Photo) Game (Level data) Lighting presets
be displayed in the model editor as a lighting preset • Lighting presets are provided by the lighting artist →Other artists can only preview models with the lighting artist's set lighting Lighting Preset Direction and color of the parallel light source SH Value(float x 12) Background image for preview Specular environment map EV LUT
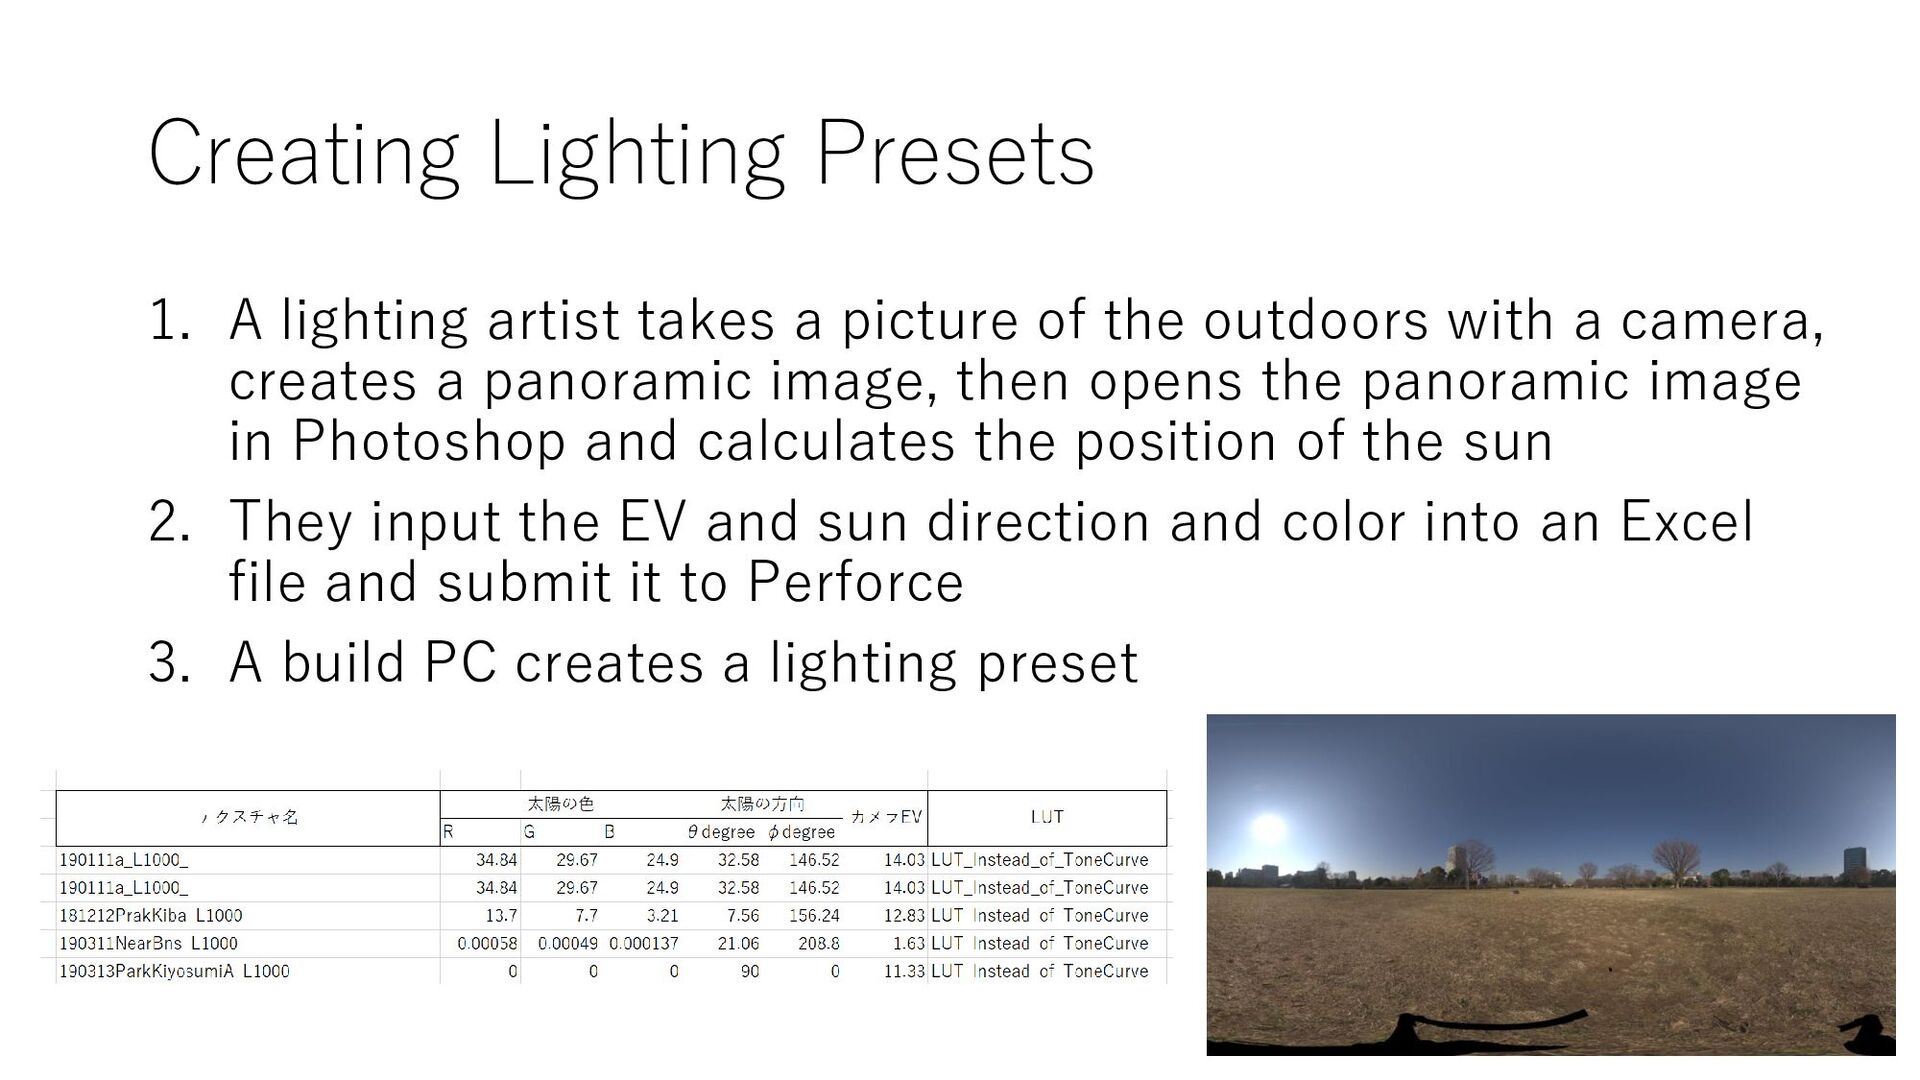
of the outdoors with a camera, creates a panoramic image, then opens the panoramic image in Photoshop and calculates the position of the sun 2. They input the EV and sun direction and color into an Excel file and submit it to Perforce 3. A build PC creates a lighting preset
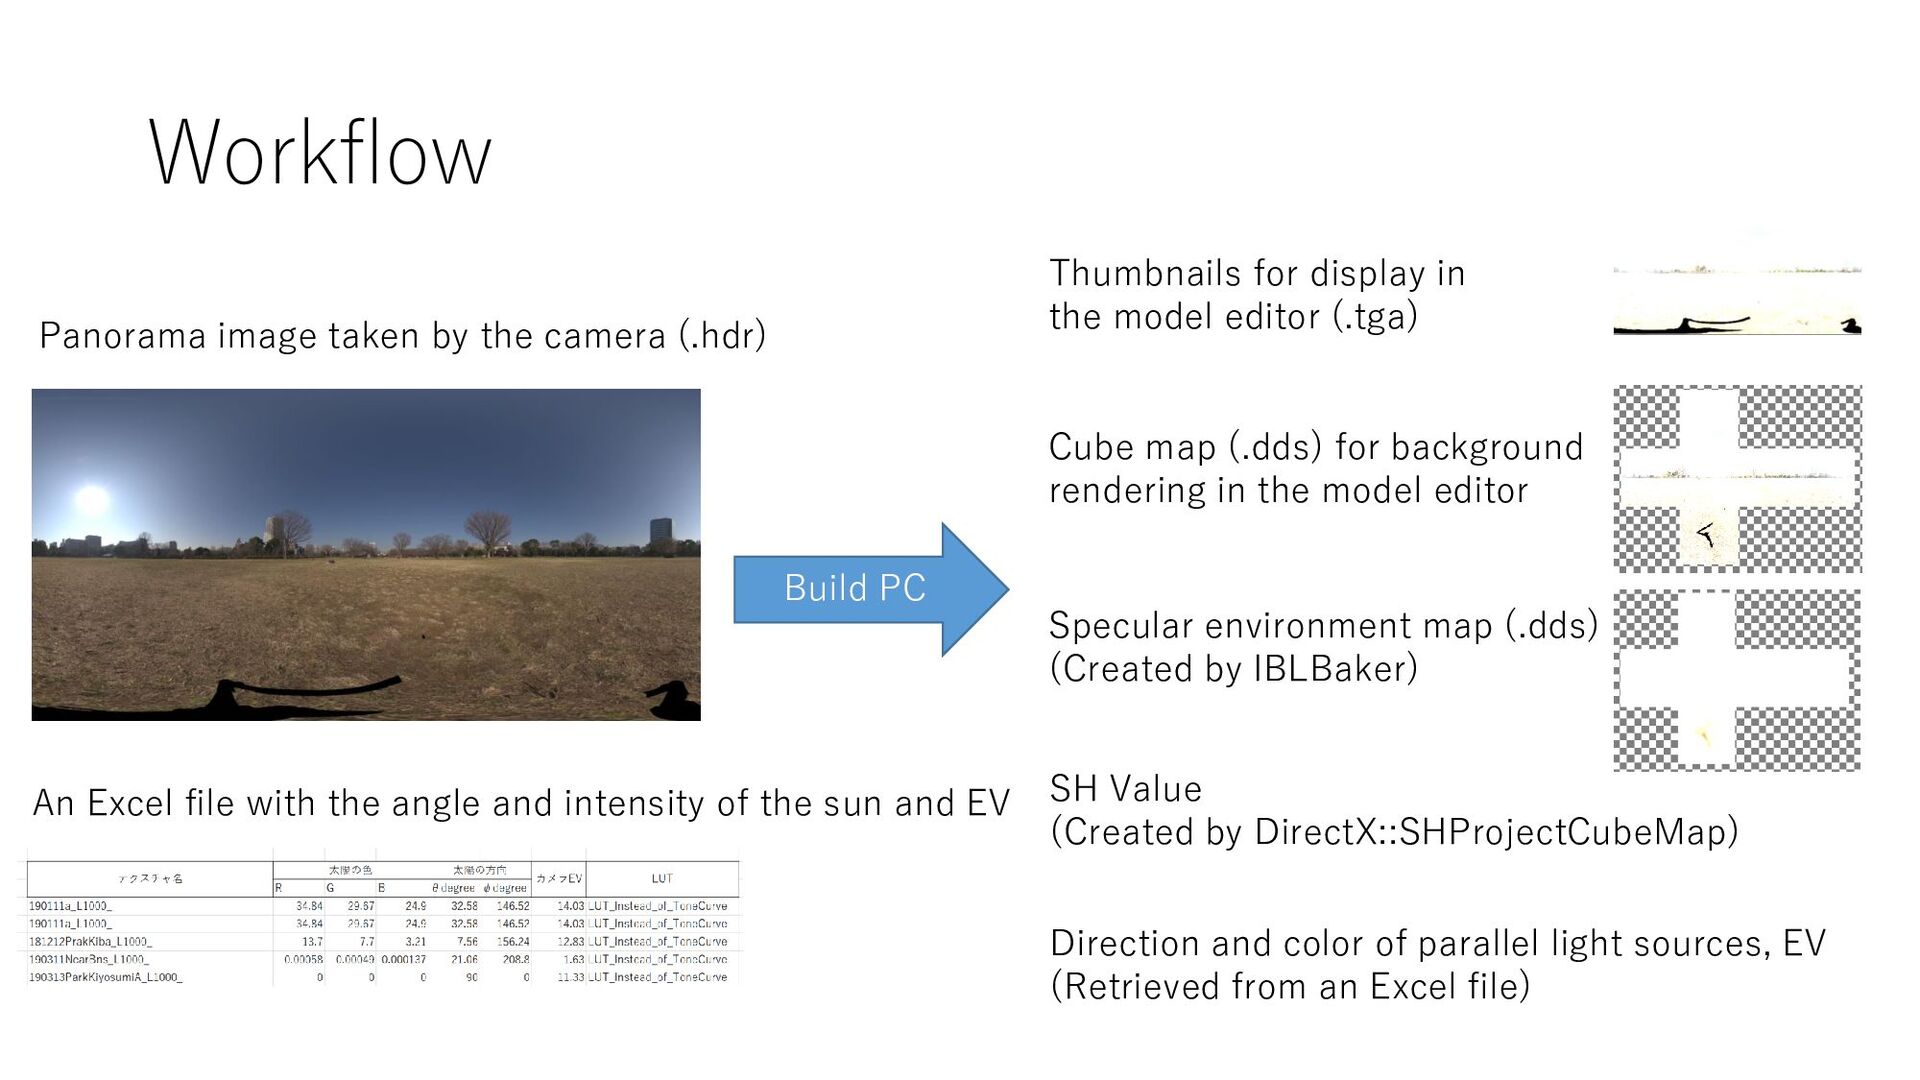
file with the angle and intensity of the sun and EV SH Value (Created by DirectX::SHProjectCubeMap) Cube map (.dds) for background rendering in the model editor Specular environment map (.dds) (Created by IBLBaker) Thumbnails for display in the model editor (.tga) Build PC Direction and color of parallel light sources, EV (Retrieved from an Excel file)
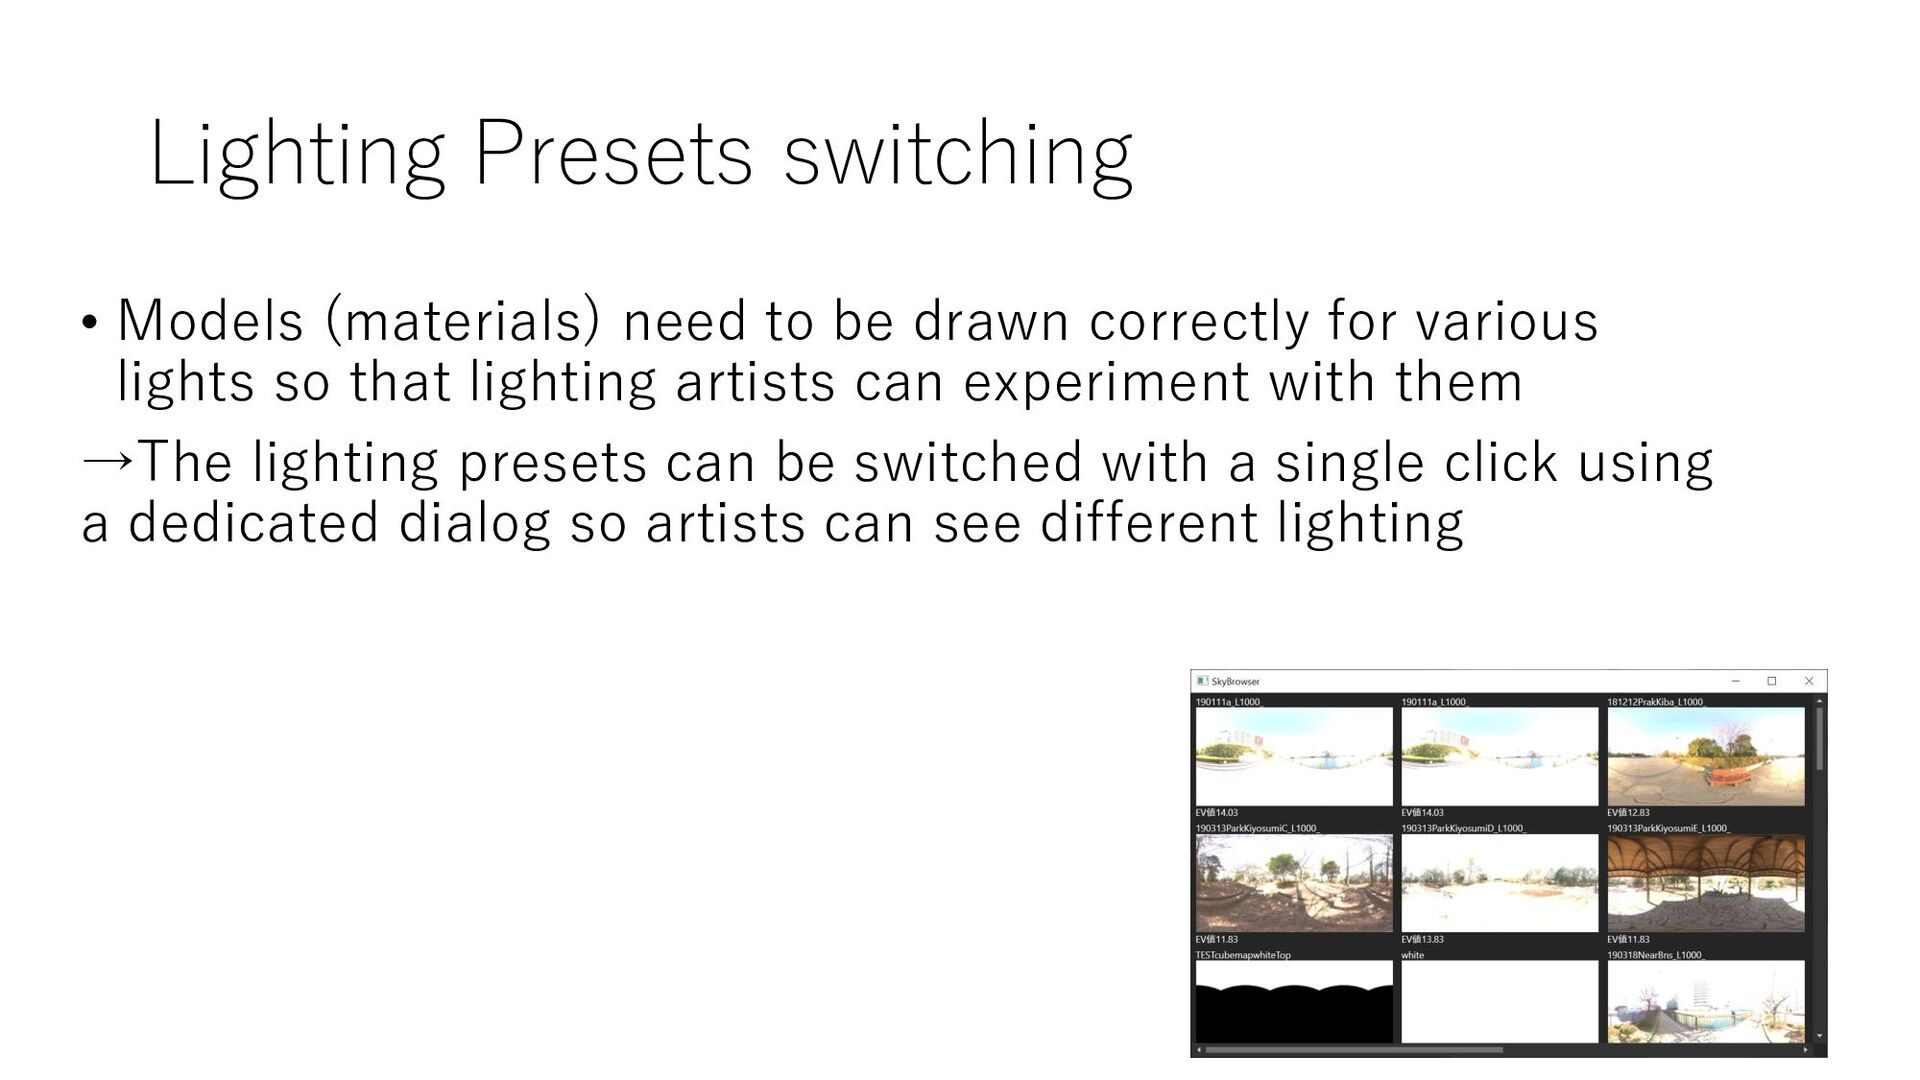
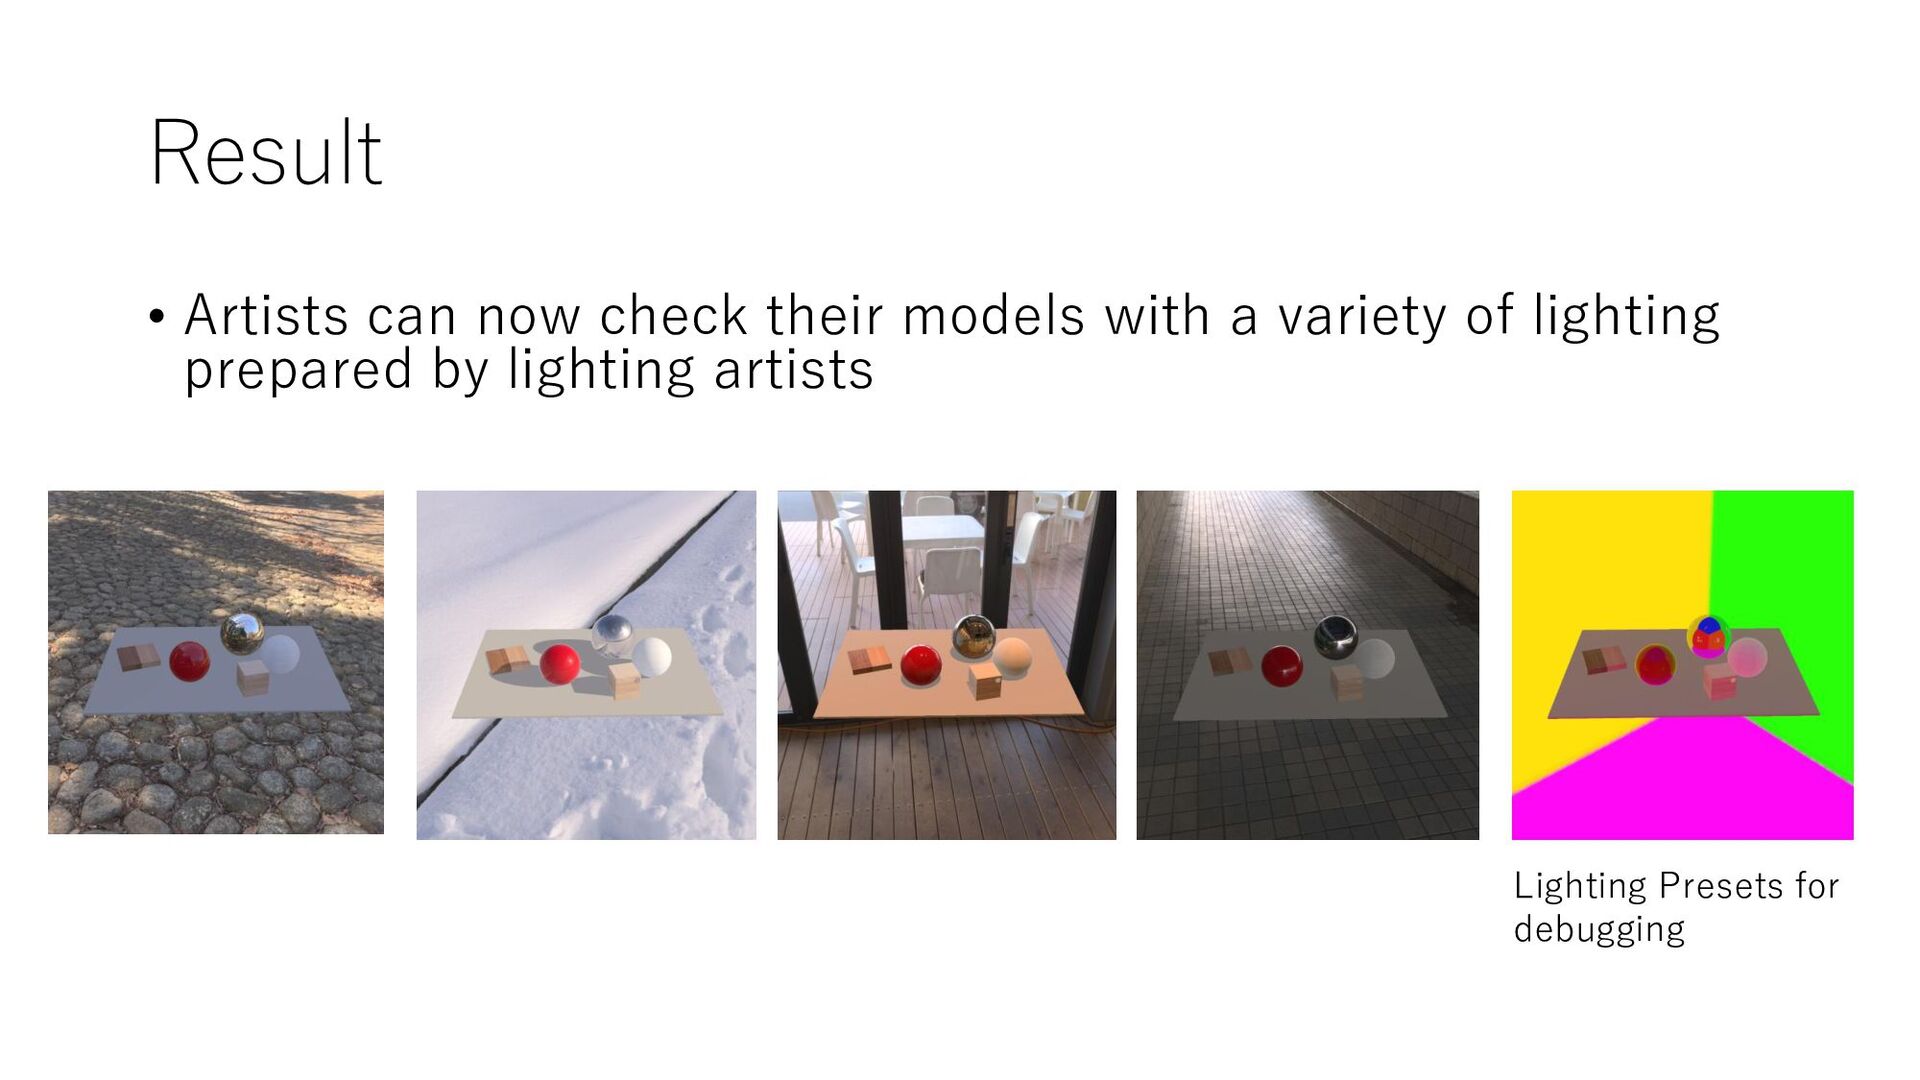
correctly for various lights so that lighting artists can experiment with them →The lighting presets can be switched with a single click using a dedicated dialog so artists can see different lighting
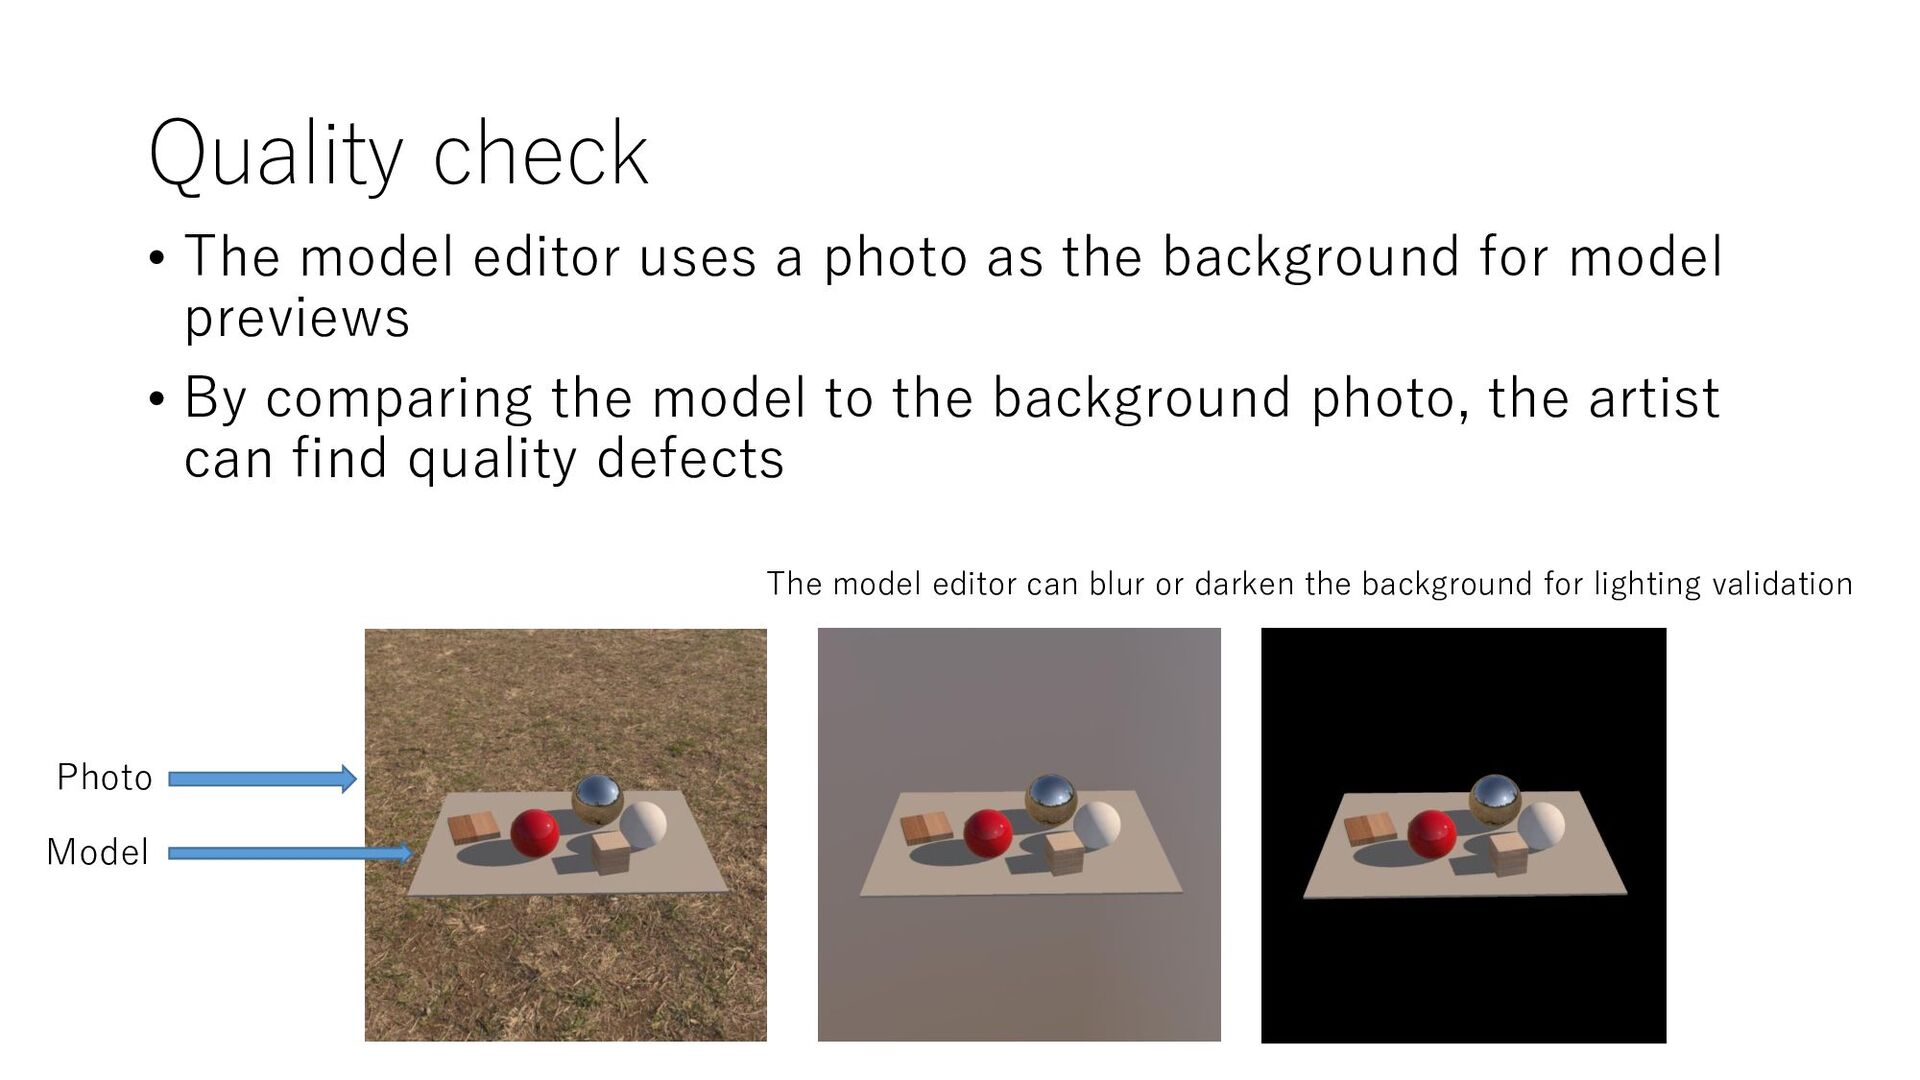
the background for model previews • By comparing the model to the background photo, the artist can find quality defects Photo Model The model editor can blur or darken the background for lighting validation
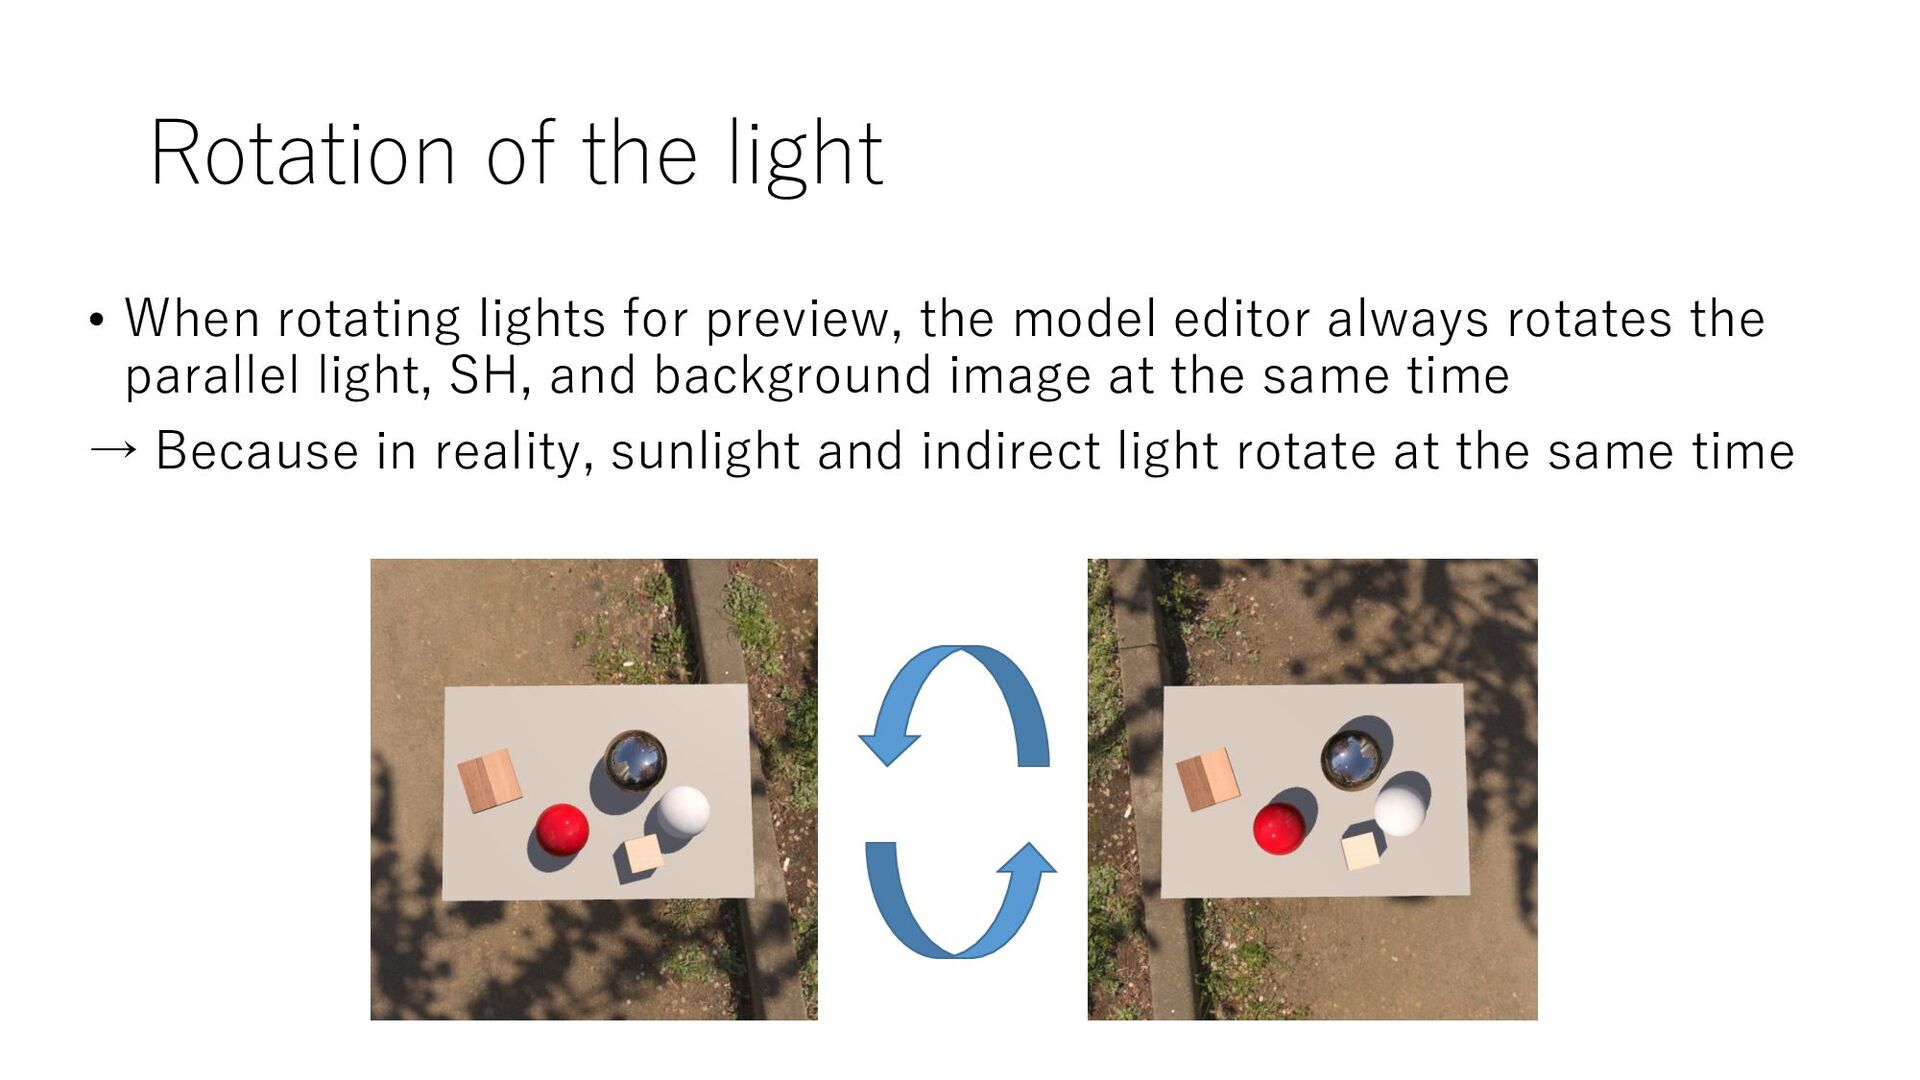
the model editor always rotates the parallel light, SH, and background image at the same time → Because in reality, sunlight and indirect light rotate at the same time
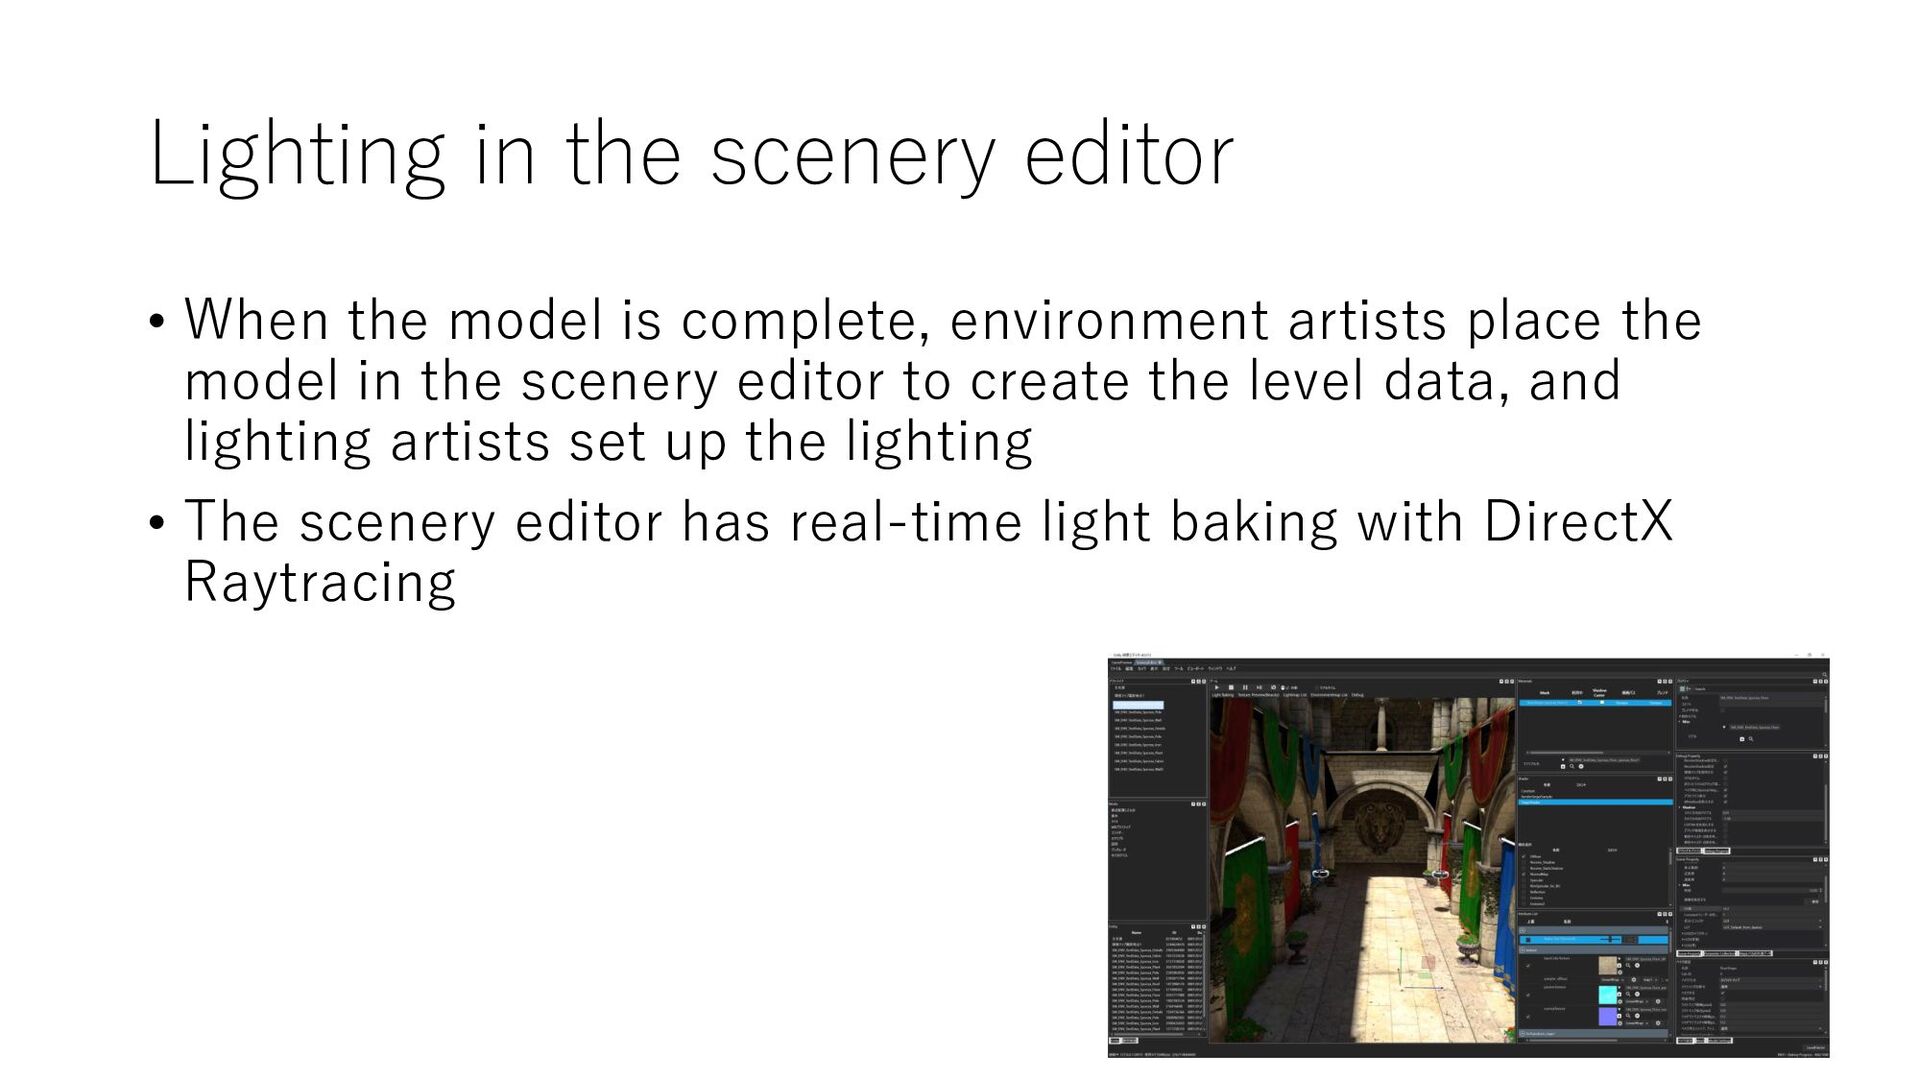
complete, environment artists place the model in the scenery editor to create the level data, and lighting artists set up the lighting • The scenery editor has real-time light baking with DirectX Raytracing
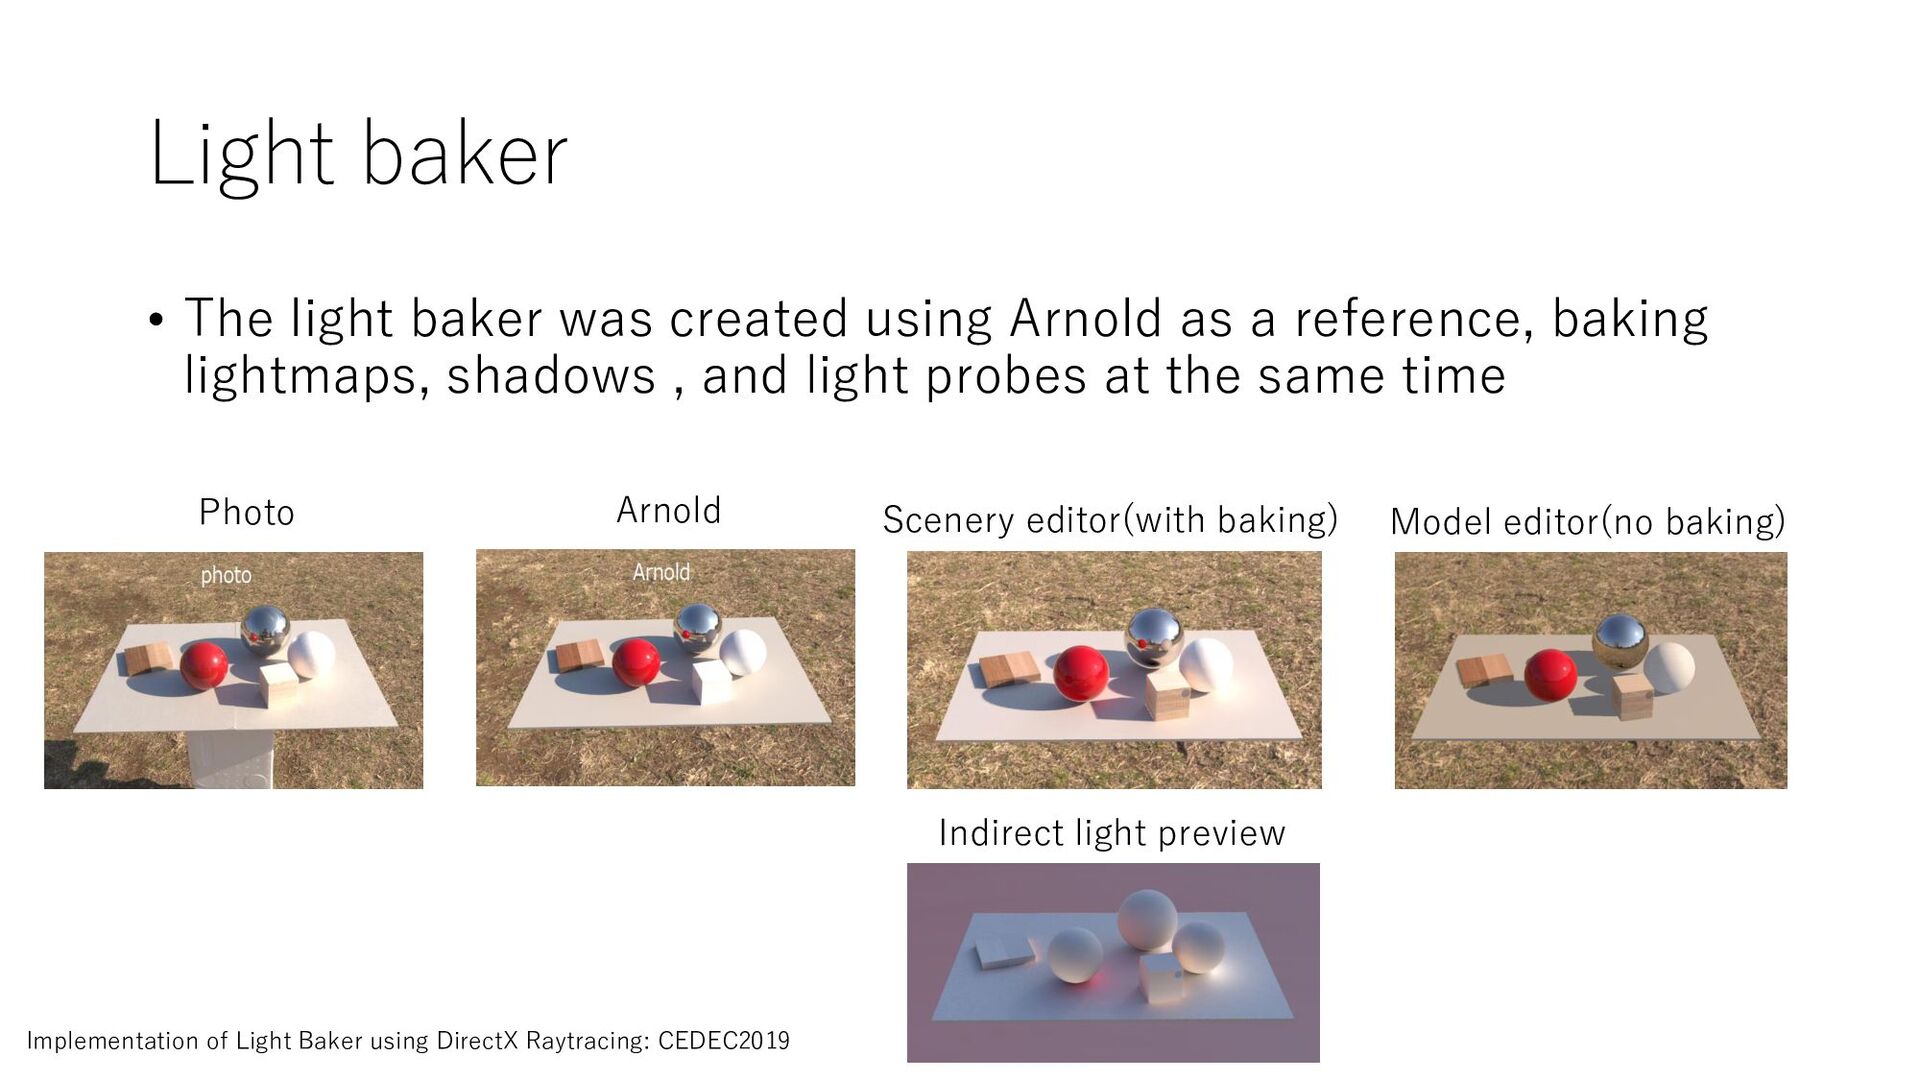
as a reference, baking lightmaps, shadows , and light probes at the same time Implementation of Light Baker using DirectX Raytracing: CEDEC2019 Photo Arnold Model editor(no baking) Scenery editor(with baking) Indirect light preview
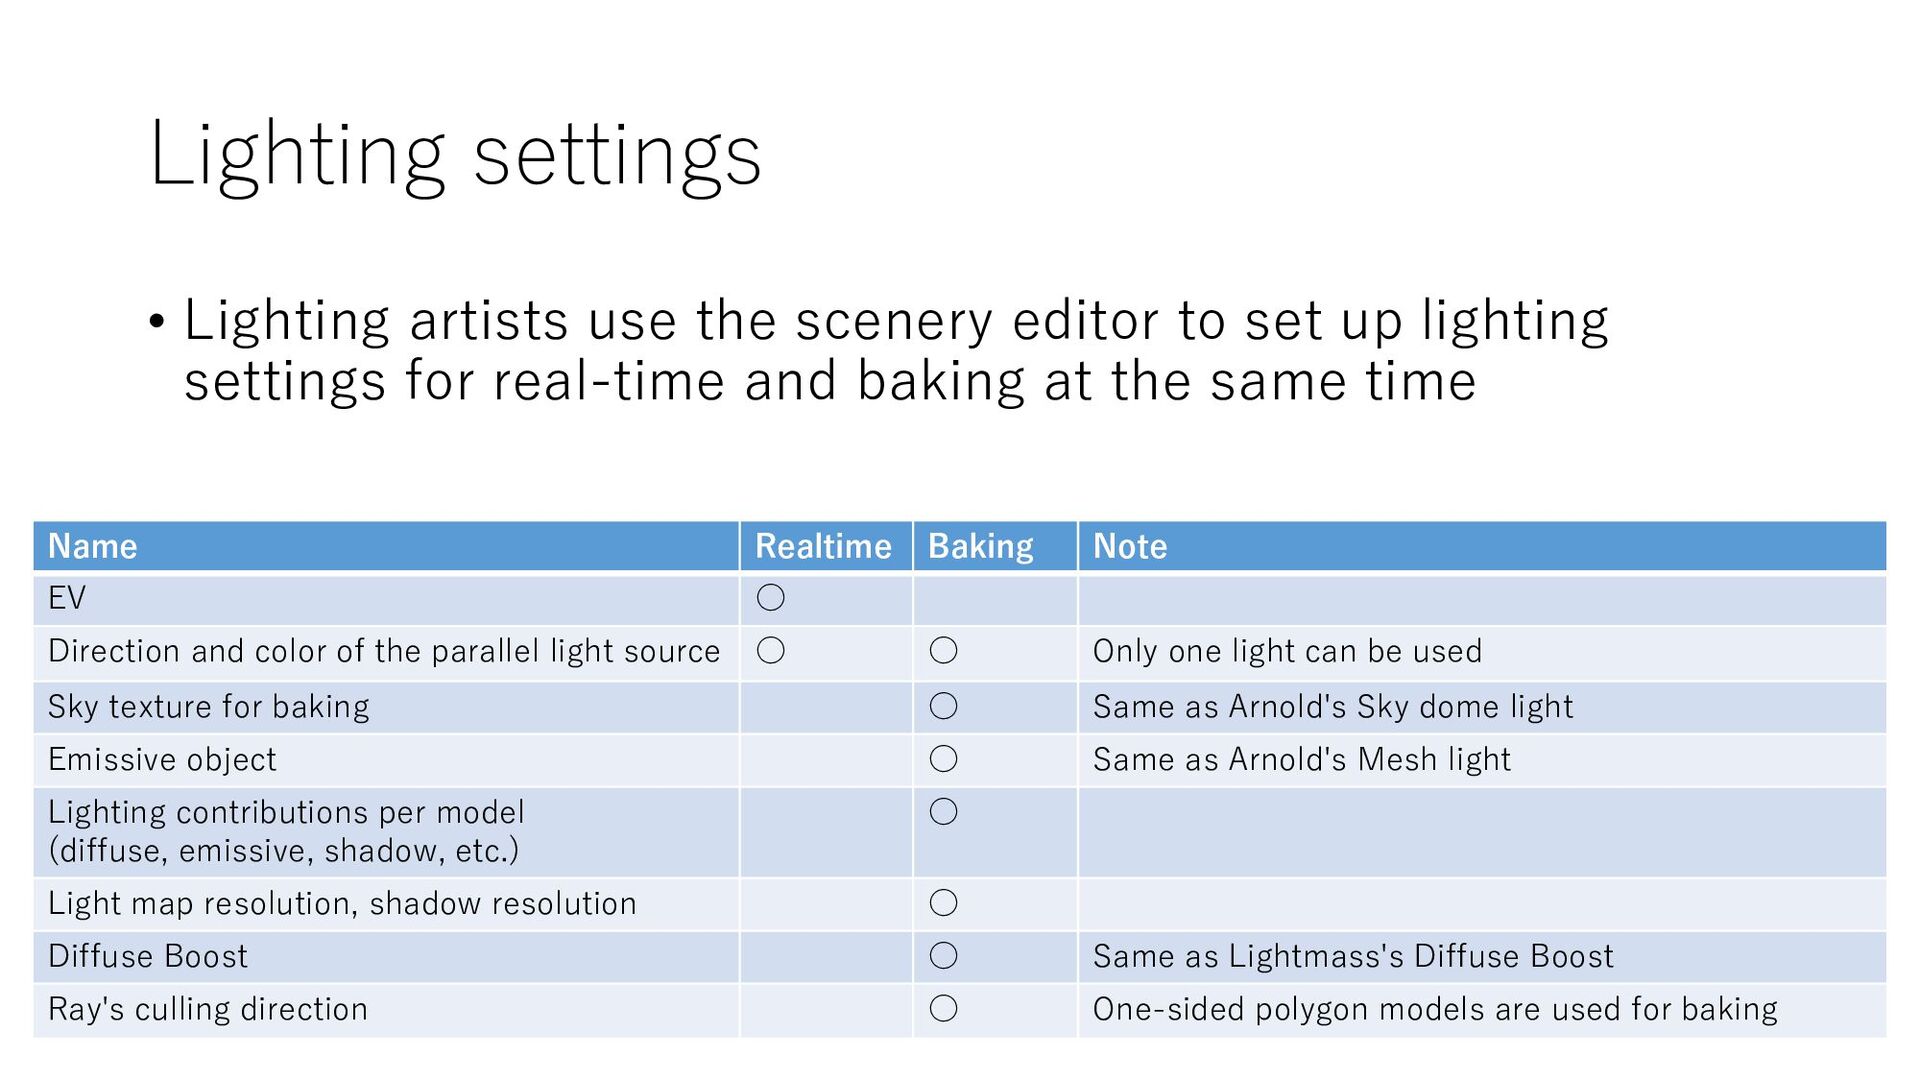
set up lighting settings for real-time and baking at the same time Name Realtime Baking Note EV ◦ Direction and color of the parallel light source ◦ ◦ Only one light can be used Sky texture for baking ◦ Same as Arnold's Sky dome light Emissive object ◦ Same as Arnold's Mesh light Lighting contributions per model (diffuse, emissive, shadow, etc.) ◦ Light map resolution, shadow resolution ◦ Diffuse Boost ◦ Same as Lightmass's Diffuse Boost Ray's culling direction ◦ One-sided polygon models are used for baking
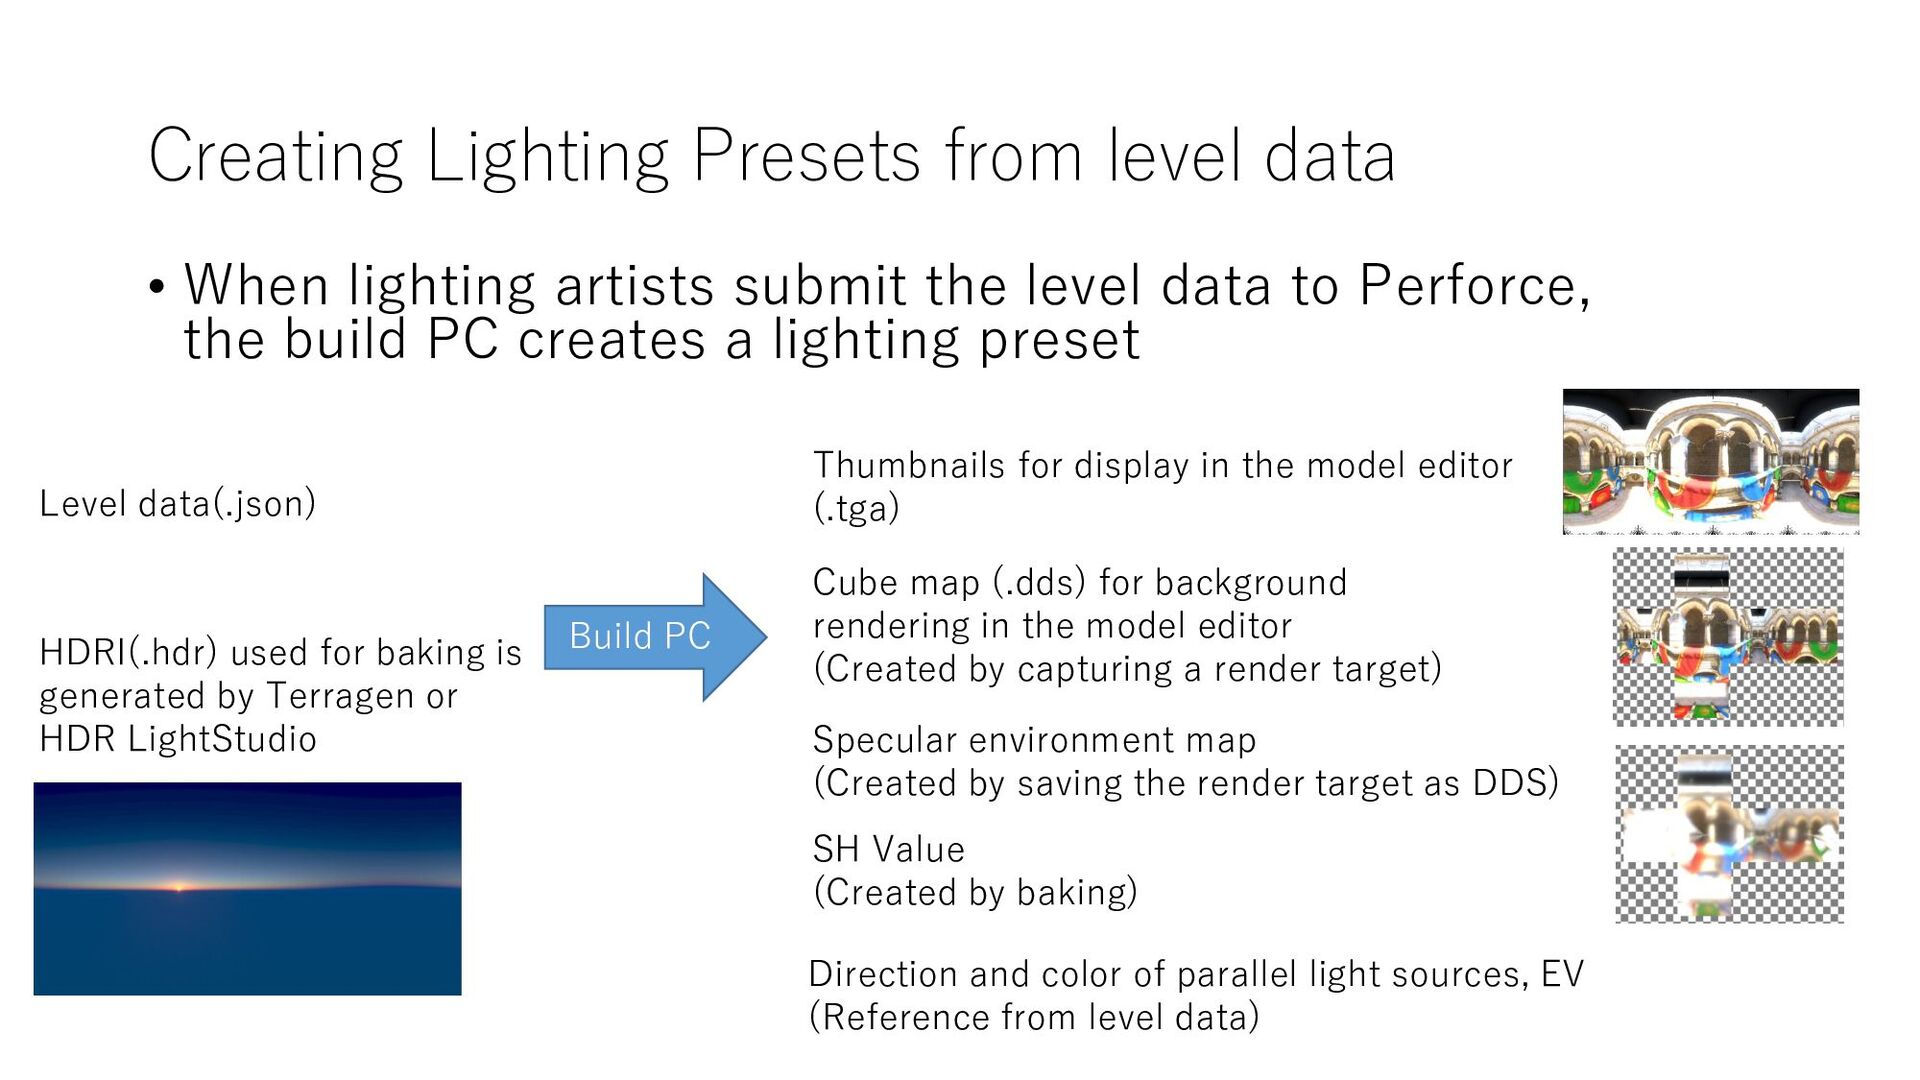
submit the level data to Perforce, the build PC creates a lighting preset Level data(.json) SH Value (Created by baking) Cube map (.dds) for background rendering in the model editor (Created by capturing a render target) Specular environment map (Created by saving the render target as DDS) Direction and color of parallel light sources, EV (Reference from level data) HDRI(.hdr) used for baking is generated by Terragen or HDR LightStudio Build PC Thumbnails for display in the model editor (.tga)
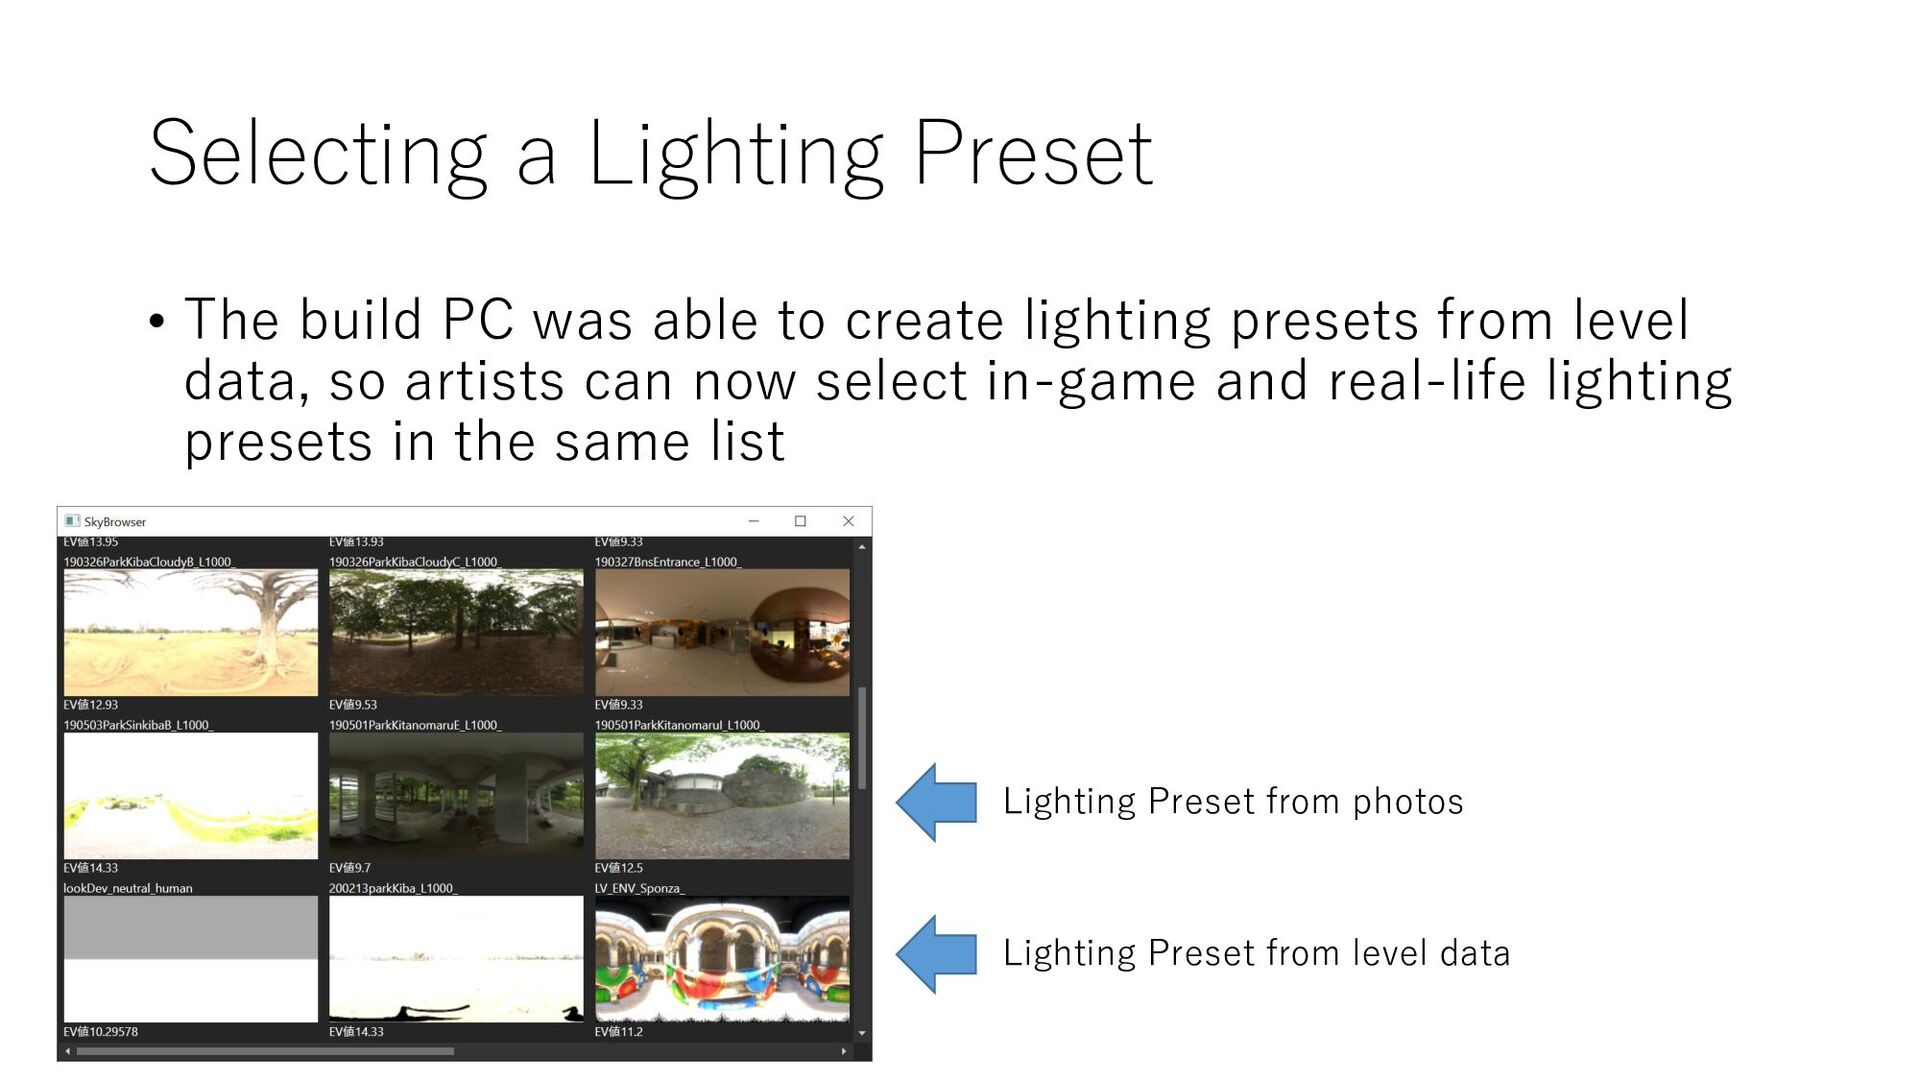
to create lighting presets from level data, so artists can now select in-game and real-life lighting presets in the same list Lighting Preset from photos Lighting Preset from level data
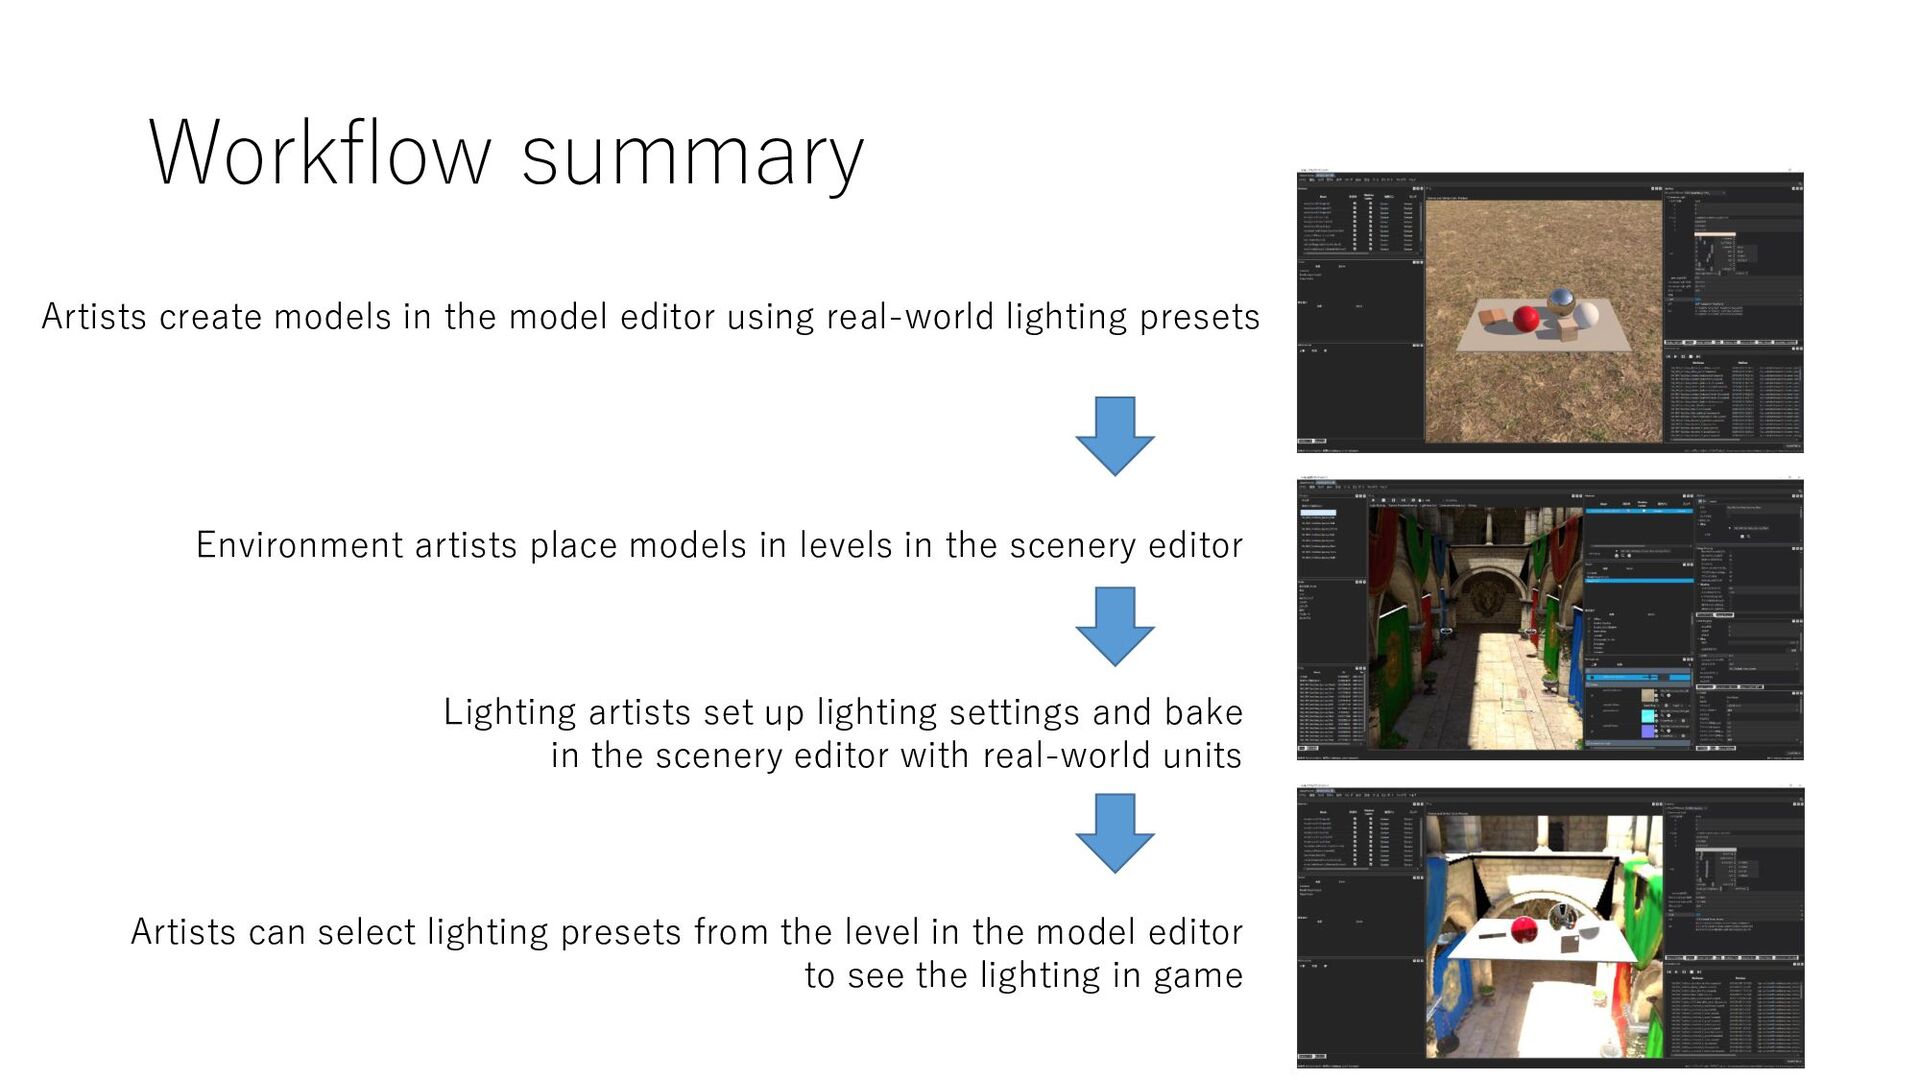
real-world lighting presets Environment artists place models in levels in the scenery editor Lighting artists set up lighting settings and bake in the scenery editor with real-world units Artists can select lighting presets from the level in the model editor to see the lighting in game
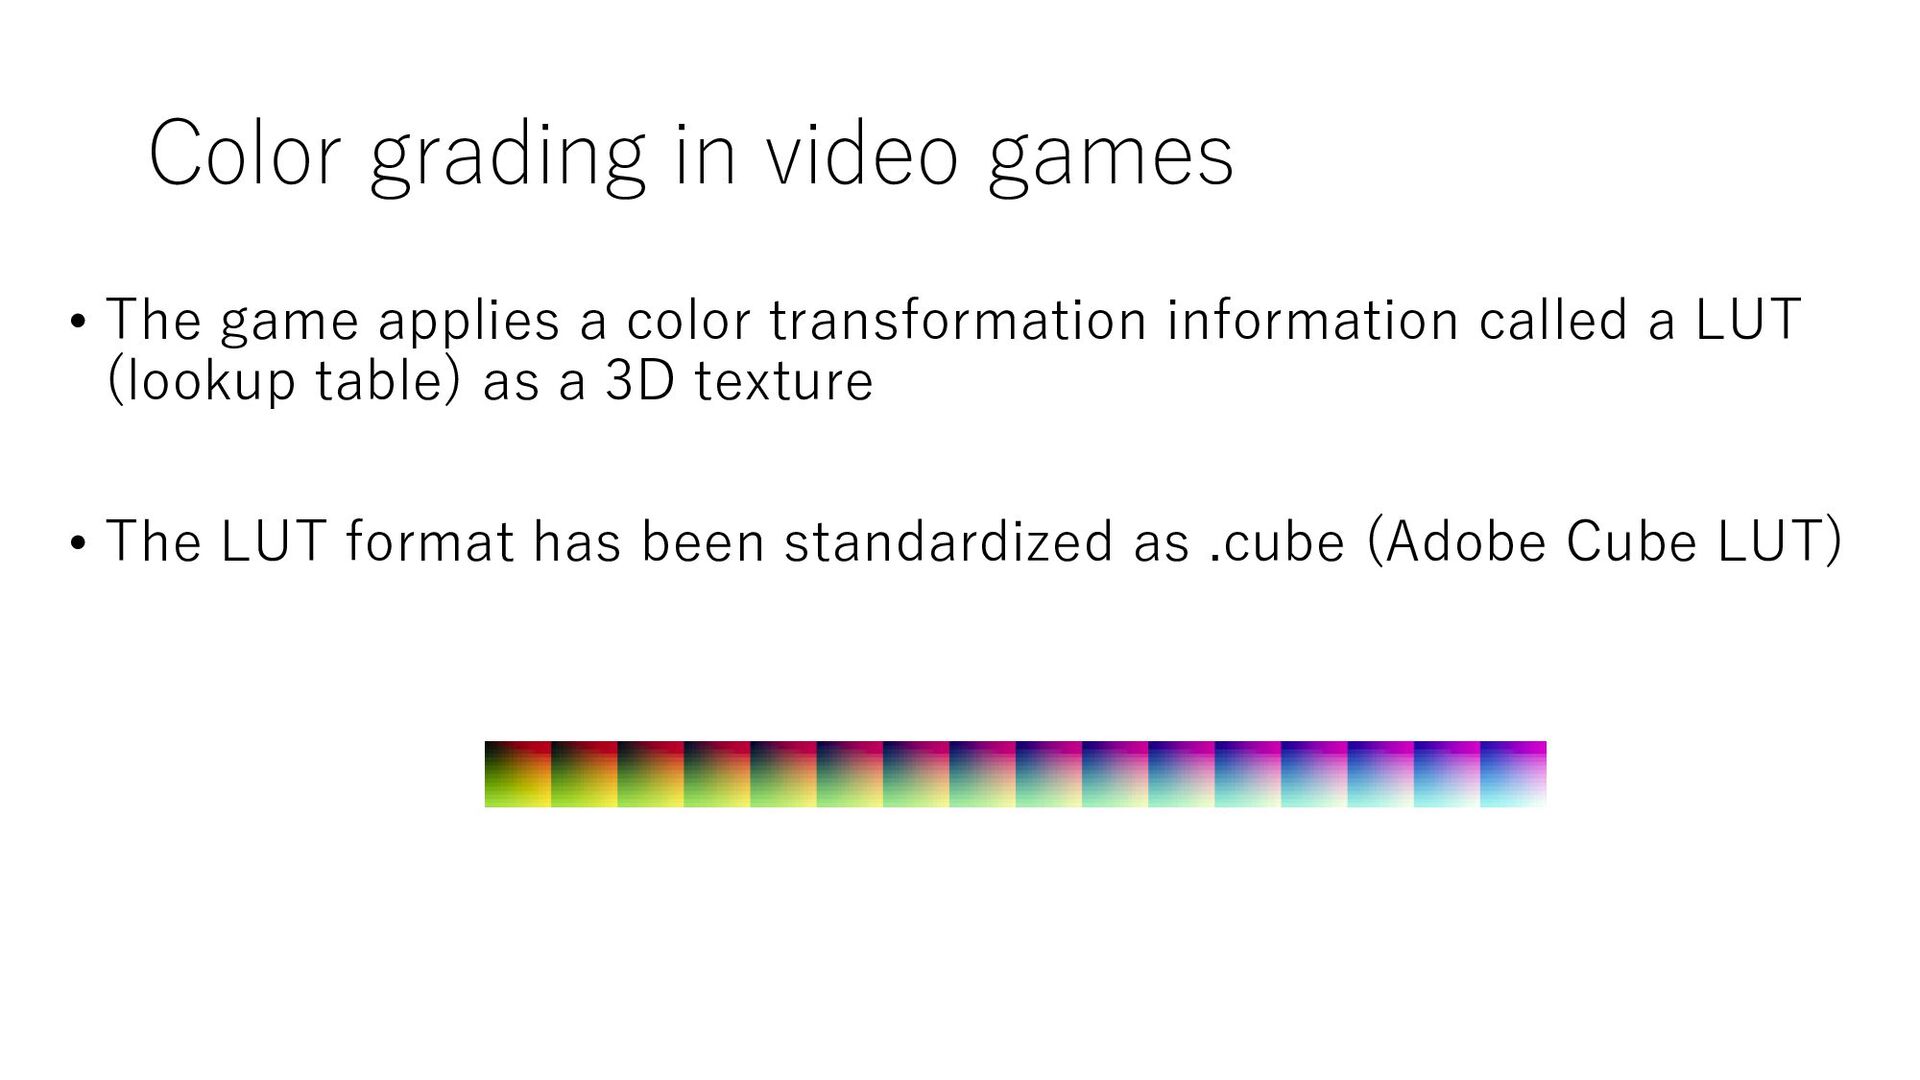
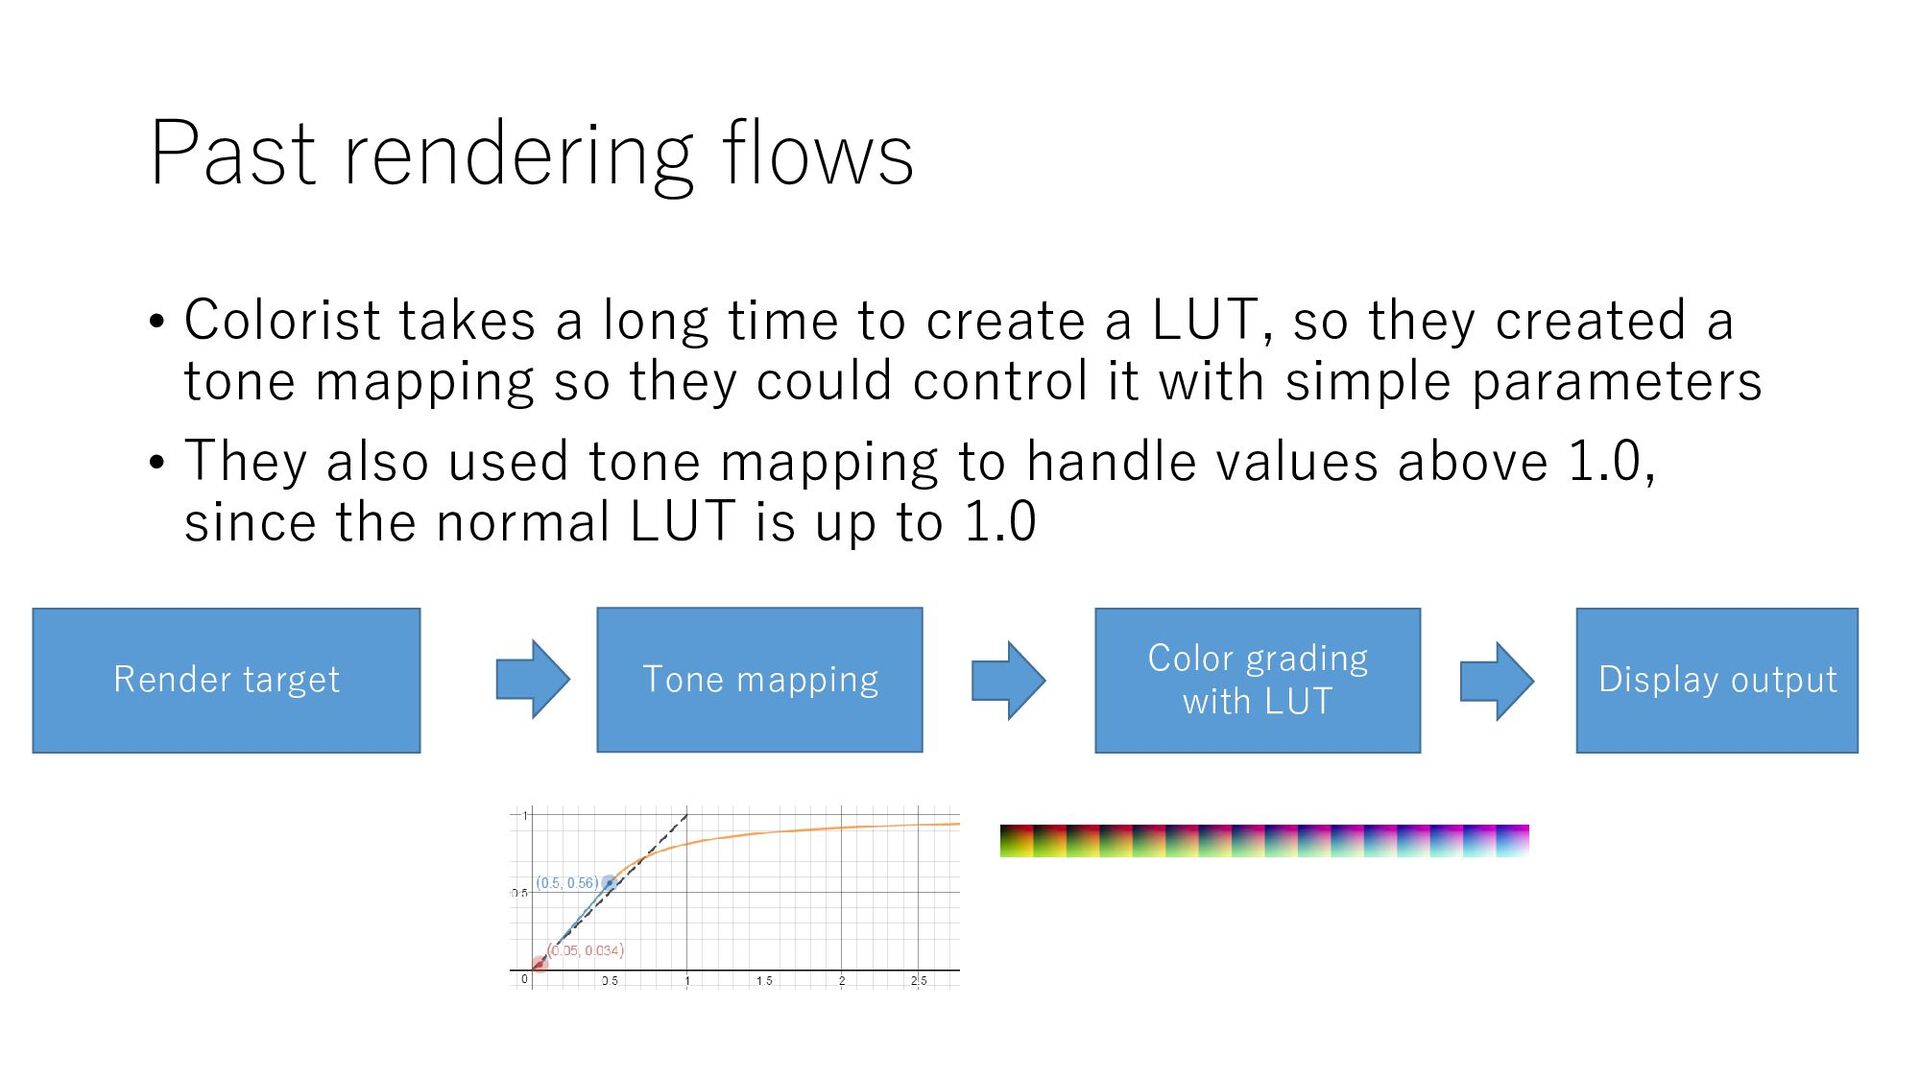
create a LUT, so they created a tone mapping so they could control it with simple parameters • They also used tone mapping to handle values above 1.0, since the normal LUT is up to 1.0 Render target Tone mapping Color grading with LUT Display output
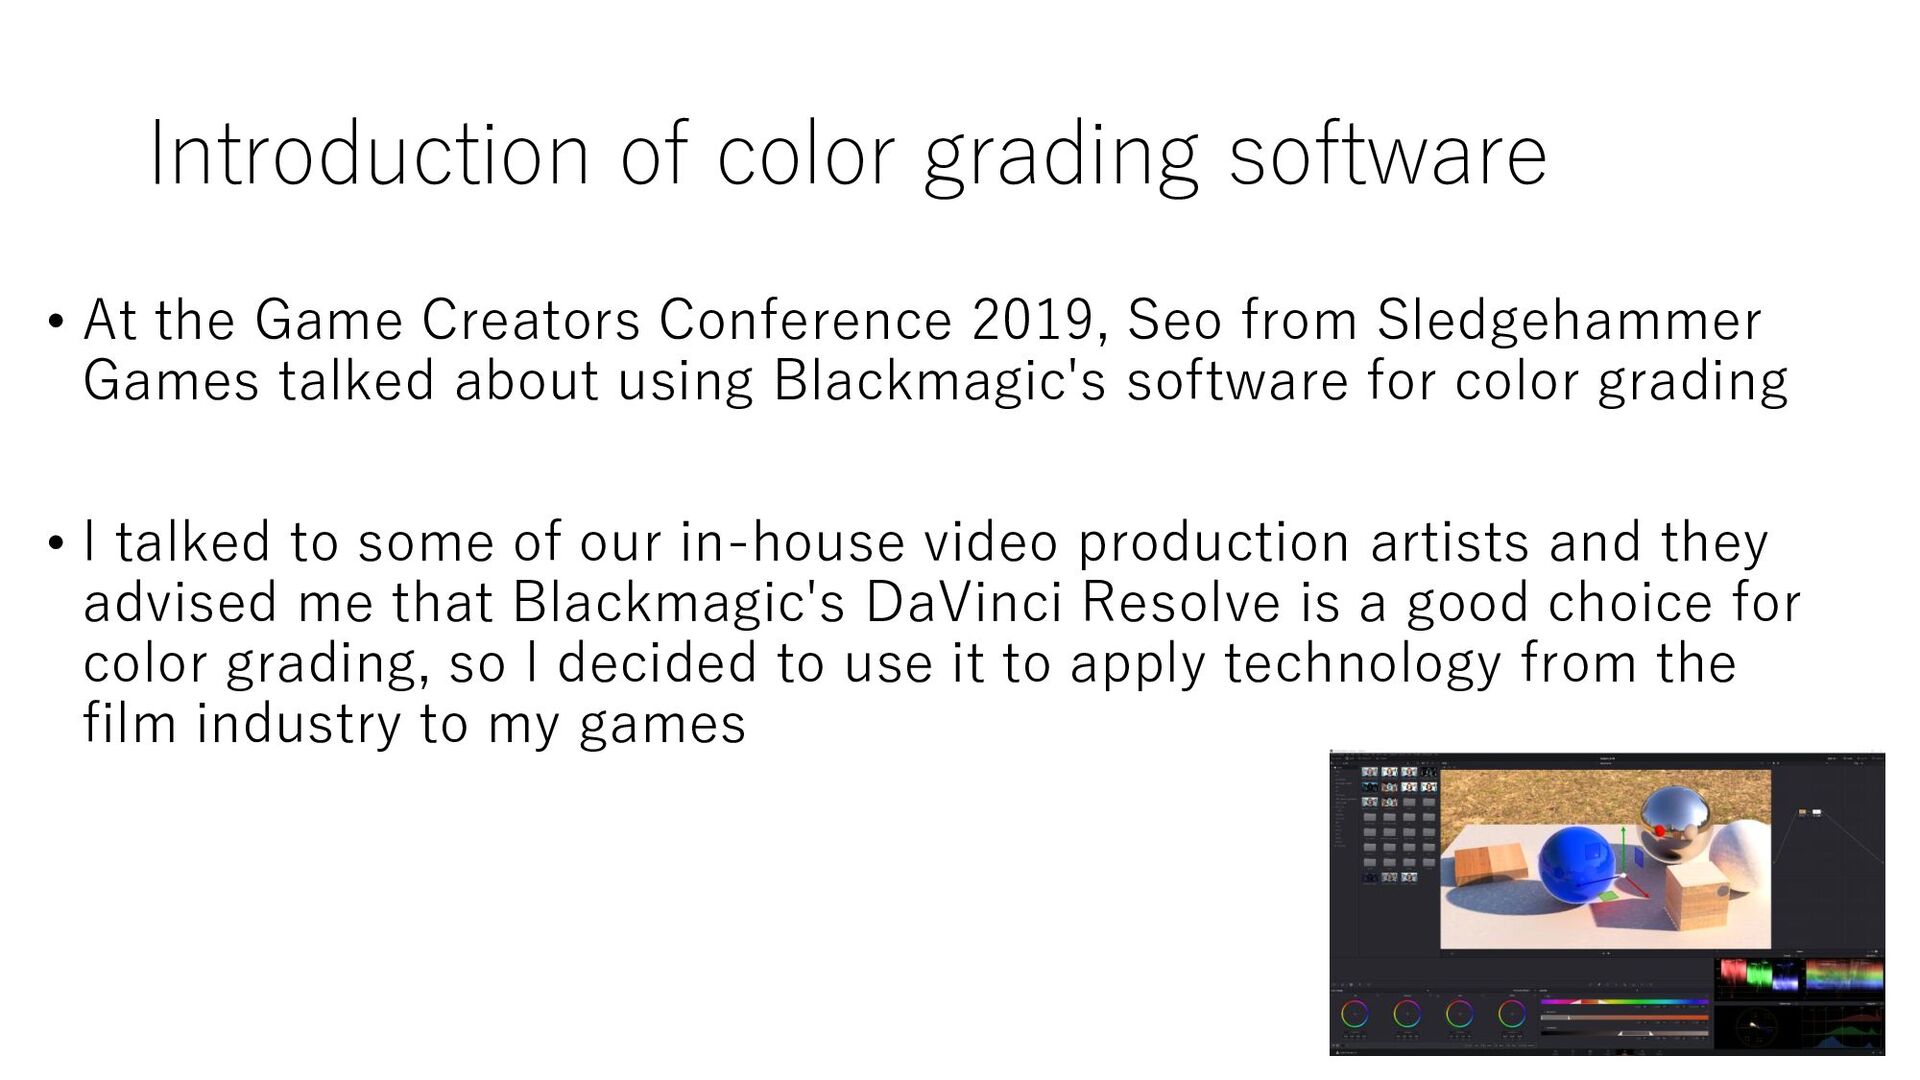
Conference 2019, Seo from Sledgehammer Games talked about using Blackmagic's software for color grading • I talked to some of our in-house video production artists and they advised me that Blackmagic's DaVinci Resolve is a good choice for color grading, so I decided to use it to apply technology from the film industry to my games
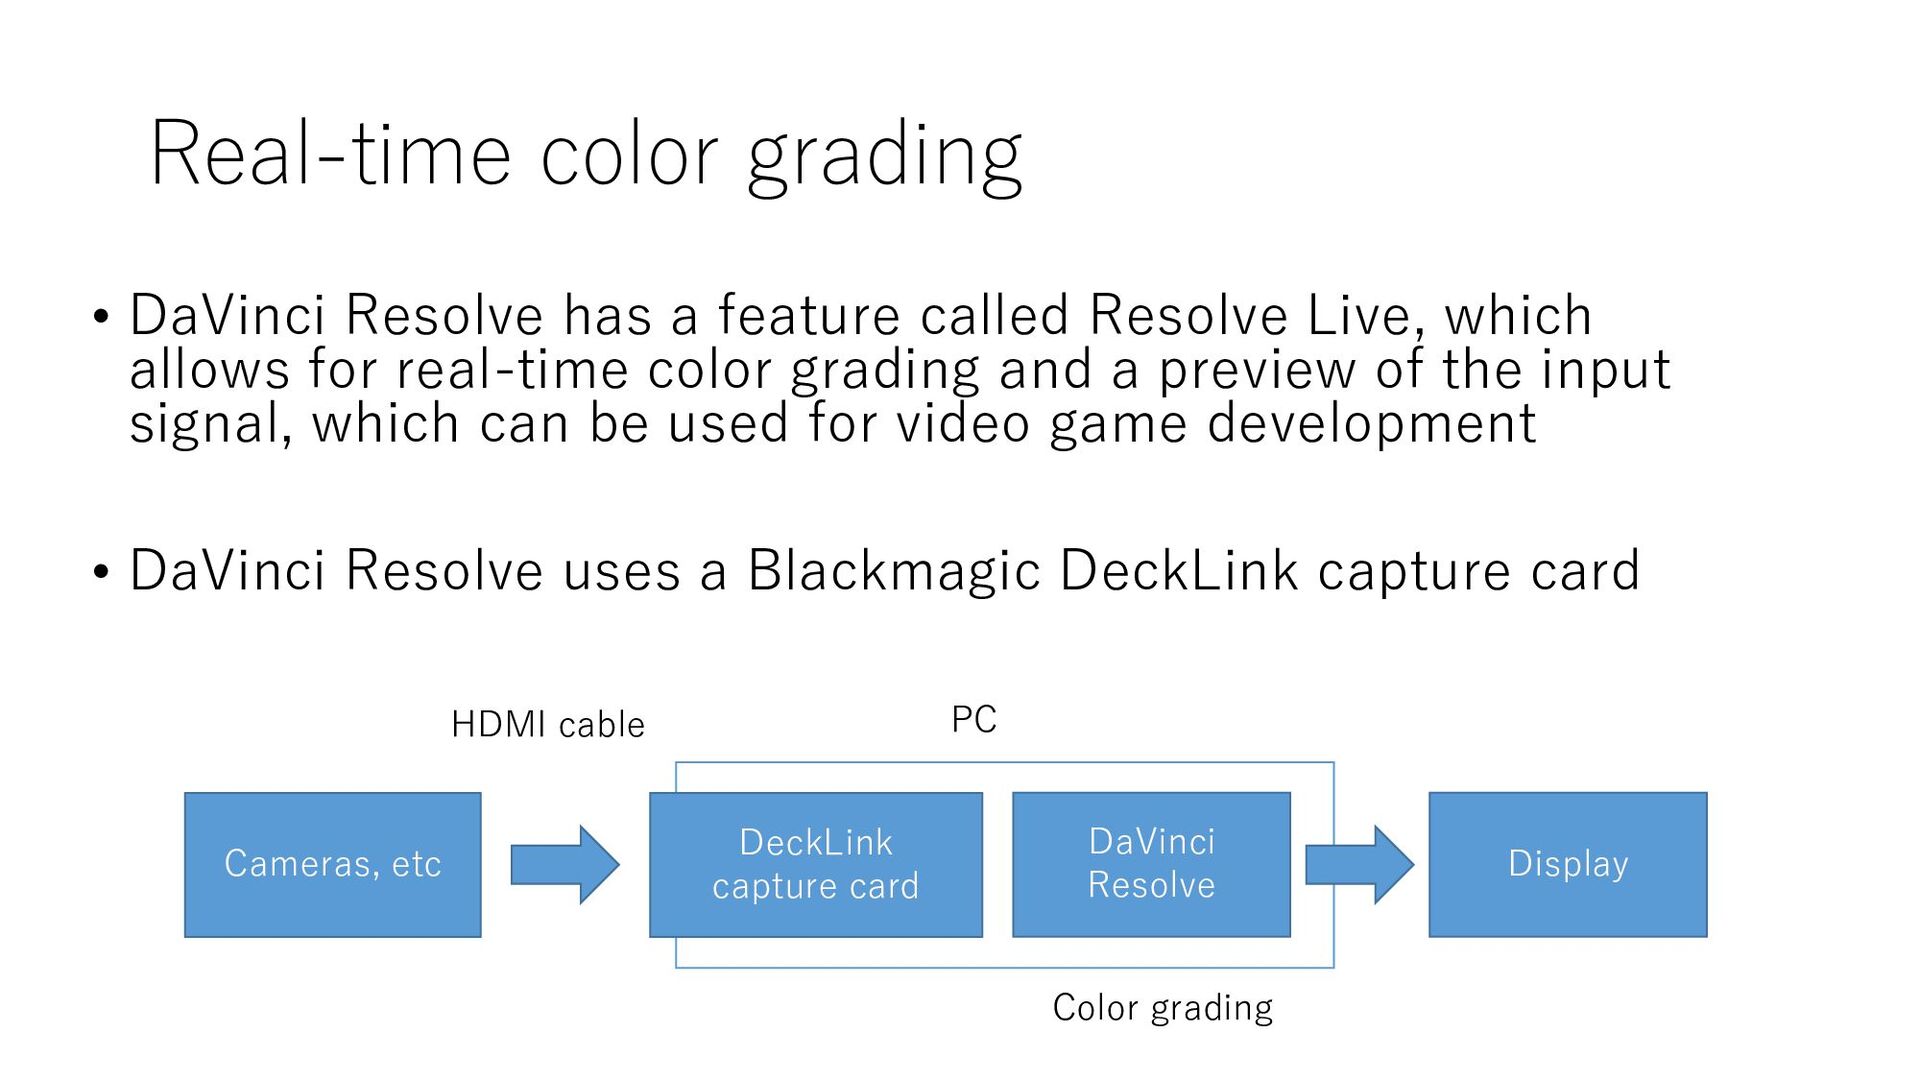
Resolve Live, which allows for real-time color grading and a preview of the input signal, which can be used for video game development • DaVinci Resolve uses a Blackmagic DeckLink capture card Cameras, etc DaVinci Resolve DeckLink capture card Display PC HDMI cable Color grading
Reason SwapChain format DXGI_FORMAT_R10G10B10A2_UNORM In DaVinci Resolve's preview screen, to increase tonality and reduce moiré SwapChain color space DXGI_COLOR_SPACE_RGB_FULL_G2084_ NONE_P2020 To use R10G10B10A2 Shader output color space Rec.709(sRGB) Since the color space in the game is Rec.709 OETF HLG(Calculations inside the shader) To perform color grading in high-intensity areas • This method uses the following settings for color grading
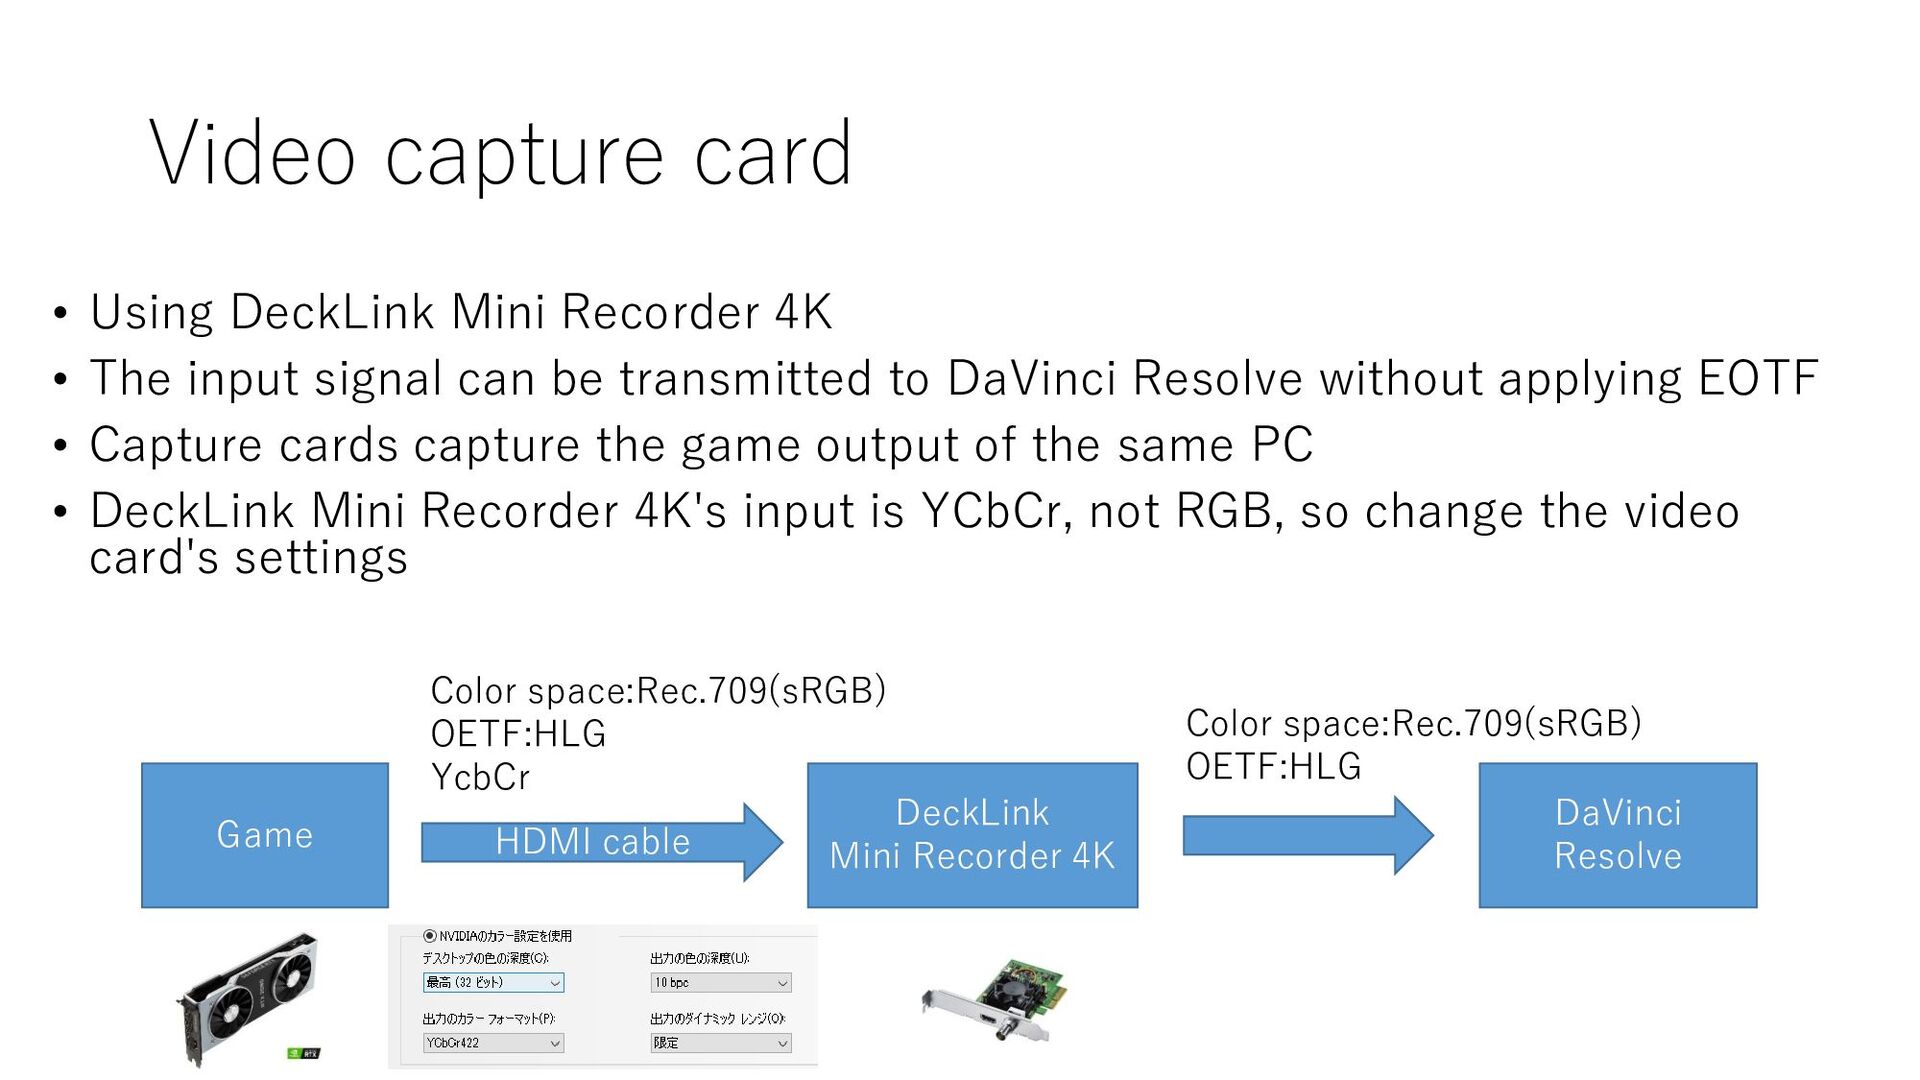
The input signal can be transmitted to DaVinci Resolve without applying EOTF • Capture cards capture the game output of the same PC • DeckLink Mini Recorder 4K's input is YCbCr, not RGB, so change the video card's settings Game DaVinci Resolve HDMI cable DeckLink Mini Recorder 4K Color space:Rec.709(sRGB) OETF:HLG Color space:Rec.709(sRGB) OETF:HLG YcbCr
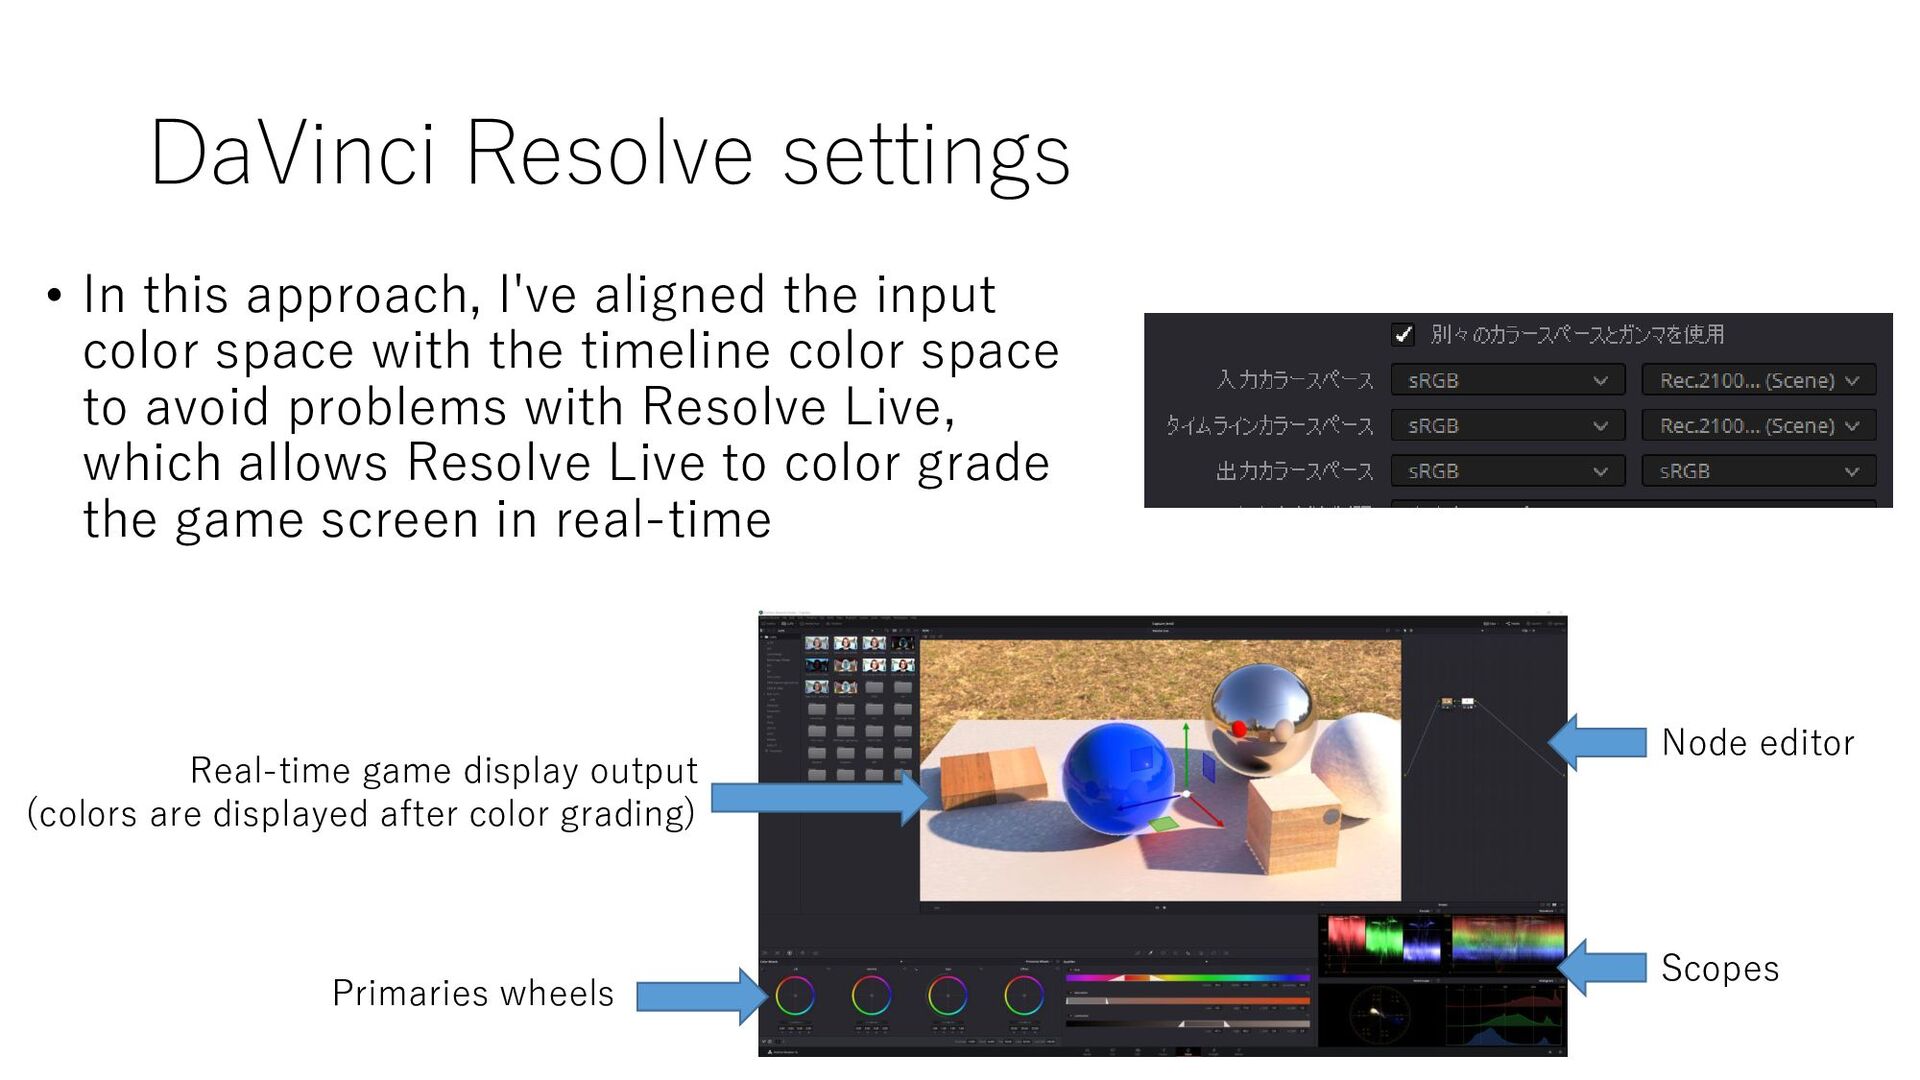
input color space with the timeline color space to avoid problems with Resolve Live, which allows Resolve Live to color grade the game screen in real-time Real-time game display output (colors are displayed after color grading) Primaries wheels Scopes Node editor
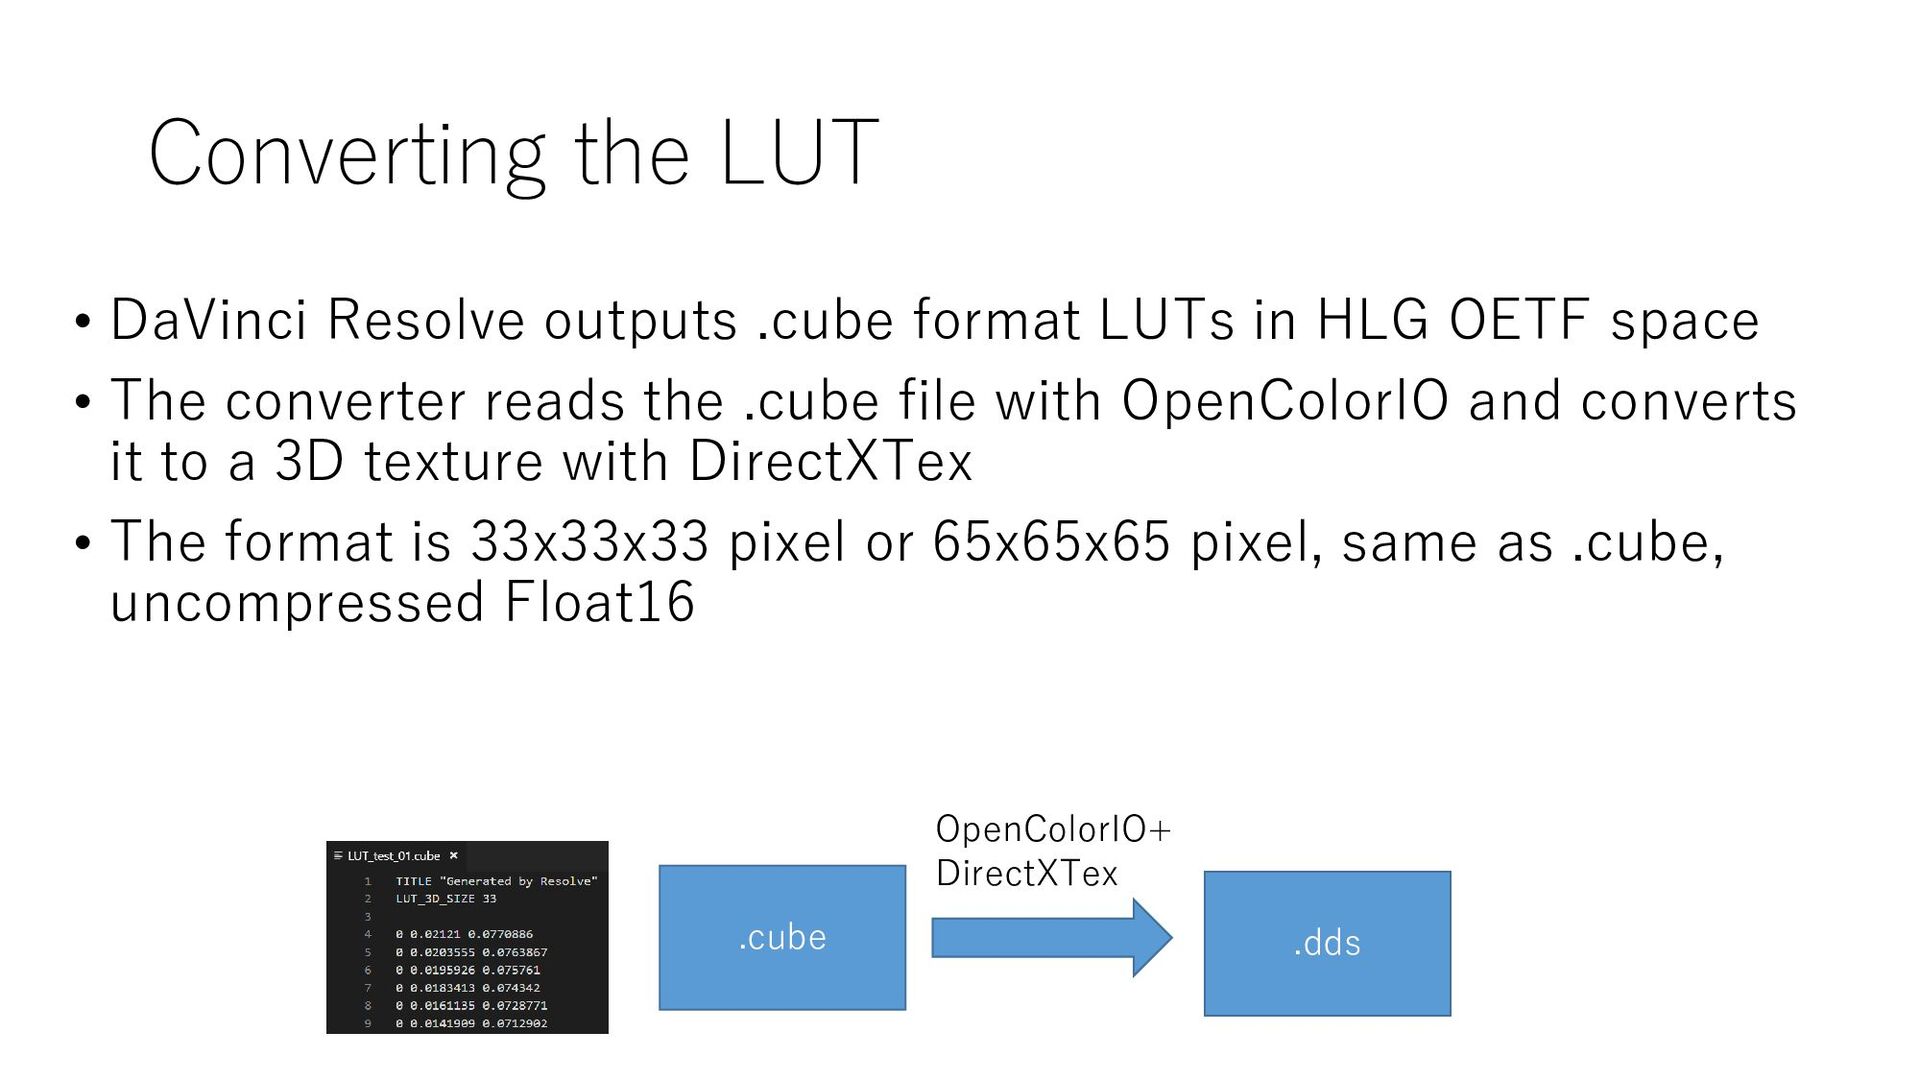
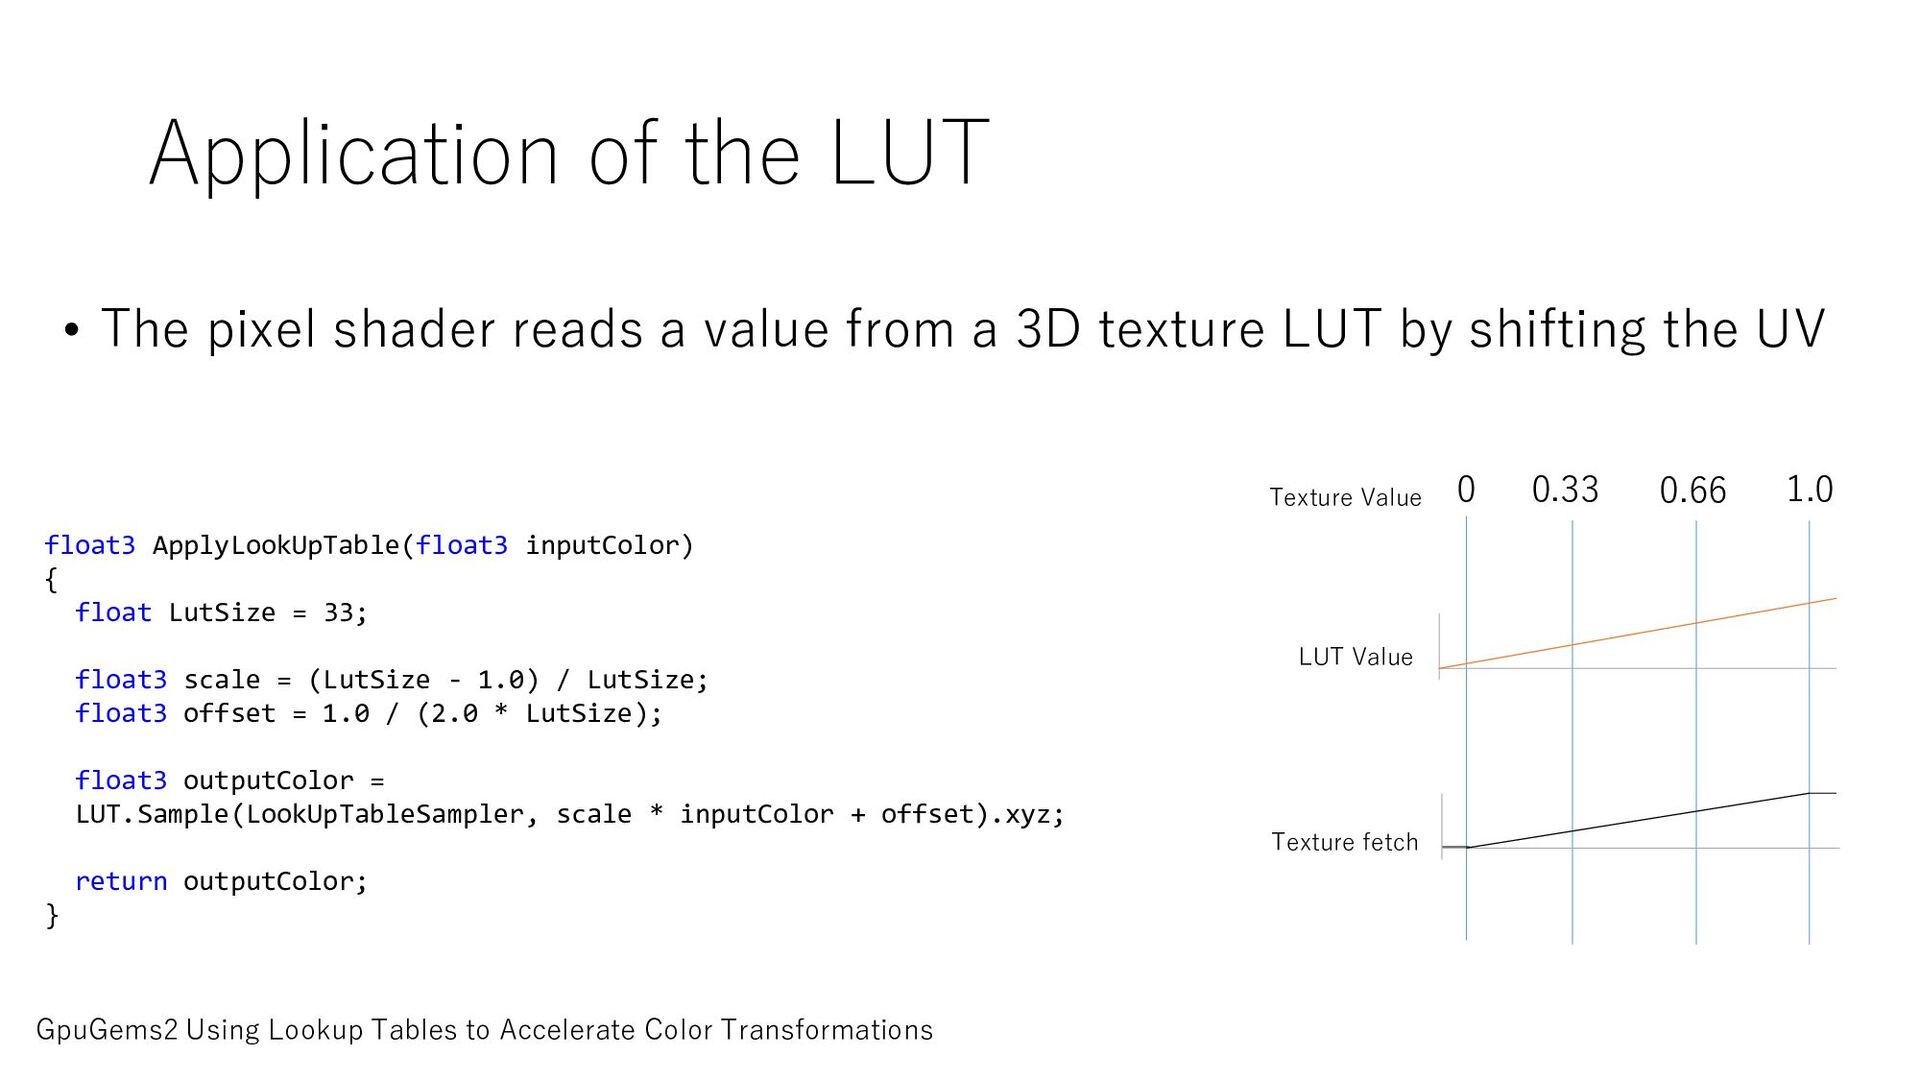
in HLG OETF space • The converter reads the .cube file with OpenColorIO and converts it to a 3D texture with DirectXTex • The format is 33x33x33 pixel or 65x65x65 pixel, same as .cube, uncompressed Float16 .cube .dds OpenColorIO+ DirectXTex
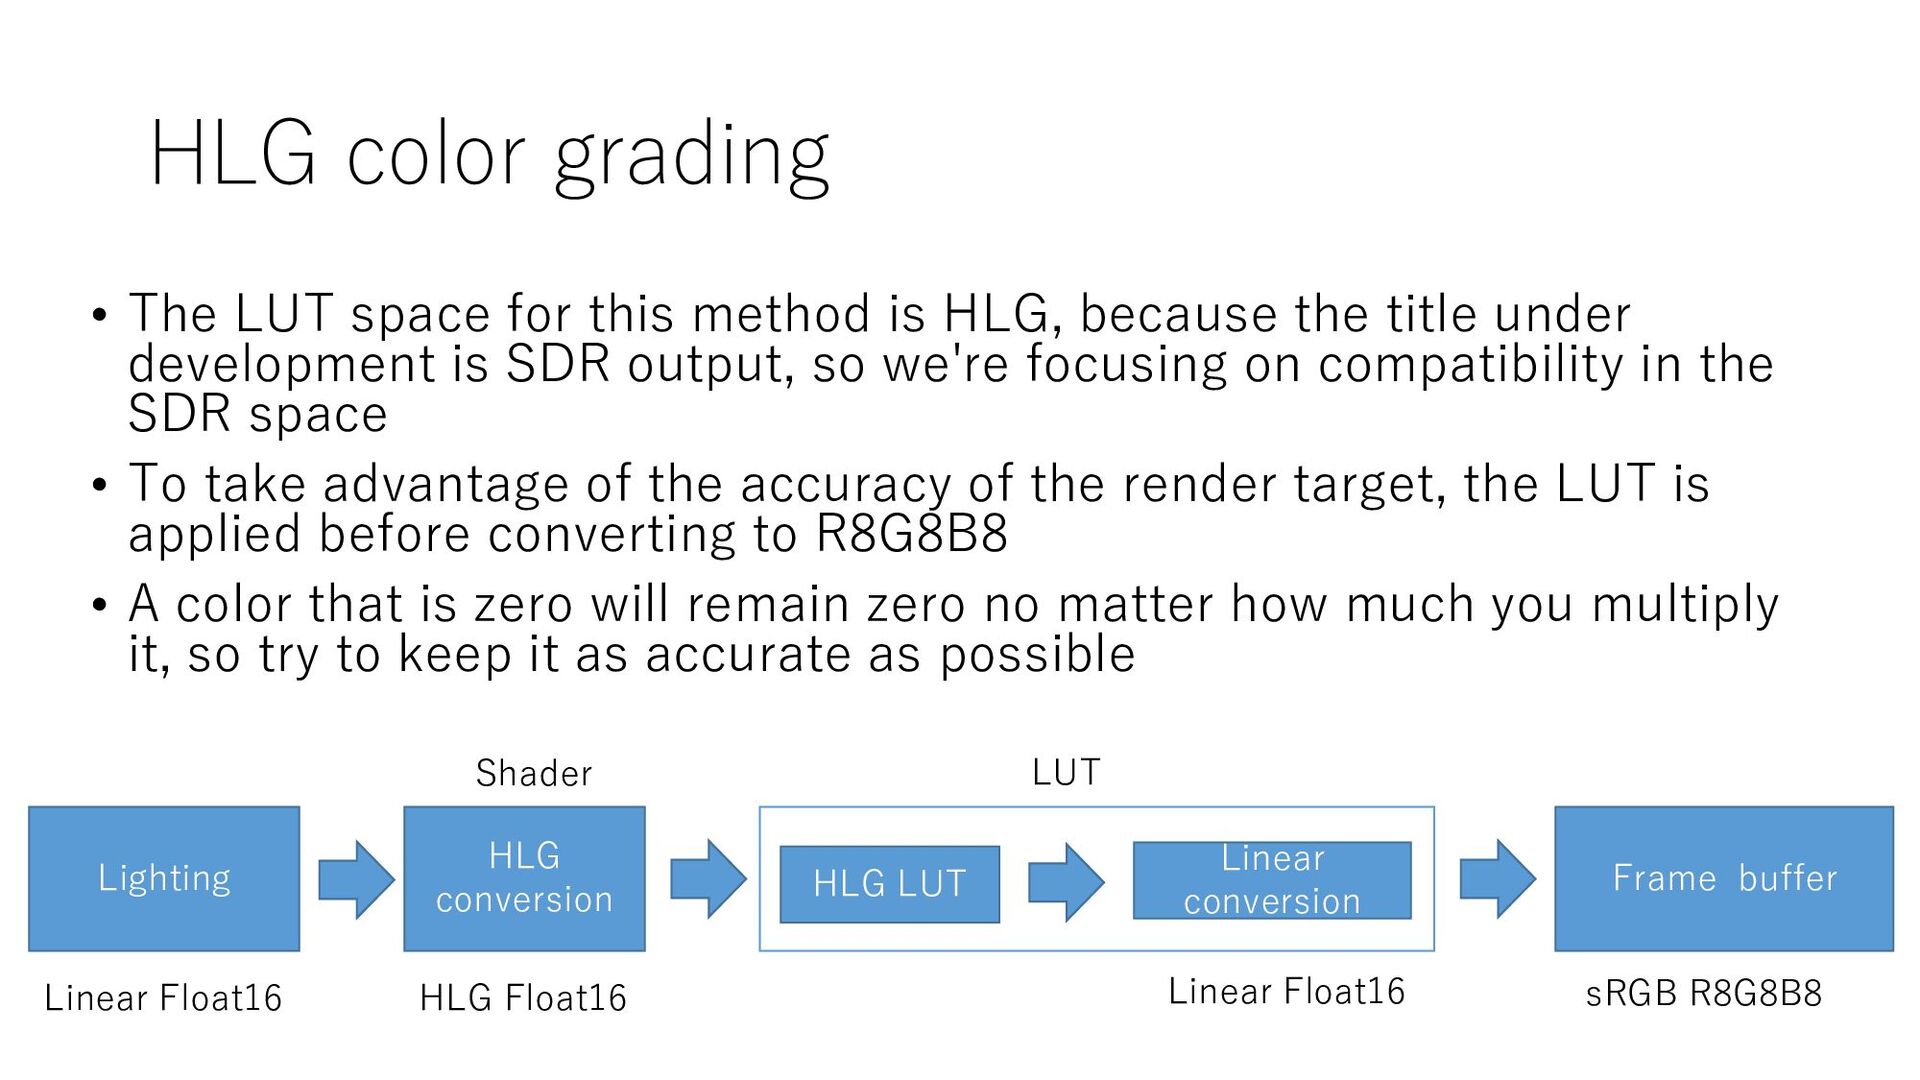
is HLG, because the title under development is SDR output, so we're focusing on compatibility in the SDR space • To take advantage of the accuracy of the render target, the LUT is applied before converting to R8G8B8 • A color that is zero will remain zero no matter how much you multiply it, so try to keep it as accurate as possible Lighting Frame buffer Linear Float16 HLG Float16 HLG conversion Linear Float16 LUT HLG LUT Linear conversion sRGB R8G8B8 Shader
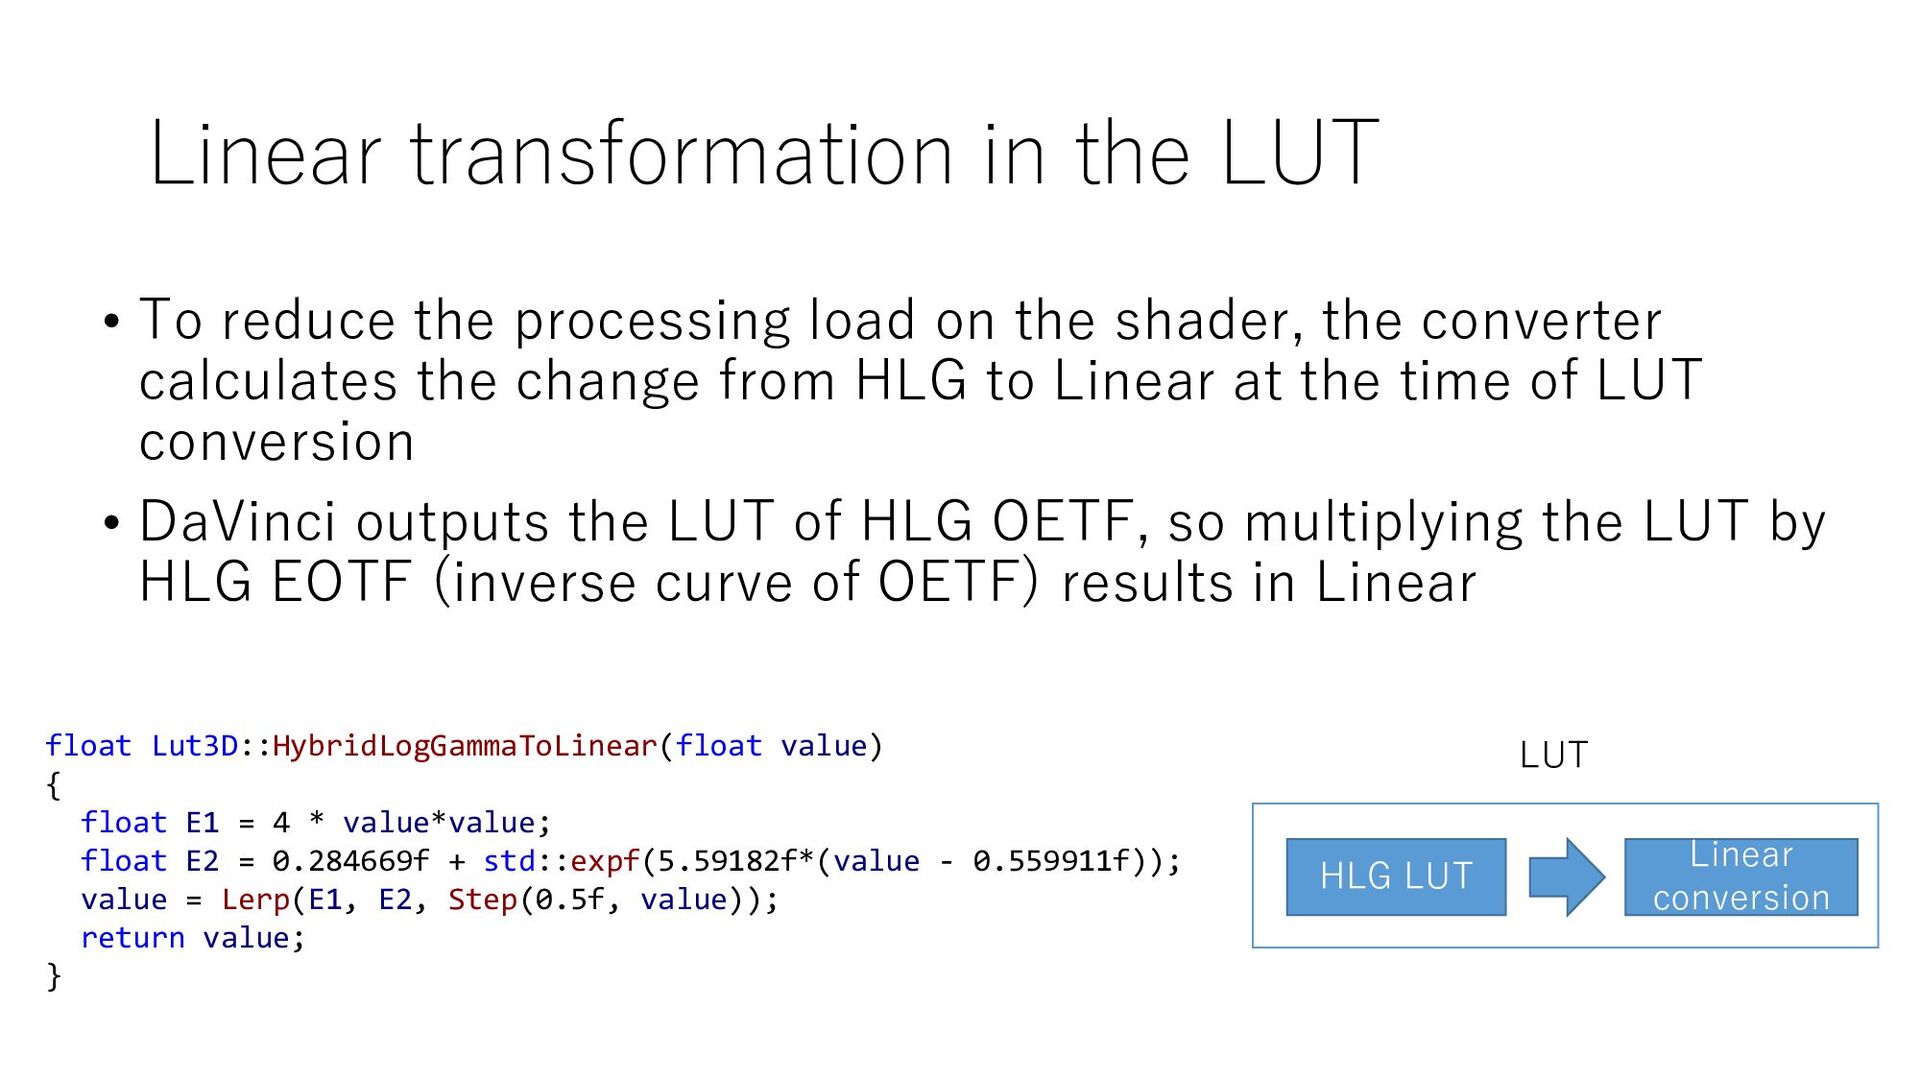
load on the shader, the converter calculates the change from HLG to Linear at the time of LUT conversion • DaVinci outputs the LUT of HLG OETF, so multiplying the LUT by HLG EOTF (inverse curve of OETF) results in Linear LUT HLG LUT Linear conversion float Lut3D::HybridLogGammaToLinear(float value) { float E1 = 4 * value*value; float E2 = 0.284669f + std::expf(5.59182f*(value - 0.559911f)); value = Lerp(E1, E2, Step(0.5f, value)); return value; }
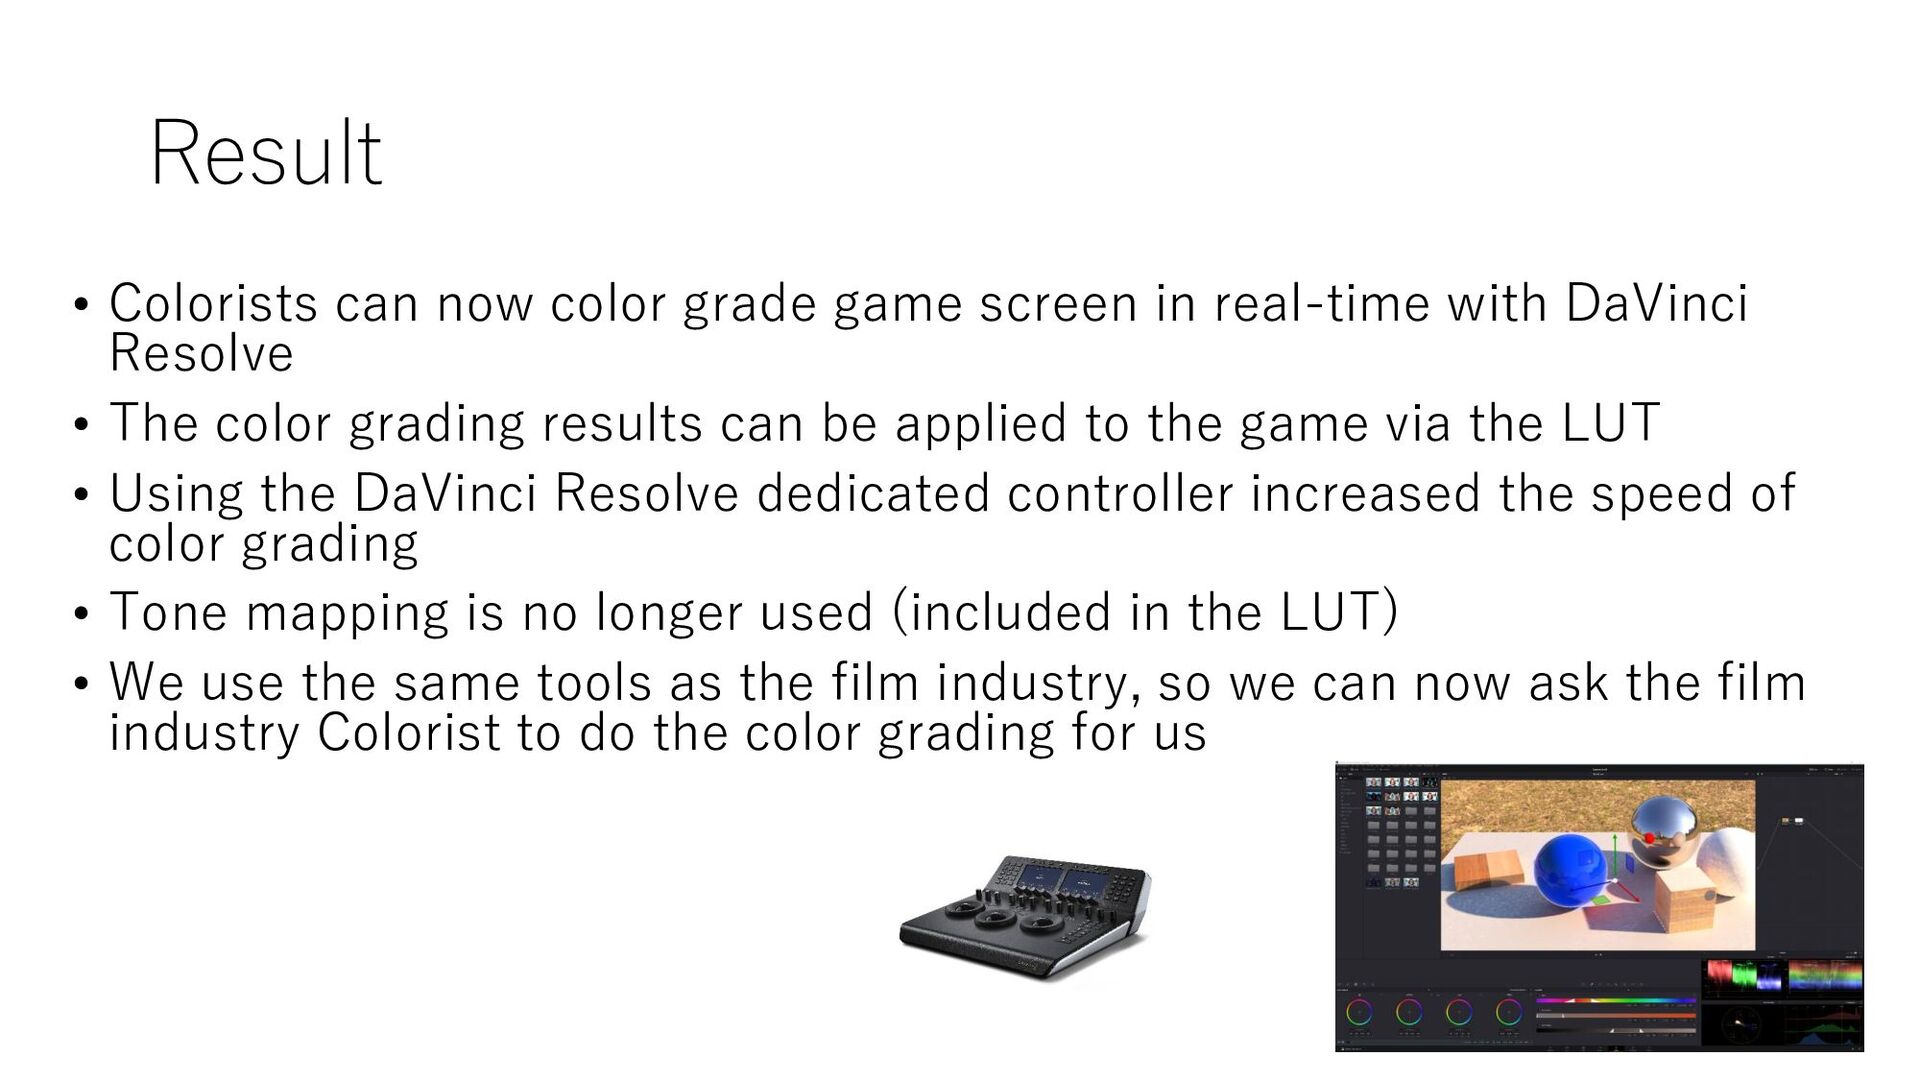
real-time with DaVinci Resolve • The color grading results can be applied to the game via the LUT • Using the DaVinci Resolve dedicated controller increased the speed of color grading • Tone mapping is no longer used (included in the LUT) • We use the same tools as the film industry, so we can now ask the film industry Colorist to do the color grading for us
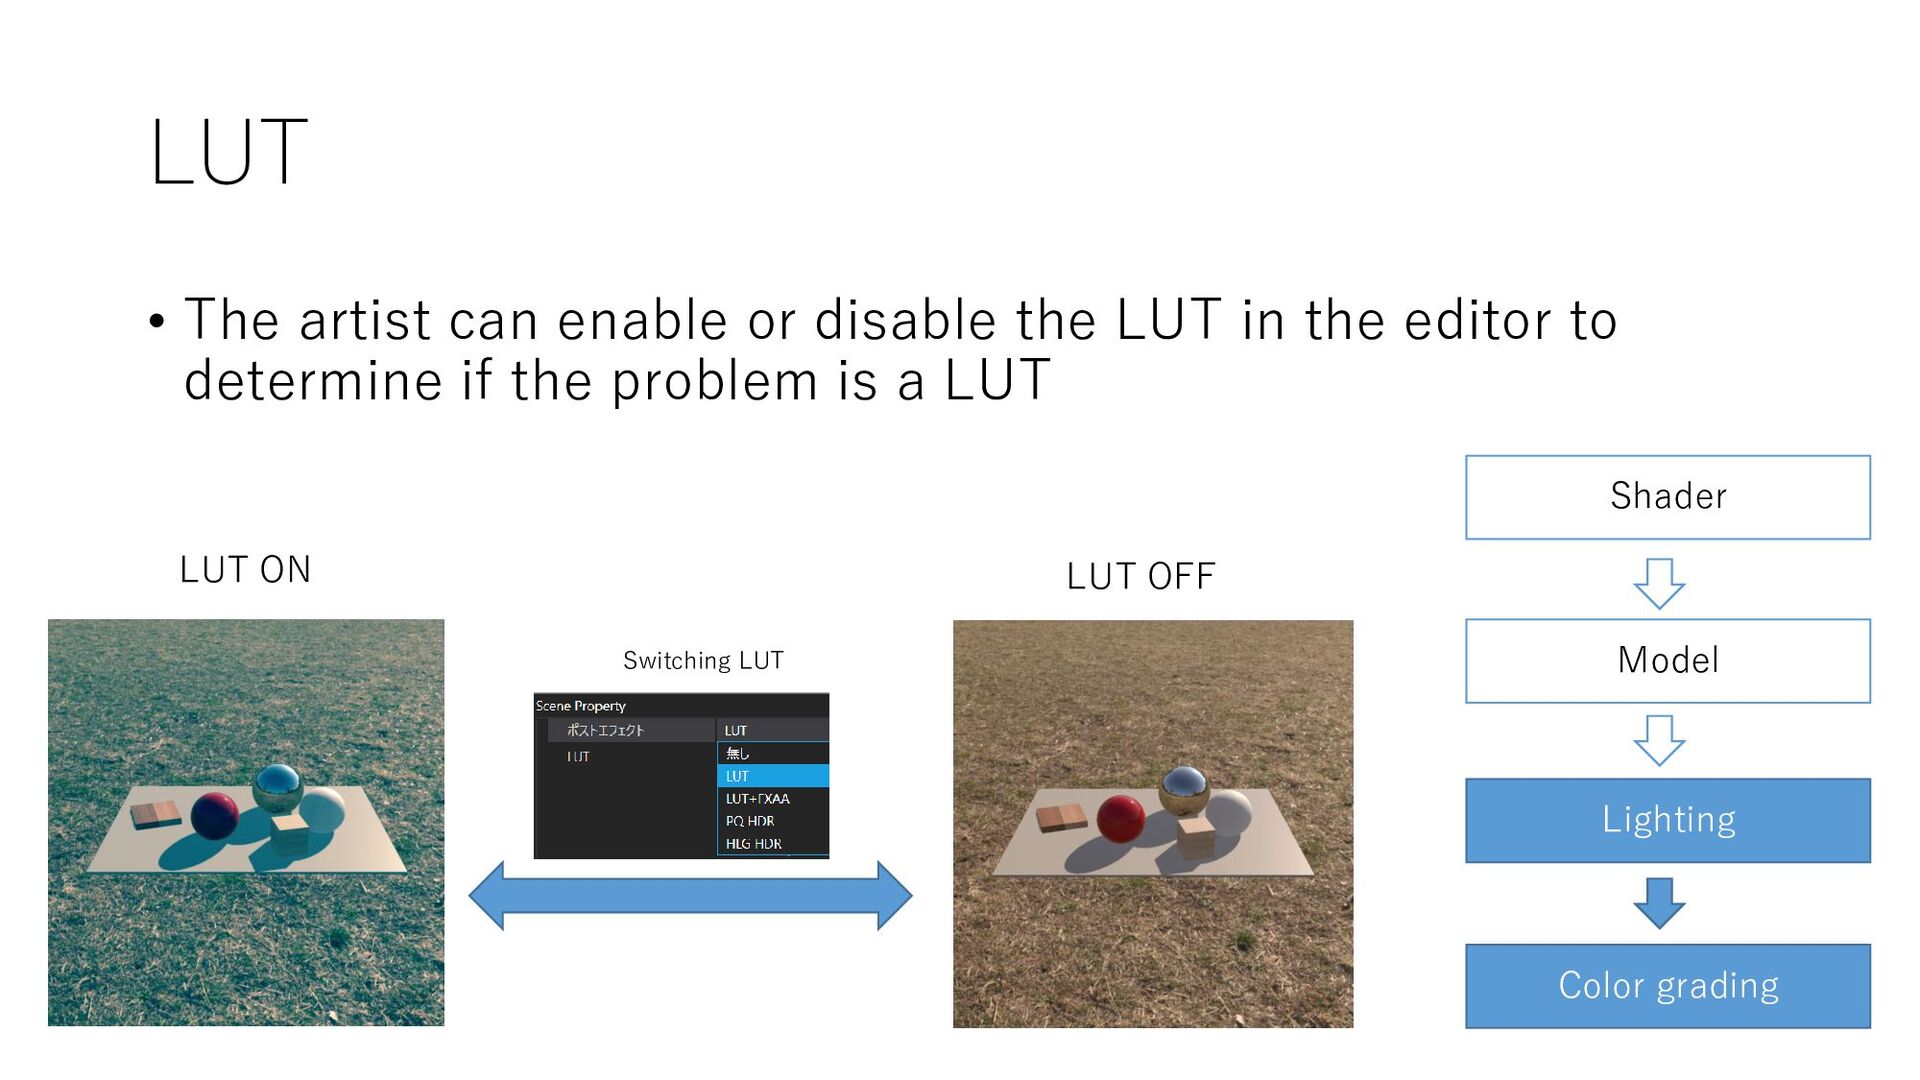
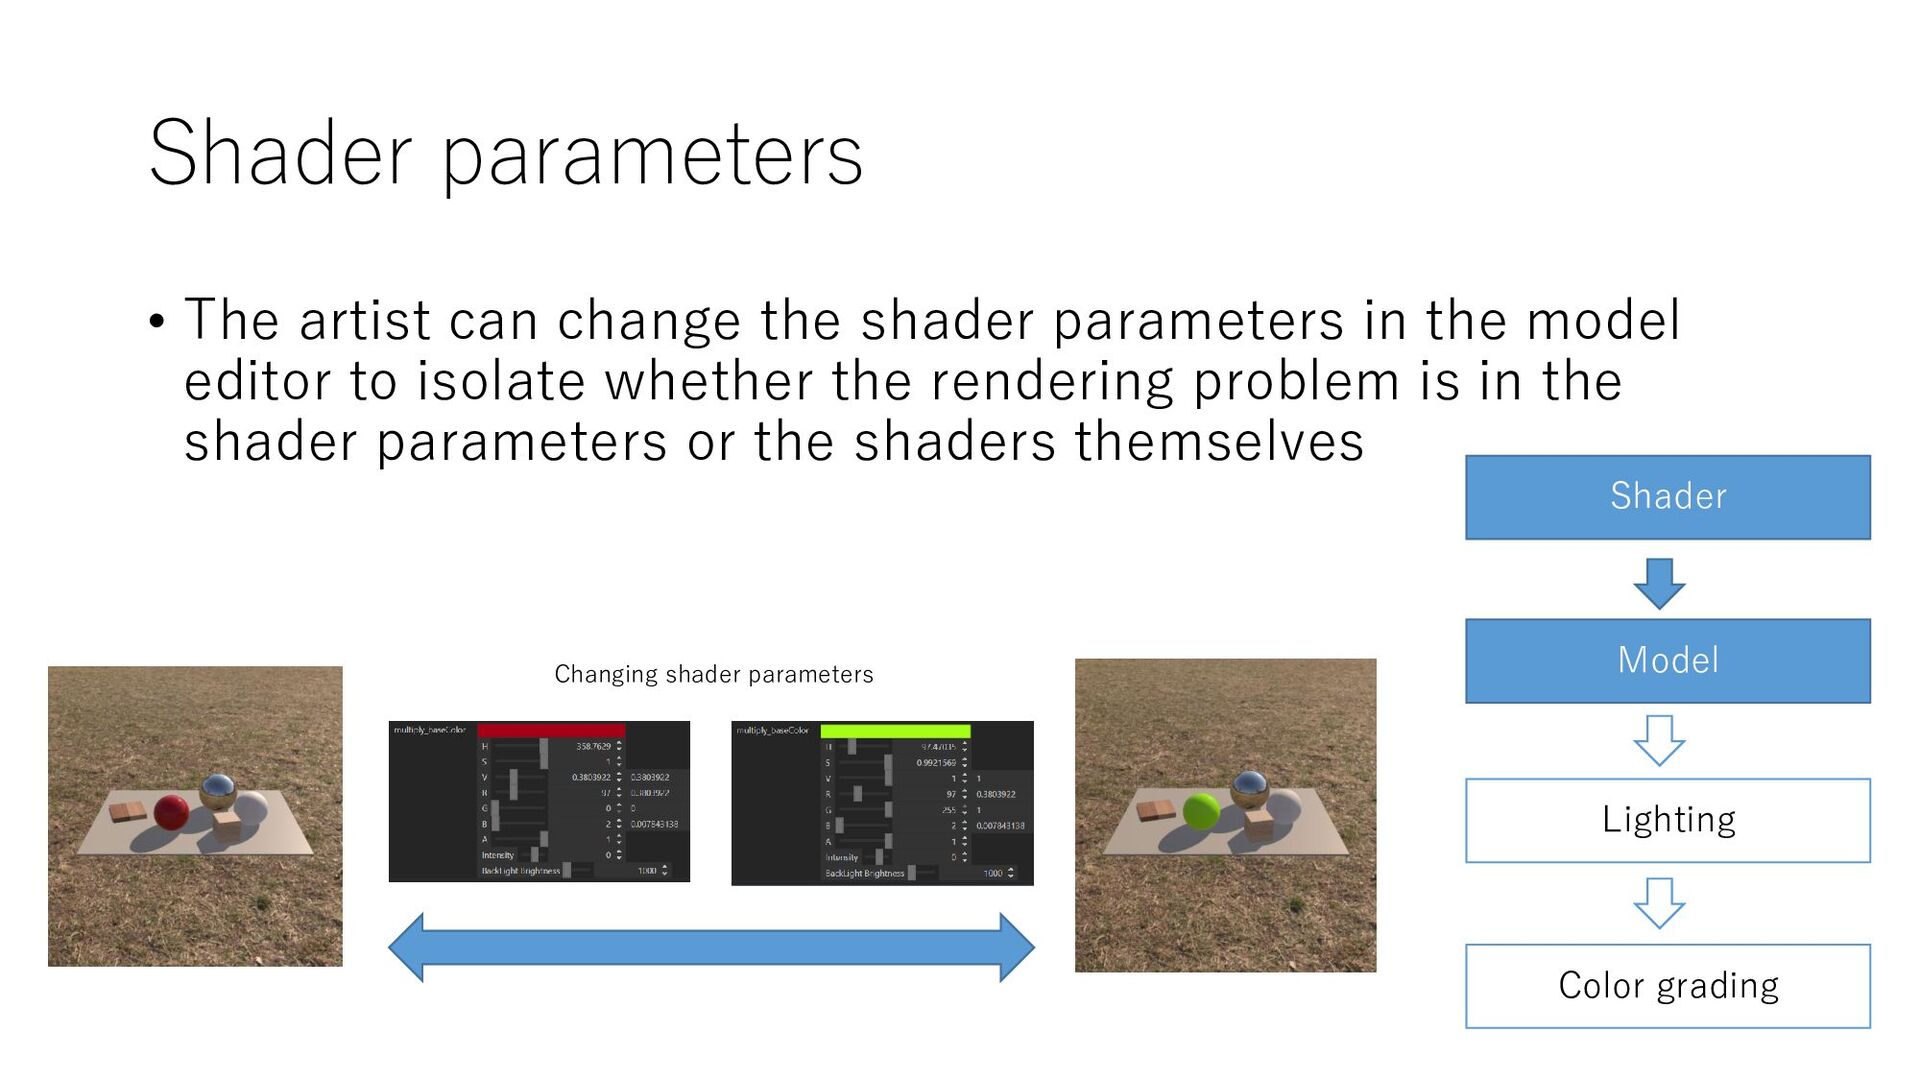
in the model editor to isolate whether the rendering problem is in the shader parameters or the shaders themselves Shader Model Lighting Color grading Changing shader parameters
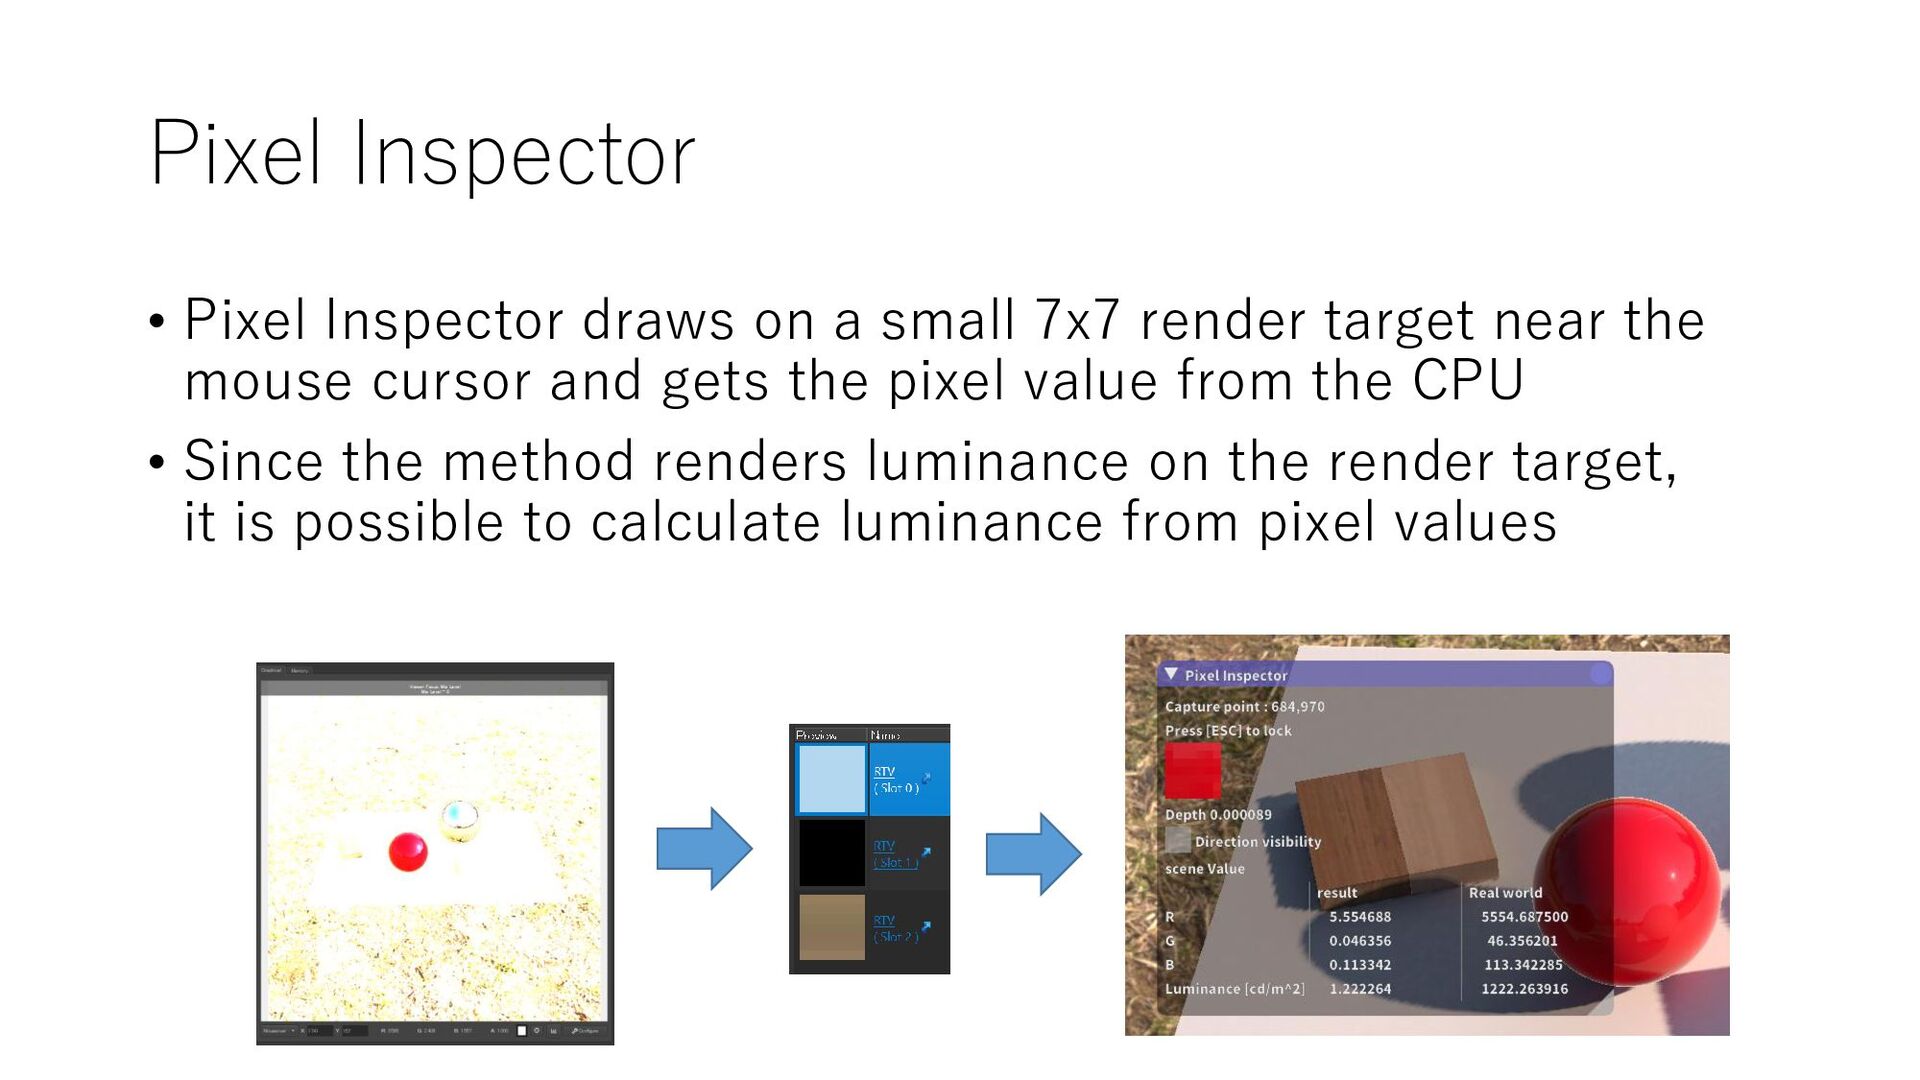
render target near the mouse cursor and gets the pixel value from the CPU • Since the method renders luminance on the render target, it is possible to calculate luminance from pixel values
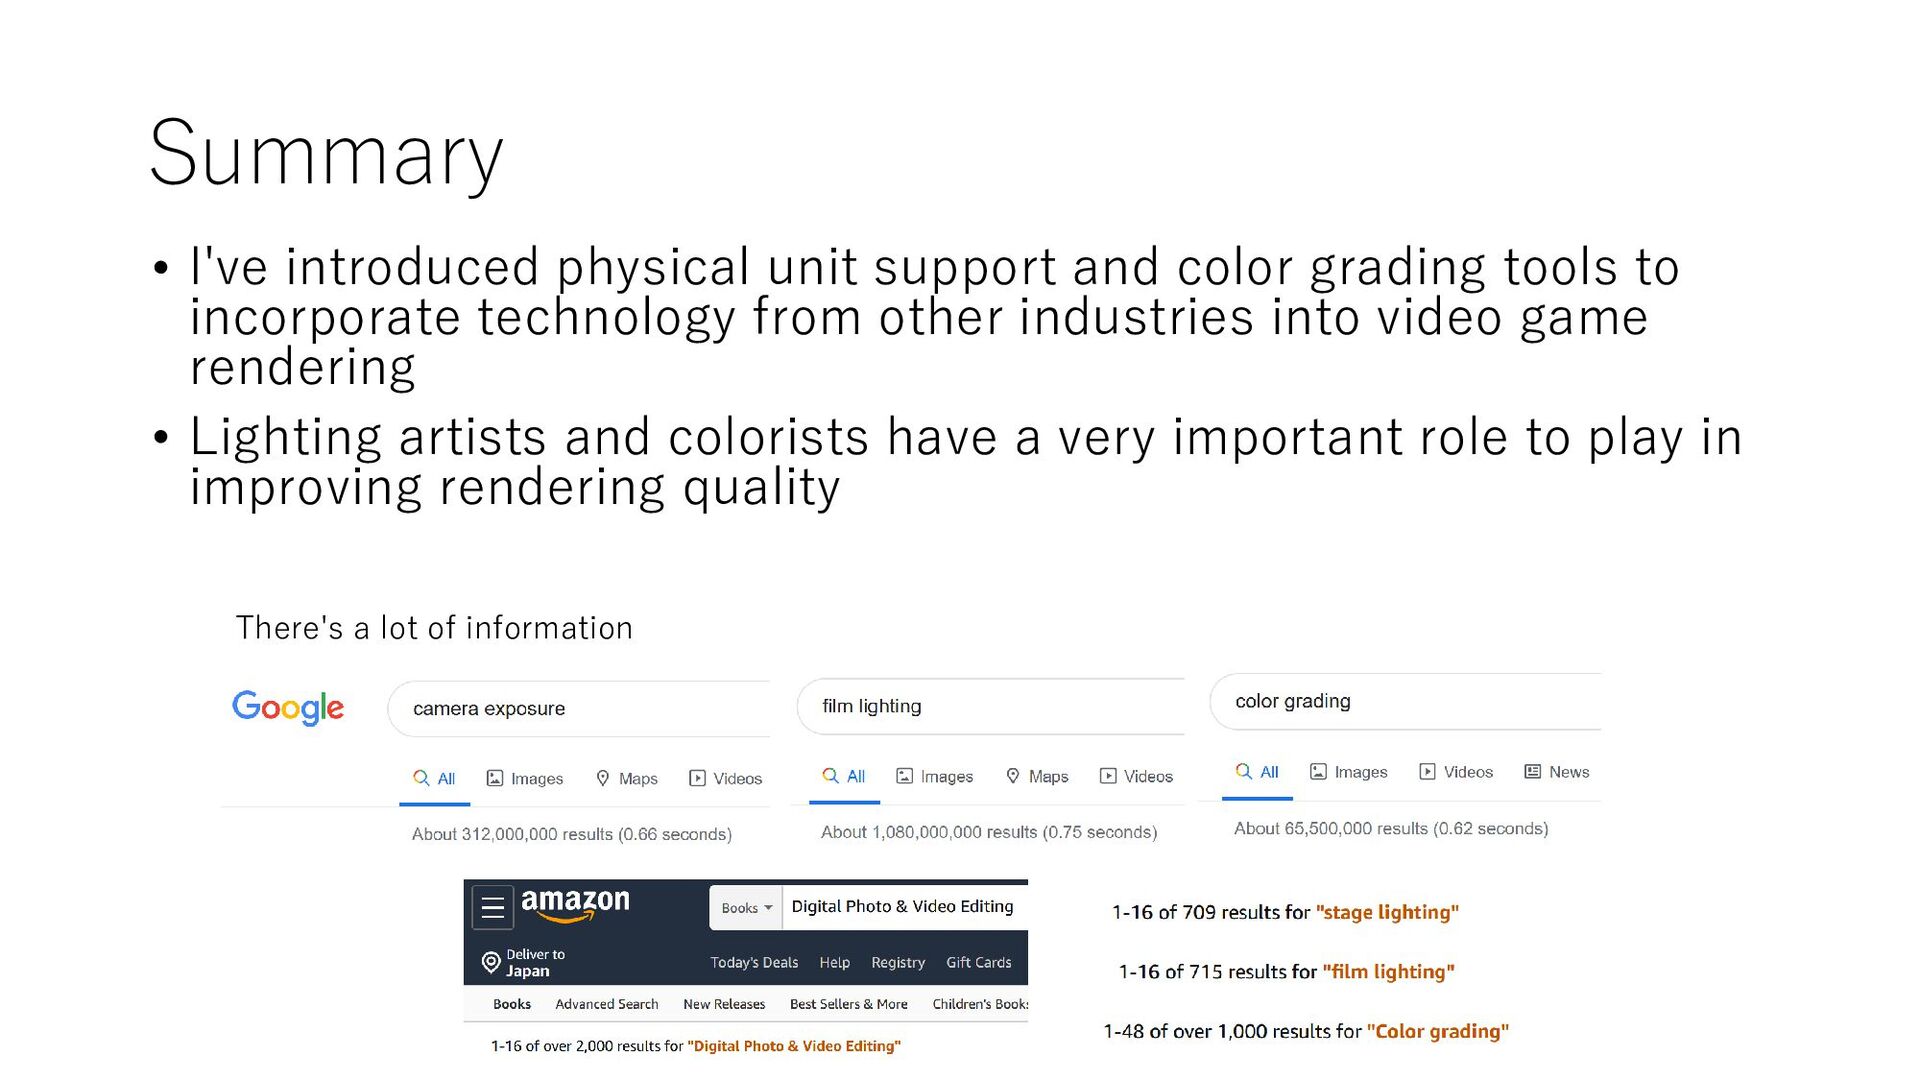
tools to incorporate technology from other industries into video game rendering • Lighting artists and colorists have a very important role to play in improving rendering quality There's a lot of information