Upgrade to Pro — share decks privately, control downloads, hide ads and more …

【CEDEC2025】Creating UI with Houdini

【CEDEC2025】Creating UI with Houdini

This is the English translation of CEDEC2025 "Creating UI with Houdini".
This document describes how to create a UI using Houdini.
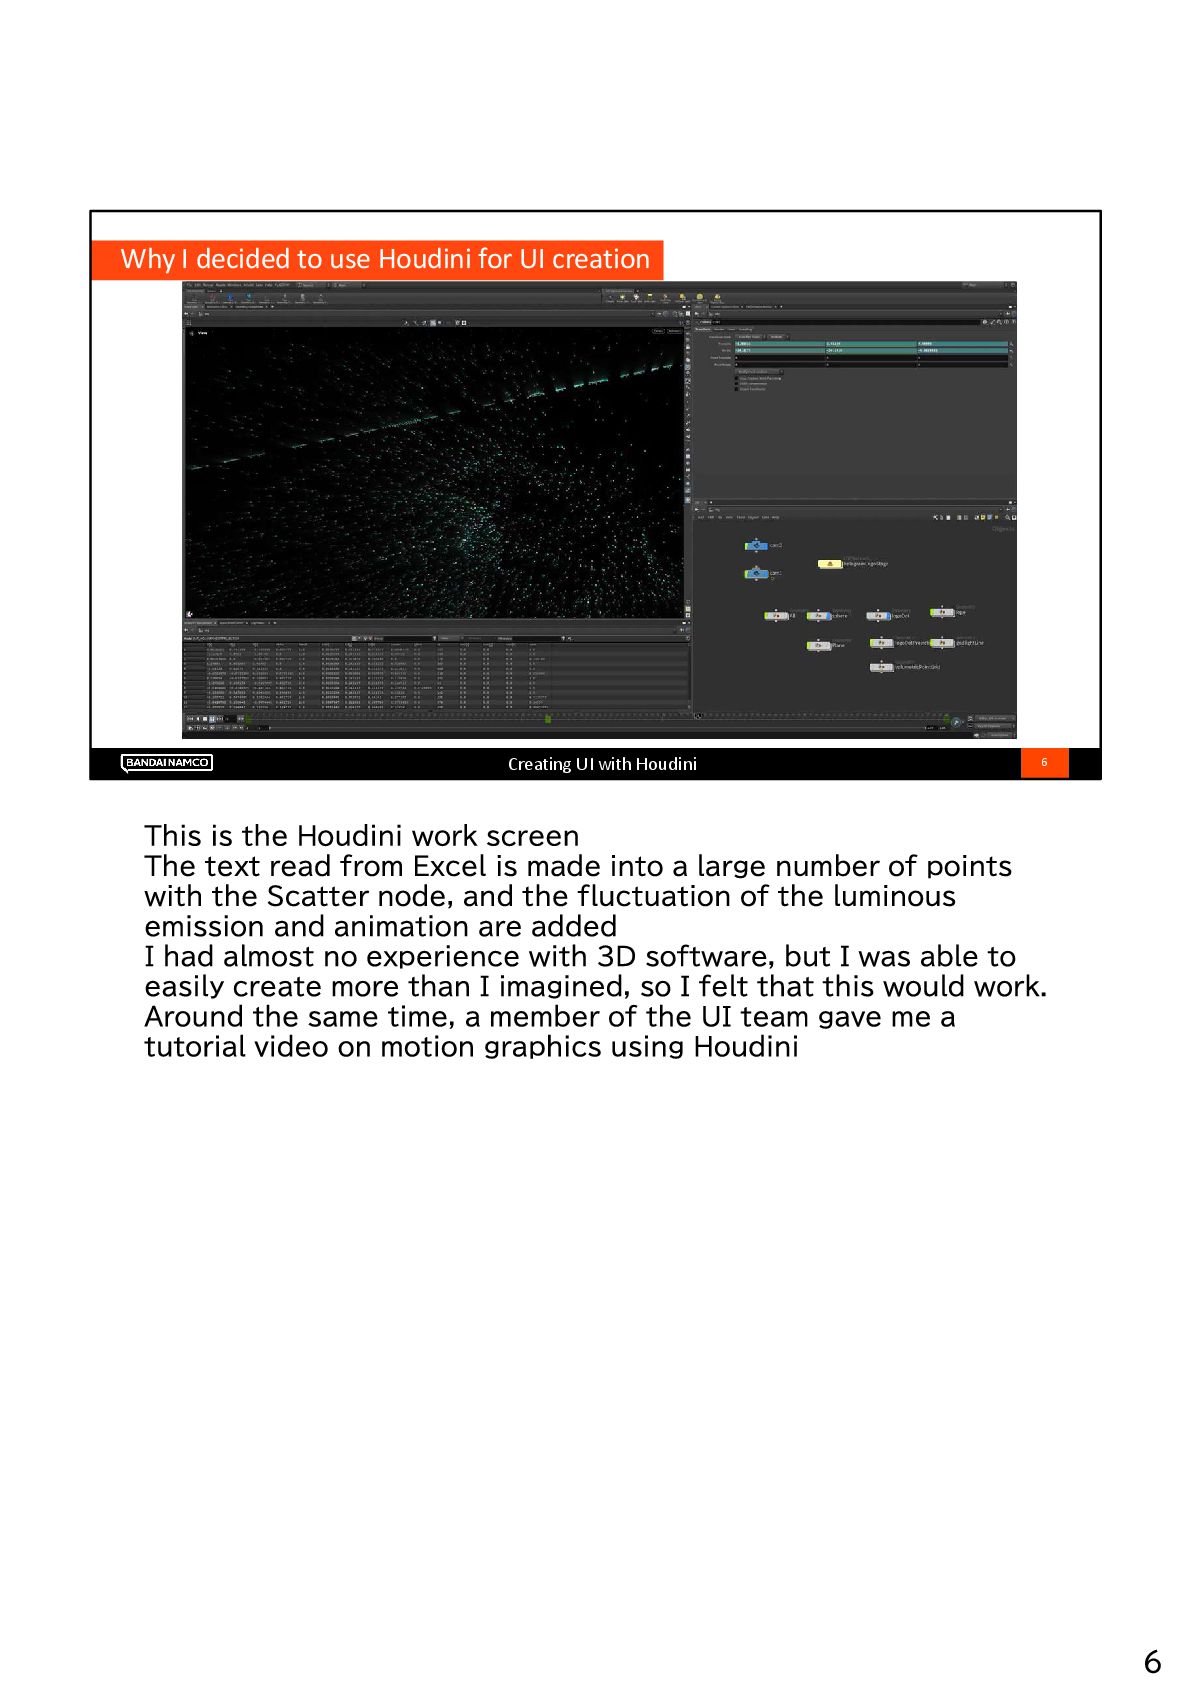
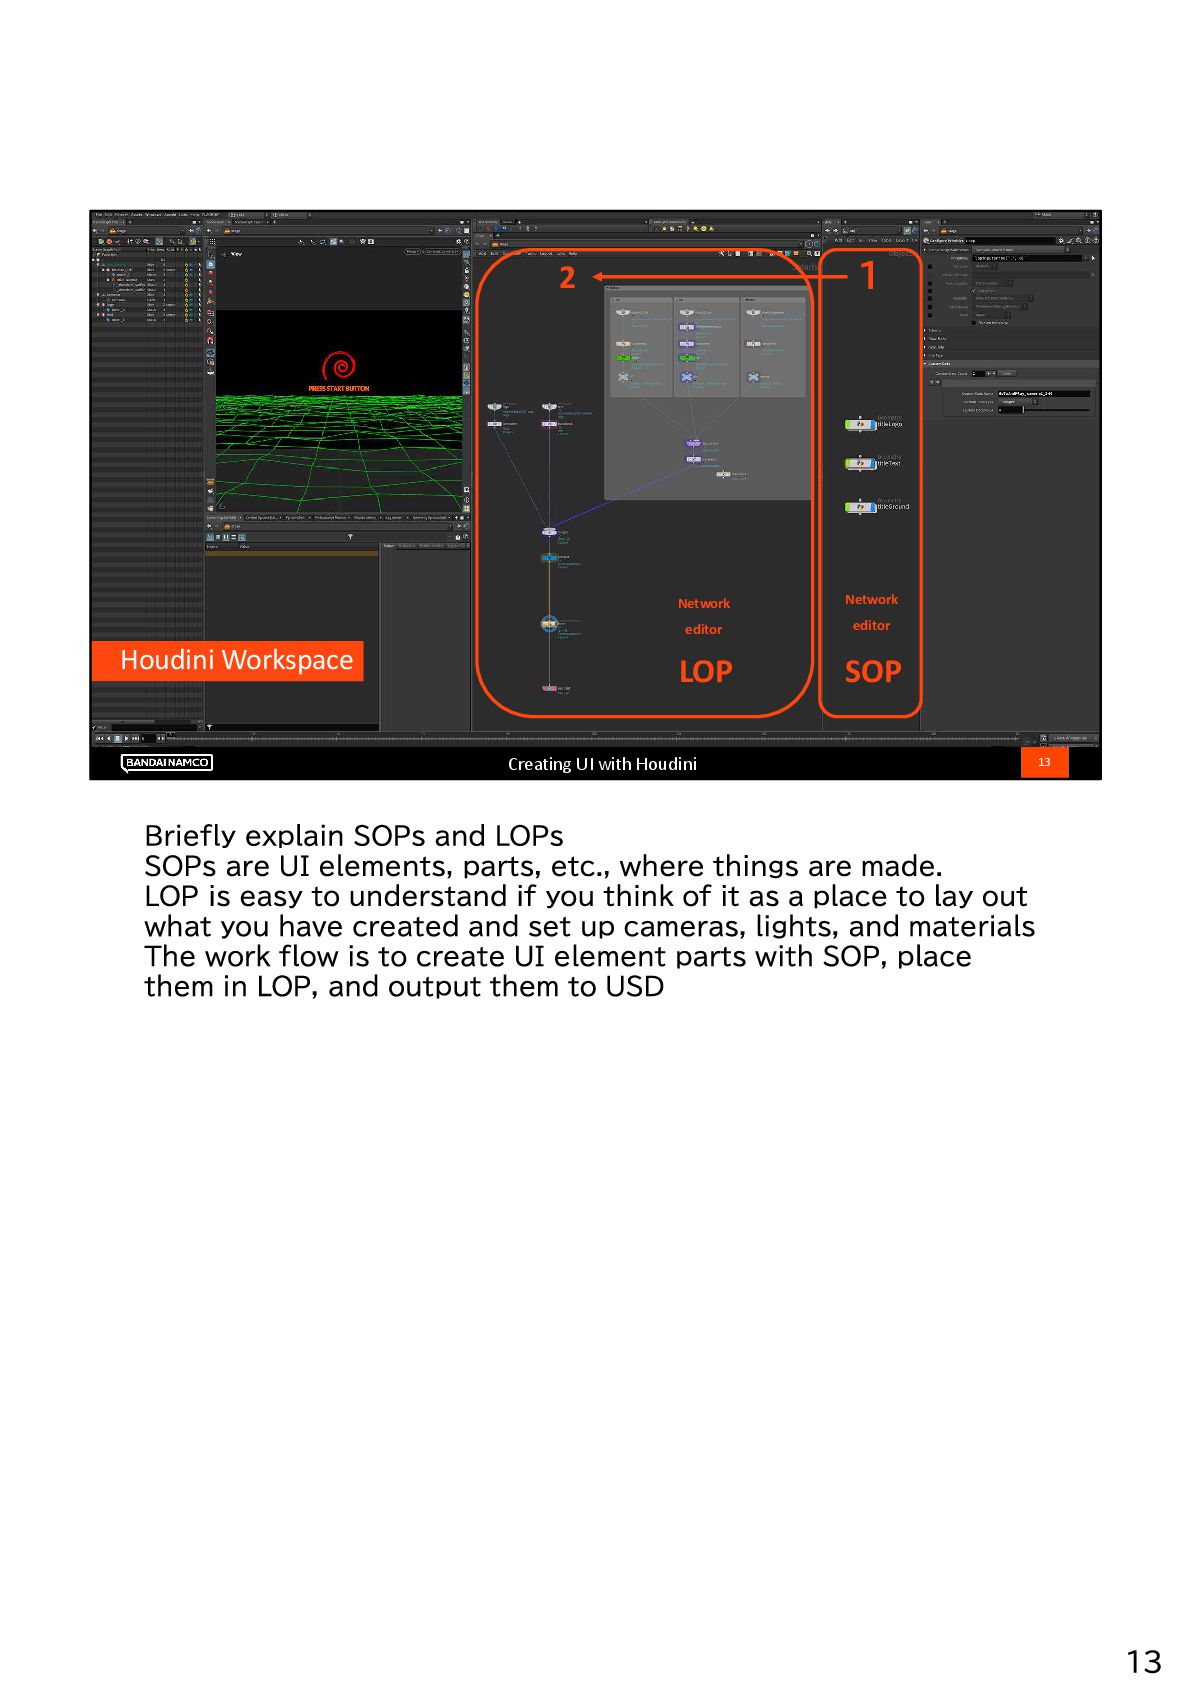
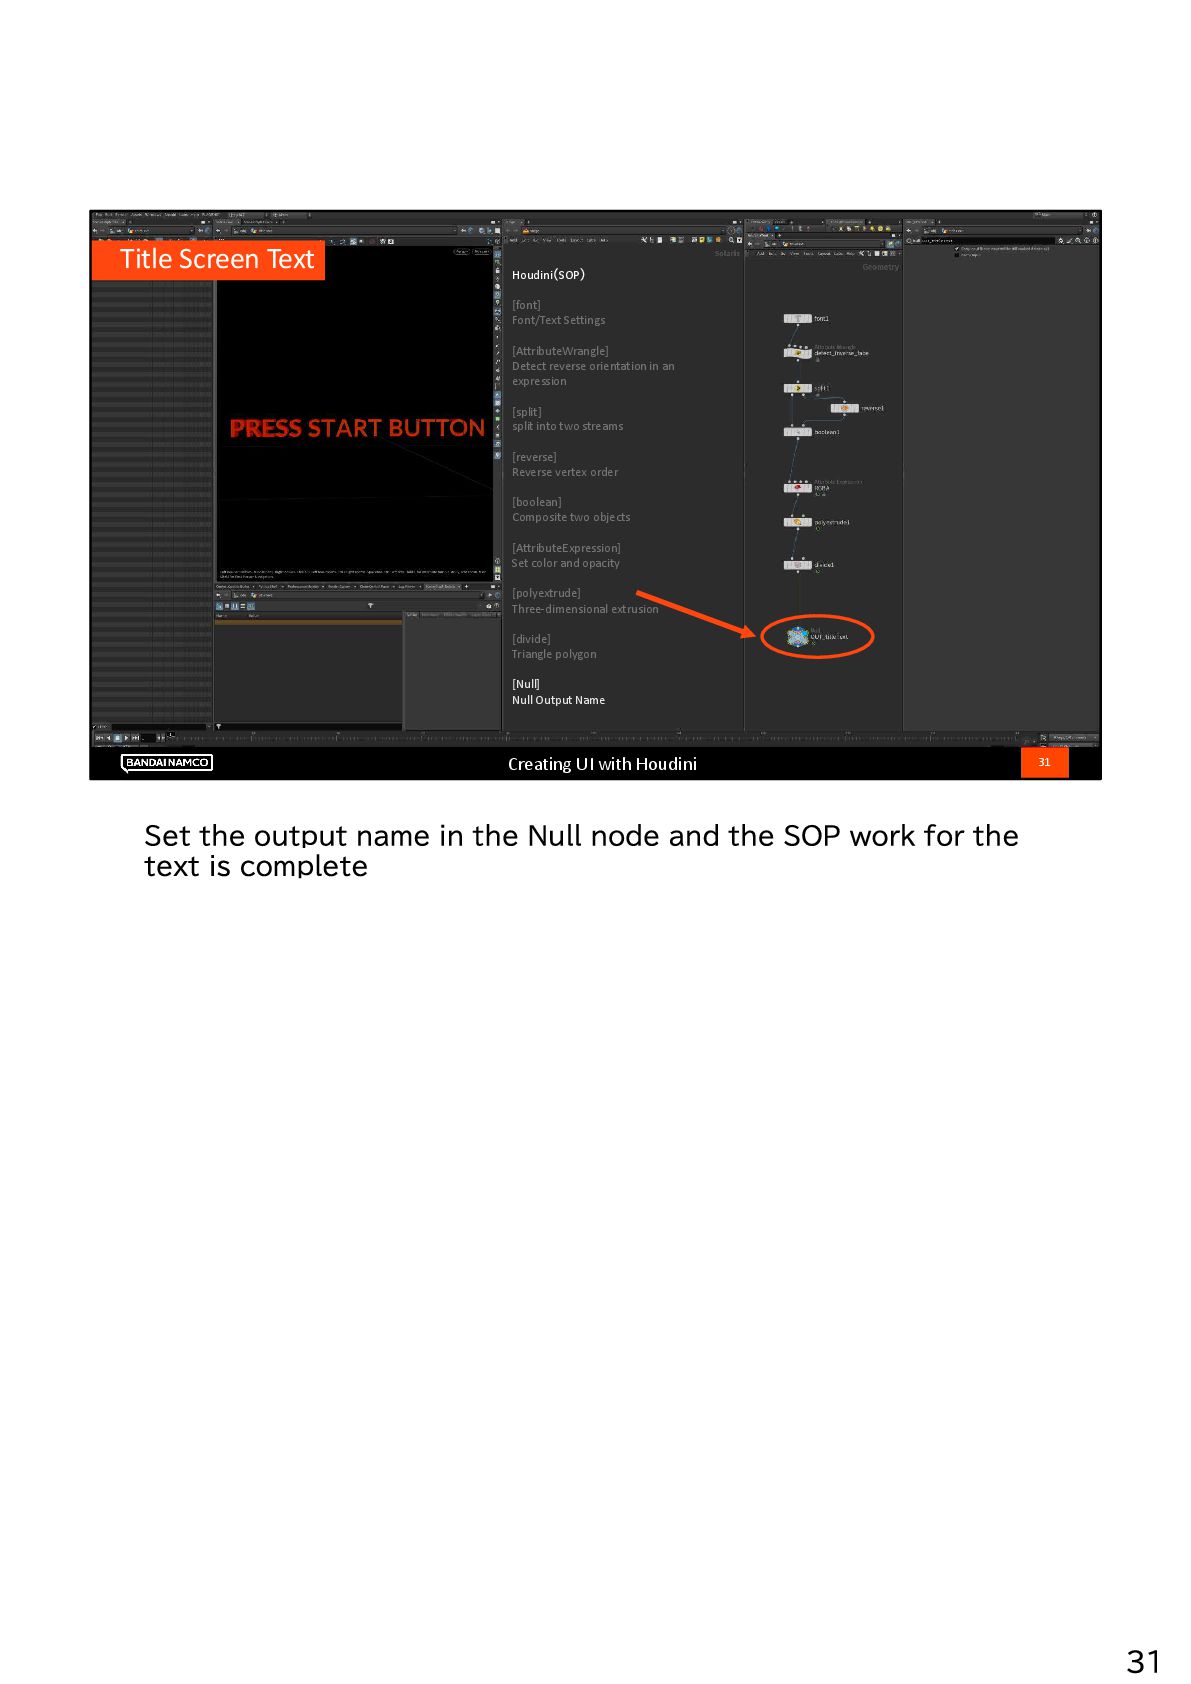
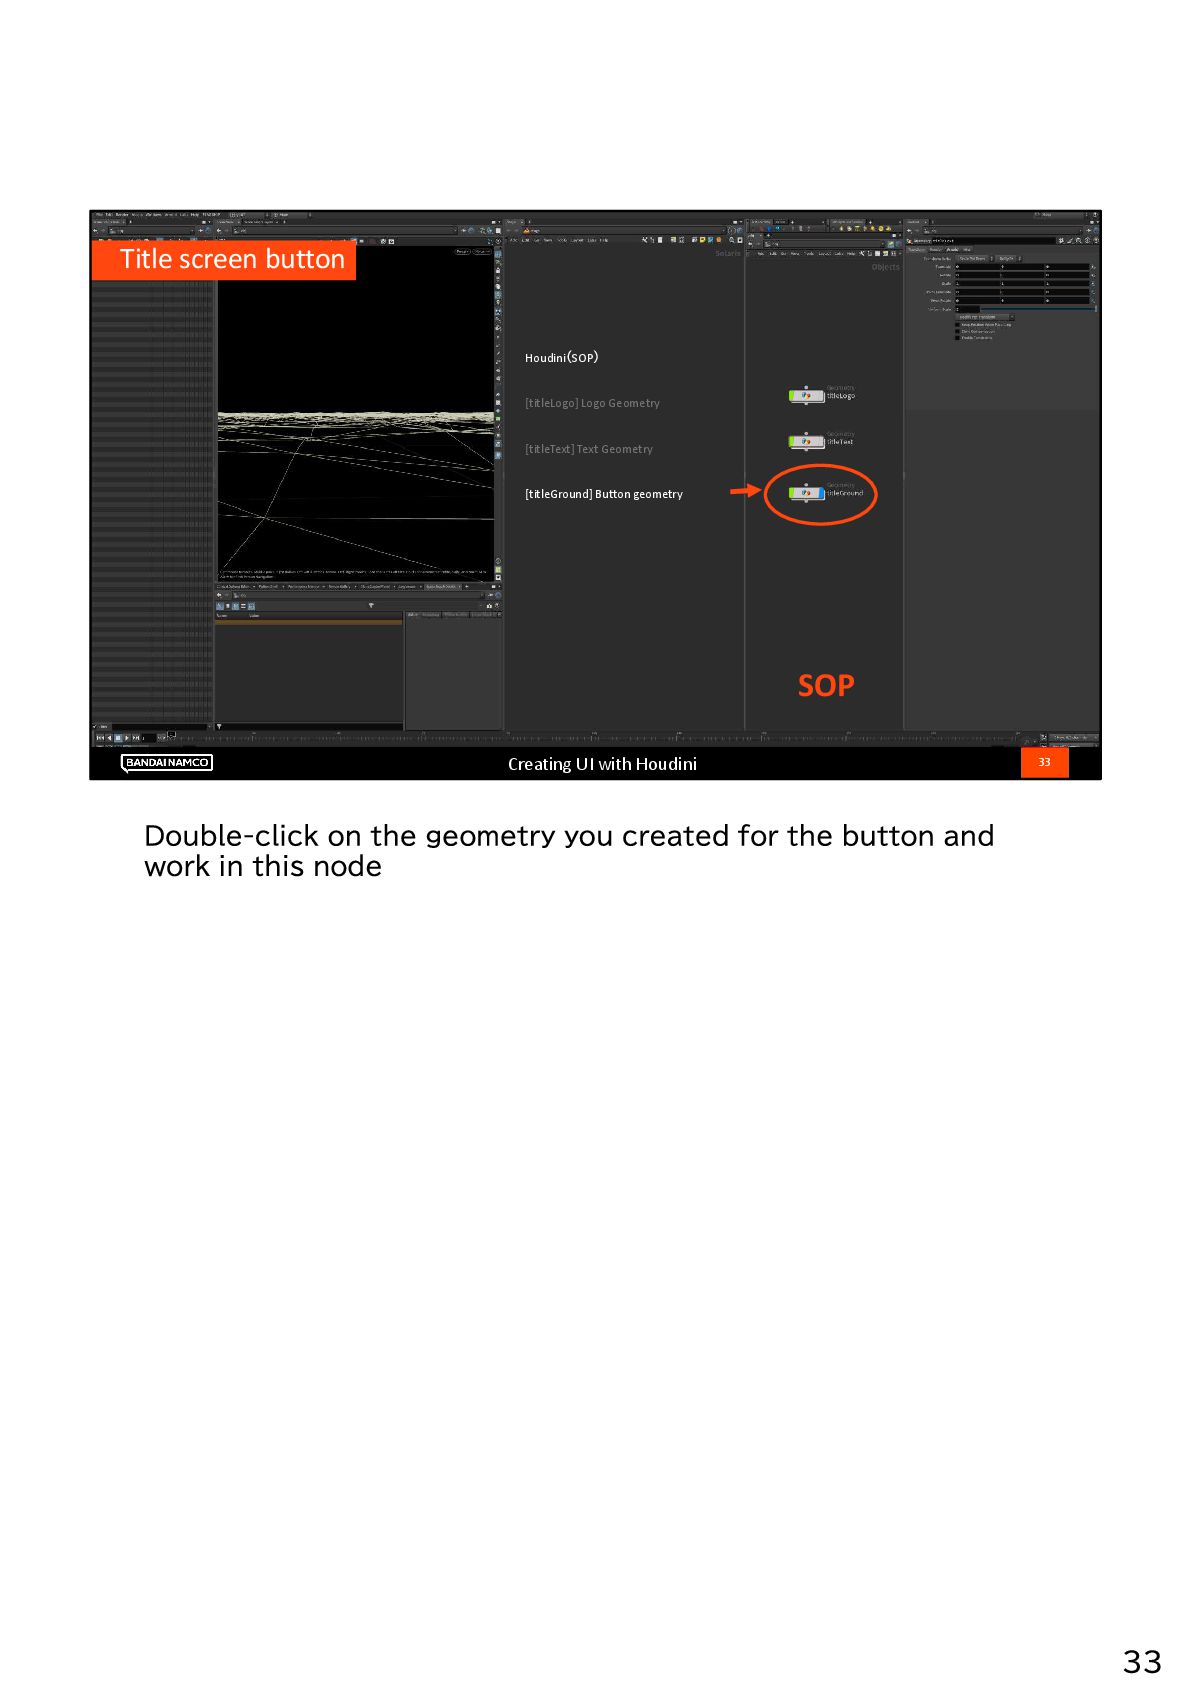
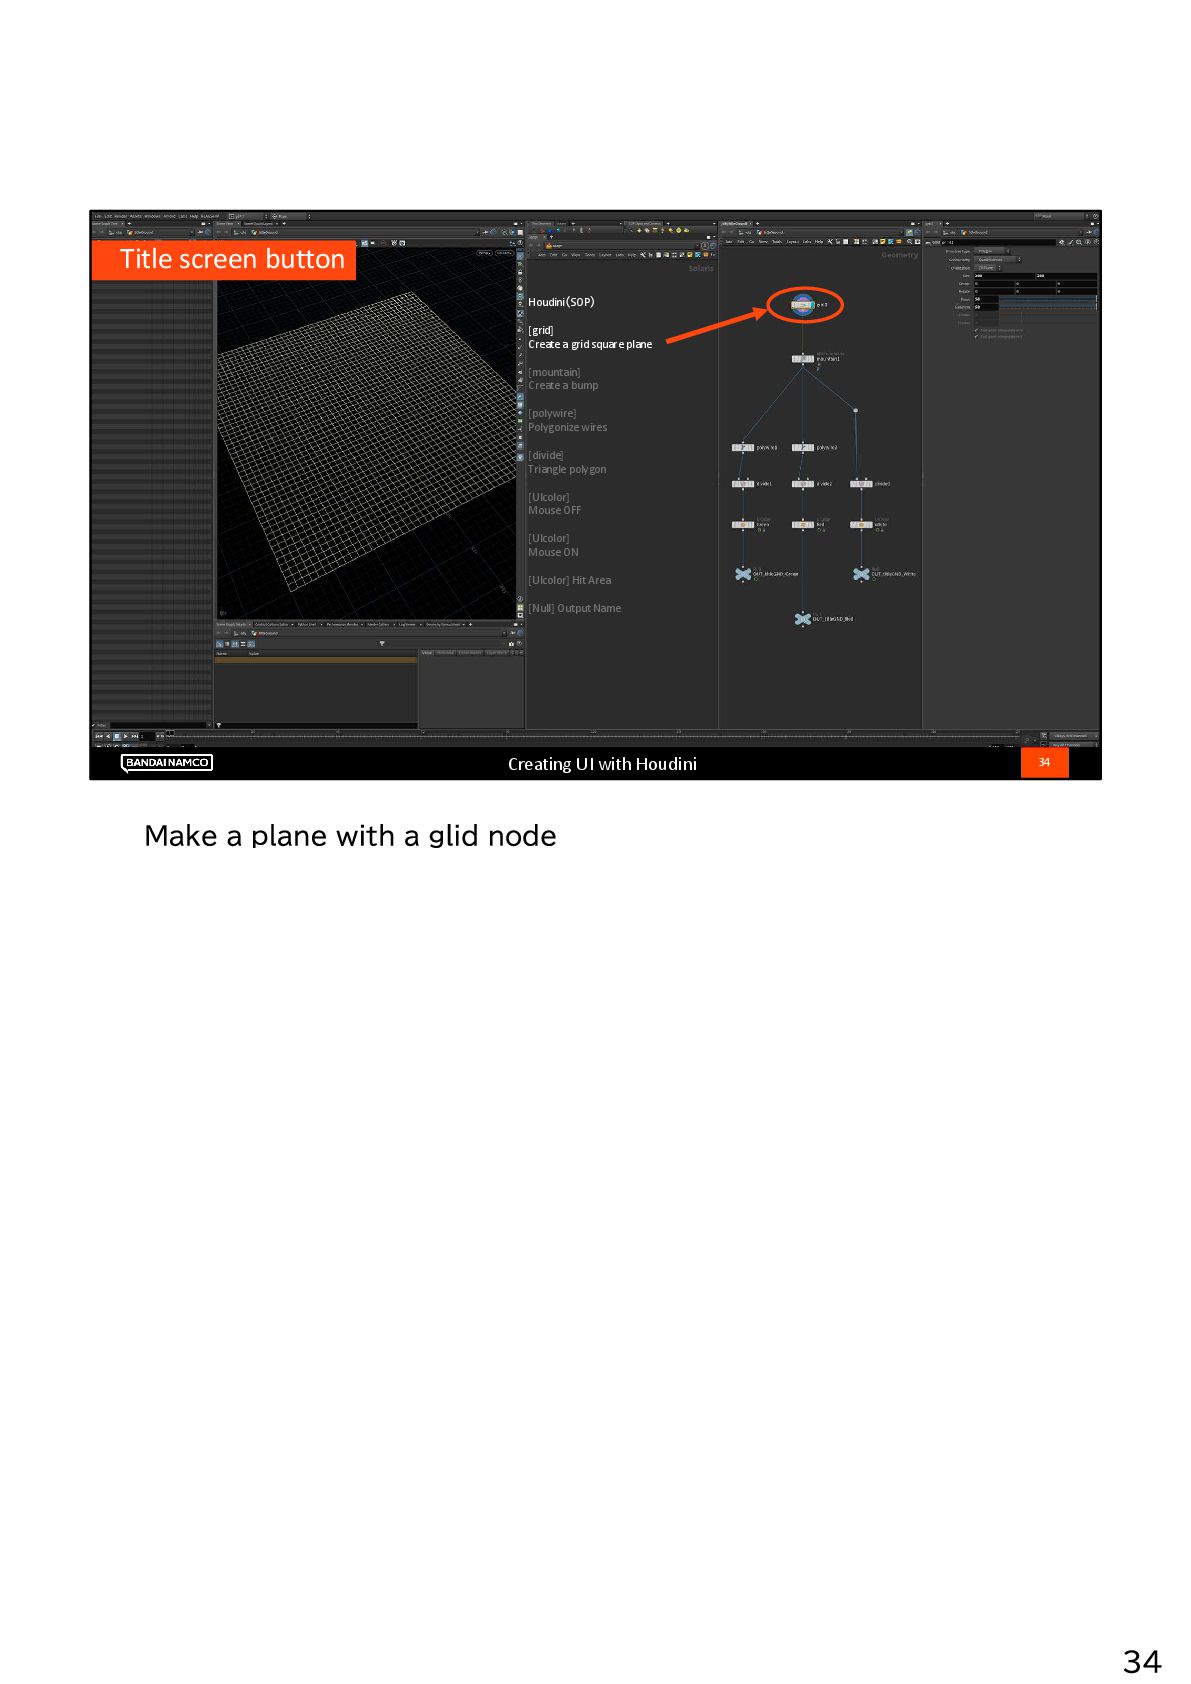
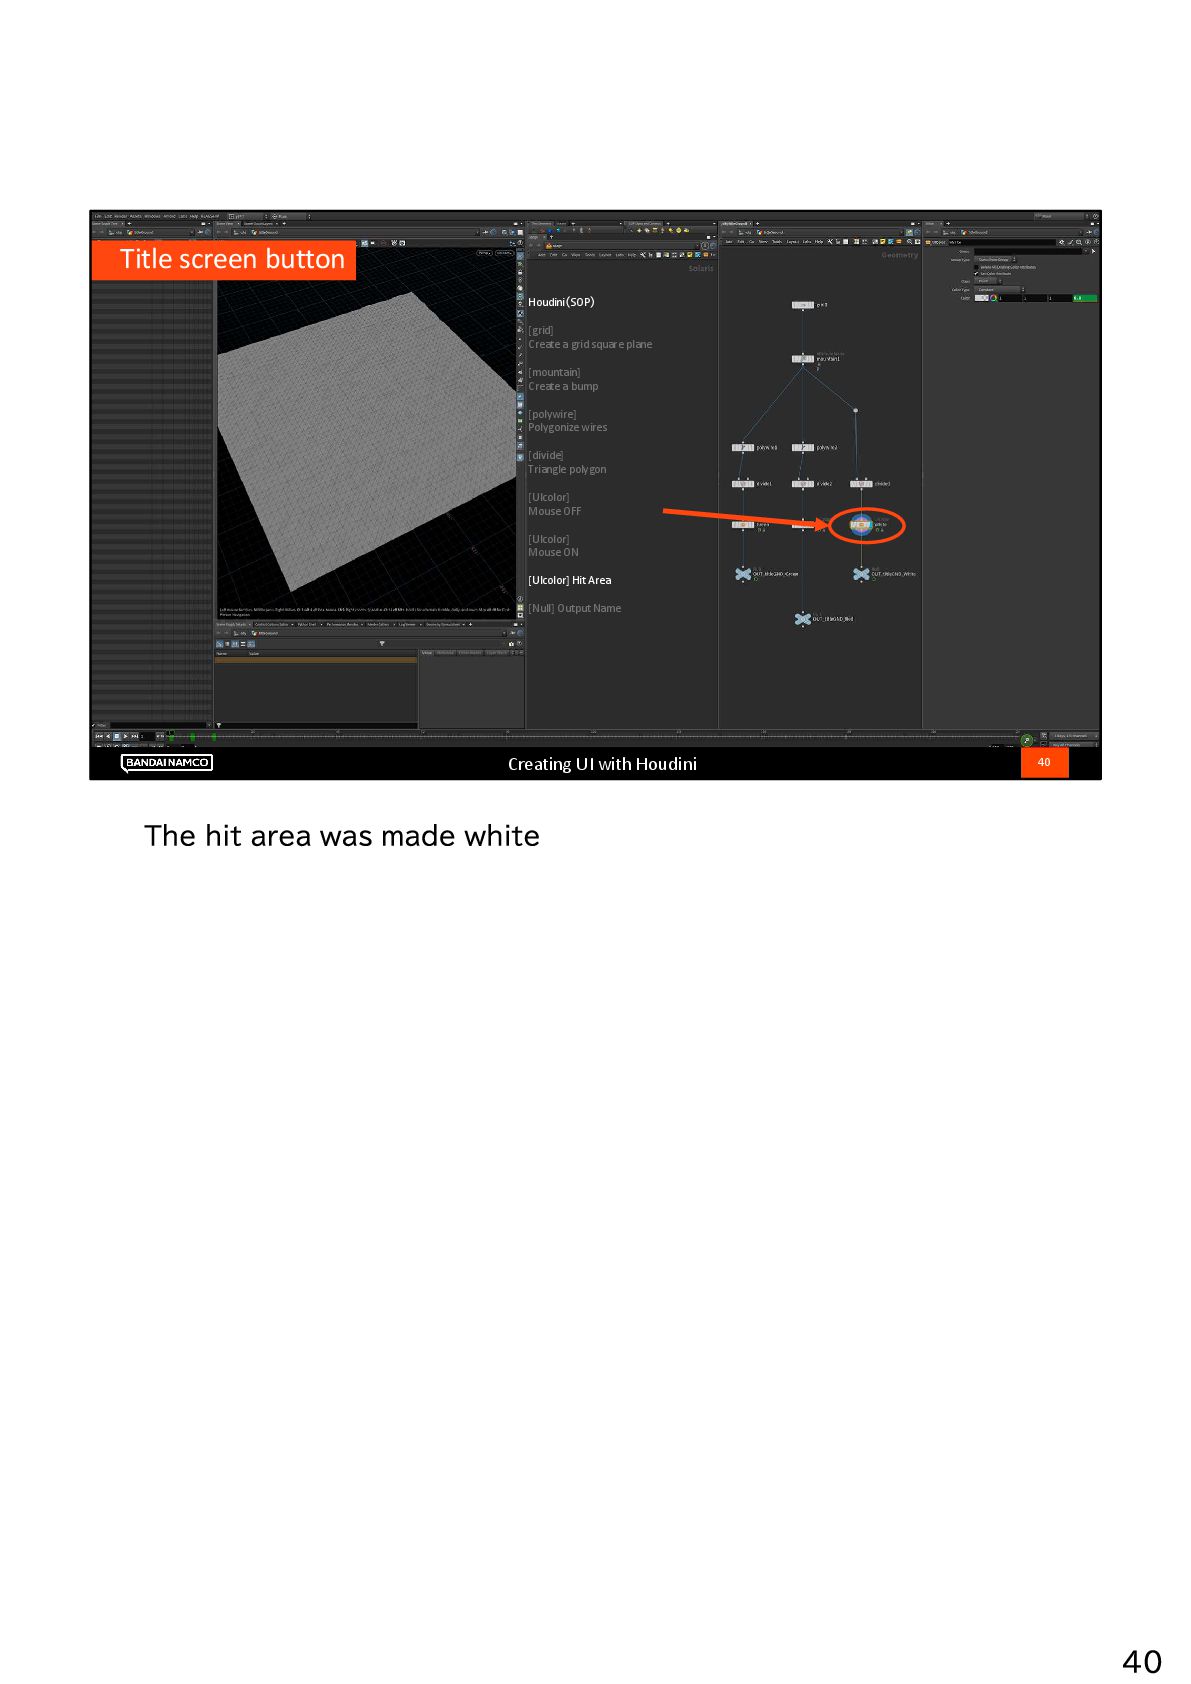
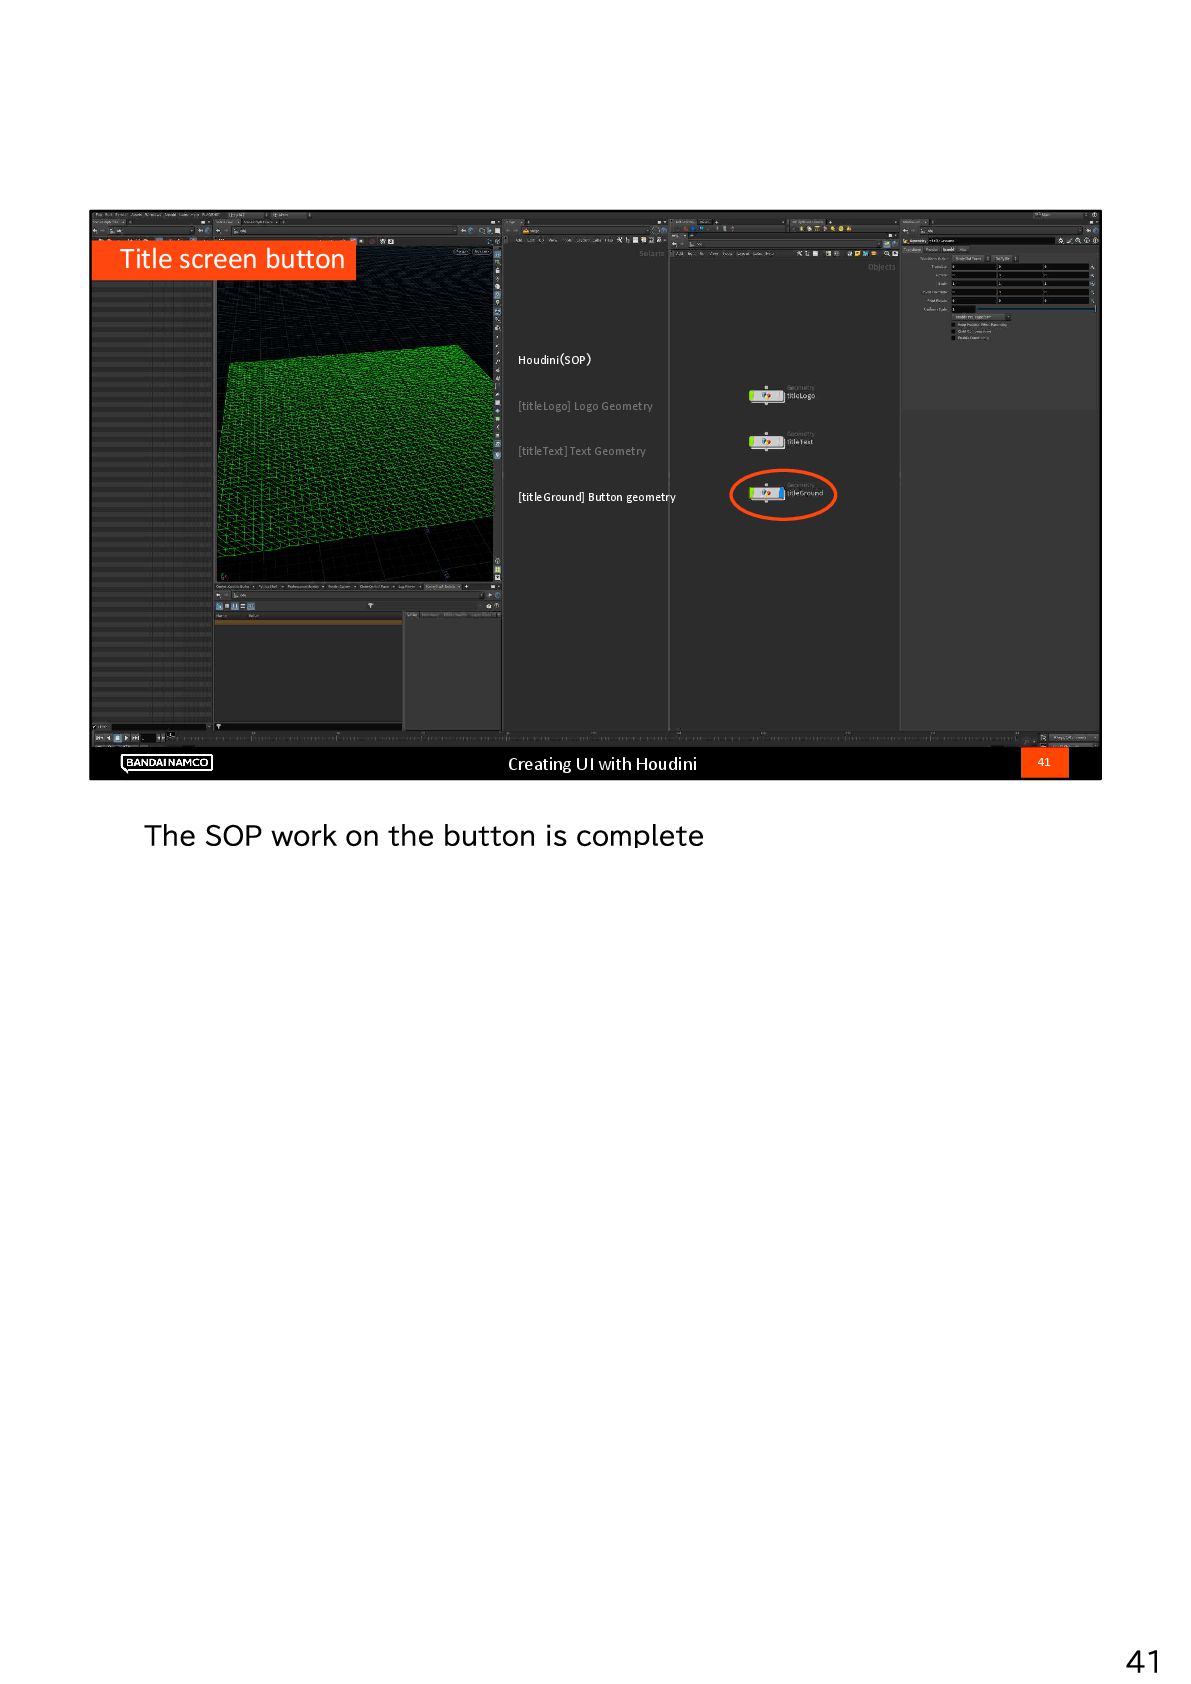
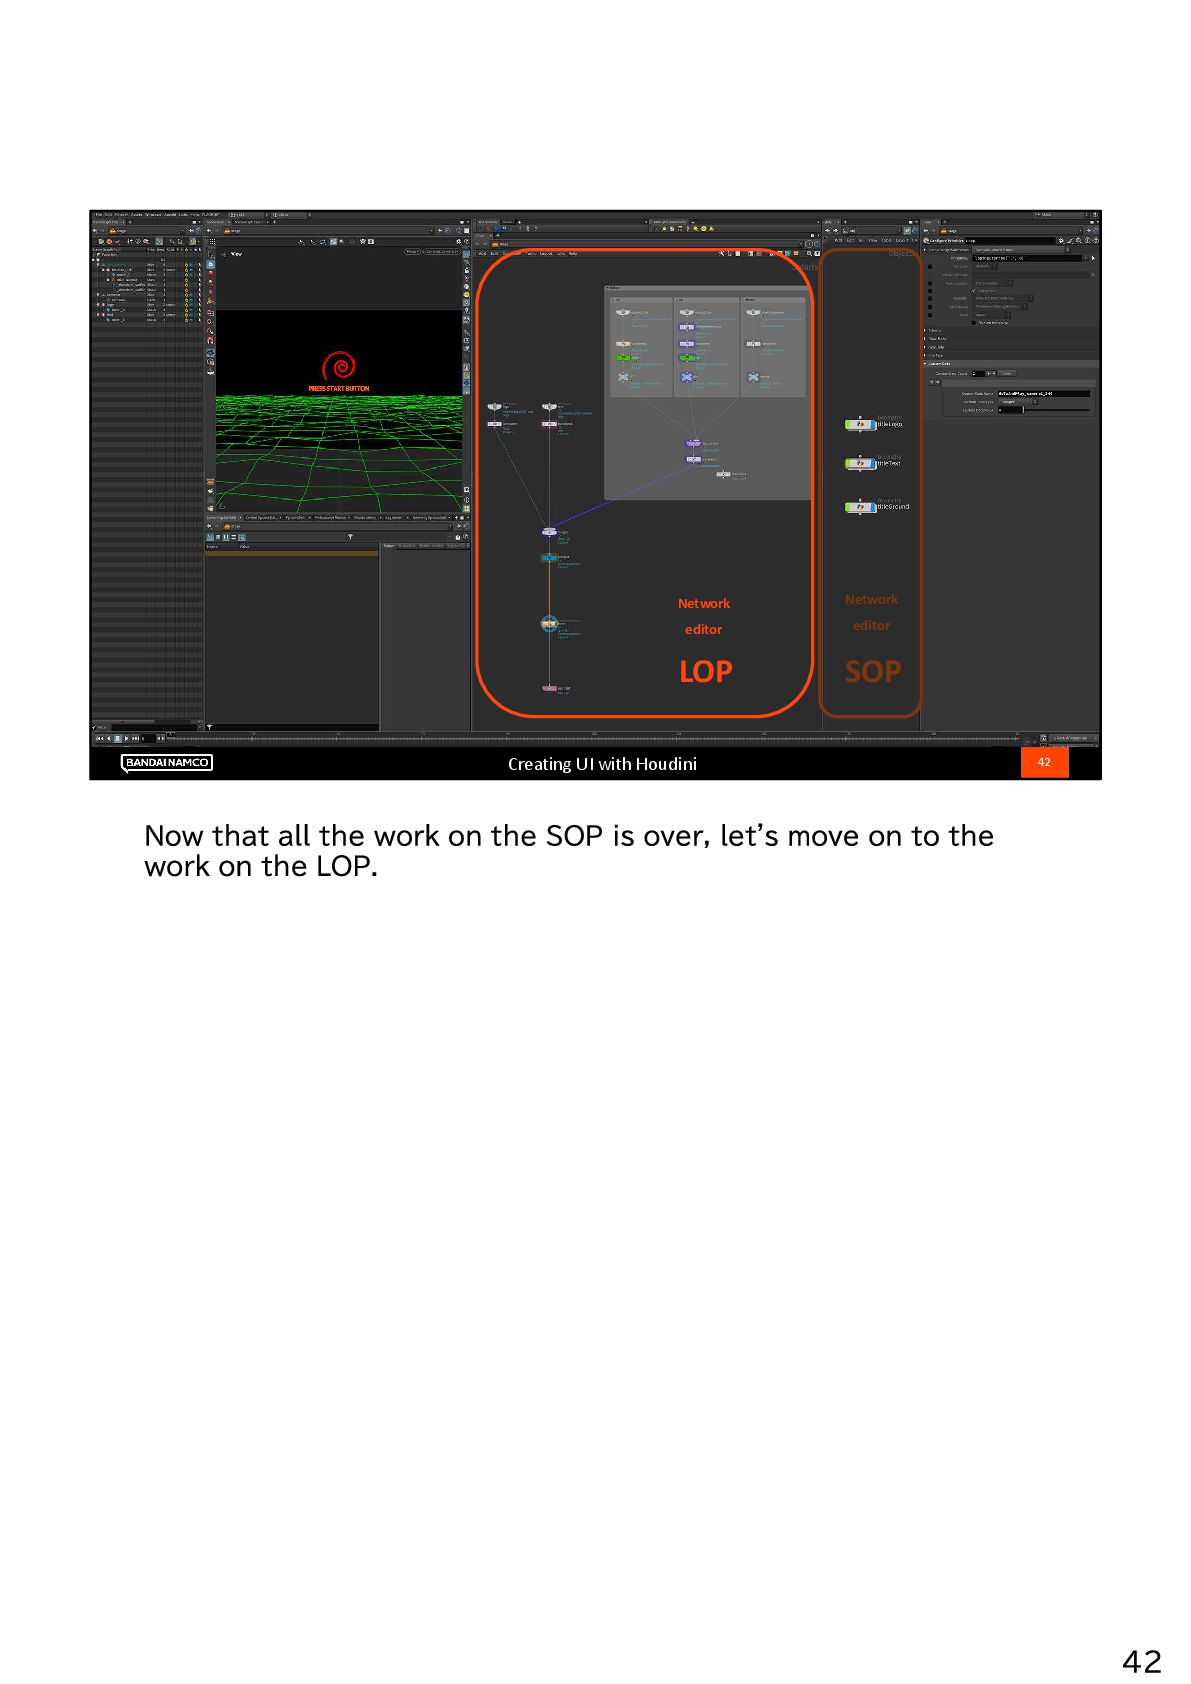
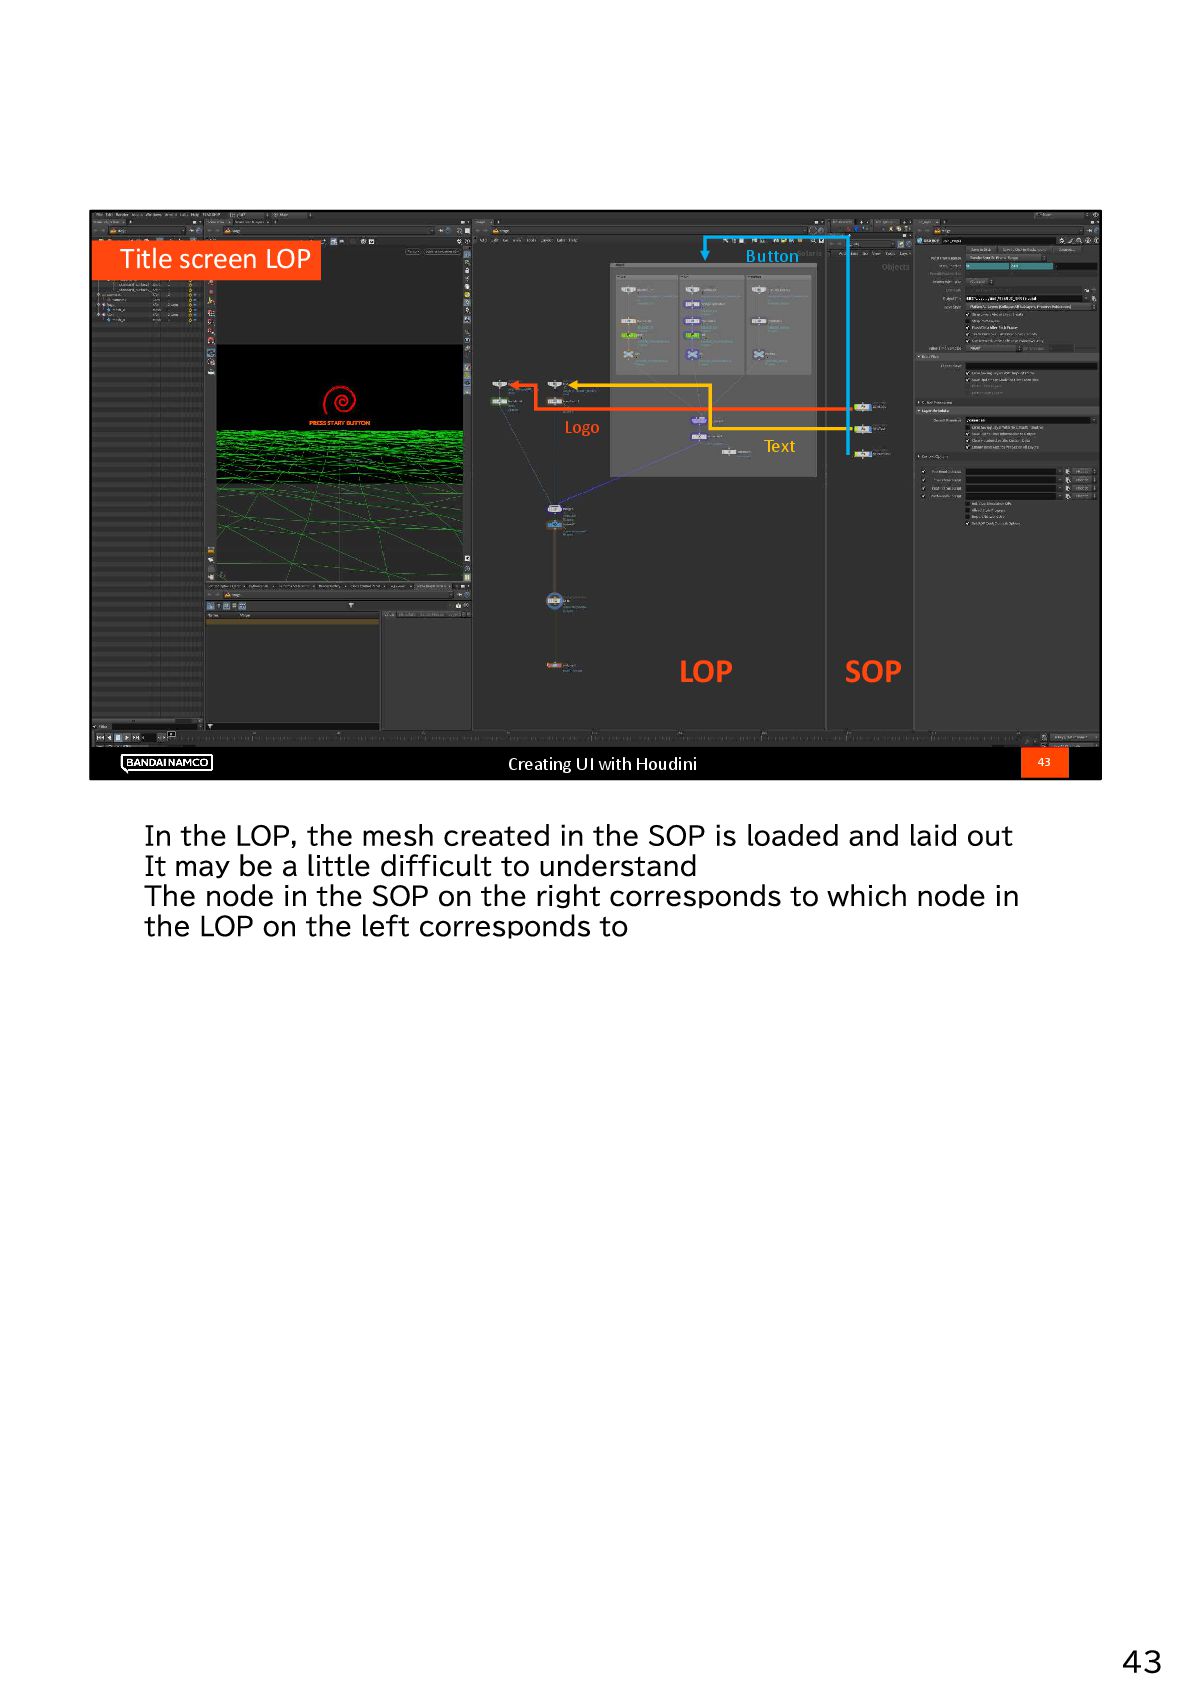
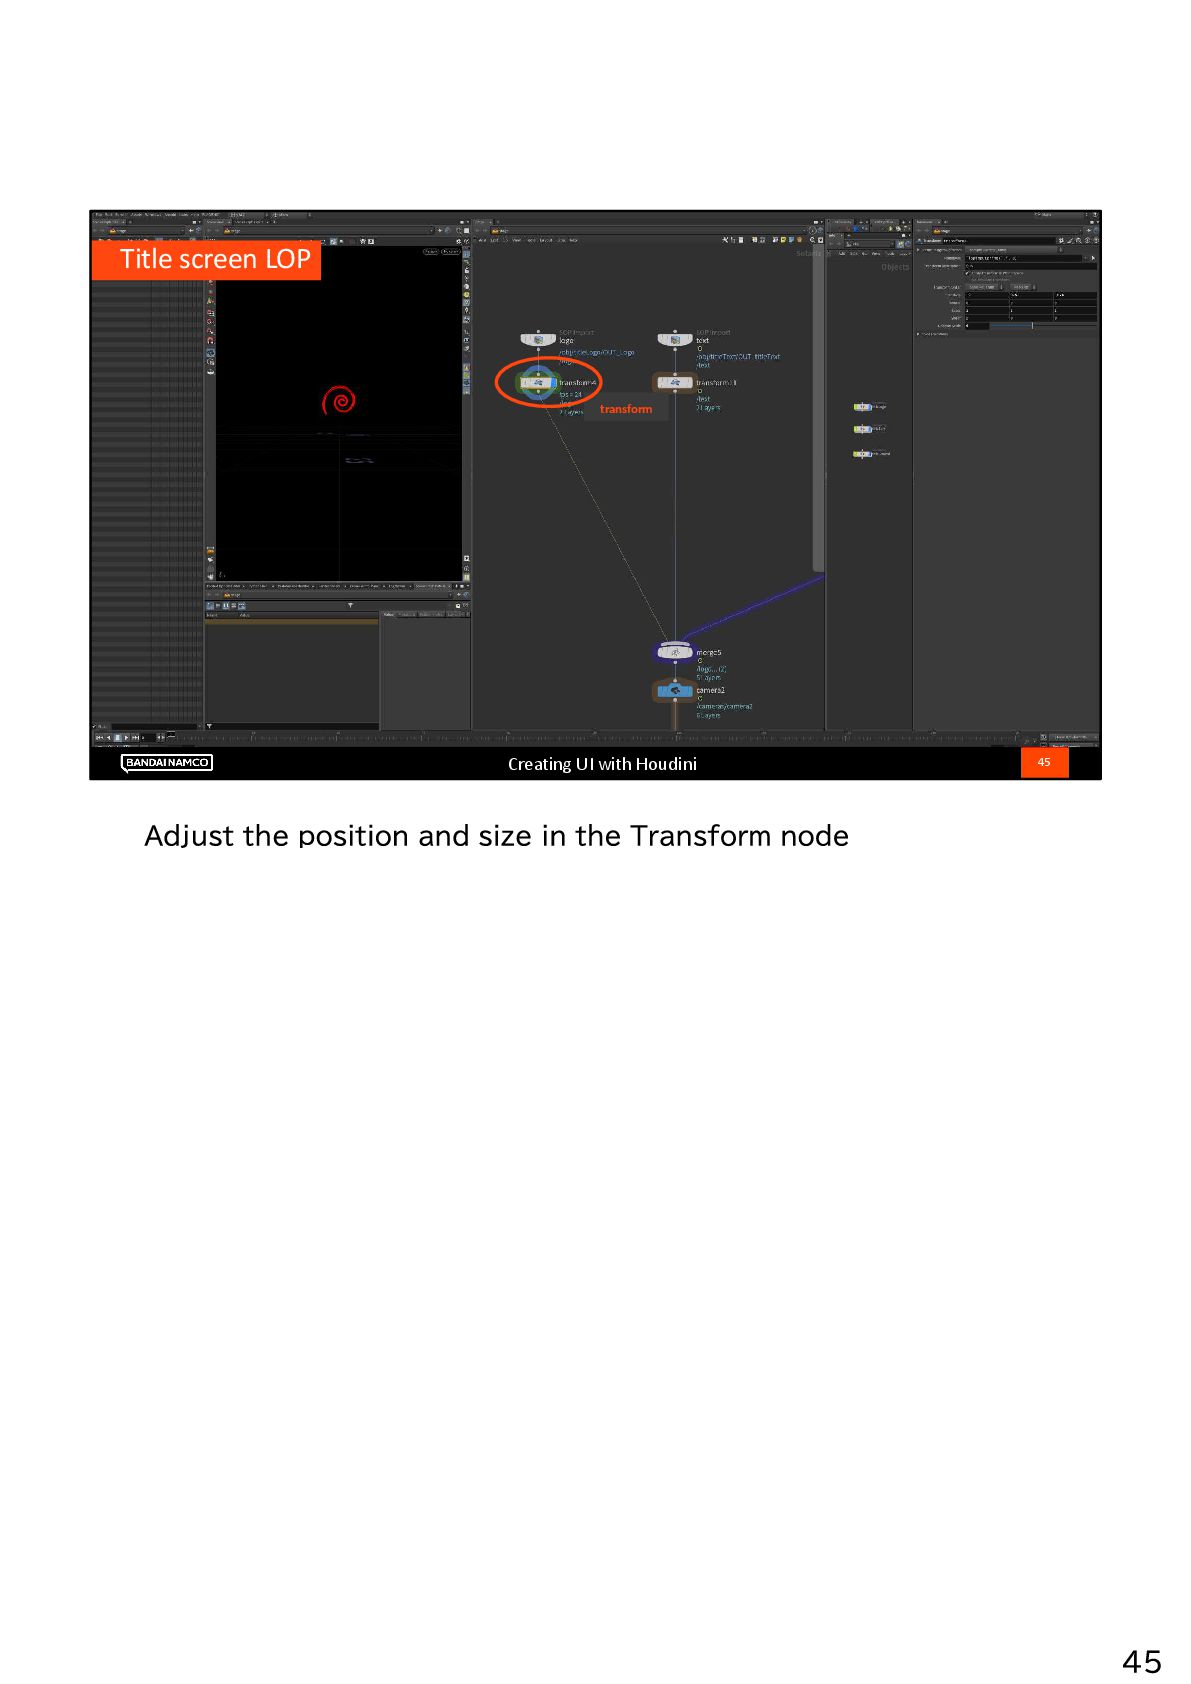
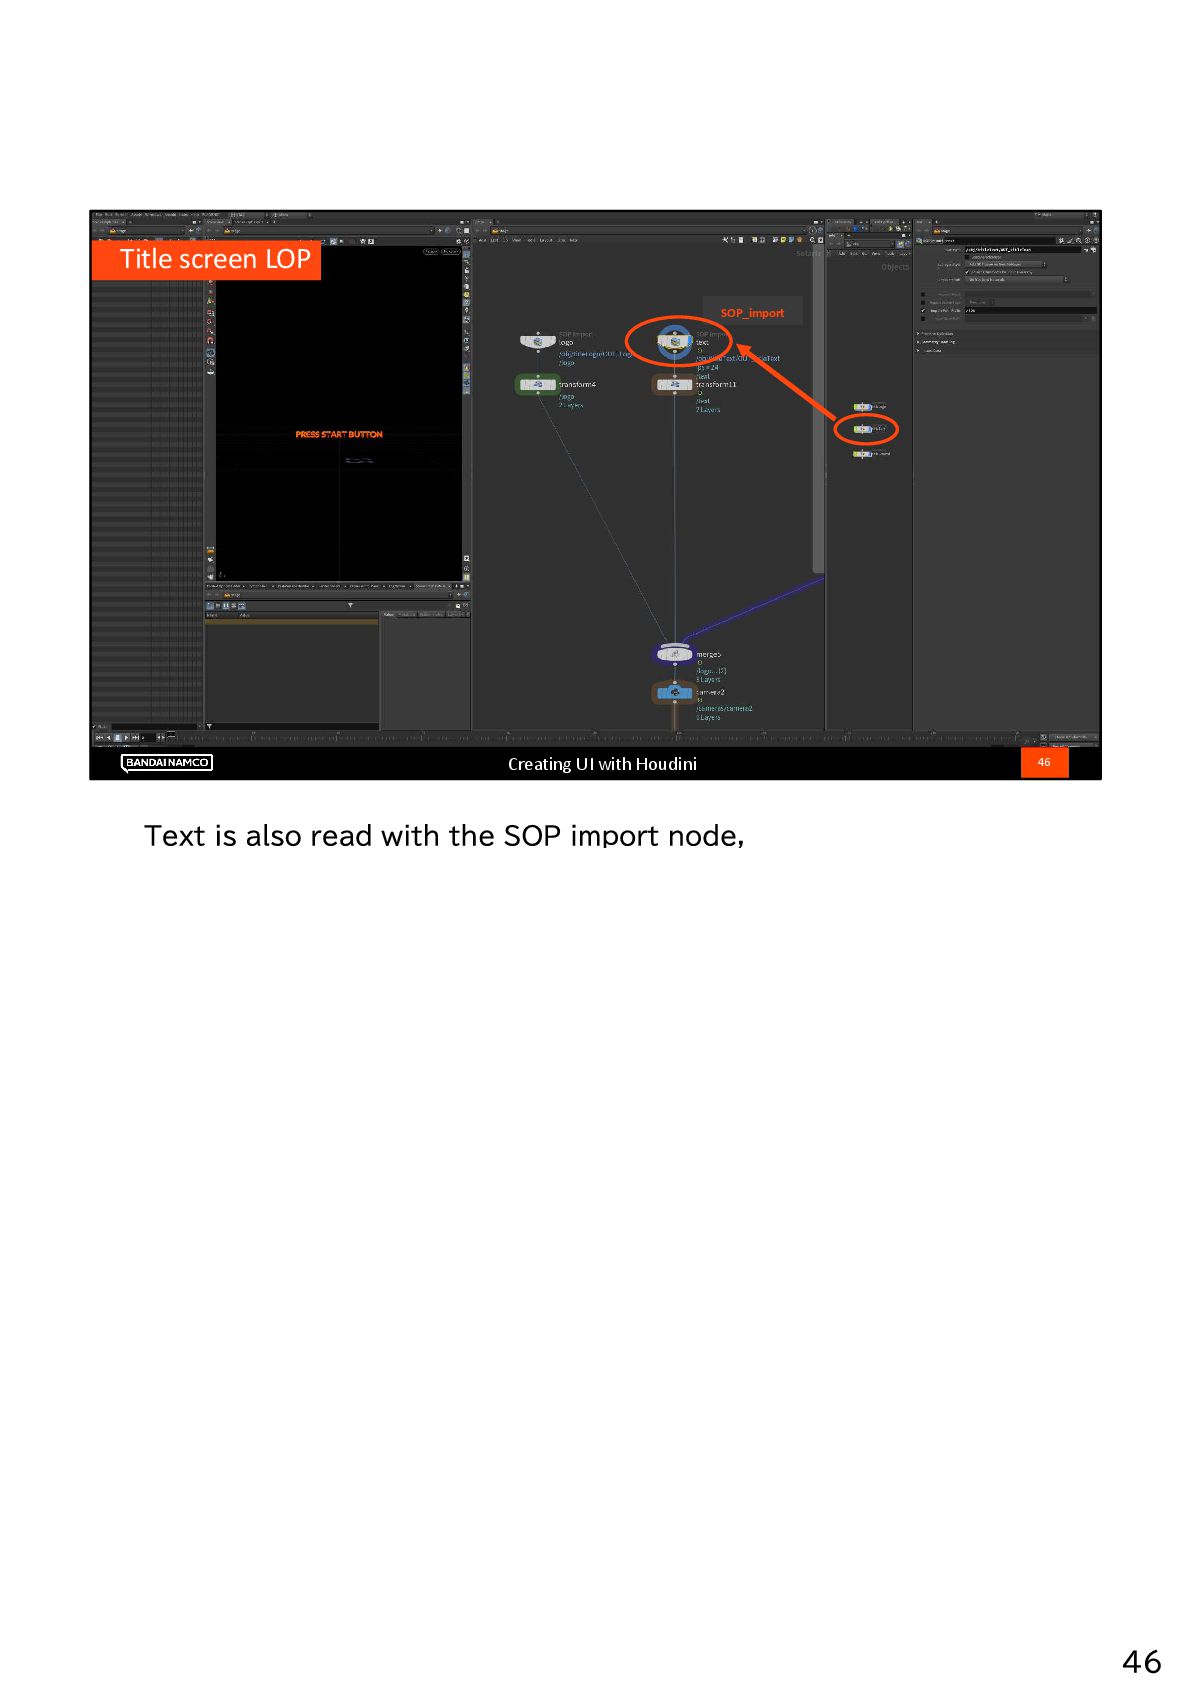
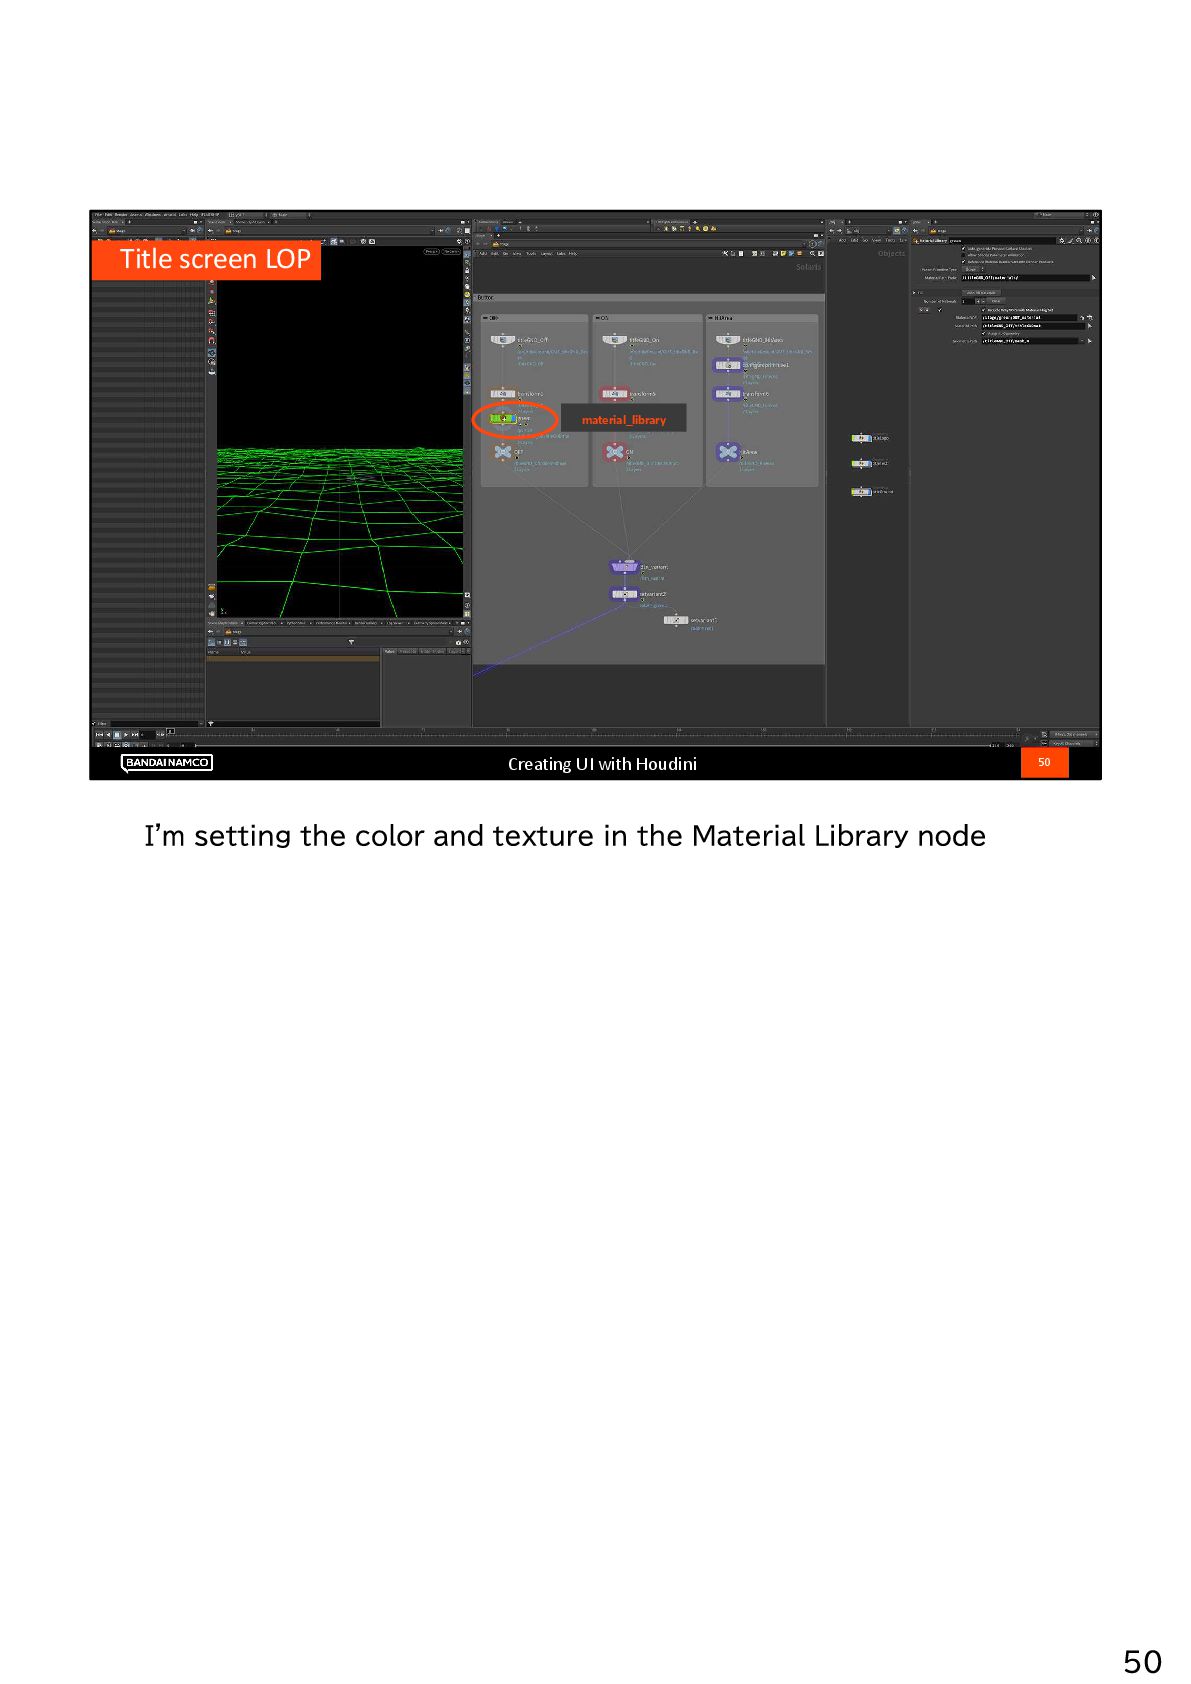
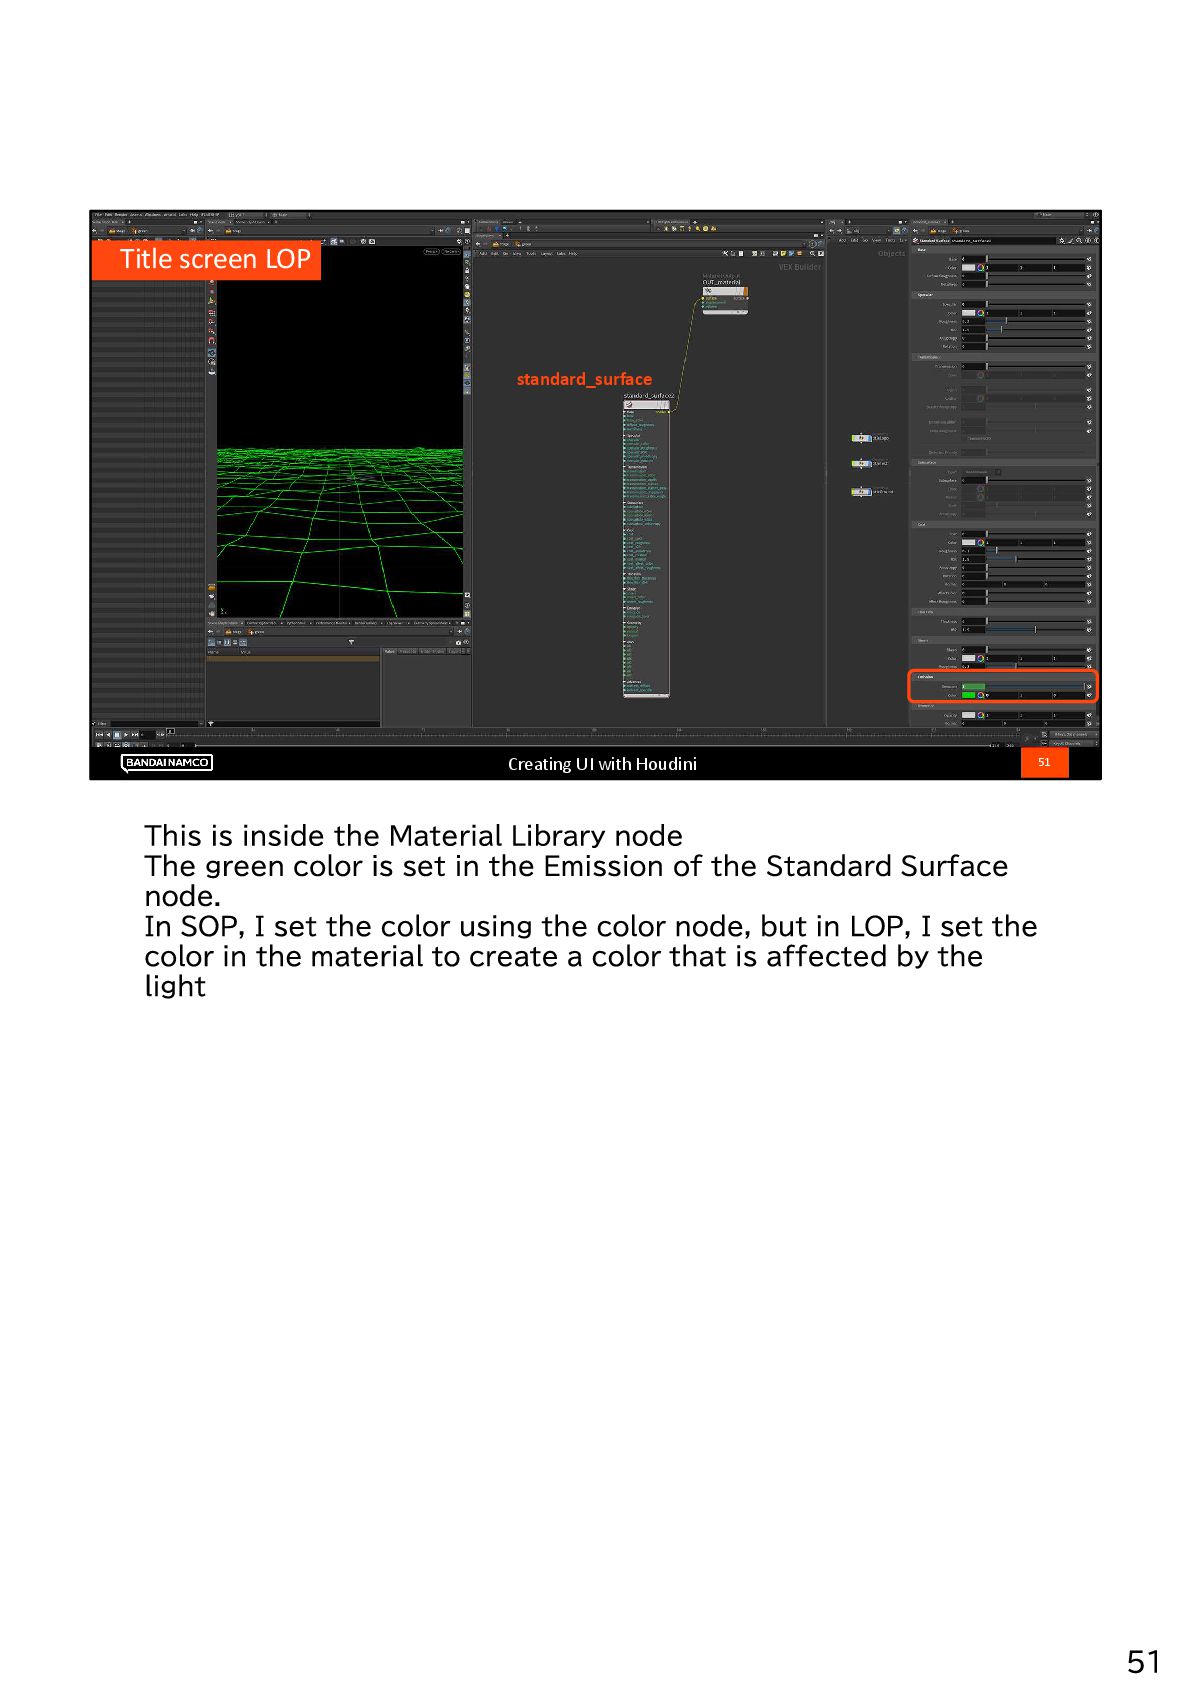
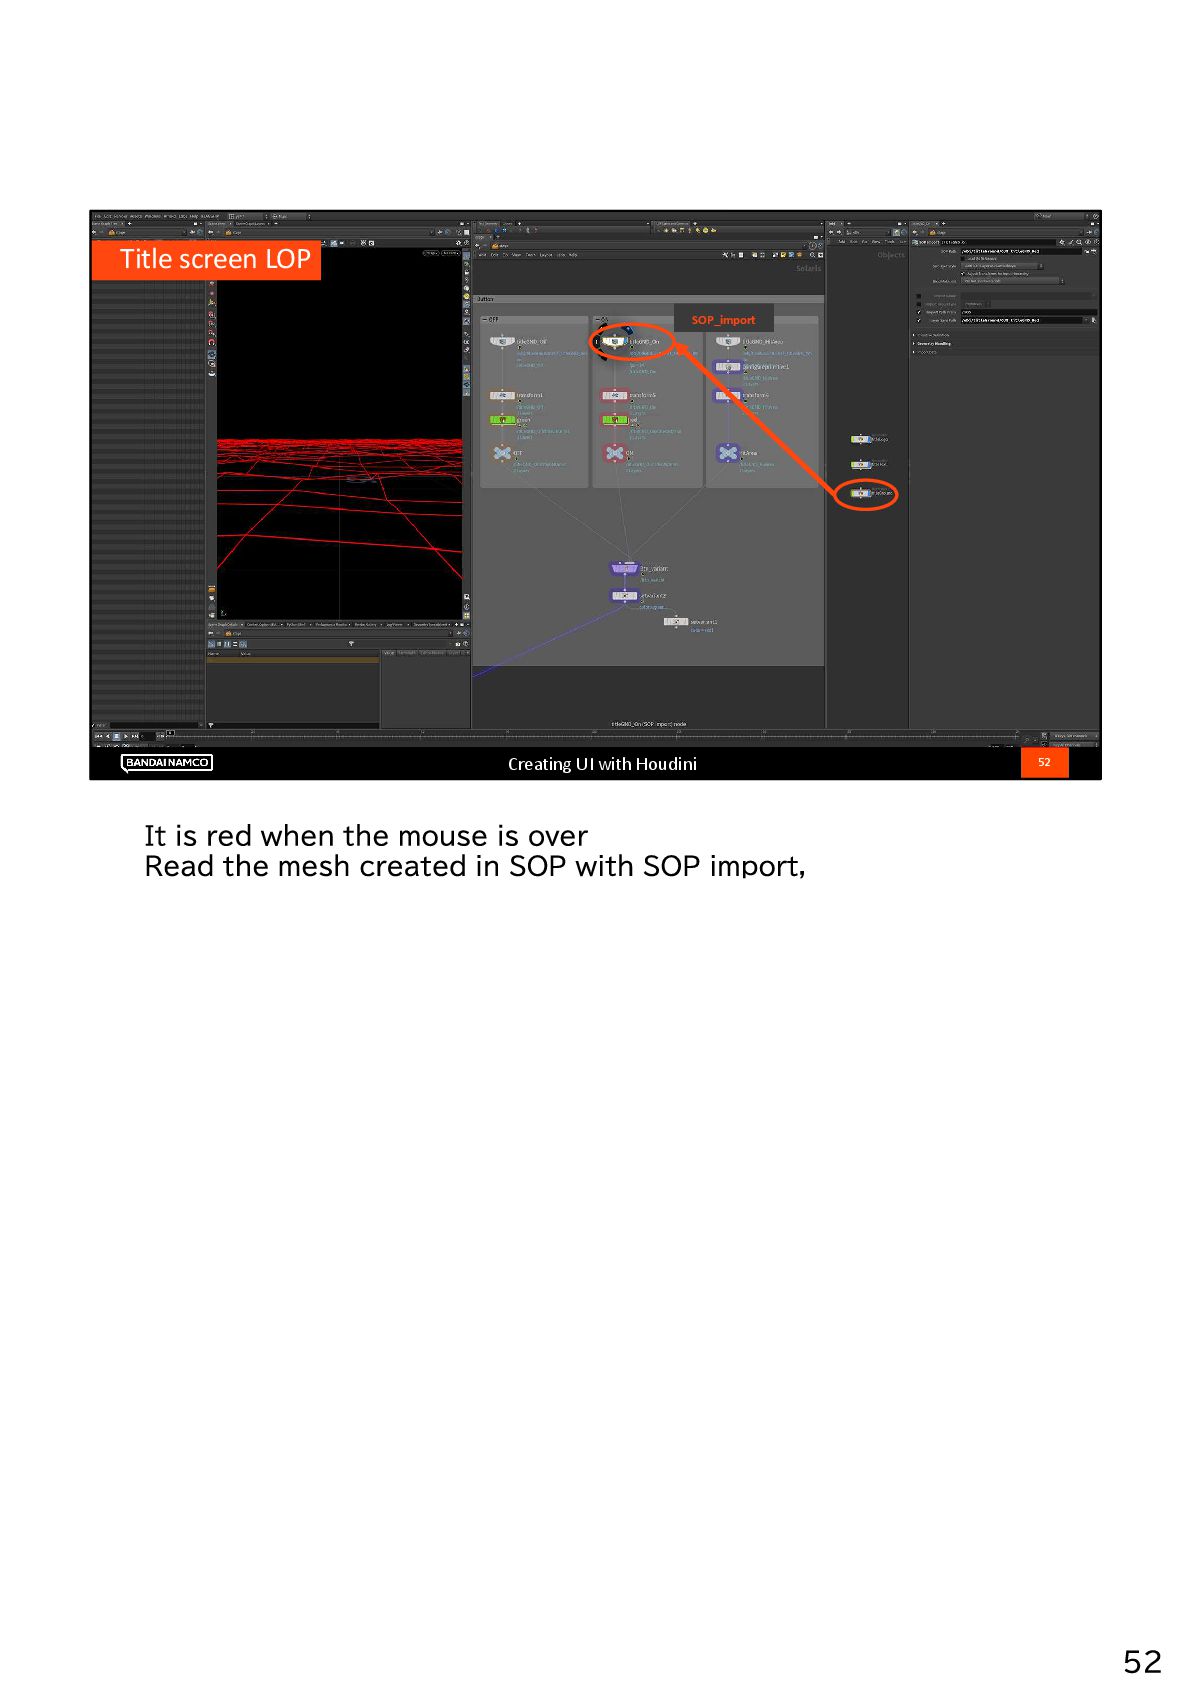
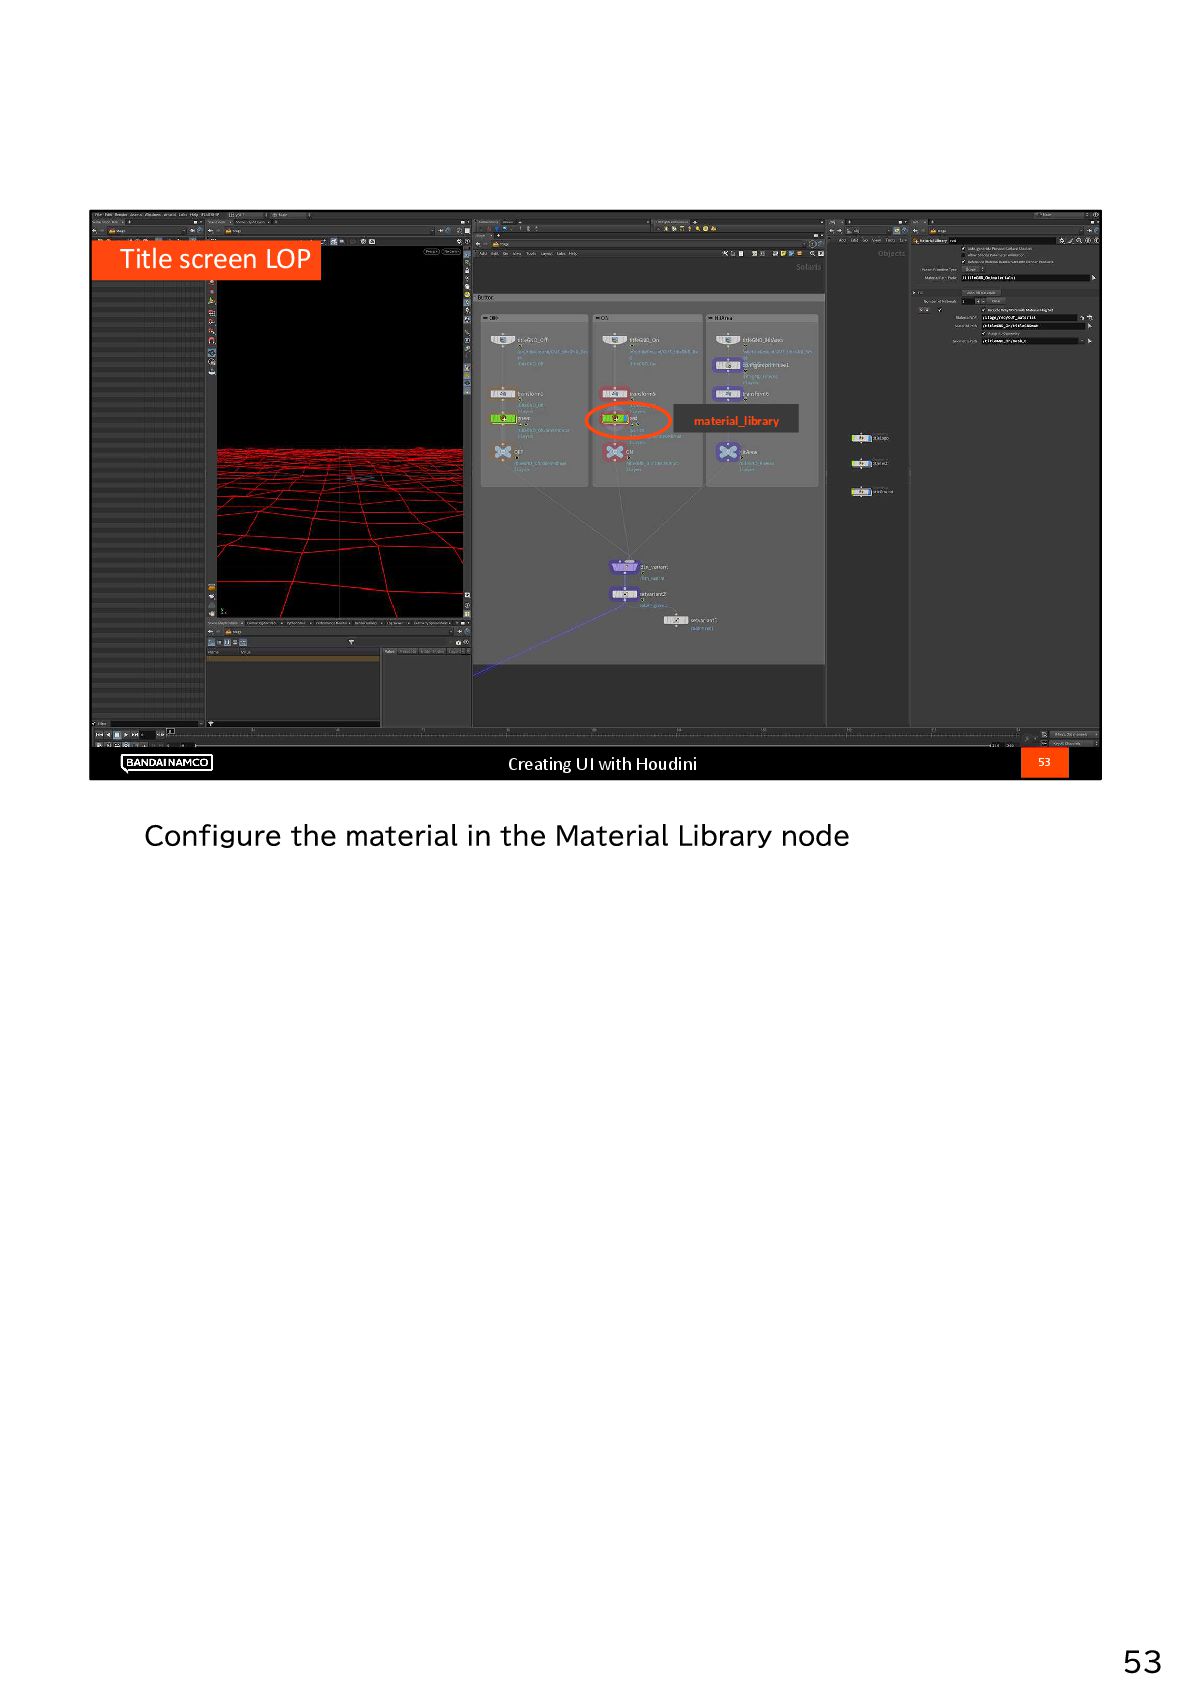
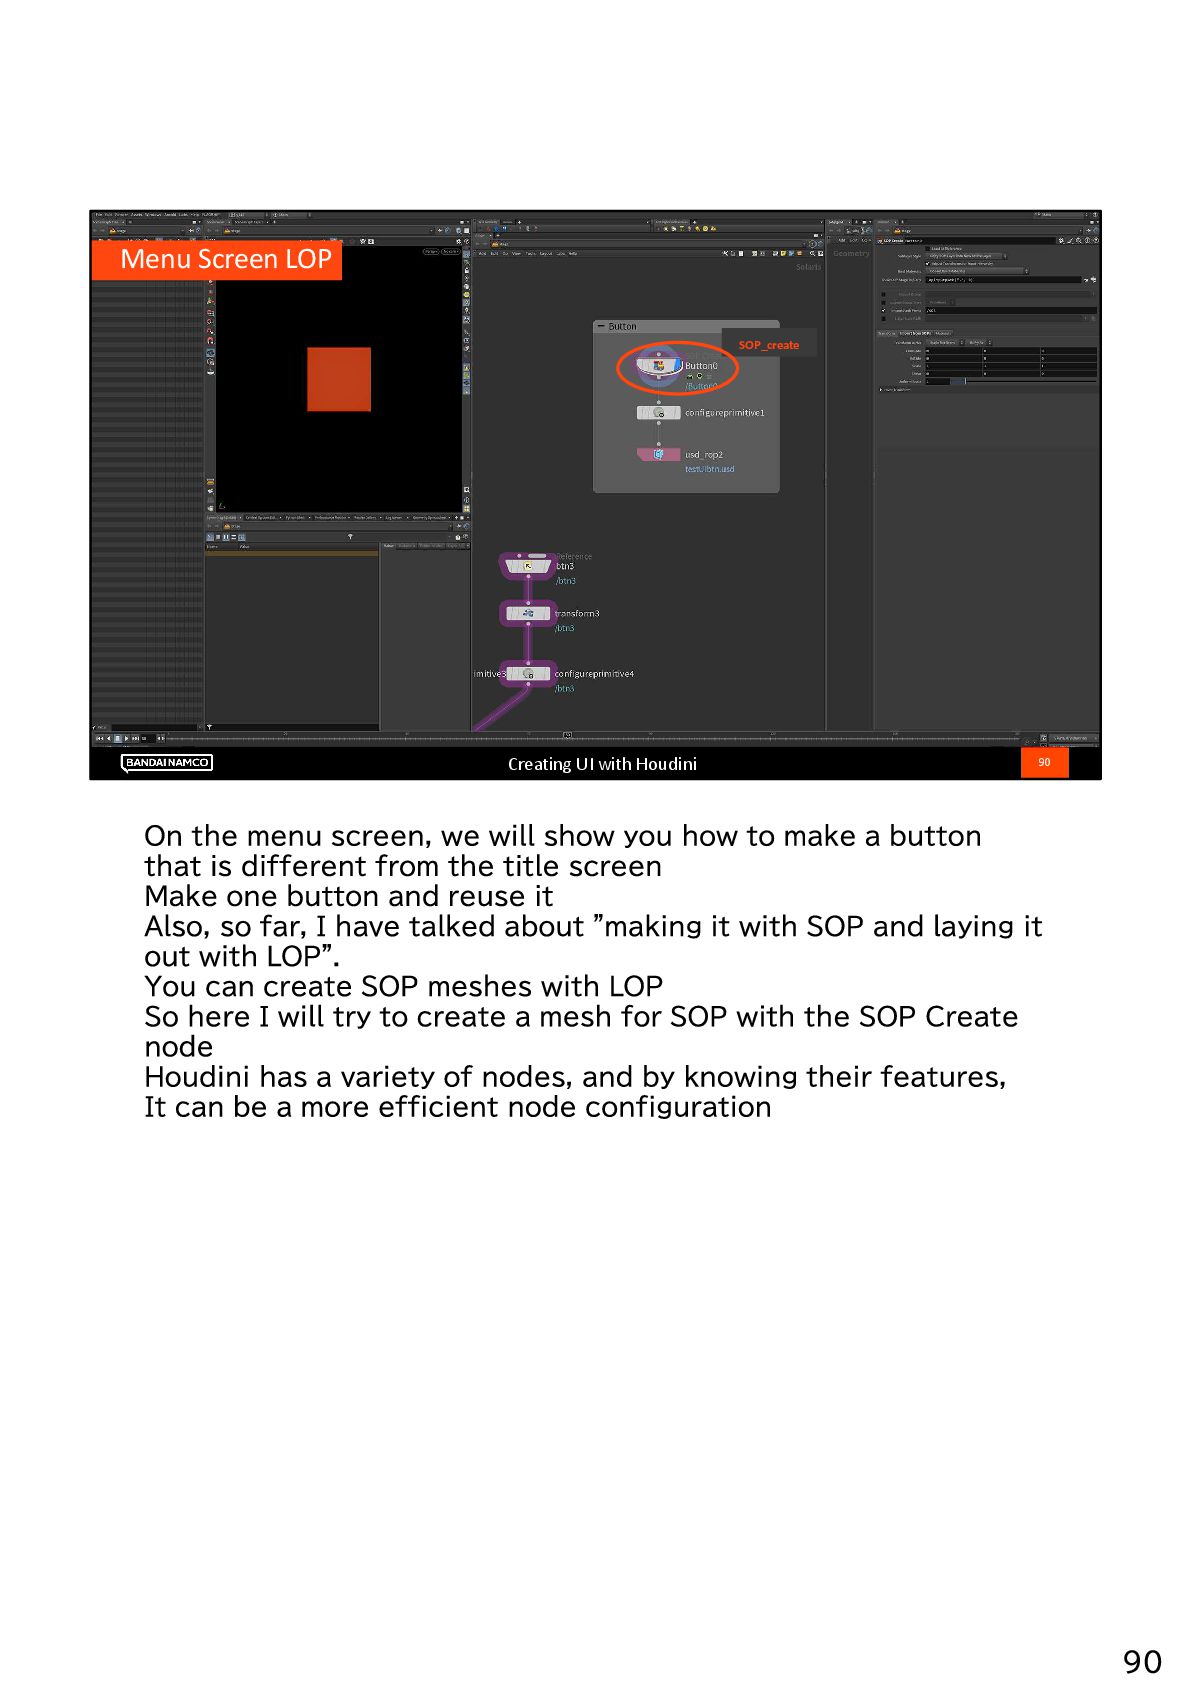
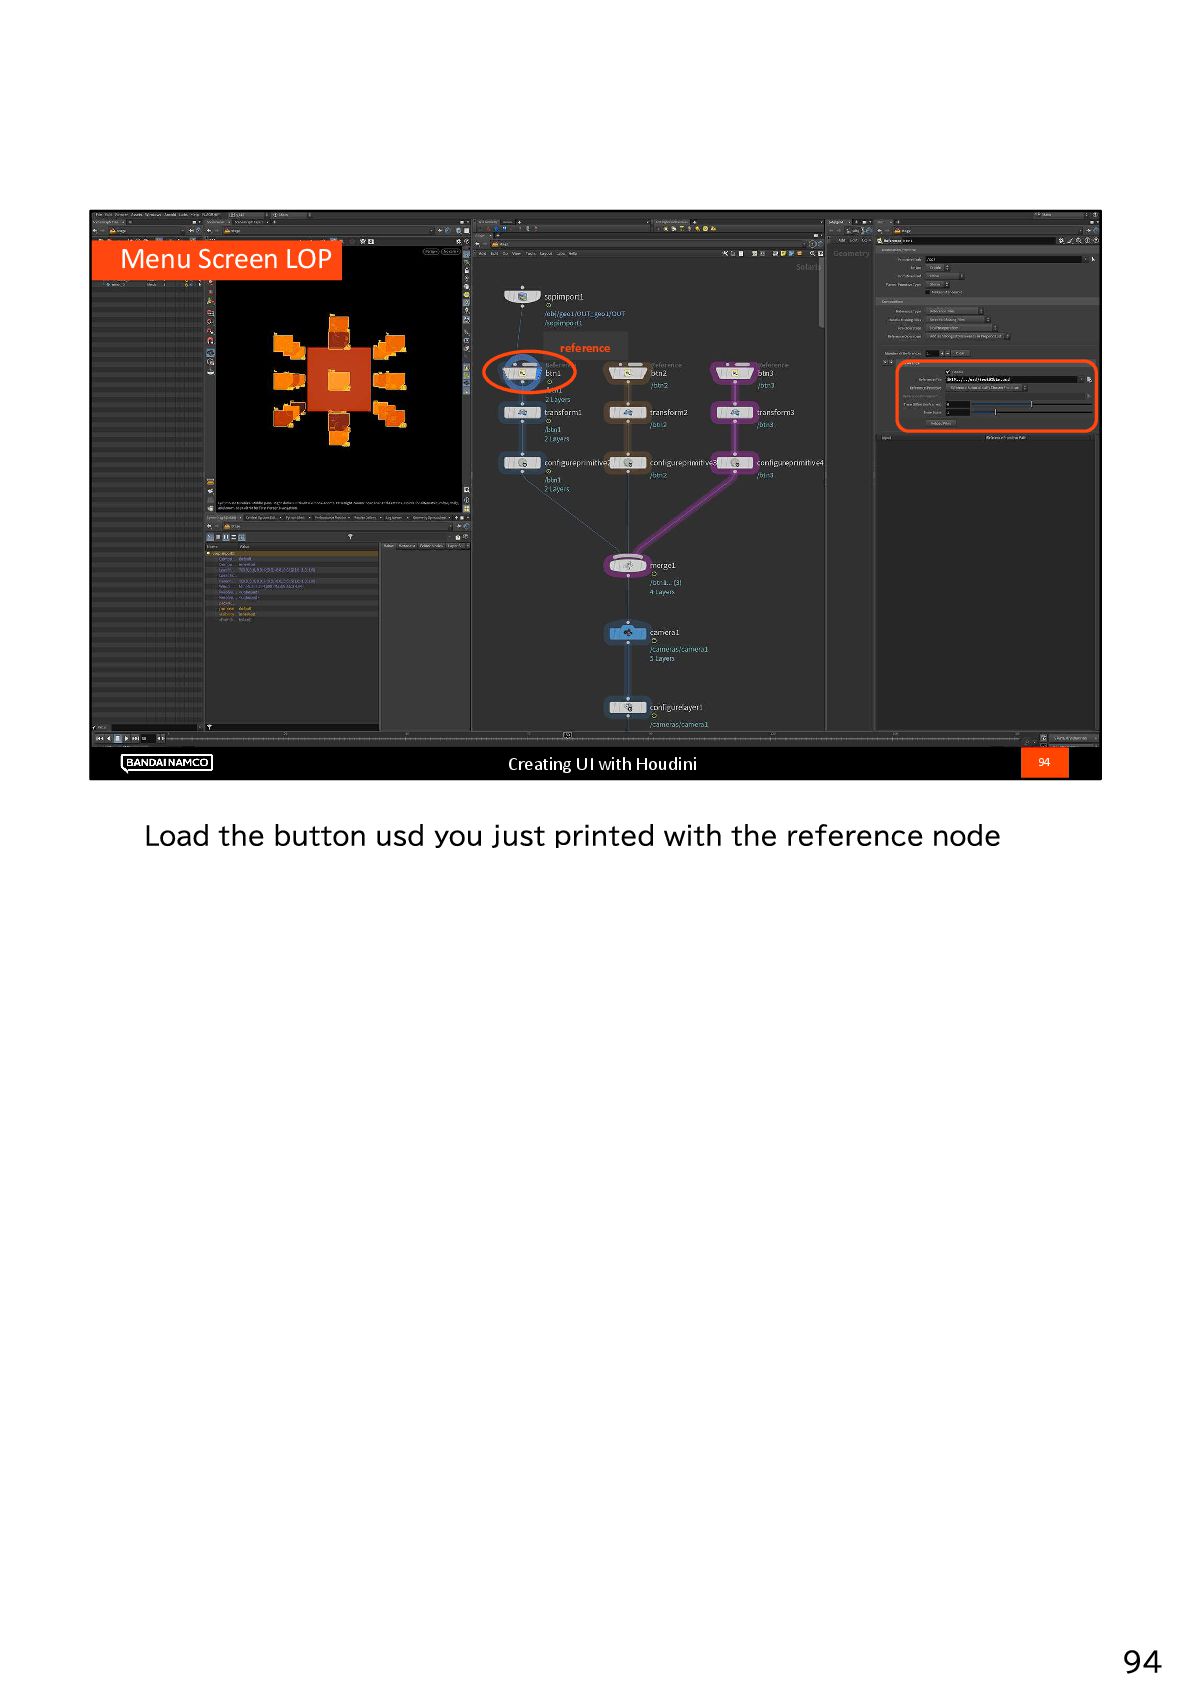
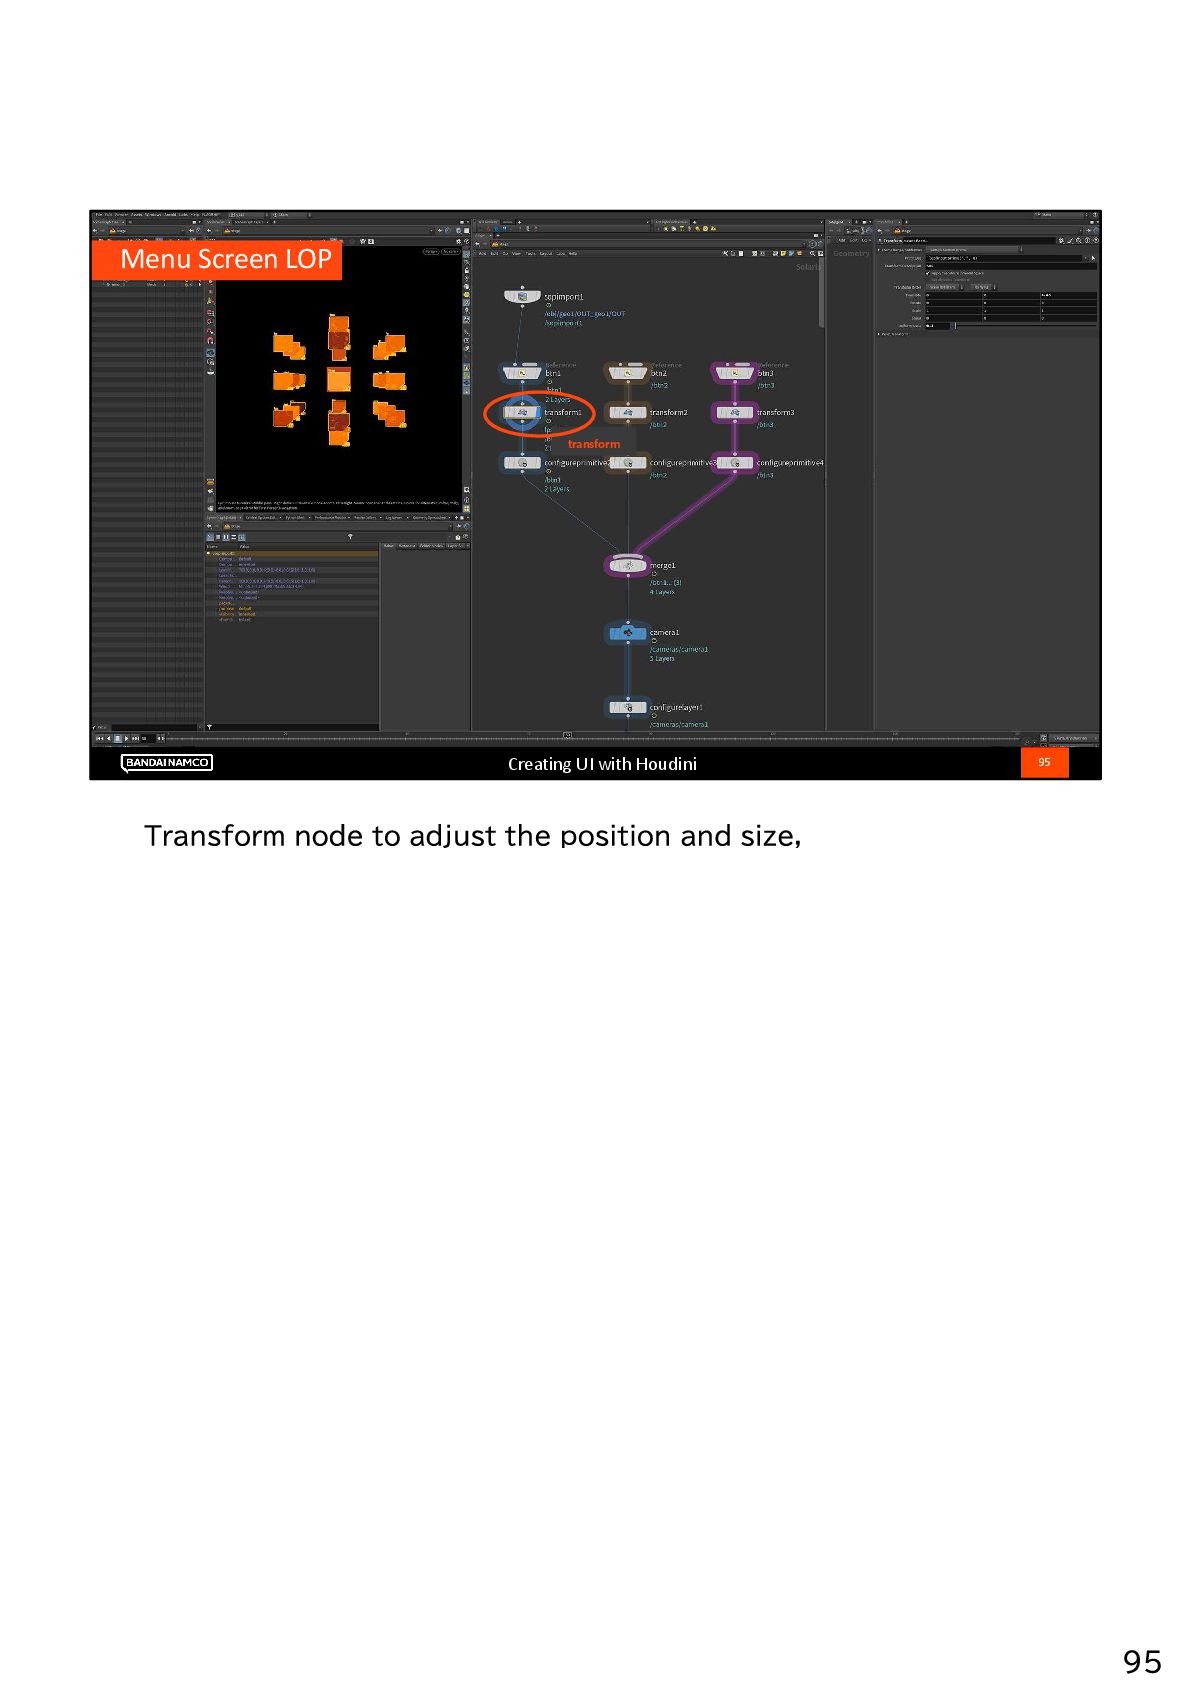
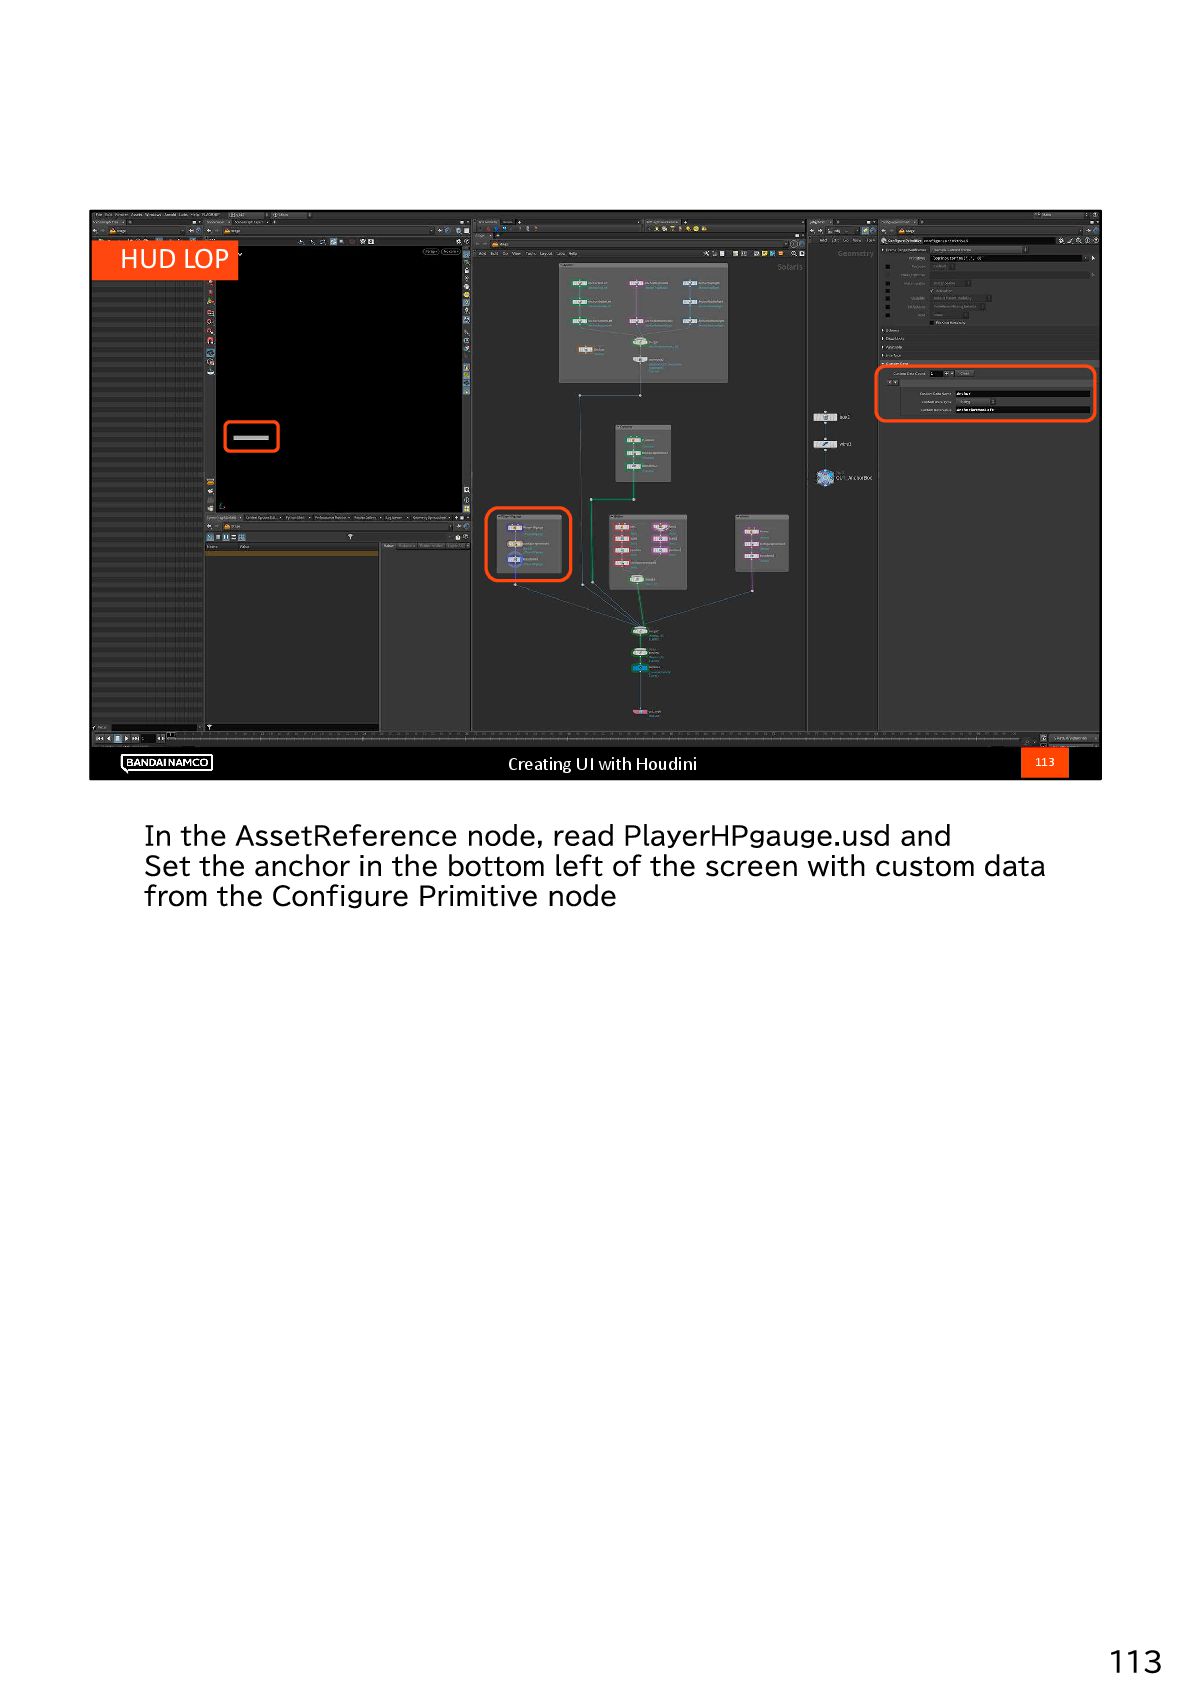
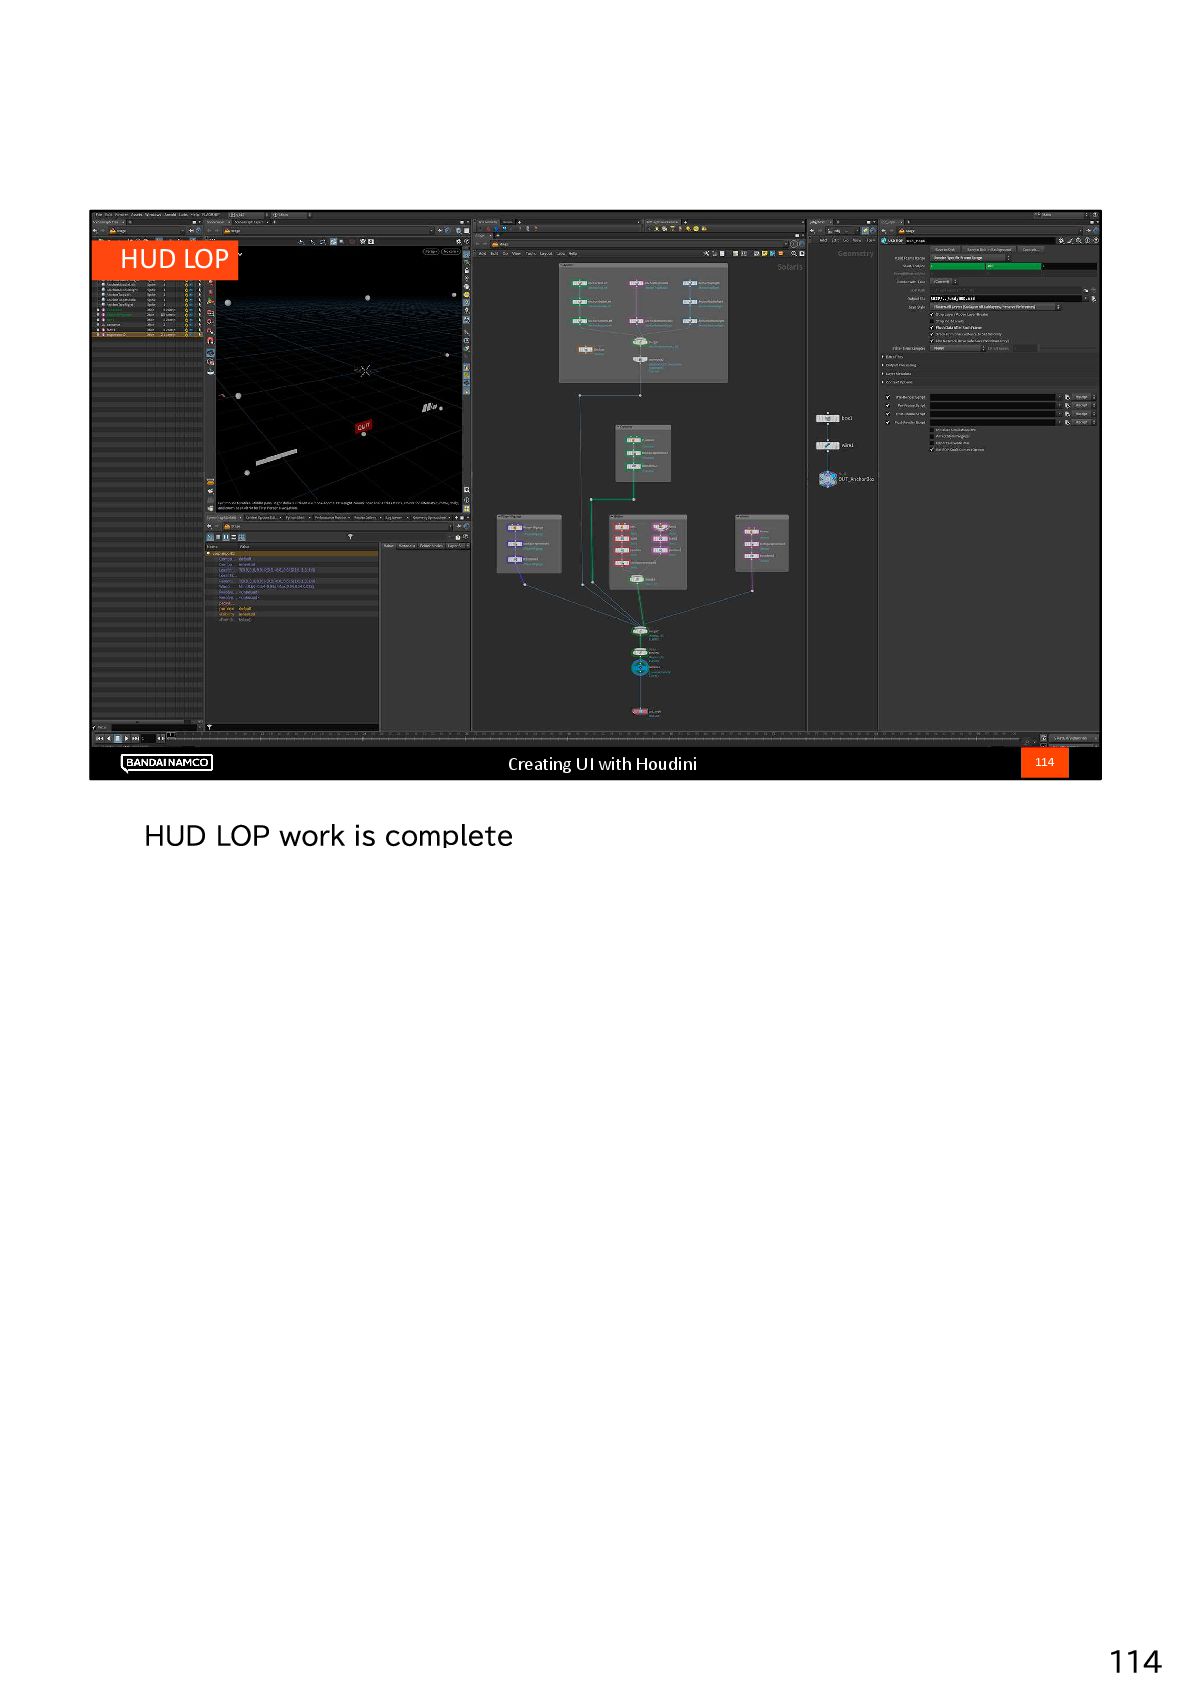
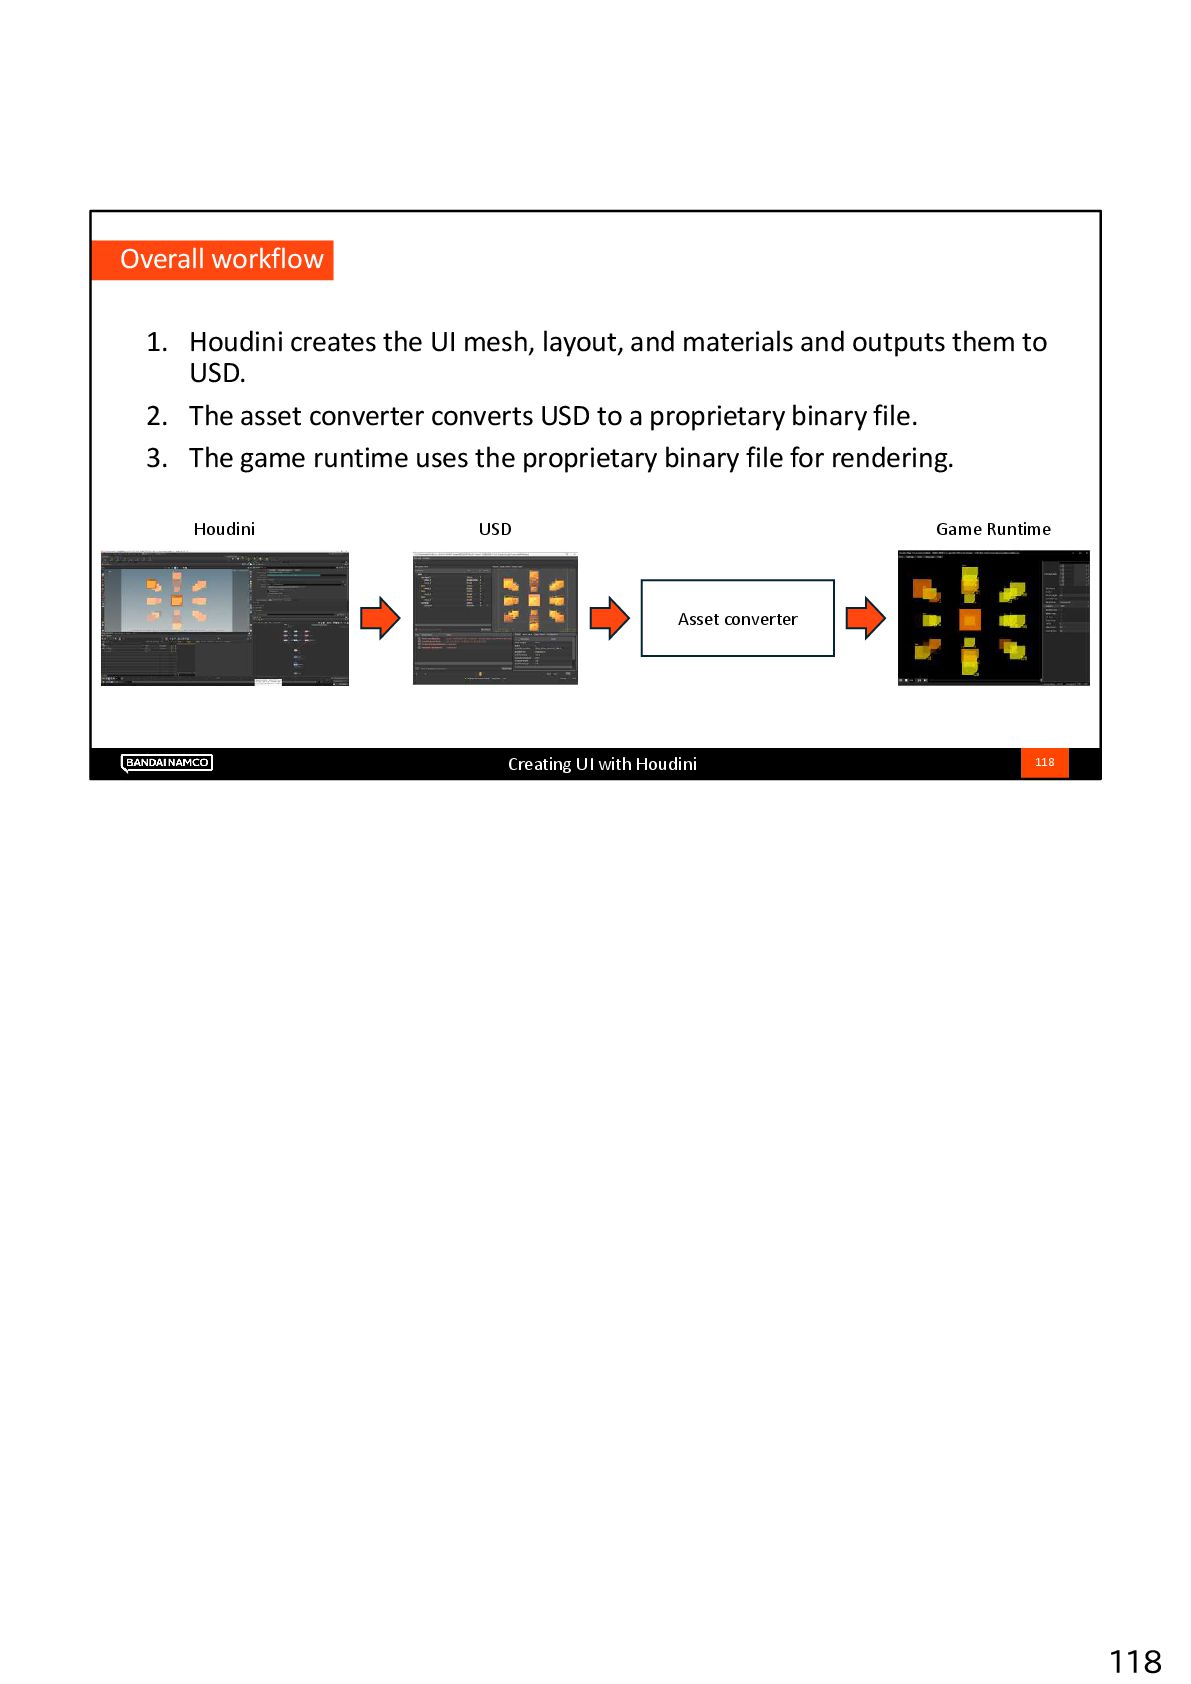
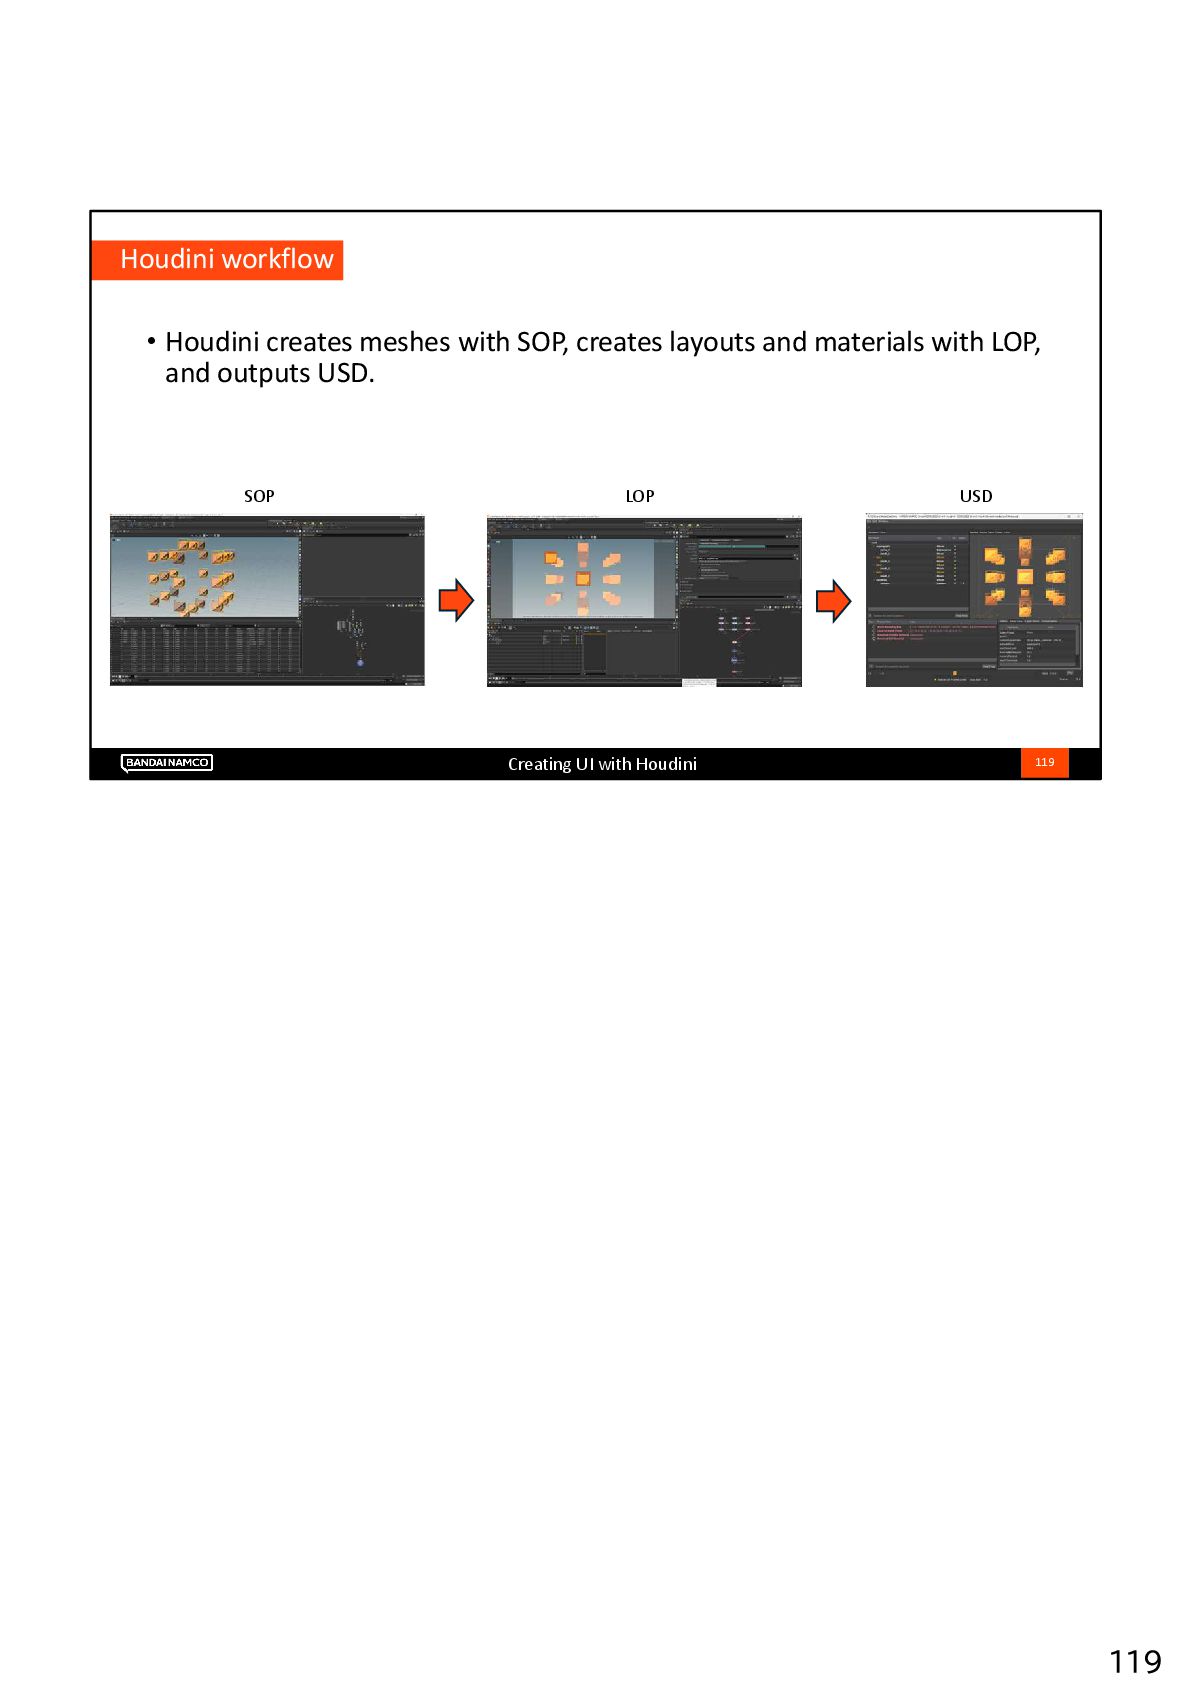
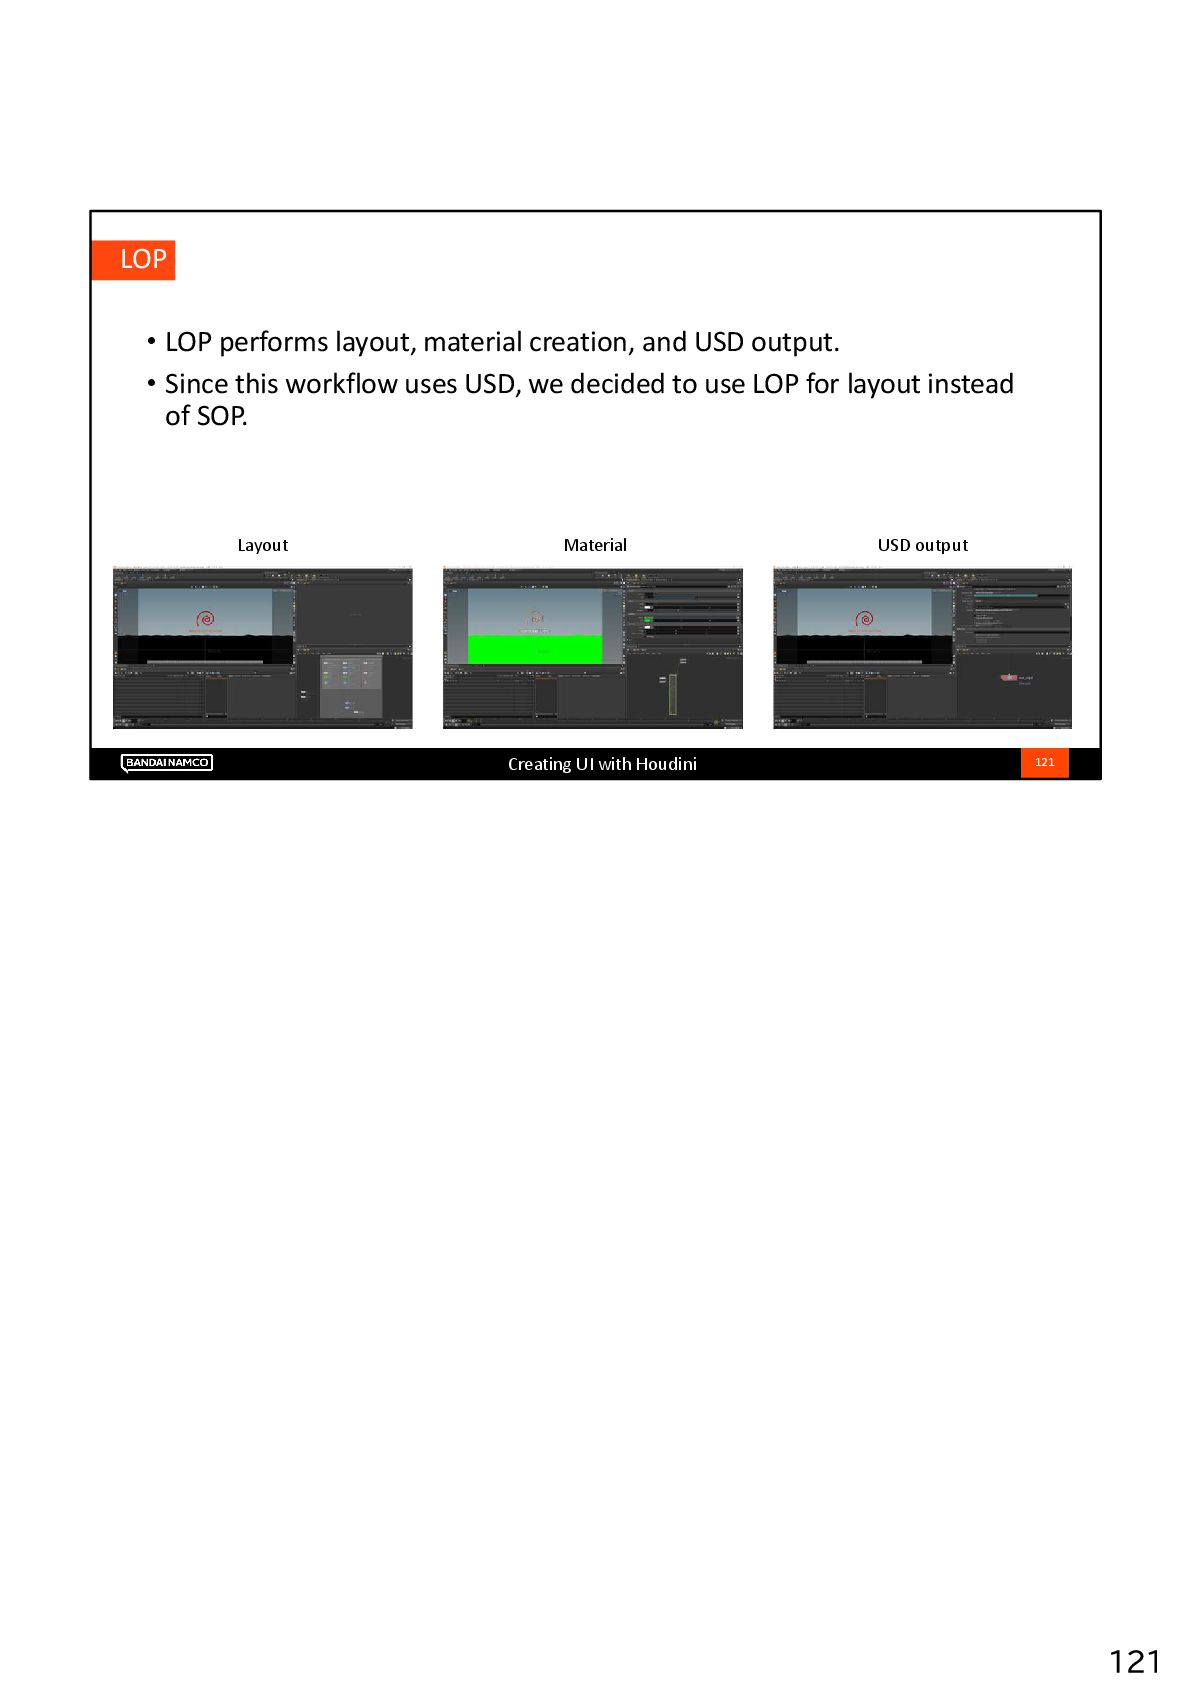
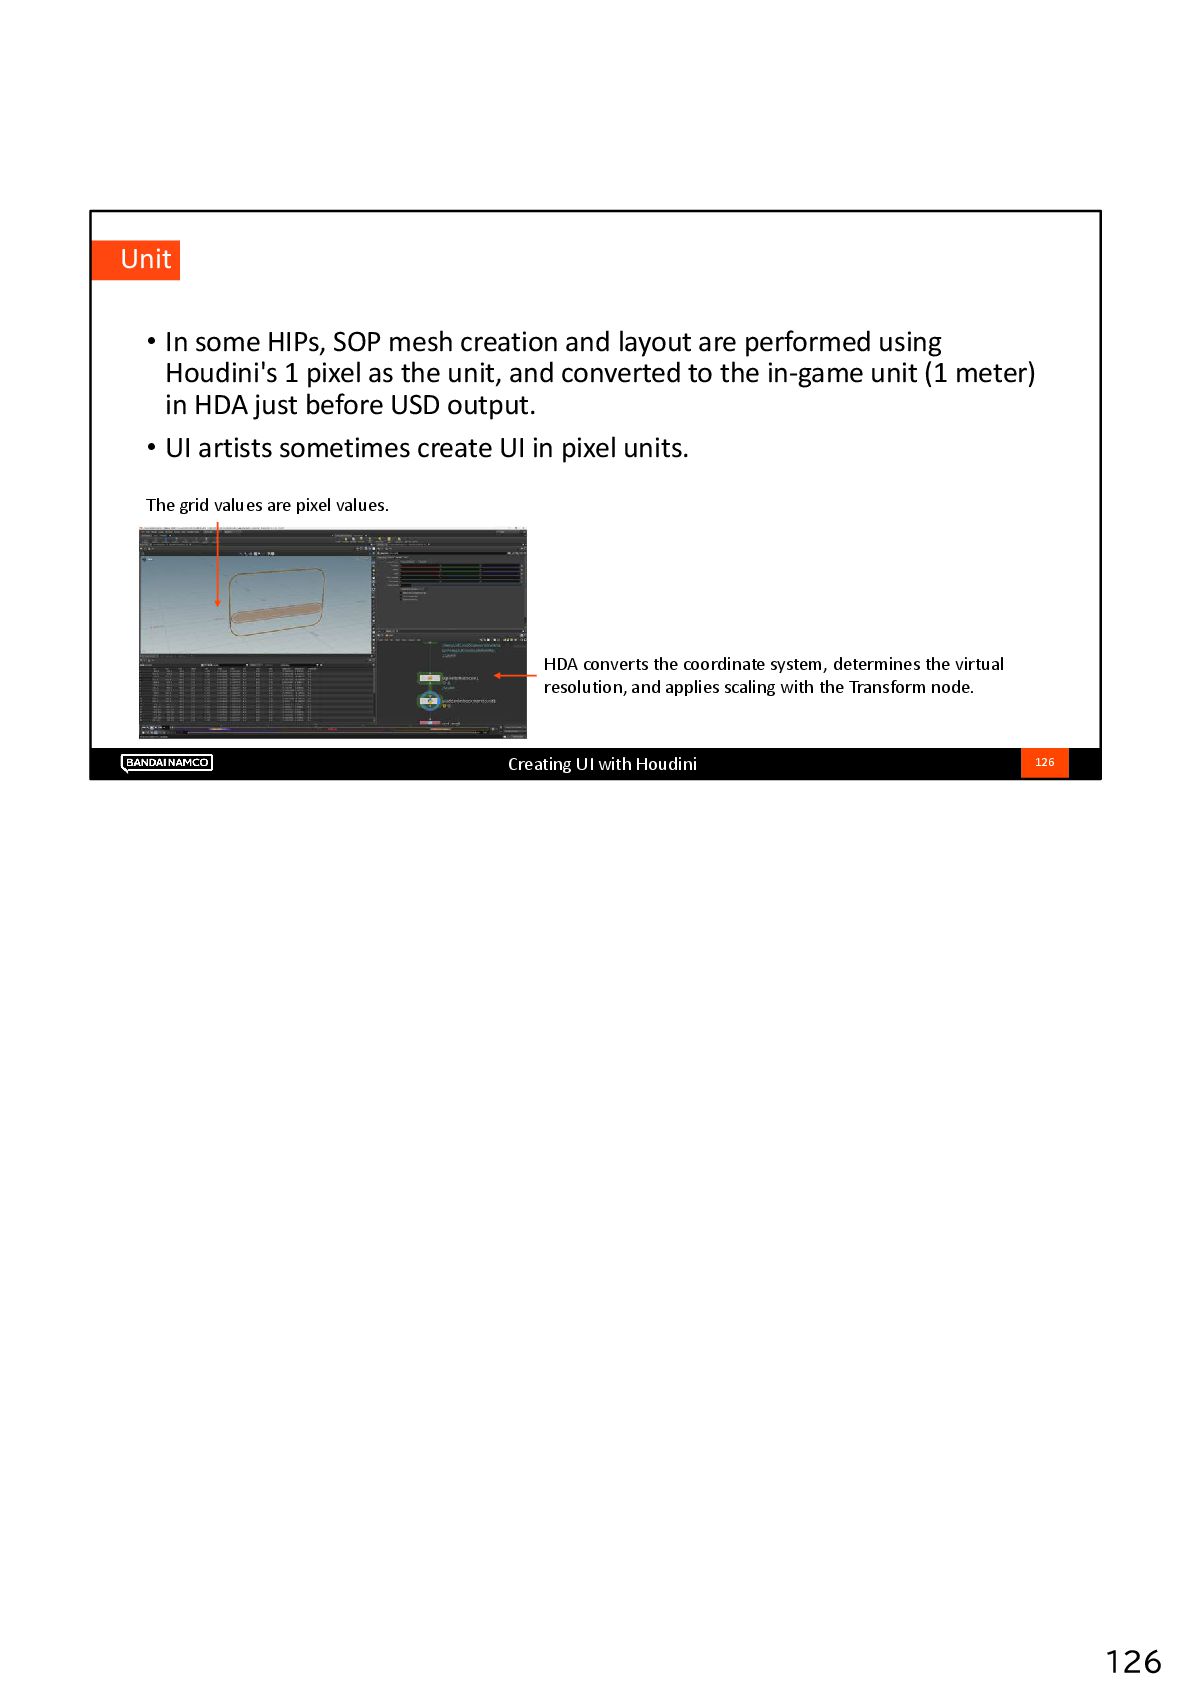
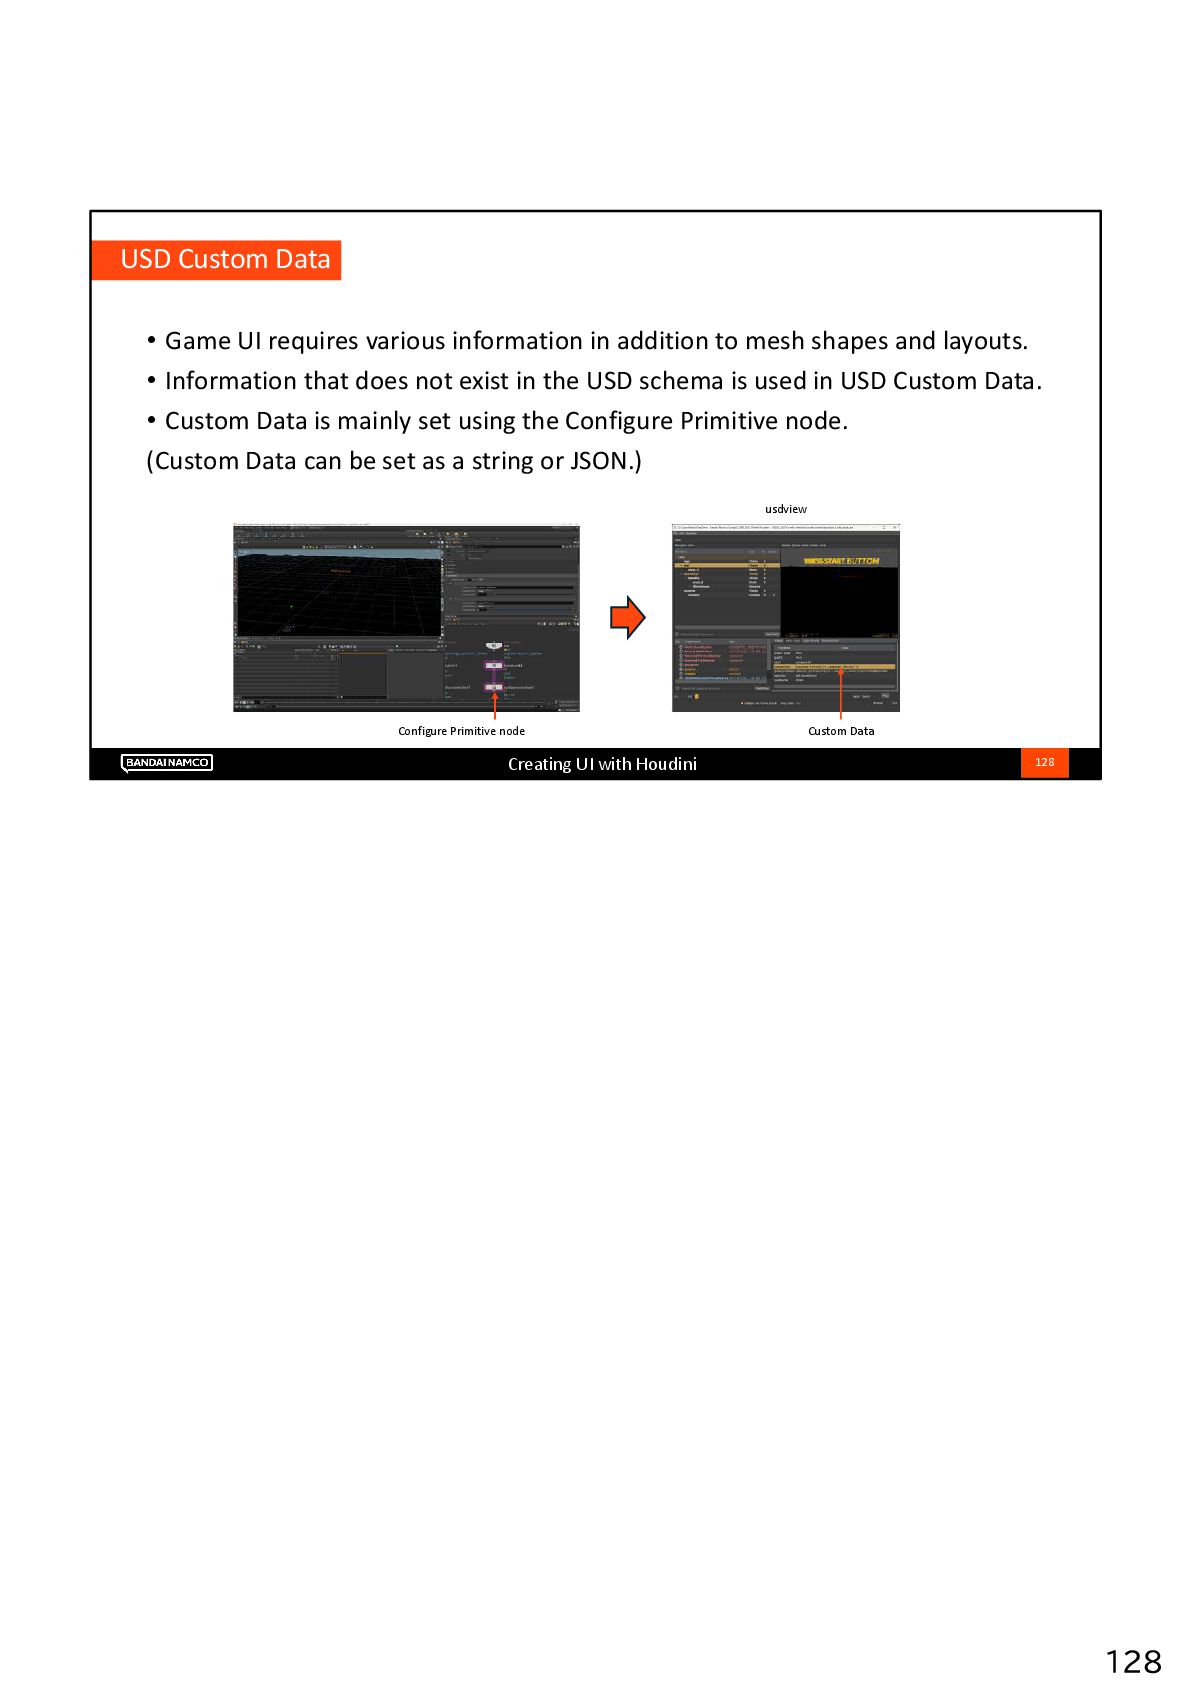
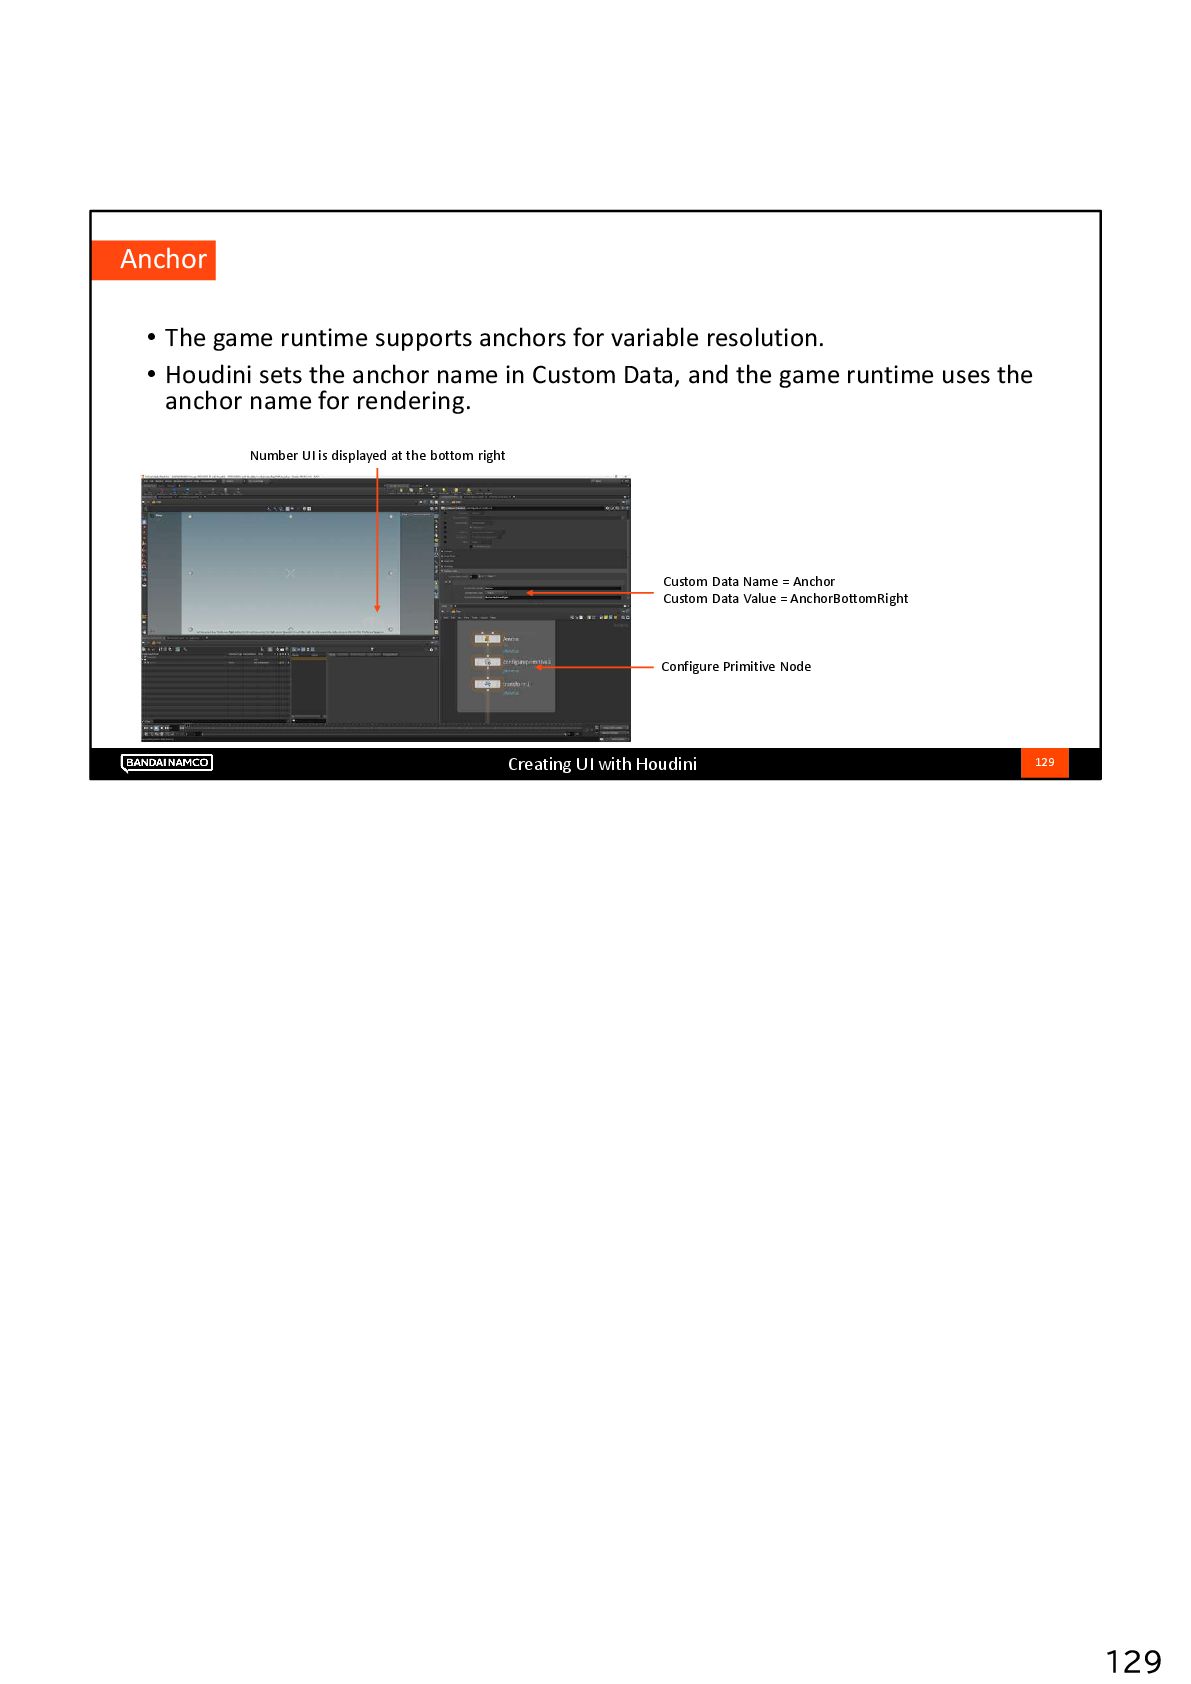
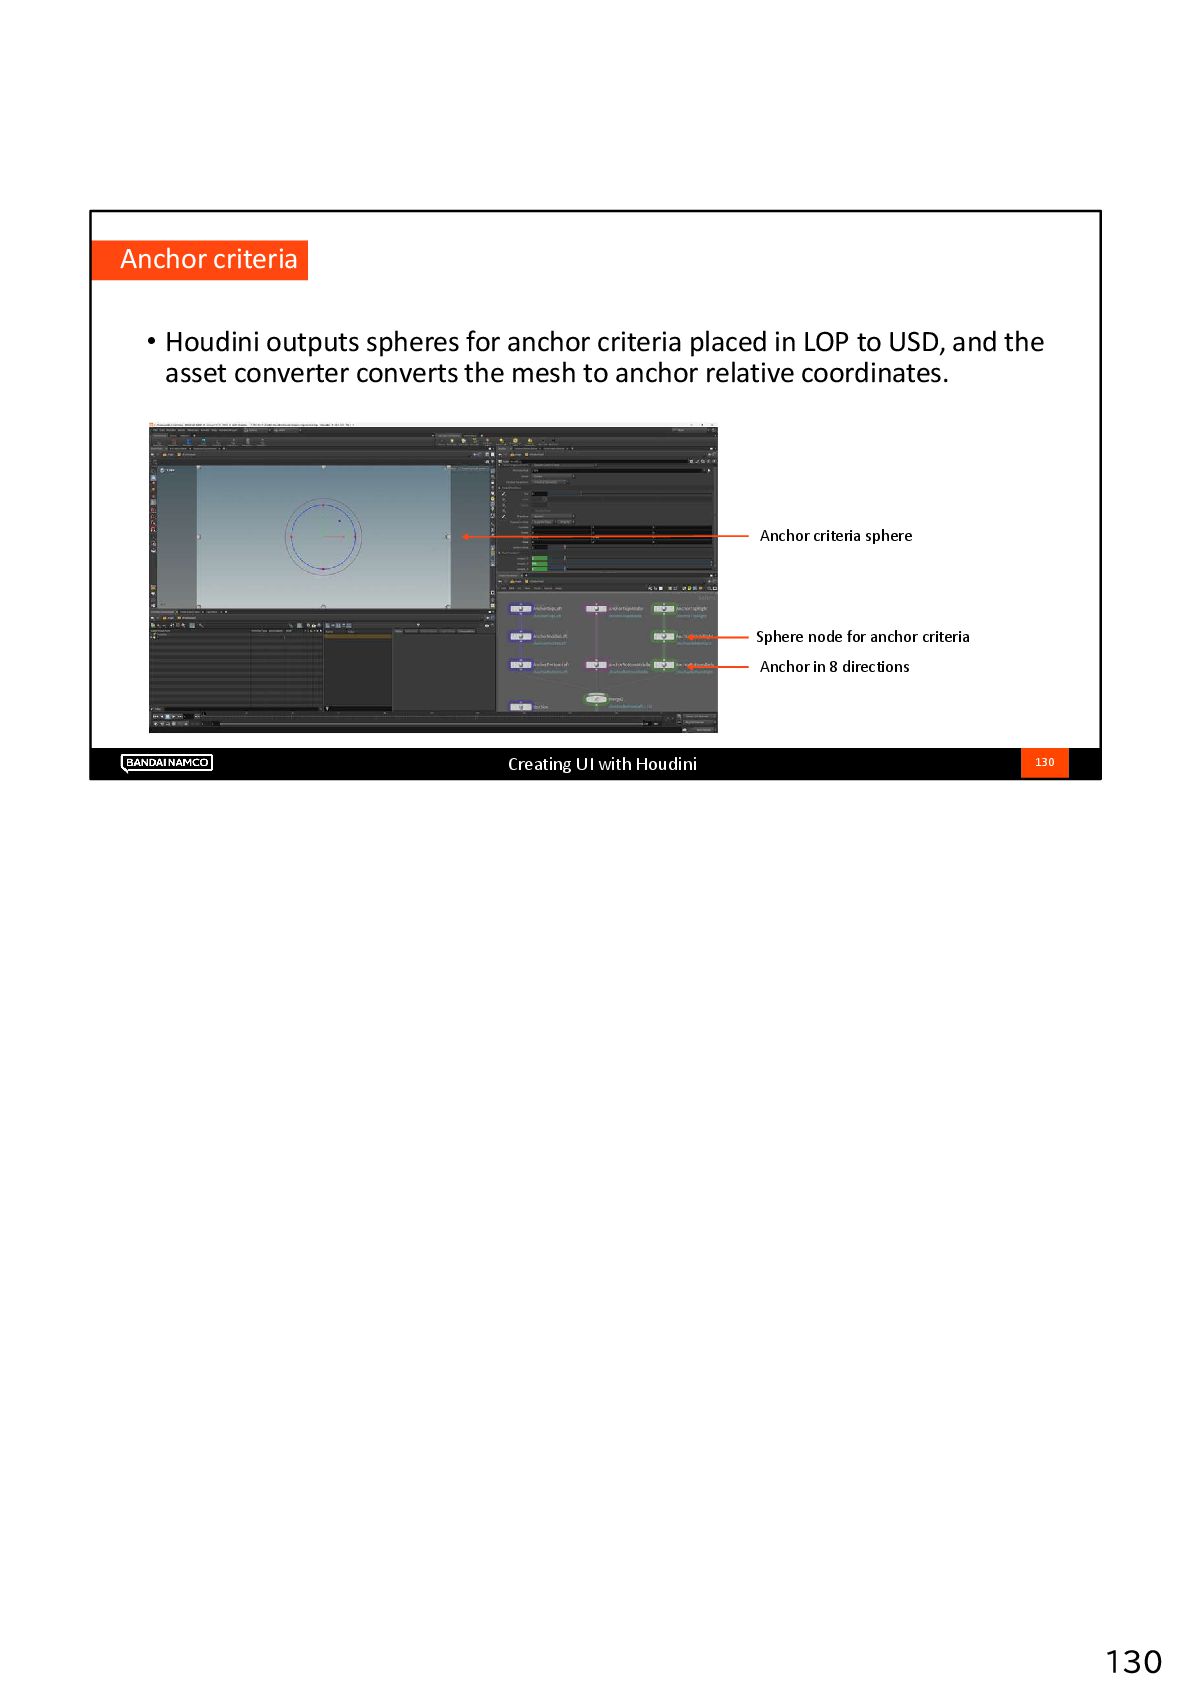
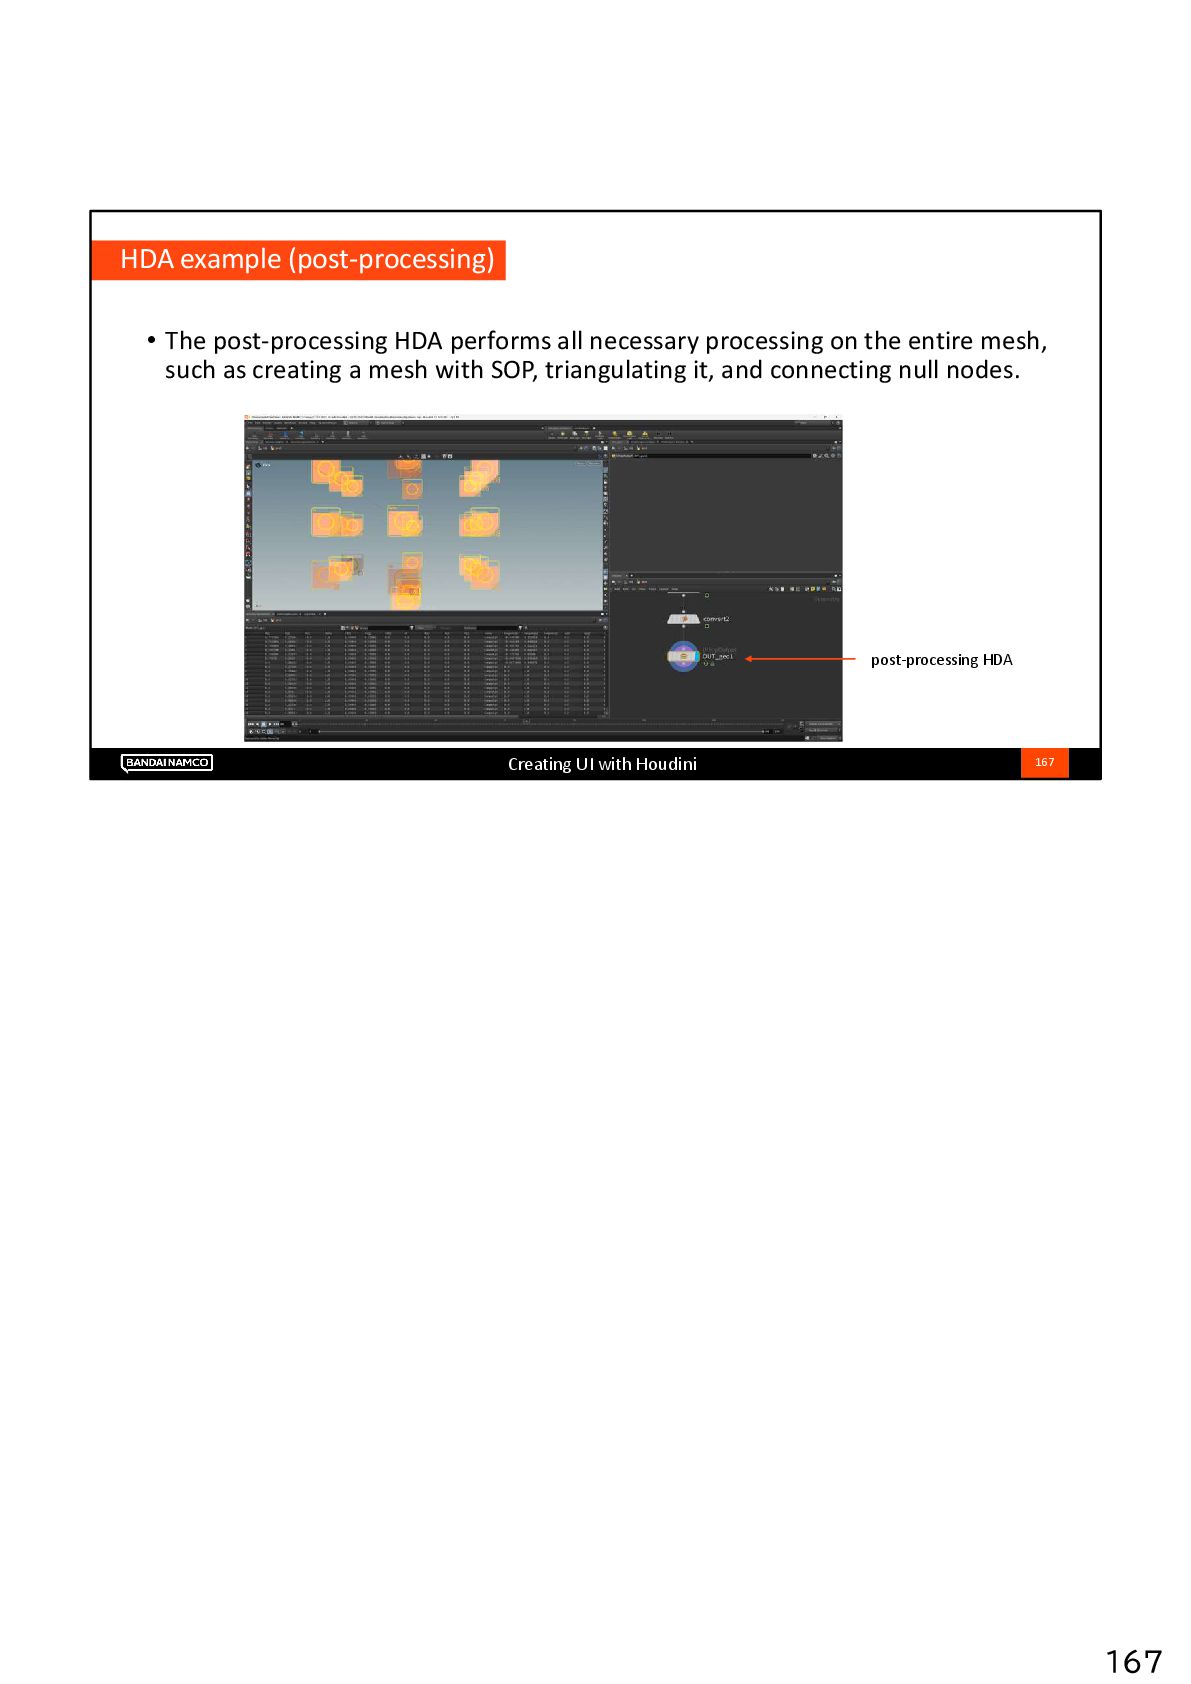
The workflow involves creating the UI mesh with Houdini SOPs, laying out the UI with Houdini LOPs, and exporting it as USD.
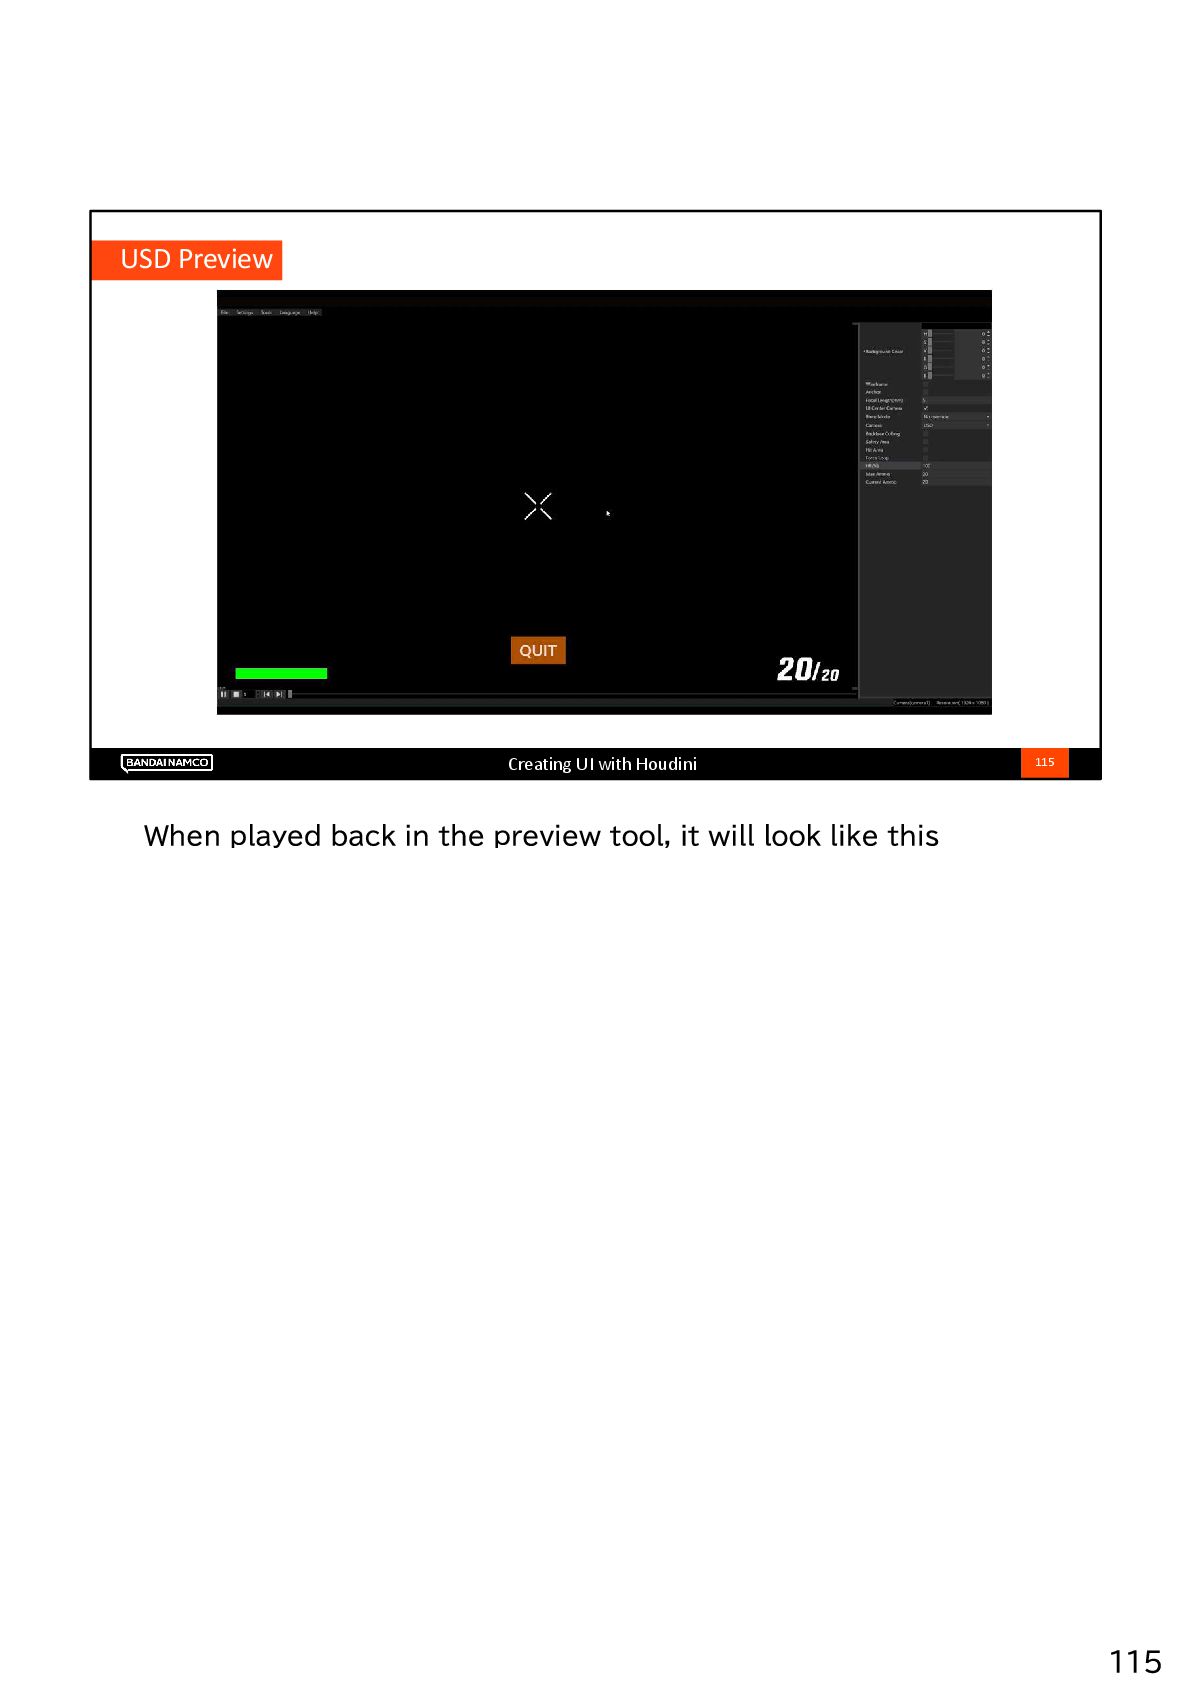
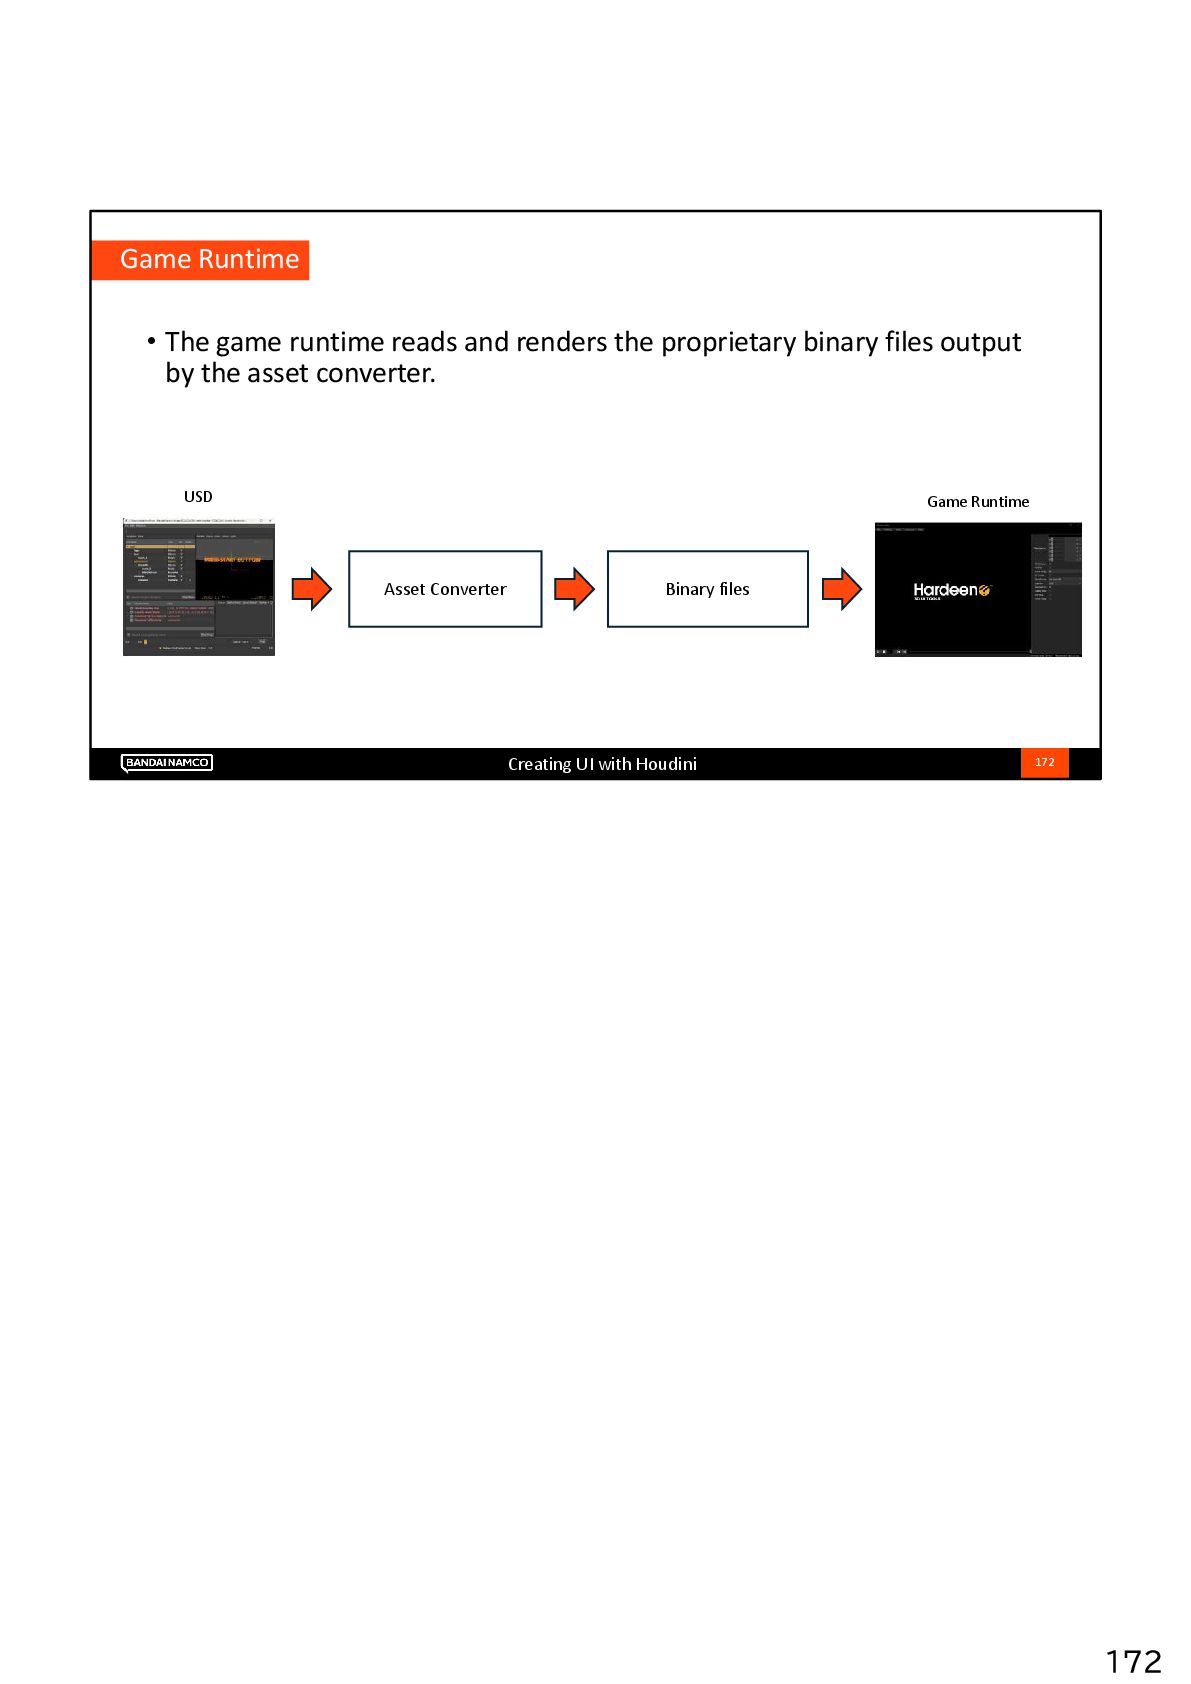
The game runtime loads the USD and renders the UI.
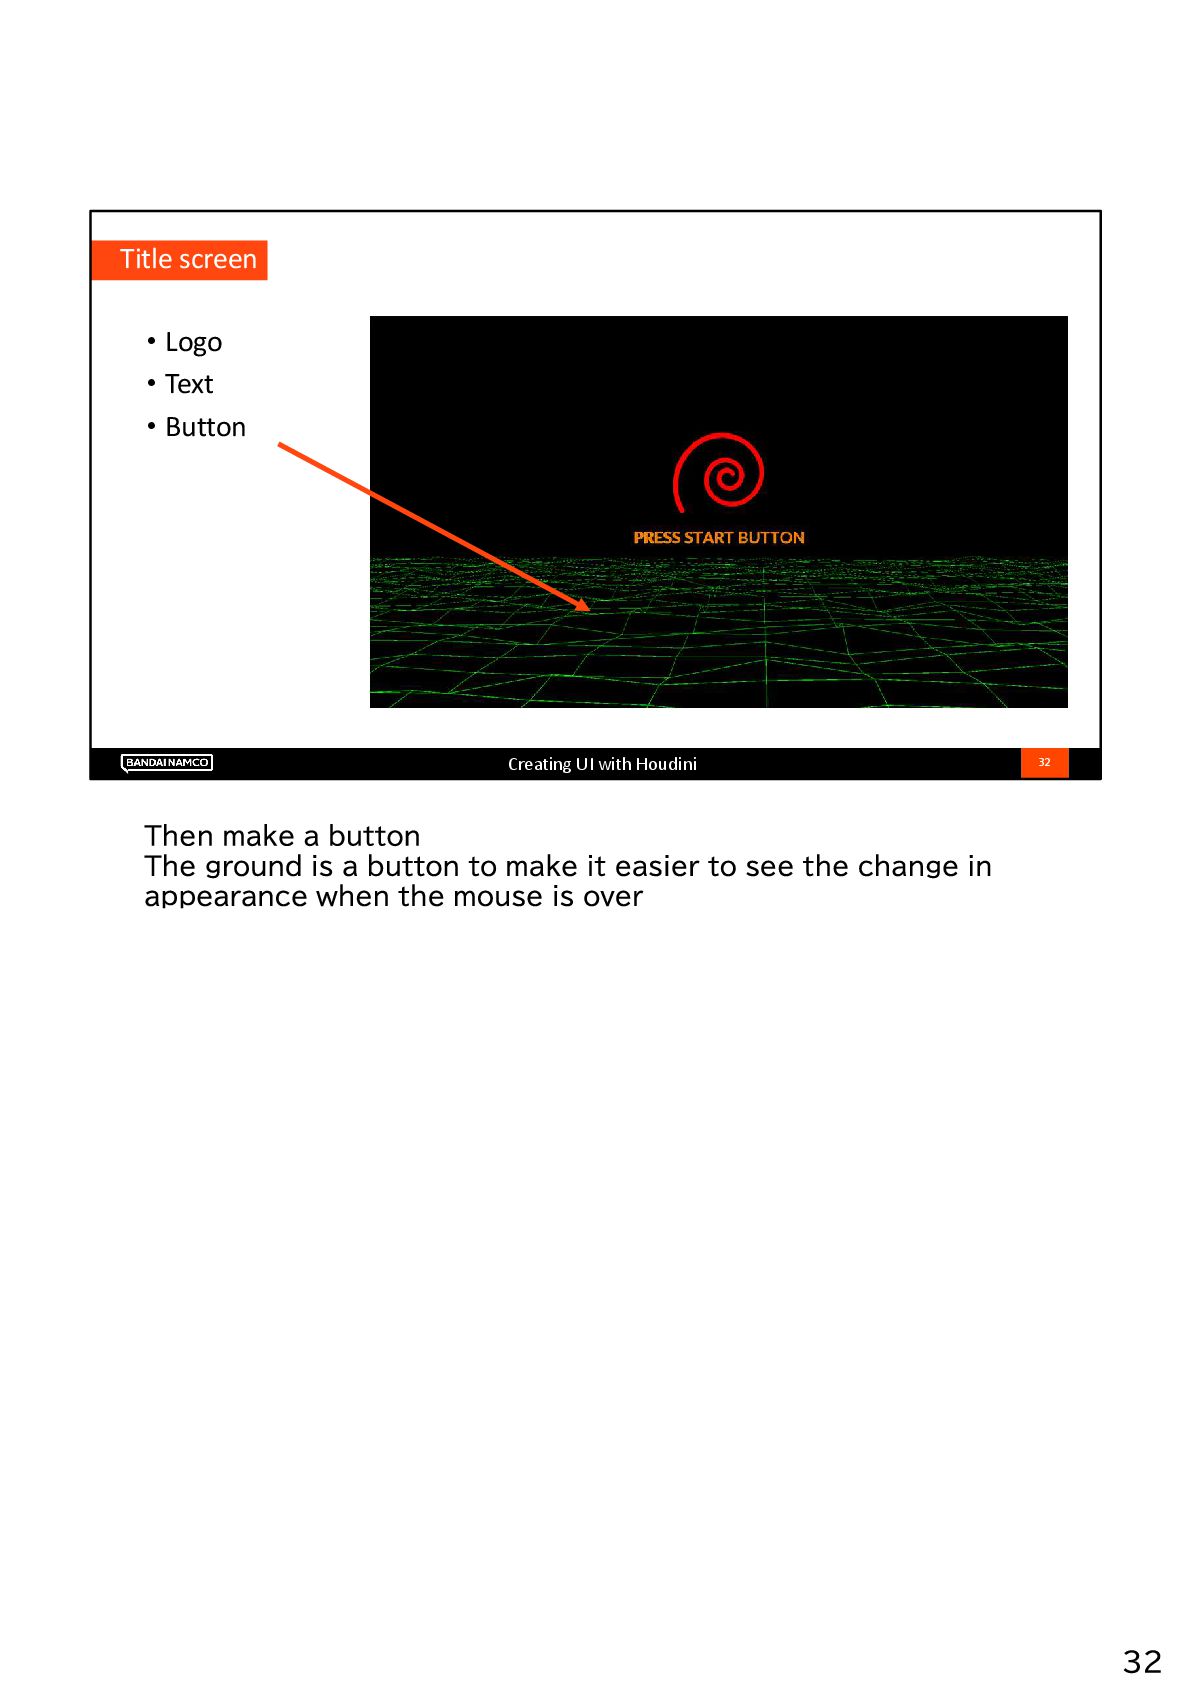
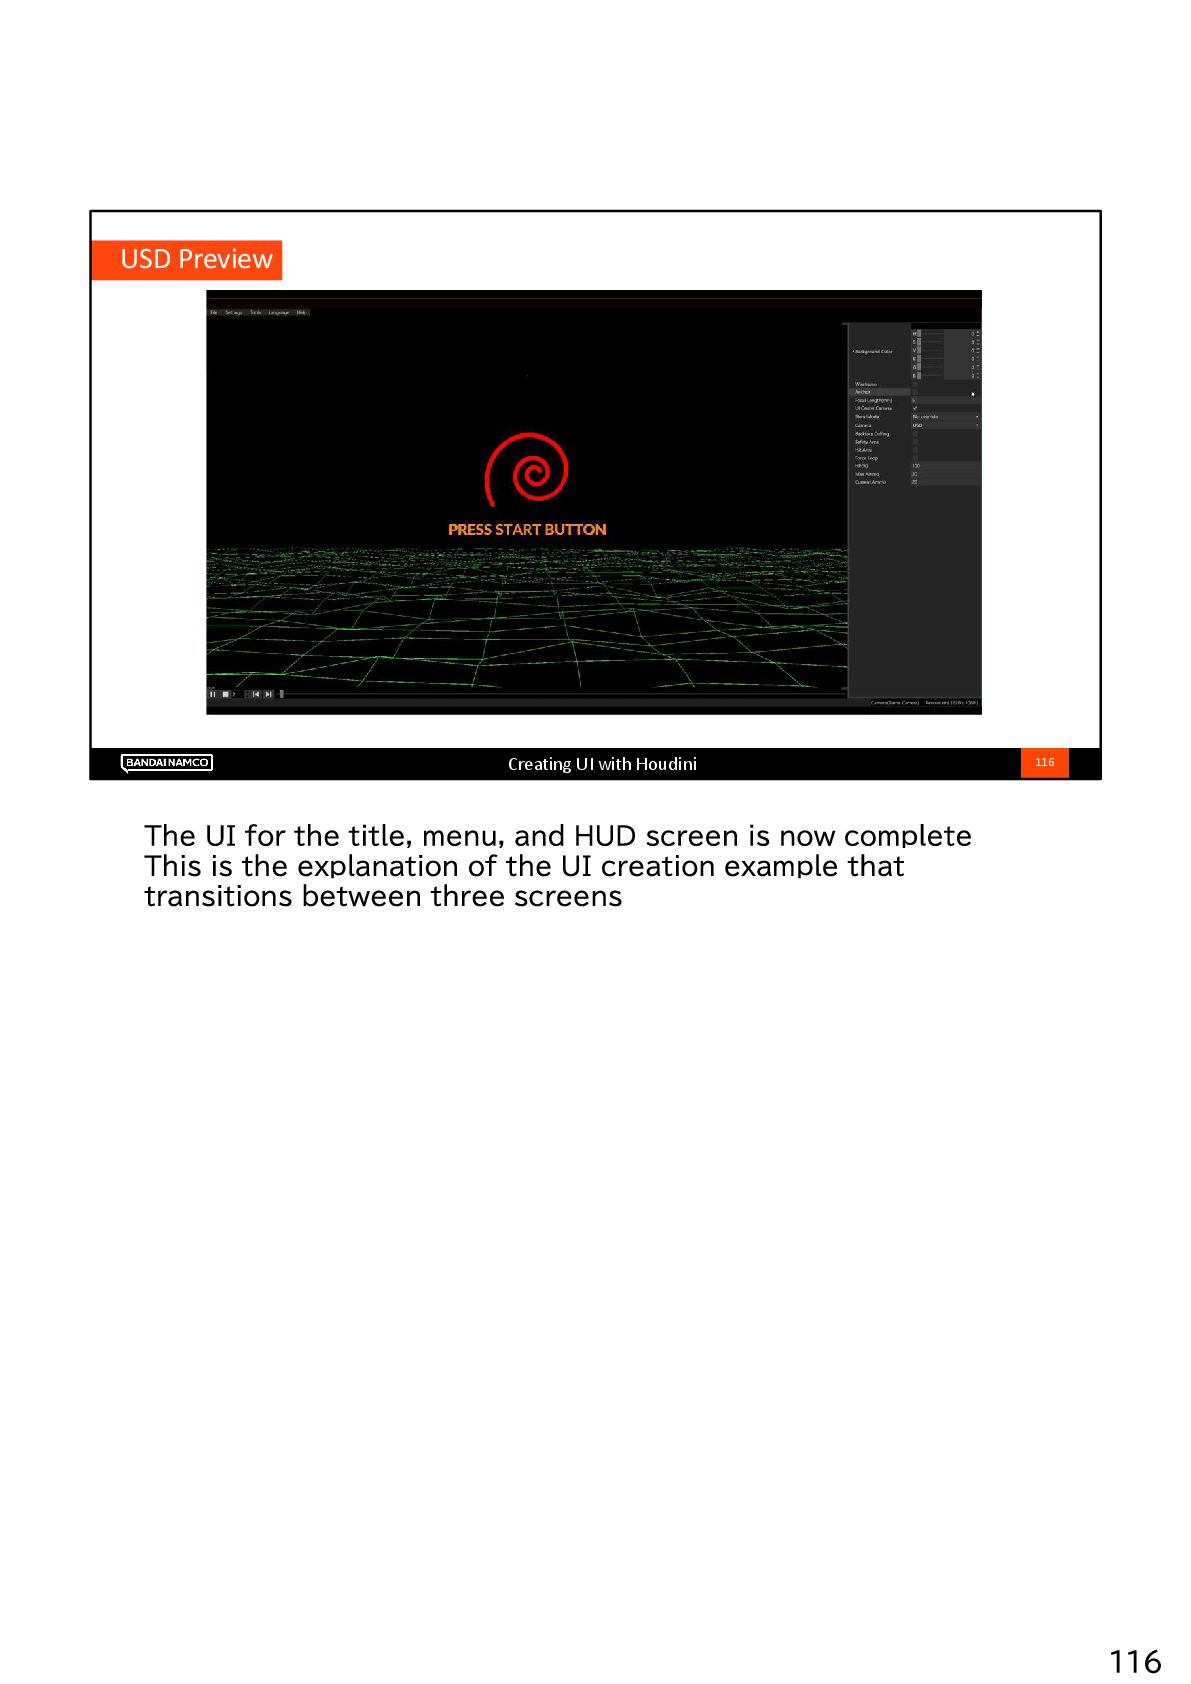
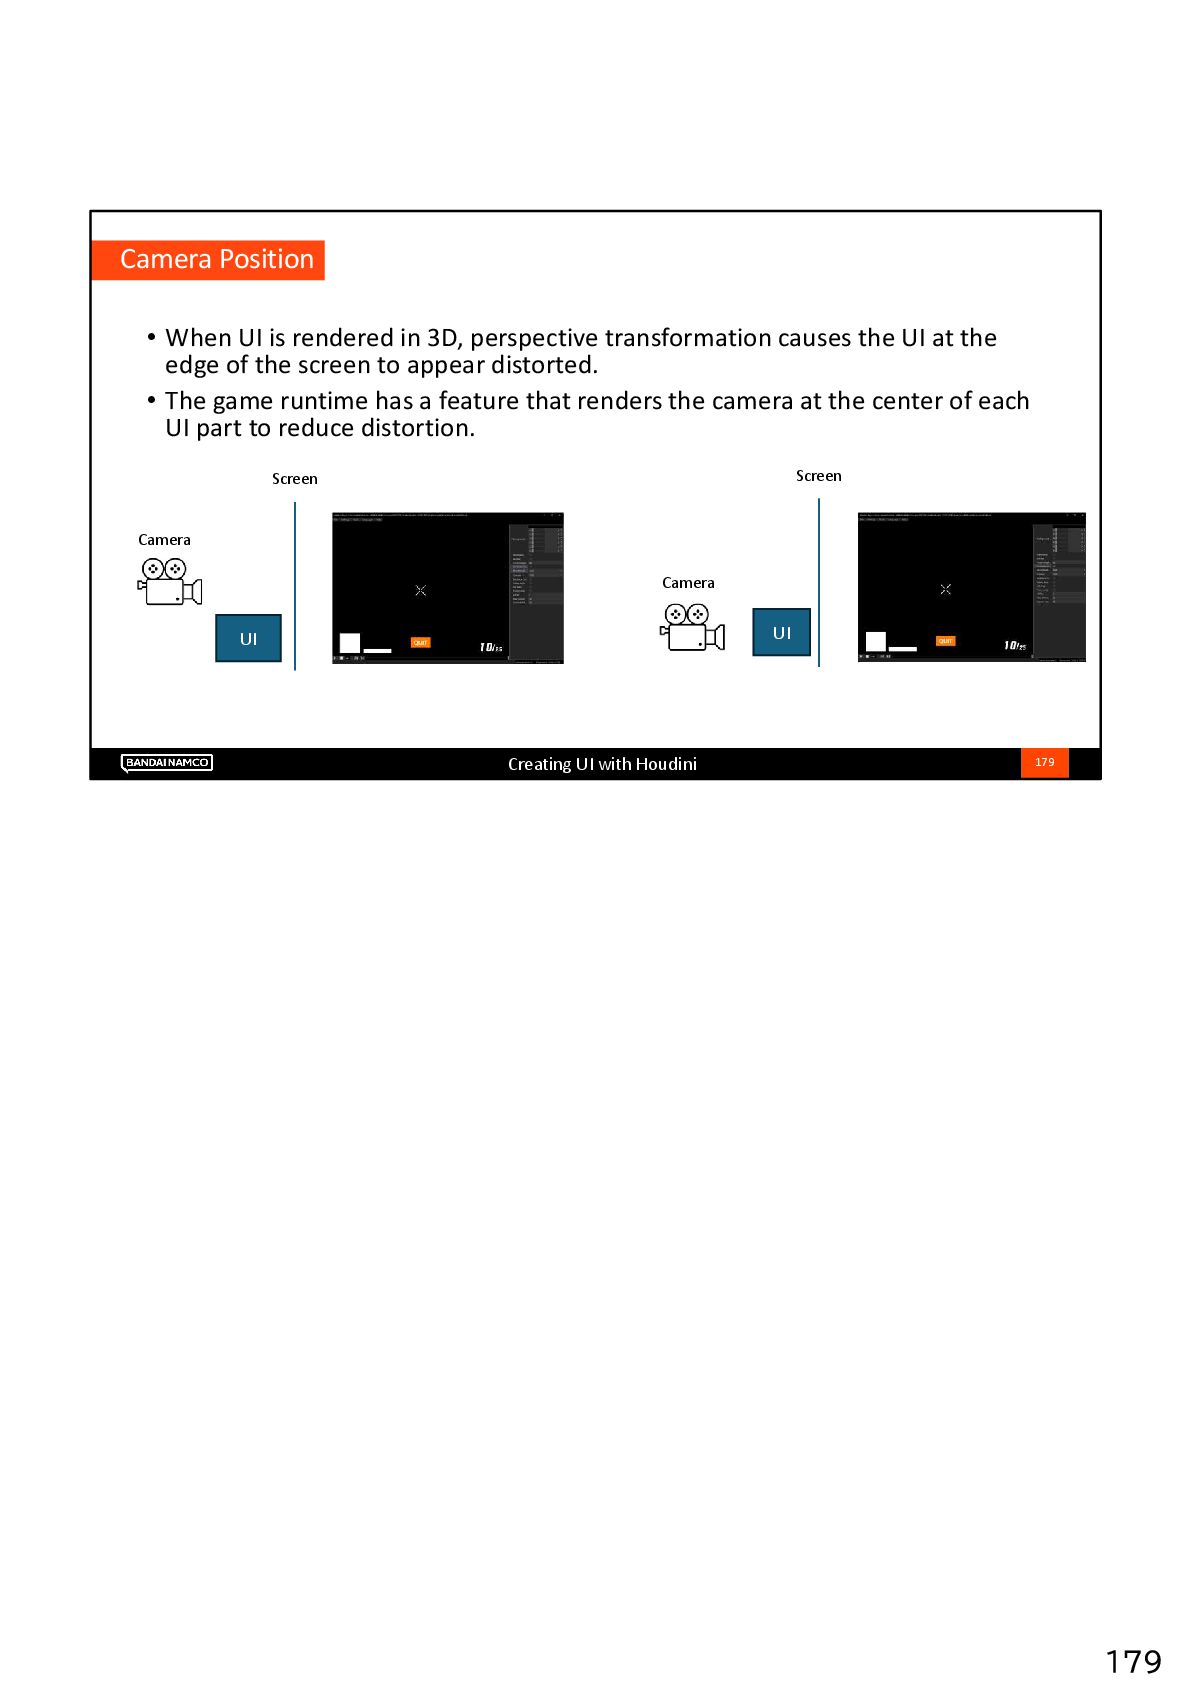
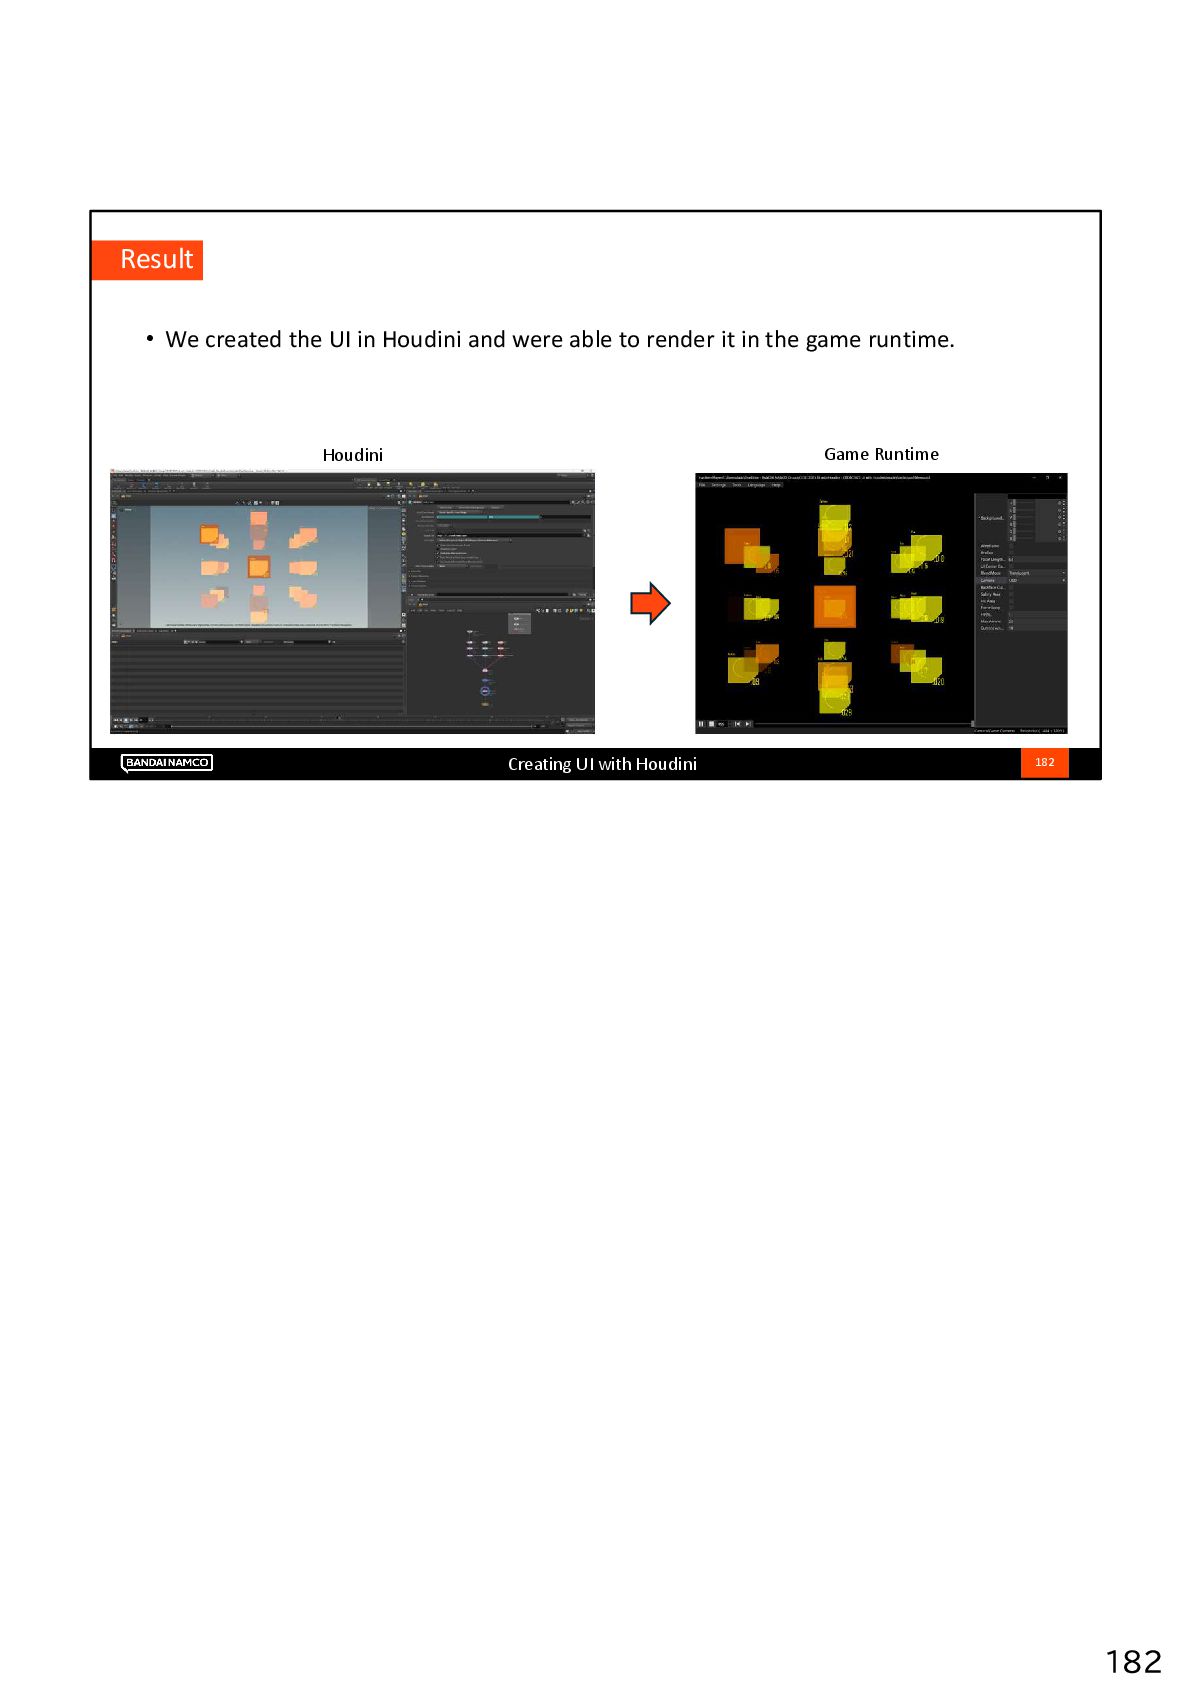
This method allows for 3D rendering of the UI, enabling the creation of UI elements that were previously impossible with traditional 2D UI.
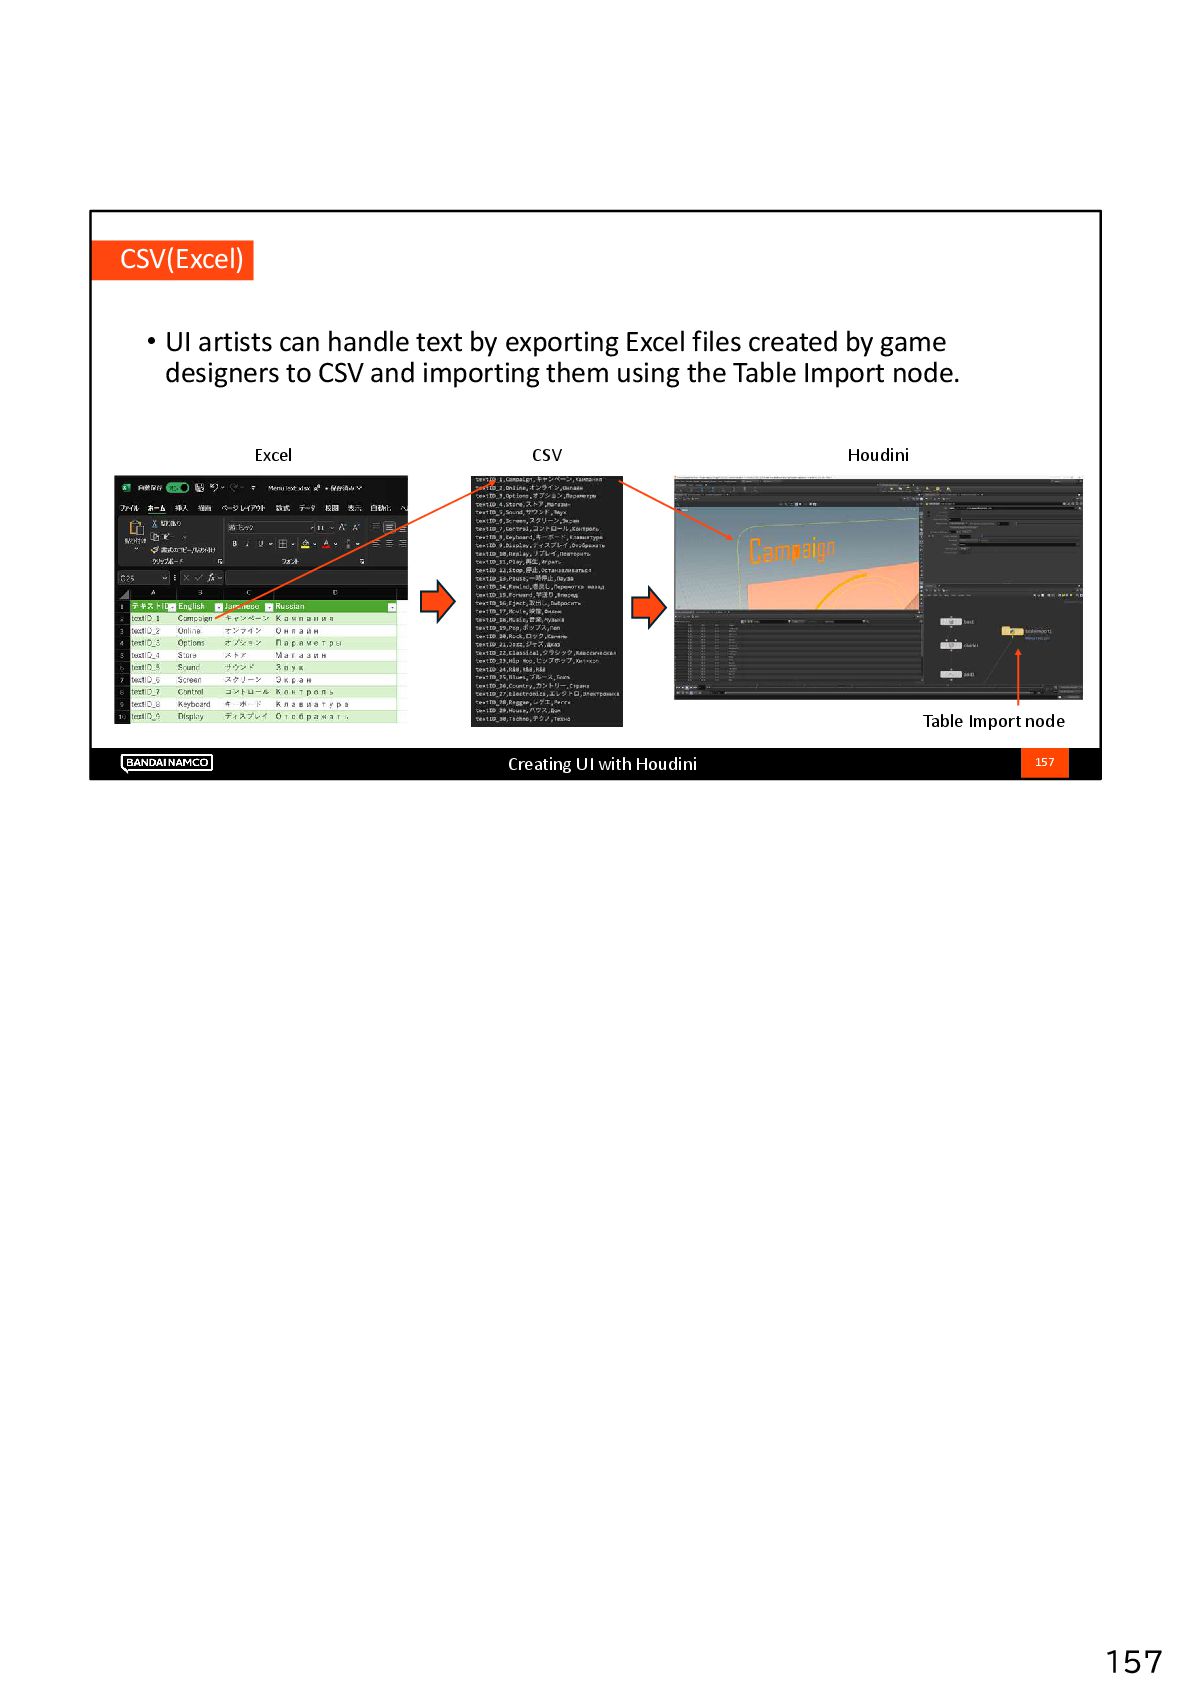
Additionally, since Houdini uses procedural workflows, it can automatically generate localized UI elements for each language.

Avatar for Bandai Namco Studios Inc.

Bandai Namco Studios Inc. PRO

September 05, 2025
Tweet

More Decks by Bandai Namco Studios Inc.

Other Decks in Technology

Transcript

  1. Creating UI with Houdini Self-introduction Joined Namco (now Bandai Namco

    Studios) in 2005. Titles he has been involved in include: ACE COMBAT 6: Fires of Liberation, ACE COMBAT ASSAULT HORIZON, Tales of Card Evolve, THE IDOLM@STER MILLION LIVE!, Pokkén Tournament, New Pokémon Snap, etc. Past lectures include: CEDEC2011 Continuous integration in ACE COMBAT ASSAULT HORIZON CEDEC2011 A case study of in-game camera production in "ACE COMBAT ASSAULT HORIZON“ CEDEC2015 Design and implementation of a game editor in Pokkén Tournament CEDEC2019 Basic design of a game editor for home video game development and stable and fast asset management CEDEC2019 Implementation of a light baker using DirectX Raytracing CEDEC2021 Lighting in "New Pokémon Snap“ CEDEC2022 Application of MaterialX and Standard Surface to game graphics CEDEC2023 Wide color gamut texture workflow using DCC tools CEDEC2024 Application of USD to Game Assets And more Wataru Tada Yukihiko Mishina Engineer Artist Joined Bandai Namco Games (now Bandai Namco Studios) in 2007. Titles he has been involved in include: ACE COMBAT 5 THE UNSUNG WAR, ACE COMBAT 6 Fires of Liberation, ACE COMBAT ASSAULT HORIZON, ACE COMBAT INFINITY, ACE COMBAT 7 SKIES UNKNOWN, etc. Related articles from lecturers Monotype's 2nd joint online seminar "Typography for games“ Bandai Namco Studios Lead UI artist Mishima Yukihiko Typeface designer Omagari Toshi https://www.youtube.com/watch?v=mmDPWk_PEy0 CGWORLD.JP "Ace Combat 7: Skies Unknown" ~ GUI expressing the "OS" of the world in the game ~ https://cgworld.jp/feature/201908-gg2019-ace7.html
  2. Creating UI with Houdini • Overview • UI Creation Example

    • Workflow • Houdini • Game Runtime • Conclusion 3 Agenda
  3. Creating UI with Houdini • Overview • UI Creation Example

    • Workflow • Houdini • Game Runtime • Conclusion 4 Agenda Now, here is an example of creating a UI using Houdini from an artist's point of view Before that, many people may be wondering, "Why do you use Houdini to create a UI in the first place?", so I will talk about the reason
  4. Creating UI with Houdini Why I decided to use Houdini

    for UI creation "I want to do various processing on text read from Excel." 5 "I want to do various processing on text read from Excel." This is the trigger Multilingual localization is almost mandatory for today's UI In that case, it is difficult to process only the read text, and it may appear floating on the screen To avoid it We do a lot of things, such as asking engineers to use special shaders and making full use of materials, but it is often difficult to achieve the desired result I was thinking about how to do something about it, and then I found a tutorial video of Houdini that gathers particles and turns them into text, which is animation like a hologram I immediately installed Houdini and what I made by imitating what I saw was displayed on the screen
  5. Creating UI with Houdini UI example • UI that transitions

    between three screens • Title screen • Menu screen • HUD screen 8
  6. Creating UI with Houdini Title screen • There are three

    elements • Logo • Text • Button 9
  7. Creating UI with Houdini Title Screen Logo 11 Adobe Illustrator

    Path Data Creation .ai or .eps Save in Illustrator 8 format
  8. Creating UI with Houdini Houdini Workspace 12 Scene View Parameter

    editor Playbar Network editor SOP Network editor LOP
  9. Creating UI with Houdini 14 Houdini SOP [titleLogo] Logo Geometry

    [titleText] Text Geometry [titleGround] Button geometry Title Screen Logo SOP
  10. Creating UI with Houdini Title Screen Logo 15 Houdini SOP

    [file] Import .eps [group] Group points [color] Set the color [polyextrude] Three-dimensional extrusion [divide] Triangle polygon [Null] Output name
  11. Creating UI with Houdini Title Screen Logo 16 Houdini SOP

    [file] Import .eps [group] Group points [color] Set the color [polyextrude] Three-dimensional extrusion [divide] Triangle polygon [Null] Output name
  12. Creating UI with Houdini Title Screen Logo 17 Houdini SOP

    [file] Import .eps [group] Group points [color] Set the color [polyextrude] Three-dimensional extrusion [divide] Triangle polygon [Null] Output name
  13. Creating UI with Houdini Title Screen Logo 18 Houdini SOP

    [file] Import .eps [group] Group points [color] Set the color [polyextrude] Three-dimensional extrusion [divide] Triangle polygon [Null] Output name
  14. Creating UI with Houdini Title Screen Logo 19 Houdini SOP

    [file] Import .eps [group] Group points [color] Set the color [polyextrude] Three-dimensional extrusion [divide] Triangle polygon [Null] Output name
  15. Creating UI with Houdini Title Screen Logo 20 Houdini SOP

    [file] Import .eps [group] Group points [color] Set the color [polyextrude] Three-dimensional extrusion [divide] Triangle polygon [Null] Output name
  16. Creating UI with Houdini 22 Houdini SOP [titleLogo] Logo Geometry

    [titleText] Text Geometry [titleGround] Button geometry Title Screen Text SOP
  17. Creating UI with Houdini Title Screen Text 23 Houdini SOP

    [font] Font/Text Settings [AttributeWrangle] Detect reverse orientation in an expression [split] split into two streams [reverse] Reverse vertex order [boolean] Composite two objects [AttributeExpression] Set color and opacity [polyextrude] Three-dimensional extrusion [divide] Triangle polygon [Null] Null Output Name
  18. Creating UI with Houdini Title Screen Text 24 Houdini SOP

    [font] Font/Text Settings [AttributeWrangle] Detect reverse orientation in an expression [split] split into two streams [reverse] Reverse vertex order [boolean] Composite two objects [AttributeExpression] Set color and opacity [polyextrude] Three-dimensional extrusion [divide] Triangle polygon [Null] Null Output Name
  19. Creating UI with Houdini Title Screen Text 25 Houdini SOP

    [font] Font/Text Settings [AttributeWrangle] Detect reverse orientation in an expression [split] split into two streams [reverse] Reverse vertex order [boolean] Composite two objects [AttributeExpression] Set color and opacity [polyextrude] Three-dimensional extrusion [divide] Triangle polygon [Null] Null Output Name
  20. Creating UI with Houdini Title Screen Text 26 Houdini SOP

    [font] Font/Text Settings [AttributeWrangle] Detect reverse orientation in an expression [split] split into two streams [reverse] Reverse vertex order [boolean] Composite two objects [AttributeExpression] Set color and opacity [polyextrude] Three-dimensional extrusion [divide] Triangle polygon [Null] Null Output Name
  21. Creating UI with Houdini Title Screen Text 27 Houdini SOP

    [font] Font/Text Settings [AttributeWrangle] Detect reverse orientation in an expression [split] split into two streams [reverse] Reverse vertex order [boolean] Composite two objects [AttributeExpression] Set color and opacity [polyextrude] Three-dimensional extrusion [divide] Triangle polygon [Null] Null Output Name
  22. Creating UI with Houdini Title Screen Text 28 Houdini SOP

    [font] Font/Text Settings [AttributeWrangle] Detect reverse orientation in an expression [split] split into two streams [reverse] Reverse vertex order [boolean] Composite two objects [AttributeExpression] Set color and opacity [polyextrude] Three-dimensional extrusion [divide] Triangle polygon [Null] Null Output Name
  23. Creating UI with Houdini Title Screen Text 29 Houdini SOP

    [font] Font/Text Settings [AttributeWrangle] Detect reverse orientation in an expression [split] split into two streams [reverse] Reverse vertex order [boolean] Composite two objects [AttributeExpression] Set color and opacity [polyextrude] Three-dimensional extrusion [divide] Triangle polygon [Null] Null Output Name
  24. Creating UI with Houdini Title Screen Text 30 Houdini SOP

    [font] Font/Text Settings [AttributeWrangle] Detect reverse orientation in an expression [split] split into two streams [reverse] Reverse vertex order [boolean] Composite two objects [AttributeExpression] Set color and opacity [polyextrude] Three-dimensional extrusion [divide] Triangle polygon [Null] Null Output Name
  25. Creating UI with Houdini Title Screen Text 31 Houdini SOP

    [font] Font/Text Settings [AttributeWrangle] Detect reverse orientation in an expression [split] split into two streams [reverse] Reverse vertex order [boolean] Composite two objects [AttributeExpression] Set color and opacity [polyextrude] Three-dimensional extrusion [divide] Triangle polygon [Null] Null Output Name
  26. Creating UI with Houdini Title screen button 33 Houdini SOP

    [titleLogo] Logo Geometry [titleText] Text Geometry [titleGround] Button geometry SOP
  27. Creating UI with Houdini Title screen button 34 Houdini SOP

    [grid] Create a grid square plane [mountain] Create a bump [polywire] Polygonize wires [divide] Triangle polygon [UIcolor] Mouse OFF [UIcolor] Mouse ON [UIcolor] Hit Area [Null] Output Name
  28. Creating UI with Houdini Title screen button 35 Houdini SOP

    [grid] Create a grid square plane [mountain] Create a bump [polywire] Polygonize wires [divide] Triangle polygon [UIcolor] Mouse OFF [UIcolor] Mouse ON [UIcolor] Hit Area [Null] Output Name
  29. Creating UI with Houdini Title screen button 36 Houdini SOP

    [grid] Create a grid square plane [mountain] Create a bump [polywire] Polygonize wires [divide] Triangle polygon [UIcolor] Mouse OFF [UIcolor] Mouse ON [UIcolor] Hit Area [Null] Output Name
  30. Creating UI with Houdini Title screen button 37 Houdini SOP

    [grid] Create a grid square plane [mountain] Create a bump [polywire] Polygonize wires [divide] Triangle polygon [UIcolor] Mouse OFF [UIcolor] Mouse ON [UIcolor] Hit Area [Null] Output Name
  31. Creating UI with Houdini Title screen button 38 Houdini SOP

    [grid] Create a grid square plane [mountain] Create a bump [polywire] Polygonize wires [divide] Triangle polygon [UIcolor] Mouse OFF [UIcolor] Mouse ON [UIcolor] Hit Area [Null] Output Name
  32. Creating UI with Houdini Title screen button 39 Houdini SOP

    [grid] Create a grid square plane [mountain] Create a bump [polywire] Polygonize wires [divide] Triangle polygon [UIcolor] Mouse OFF [UIcolor] Mouse ON [UIcolor] Hit Area [Null] Output Name
  33. Creating UI with Houdini Title screen button 40 Houdini SOP

    [grid] Create a grid square plane [mountain] Create a bump [polywire] Polygonize wires [divide] Triangle polygon [UIcolor] Mouse OFF [UIcolor] Mouse ON [UIcolor] Hit Area [Null] Output Name
  34. Creating UI with Houdini Title screen button 41 Houdini SOP

    [titleLogo] Logo Geometry [titleText] Text Geometry [titleGround] Button geometry
  35. Creating UI with Houdini USD Preview 63 • Preview Tools

    • usdview • In-house preview tool
  36. Creating UI with Houdini USD Preview 64 usdview Command line

    utility for viewing and inspecting USD scenes
  37. Creating UI with Houdini USD Preview 65 In-house preview tool

    Support for mouse events and switching to different USD This allows you to display screen transitions.
  38. Creating UI with Houdini • Overview • UI Creation Example

    • Workflow • Houdini • Game Runtime • Conclusion 117 Agenda
  39. Creating UI with Houdini Overall workflow 1. Houdini creates the

    UI mesh, layout, and materials and outputs them to USD. 2. The asset converter converts USD to a proprietary binary file. 3. The game runtime uses the proprietary binary file for rendering. 118 Game Runtime Houdini USD Asset converter
  40. Creating UI with Houdini Houdini workflow • Houdini creates meshes

    with SOP, creates layouts and materials with LOP, and outputs USD. 119 SOP LOP USD
  41. Creating UI with Houdini SOP • SOP creates a mesh

    for the UI. • The main nodes used are Circle, Grid, Polywire, Font, etc. 120
  42. Creating UI with Houdini LOP • LOP performs layout, material

    creation, and USD output. • Since this workflow uses USD, we decided to use LOP for layout instead of SOP. 121 Material Layout USD output
  43. Creating UI with Houdini Difference Between SOP and LOP •

    LOP is designed for USD, and nodes can create USD. • The Scene Graph Path window shows USD, making it easy to debug data. 122 Scene Graph Path window
  44. Creating UI with Houdini SOP Import • The SOP Import

    node imports the mesh. • To use SOP Path, a Null node is connected to the end of each SOP mesh so that the SOP Path does not need to be changed when nodes are added or deleted in SOP. 123 SOP Import node SOP Path Null node SOP LOP
  45. Creating UI with Houdini Refer to other USD • Mesh

    can be referenced by the Asset Reference node not only from SOP Import but also from USD output from another HIP. • Used when assigning artists to each UI part. 124 HIP file for UI mesh (Crosshair.hip) HIP file for layout Asset Reference node (Refer to Crosshair.usd) USD ROP node (Output Crosshair.usd) Crosshair.usd mesh is displayed
  46. Creating UI with Houdini Layout • Transform nodes position and

    layout meshes. 125 Transform node Position and scale values
  47. Creating UI with Houdini Unit • In some HIPs, SOP

    mesh creation and layout are performed using Houdini's 1 pixel as the unit, and converted to the in-game unit (1 meter) in HDA just before USD output. • UI artists sometimes create UI in pixel units. 126 The grid values are pixel values. HDA converts the coordinate system, determines the virtual resolution, and applies scaling with the Transform node.
  48. Creating UI with Houdini Game Camera • Camera nodes set

    camera information in USD. • UI artists can set the cameras used in the main menu during gameplay. 127 Camera node Game runtime camera
  49. Creating UI with Houdini USD Custom Data • Game UI

    requires various information in addition to mesh shapes and layouts. • Information that does not exist in the USD schema is used in USD Custom Data. • Custom Data is mainly set using the Configure Primitive node. (Custom Data can be set as a string or JSON.) 128 Configure Primitive node Custom Data usdview
  50. Creating UI with Houdini Anchor • The game runtime supports

    anchors for variable resolution. • Houdini sets the anchor name in Custom Data, and the game runtime uses the anchor name for rendering. 129 Custom Data Name = Anchor Custom Data Value = AnchorBottomRight Configure Primitive Node Number UI is displayed at the bottom right
  51. Creating UI with Houdini Anchor criteria • Houdini outputs spheres

    for anchor criteria placed in LOP to USD, and the asset converter converts the mesh to anchor relative coordinates. 130 Sphere node for anchor criteria Anchor in 8 directions Anchor criteria sphere
  52. Creating UI with Houdini Anchors in game runtime • The

    game runtime draws meshes relative to the anchor criteria. 131 Anchor criteria (debug display) Number UI is displayed relative to the anchor in the lower right corner Change resolution, aspect ratio
  53. Creating UI with Houdini Blending Modes • Houdini sets blend

    modes such as transparency and addition to Custom Data, and the game runtime reads and renders the blend modes. 132 Transparent Add Configure Primitive node Custom Data Name = Blend Custom Data Value = Add
  54. Creating UI with Houdini Render Pass • Houdini sets drawing

    paths, such as 3D and 2D, in Custom Data, and the game runtime reads and renders the pass. • When using a 3D render pass, the ender pass is the same as those for characters and backgrounds, so the background hides the UI and is affected by the lights placed in the background. 133 Custom Data Name = RenderPass Custom Data Value = 3D Configure Primitive node
  55. Creating UI with Houdini Animation • Animation uses frame animation.

    • Houdini creates a different mesh for each frame, and the game runtime displays the UI by specifying the frame number. 134 Frame 30 Frame 1 Frame 60
  56. Creating UI with Houdini Animation creation • Houdini sets keyframes

    for node properties and creates animations using expressions such as $F. • Animation control such as loops is performed using LOP. 135 Keyframe on Uniform Scale Transform node
  57. Creating UI with Houdini Animation • USD supports frame animation,

    so Houdini writes all frame data to USD (using USD time-varying data). • Game camera information also supports animation. 136 Frame 1 mesh Frame 2 mesh Frame 3 mesh USD Houdini https://openusd.org/release/tut_xforms.html Frame 1 camera Frame 2 camera Frame 3 camera
  58. Creating UI with Houdini Animation frame control • Houdini sets

    animation frame control information in Custom Data, and the game runtime controls the animation frames. • The control information is implemented based on Adobe Animate (formerly Macromedia Flash) ActionScript. (In addition to GoToAndPlay, GoToAndStop, Stop, etc., can also be set.) 137 Custom Data Name = GoToAndPlay_Menu_btn3_10 (When the 10th frame of the btn3 mesh in Menu.usd is reached, GoToAndPlay is executed.) Custom Data Value = Menu_btn3_1 (Play from the first frame of the btn3 mesh in Menu.usd) Configure Primitive node
  59. Creating UI with Houdini Animation example (loop animation) • Example

    of restarting playback from frame 0 after playing frame 240 of the UI. 138 Loop animation Configure Primitive node Custom Data Name = GoToAndPlay_camera_240 (When the camera reaches frame 240, execute GoToAndPlay.) Custom Data Value = 0 (play from frame 0)
  60. Creating UI with Houdini Animation bookmarks • Houdini's animation bookmark

    feature allows frame labels to be used in Custom Data in addition to frame numbers. • Animation bookmarks are not output to USD as is, so a Python script node sets the frame name in Custom Data. 139 HDA to set Animation bookmarks to USD Animation bookmarks
  61. Creating UI with Houdini Button • When button processing is

    set to Custom Data, the mesh functions as a button. • In addition to when the mouse is clicked, Custom Data Name can be set for when the mouse cursor overlaps the mesh, when the mouse cursor moves away from the mesh, and so on. 140 Configure Primitive node Custom Data Name = MouseEnter_btn3 (when the mouse cursor overlaps the btn3 mesh) Custom Data Value = btn3_13 (play btn3 mesh from frame 13) When the mouse cursor overlaps the btn3 mesh, It flashes due to frame animation.
  62. Creating UI with Houdini Button example (scene transition) • If

    the USD name is specified in Custom Data, the game runtime will transition to the UI specified in Custom Data when the button mesh is clicked. 141 Configure Primitive node Custom Data Name = MouseDown_btn1 (when mouse clicking on the btn1 mesh) Custom Data Value = GoToAndPlay_Title_camera1_1 (Transition to Title.usd and play camera1 from the first frame) Click on the btn1 mesh labeled QUIT to transition to another USD.
  63. Creating UI with Houdini Button example (camera change) • If

    a camera name is set in Custom Data, the game runtime will change the camera with a mouse click. 142 Configure Primitive node Custom Data Name = MouseDown_btn1 (when mouse clicking on the btn1 mesh) Custom Data Value = camera1_96 (playback camera1 from 96 frames) btn1 Clicking on the mesh with the mouse changes the camera.
  64. Creating UI with Houdini Button using variant • In Houdini,

    button meshes can be connected to the AddVariant node to preview ON and OFF states. • The game runtime recognizes meshes as buttons and processes them based on the USD variant and SOP name suffix. 143 AddVariant node SOP Import node SOP name
  65. Creating UI with Houdini Preview with variant • By setting

    the mesh variant from Scene Graph Path, the button state can be switched and previewed. 144 Addvariant Node Button OFF Node Button ON Node Button Hit Area Node Button ON Button OFF Right-click to switch variants and preview buttons.
  66. Creating UI with Houdini Renderer • Arnold is used as

    the renderer for material previews. • Since Arnold takes a long time to render, Houdini VK is used when checking mesh shapes and animations. 145 Houdini VK (for animation preview) Arnold (for material preview)
  67. Creating UI with Houdini Arnold • Character artists and environment

    artists use Arnold to check their renderings, so UI artists also use Arnold for rendering. • When UI artists are unsure about renderer settings or material parameters, they can ask character artists and environment artists for parameter values. 146 Maya materials Houdini materials Arnold Standard Surface
  68. Creating UI with Houdini Material • The material uses Arnold

    Standard Surface. • Houdini creates an Arnold Standard Surface material using the Material Library node. • It sets Emission and Opacity, but sometimes uses other parameters. 147 Arnold Standard Surface
  69. Creating UI with Houdini USD output of materials • The

    UI uses Arnold Standard Surface so that material parameters can be output to USD. 148 usdview Arnold Standard Surface Parameters Houdini
  70. Creating UI with Houdini Color settings in SOP • To

    check the mesh color in SOP, SOP sets the color, and VOP can also convert the mesh color information into Arnold parameters. 149 SOP LOP Referencing the value of the Color node in SOP with the User Data RGBA node
  71. Creating UI with Houdini Lighting Presets • When using Arnold,

    artists use HDRI to check the lighting results. • The lighting information created by the lighting artist is converted from Excel and HDRI to USD and referenced by the Asset Reference node. 150 CEDEC2020: HDRI production technique with high reliability Lighting Information Excel Houdini HDRI USD DomeLight + DistantLight
  72. Creating UI with Houdini USD output • Output USD with

    USD ROP node. • To make it easier to manage USD in Perforce, set Save Style to Flatten All Layers and consolidate the output USD into a single file. 151 For animation output, set Valid Frame Range to Render Specific Frame Range. To combine USD into a single file, set Save Style to Flatten All Layers. To write all frame information to USD, set Flush Data After Each Frame to ON. USD ROP node
  73. Creating UI with Houdini UI using in-game parameters • In

    some UI elements, such as HUD, the game runtime uses parameters during gameplay to control UI display. • Frame number • Display/hide each UI • UI size • ... 152
  74. Creating UI with Houdini Numbers • Houdini creates a mesh

    of numbers from 0 to 9. • The game runtime displays the number mesh using parameters in the game to represent numbers. 153 Numbers Number Mesh Game Runtime
  75. Creating UI with Houdini Player Health Gauge % display •

    Houdini creates a health gauge mesh as a frame animation from 0 to 100 frames. • The game runtime refers to the player's health in the game and sets the display frame of the health gauge mesh. 154 Health Gauge Health Gauge Mesh Game Runtime
  76. Creating UI with Houdini Mesh switching with player input •

    Houdini creates a crosshair mesh and sets the color to white for frame one and red for frame 2. • The game runtime can change the color of the crosshair by changing the crosshair display frame when the player clicks the mouse. 155 Frame 1 Frame 2 Mouse click changes crosshair to red
  77. Creating UI with Houdini Other asset usage • Houdini can

    import and process assets from other DCC tools. • CSV(Excel) • EPS(Illustrator) • USD(Maya) 156
  78. Creating UI with Houdini CSV(Excel) • UI artists can handle

    text by exporting Excel files created by game designers to CSV and importing them using the Table Import node. 157 Excel CSV Table Import node Houdini
  79. Creating UI with Houdini Multilingual support • Multilingual support is

    possible by referencing strings for localization from CSV (Excel). • Houdini performs procedural processing and can change the shape of the UI according to character length and language. 158 English Japanese Russian Excel
  80. Creating UI with Houdini EPS(Illustrator) • UI artists can import

    EPS files from Illustrator, allowing them to create UI materials using the familiar Illustrator. 159 Illustrator Houdini
  81. Creating UI with Houdini Post-processing after EPS import • After

    importing the EPS file, Houdini performs post-processing for the game runtime. • Change vertices to triangles (polygons). • Align the direction of the normal. • For back-face culling, rearrange the vertices in clockwise order • .... 160
  82. Creating UI with Houdini USD(Maya) • Maya outputs USD, which

    Houdini imports as a mesh. • The imported mesh is processed using SOP nodes to convert it to a wireframe or simplify its shape. • UI artists can use meshes created by character artists and background artists as materials. 161 Maya Import results After mesh processing
  83. Creating UI with Houdini Houdini Script • In response to

    requests from artists, programmers created scripts(error checkers, automatic addition of post-processing nodes, conversion from absolute paths to relative paths, etc.). • There are four types of script extensions. 162 HDA Menu Shelf Panel (pypanel)
  84. Creating UI with Houdini HDA • Programmers are creating HDAs

    for UI to improve efficiency. 163 SOP LOP HDA for UI
  85. Creating UI with Houdini HDA example (editing RGB values and

    alpha values) • HDA combining Color node and Attribute Wrangle node edits RGB and alpha values. 164 HDA Color Value and Alpha Value Editing
  86. Creating UI with Houdini HDA Example(Configure Primitive) • When setting

    Custom Data, the Configure Primitive node requires text input, so HDA has a pull-down menu for Custom Data items. 165 HDA Selecting render pass and mouse events from a pull-down menu
  87. Creating UI with Houdini HDA example (environment setup) • Set

    up a node to provide a working environment for UI artists. • Includes a preview camera node and an anchor criteria sphere node. 166 Camera node for UI preview UI preview camera Anchor Sphere
  88. Creating UI with Houdini HDA example (post-processing) • The post-processing

    HDA performs all necessary processing on the entire mesh, such as creating a mesh with SOP, triangulating it, and connecting null nodes. 167 post-processing HDA
  89. Creating UI with Houdini Font Files (.otf) • The otf

    files used in the UI can be selected from the Font node font list by specifying the folder in HOUDINI_OUTLINEFONT_PATH in houdini.env. 168 OTF files are included in the font list.
  90. Creating UI with Houdini Asset Verification • After creating the

    UI or when a bug occurs, programmers use Scene Graph Path and usdview to verify that the intended USD is being output. 169 Scene Graph Path usdview
  91. Creating UI with Houdini Bug isolation • If no problems

    are found in the Scene Graph Path or usdview, it is clear that the program causes the bug. • USD can be checked numerically using tools such as usdview, making it easy to debug data. 170 Houdini (Scene Graph Path) usdview Asset Converter Game Runtime Program cause Asset cause
  92. Creating UI with Houdini • Overview • UI Creation Example

    • Workflow • Houdini • Game Runtime • Conclusion 171 Agenda
  93. Creating UI with Houdini Game Runtime • The game runtime

    reads and renders the proprietary binary files output by the asset converter. 172 Binary files Game Runtime USD Asset Converter
  94. Creating UI with Houdini Asset Converter • C# tool that

    reads USD and outputs custom binary files. • The USD library is built manually for debugging purposes. 173 CEDEC2024: Application of USD to Game Assets https://github.com/PixarAnimationStudios/OpenUSD
  95. Creating UI with Houdini Proprietary binary file • The binary

    file has almost the same structure as USD, containing vertex data, material parameters, camera information, Custom Data, and the entire variant set. 174 USD Proprietary binary file Mesh Vertex Data camera Mesh Vertex Data camera Material Parameters Material Parameters Custom Data Custom Data
  96. Creating UI with Houdini Animation • The proprietary binary file

    contains information for all frames 175 Proprietary binary file Frame 1 Mesh Vertex Data Camera Data Material Parameters Frame 2 Mesh Vertex Data Camera Data Material Parameters …
  97. Creating UI with Houdini Loading binary files • The game

    runtime loads a proprietary binary file and creates a vertex buffer for all frames. • The implementation is similar to the geometry cache. 176 Frame 1 Frame 30 Frame 30
  98. Creating UI with Houdini Architecture • The game runtime is

    implemented independently of the game engine to support various game engines. • USD is Y-up right-handed by default, so the game runtime converts the mesh coordinate system to match the game engine. 177 Game Engine A UI Game Runtime Game Engine B In-house preview tool
  99. Creating UI with Houdini Shader • Implementing Standard Surface. •

    The game runtime has parameters that cannot be correctly reproduced by Standard Surface, such as Transmission. Still, we are trying to make it possible to use Arnold's material parameters as much as possible. 178 CEDEC2022: Application of MaterialX and Standard Surface to Video Game Graphics https://autodesk.github.io/standard-surface/
  100. Creating UI with Houdini Camera Position • When UI is

    rendered in 3D, perspective transformation causes the UI at the edge of the screen to appear distorted. • The game runtime has a feature that renders the camera at the center of each UI part to reduce distortion. 179 UI UI Screen Camera Camera Screen
  101. Creating UI with Houdini Characters generated by the program •

    There are some UI elements, such as text boxes, where Houdini cannot insert character meshes. • In such cases, as with conventional 2D text processing, Houdini sets the font name and text ID in the Custom Data of the text box, and the game runtime generates the character mesh. 180 Houdini Game Runtime
  102. Creating UI with Houdini • Overview • UI Creation Example

    • Workflow • Houdini • Game Runtime • Conclusion 181 Agenda
  103. Creating UI with Houdini Result • We created the UI

    in Houdini and were able to render it in the game runtime. 182 Game Runtime Houdini
  104. Creating UI with Houdini Conclusion (Engineer) • By building a

    workflow using Houdini and USD, assets became stable and unaffected by the game engine. • Houdini itself is stable, and USD allows various parameters to be checked numerically, so when a problem occurs, it is possible to identify the cause of the change in the rendering result. • In Houdini, frequently used nodes can be reused as HDAs, and Python scripts can be prepared to improve work efficiency. • Background mesh data can be imported into Houdini via USD and used for UI materials, making it easier for artists to exchange assets. 183
  105. Creating UI with Houdini Conclusion (Artist) • UI development environment

    with Houdini + USD offers unlimited possibilities. • Methods that automatically generate data and content based on formulas and rules are ideal for UI production. • Minimizes the need for detailed manual settings, enabling efficient creation of complex patterns and large-scale data. • Expands the range of expression by enabling UI to be handled in a 3D space. • Using the same language as other art sections enables consultation on expression methods and sharing of knowledge. • 3D Computer Graphics knowledge is required. • 3D rendering, cameras, lighting, materials, renderers, USD... 184
  106. Creating UI with Houdini Summary (Artist) 185 LITTLE BIG UI

    TRAINING https://www.sidefx.com/tutorials/little-big-ui-training-promo/ SCI-FI VISUALIZATIONS IN HOUDINI https://www.rebelway.net/sci-fi-visualizations-houdini Starting Houdini from Scratch https://www.youtube.com/watch?v=w7EtvfGokZs HARD EASY NORMAL • Recommended tutorials
  107. Creating UI with Houdini Future considerations • Using lights •

    By setting up lights in LOP and outputting them as UsdGeomLight in USD, UI lights can affect the environment. 186 https://openusd.org/dev/api/usd_lux_page_front.html
  108. Creating UI with Houdini References • https://www.sidefx.com/docs/houdini • https://openusd.org •

    CEDEC2020: HDRI production technique with high reliability • CEDEC2022: Applica on of MaterialX and Standard Surface to Video Game Graphics • CEDEC2024: Application of USD to Game Assets 187
  109. Creating UI with Houdini Version • Houdini FX 20.5.550 •

    Arnold for Houdini 6.3.4 • USD 24 • Python 3.10 188
  110. Creating UI with Houdini Questions and Comments • Please contact

    us if you have any questions or comments • Wataru Tada: [email protected] • Yukihiko Mishina: [email protected] 189